Your PC Is Not Broken Here’s What’s Actually Happening
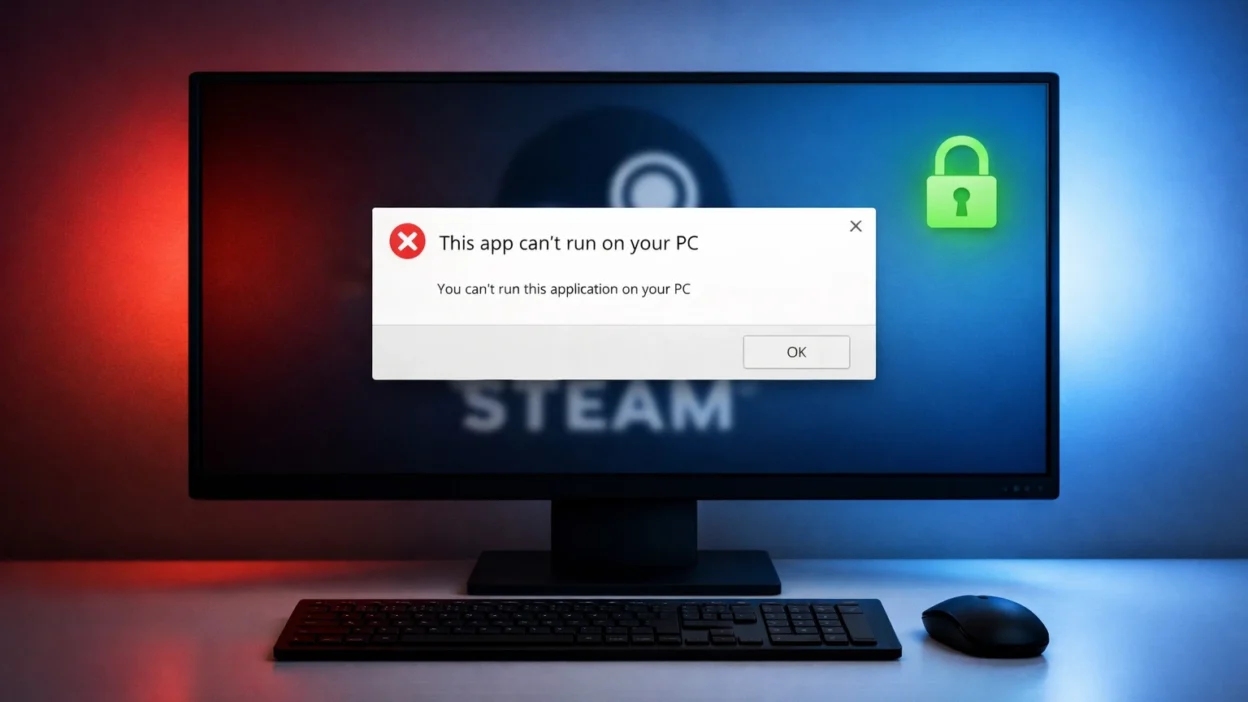
If you just tried to launch Steam and got hit with that error, take a breath. Your PC is not broken. I have been through this exact situation and I know how alarming it looks when Steam suddenly refuses to open and Windows gives you no real explanation.
The Steam setup exe error that blocks the app from running has nothing to do with your hardware. It is a Windows 11 permission issue and it is completely fixable
What is actually happening is much simpler than it looks.
Windows 11 Is Silently Blocking the File
Windows 11 is not rejecting your PC. It is blocking the Steam executable file from running and that distinction changes everything about how you fix it. Your hardware is perfectly fine. Your processor, your RAM, your storage none of that is the issue here.
If you are on an older machine and wondering whether an upgrade makes sense, check out whether gaming laptops are worth it in 2026 before making any decisions.
Windows 11 has a built-in security layer that quietly evaluates files before allowing them to run. When it does not fully trust a file, whether because it is unsigned, older, or downloaded from outside the Microsoft Store, it simply blocks it without giving you a clear explanation. Instead, you get that frustrating error message that makes it sound like your entire computer is the problem.
It is not. The file just did not pass Windows 11’s trust check.
Why This Feels So Confusing
I think the reason this error message causes so much panic is because of how it is worded. “This app can’t run on your PC” sounds final. It sounds like a permanent verdict about your computer’s capabilities.
But it is really just Windows saying it is not sure about this particular file right now.
Think of it like a bouncer who does not recognize someone at the door. They are not saying the person is dangerous. They just have not verified them yet and that is fixable.They are just saying they have not verified them yet.
That distinction matters a lot because it means the fix is about convincing Windows to trust Steam again, not about upgrading your PC or replacing anything.
The Steam Client Is Not Launching Because of a Trust Block
When you see the Steam client not launching with this error, Windows has flagged the Steam file as unverified and blocked it from running. The reason varies. Sometimes it is a wrong program association where Windows does not recognize how to handle the file.
Other times it is a trust issue with the source the file came from. Either way, these are fixable problems and the troubleshooting steps I walk through below cover every scenario. This is a PC error message fix situation, not a hardware problem.
Other times Windows has flagged it as coming from an untrusted source. In some cases a recent Windows 11 update tightened the security rules and files that worked perfectly before suddenly get blocked.
None of these causes require you to buy new hardware or reinstall your entire operating system.
You Are Closer to a Fix Than You Think
Every cause I just described has a clear, tested fix. I have personally worked through several versions of this error and in almost every case Steam is running again within five minutes.
This is a software permissions issue and software permissions can be changed in just a few steps.
I have personally worked through several versions of this error and in almost every case the fix takes less than five minutes once you know which setting to change.
The sections below walk you through six tested fixes in order from the fastest and simplest to the more advanced options. Start with Fix 1 and work your way down. Most people solve this before they even reach Fix 3.
Your PC is fine. Let us get Steam running again.
Watch this quick video if you prefer a visual walkthrough
Why Windows 11 Blocks Steam With This Error
Before the fixes, I want to quickly explain what is actually causing this Windows 11 app compatibility error. Understanding the root cause takes two minutes and helps you pick the right fix on the first try instead of working through all six.
But understanding the root cause helps you pick the right fix faster and avoid wasting time on steps that do not apply to your situation.
There are four main reasons Windows 11 triggers this Windows 11 app compatibility error when you try to run Steam. Each one is slightly different and points to a different fix.
The Four Root Causes Behind This Error
The executable file is too old or unsigned
Steam’s installer and some of its core files are executable files that Windows needs to verify before running. If the file does not have a valid digital signature that Windows recognizes, Windows 11 will silently block it. This is especially common with older versions of the Steam installer that you may have saved on your computer for a while.
Windows essentially looks at the file and says it cannot confirm where it came from or whether it is safe. So it blocks it rather than running it. The Steam.exe file itself is not corrupted or broken. Windows just does not trust it in that moment.
An app architecture mismatch between the software and your system
This is one of the most common causes and also one of the least understood. Every application is built for a specific system architecture. Some apps are built for 32-bit systems using x86 architecture. Others are built for 64-bit systems. When there is an app architecture mismatch, meaning you try to run a 32-bit app on a system that expects 64-bit software, Windows 11 blocks it with this exact error.
A 32-bit app on Windows 11 64-bit does not automatically mean it will fail, but if Windows has strict compatibility checks enabled, it can flag a 32-bit app Windows 11 as incompatible and refuse to launch it.
Windows does not trust files from third-party sources
If you downloaded Steam from anywhere other than the official Valve website, Windows 11 may flag it as coming from an untrusted source. This is part of Windows 11’s Reputation-Based Protection system. It checks whether the file comes from a known and trusted publisher. Files downloaded from third-party sites, file-sharing platforms, or even some download aggregators often do not carry the right trust signals.
This is a software installation problem that has nothing to do with your PC’s power or specifications. It is purely about where the file came from.
Windows 11 24H2 changed the rules without warning
This is the cause that catches most people off guard. If Steam worked perfectly on your computer before and suddenly stopped after a Windows update, this is almost certainly why. Windows 11’s 24H2 update introduced stricter executable trust policies. Apps and installers that ran without any issues on older Windows 11 versions or on Windows 10 can suddenly trigger this operating system compatibility block after the update.
Microsoft tightened these rules to improve security, but the side effect is that perfectly legitimate software like Steam can get caught in the filter. This is not a bug exactly. It is a policy change that creates unexpected friction for regular users.
How to Check If Your PC Is 64-Bit or 32-Bit (Takes 30 Seconds)
Once you confirm your system type, download Steam directly from the official Valve website to make sure you get the correct version for your architecture.
Knowing your system architecture takes about 30 seconds and can save you a lot of time by pointing you to the right solution immediately.
Here is how to do it:
- Press the Windows key and R at the same time. A small Run box will appear at the bottom left of your screen.
- Type msinfo32 and press Enter.
- The System Information window will open. Look for the line that says System Type.
If it says x64-based PC then you are running a 64-bit system. This is the most common setup for any modern computer running Windows 11 64-bit.
If it says x86-based PC then you are on a 32-bit system, which is rare on newer machines but worth confirming.
Once you know your system type, make sure the version of Steam you are trying to install matches that architecture. Always download Steam directly from the official Valve website to get the correct and most current version. This single step eliminates one of the most common causes of the error immediately.
Did You Upgrade From Windows 10? This Is Why It Broke
If you are sitting there thinking “Steam worked perfectly last week and now it just stopped,” I completely understand your frustration. This is one of the most common stories I hear from people dealing with this error.
Here is what likely happened. When Windows 11 pushes a major update, especially the 24H2 version, it does not just add new features. It also updates the underlying security and trust policies that govern how Windows handles executable files. These policy changes apply silently in the background without notifying you.
The Windows 11 app compatibility error you are now seeing is not because Steam changed or because your computer changed. It is because Windows 11 quietly raised its standards for what it considers a trusted application.
Apps that had been running without issues for months can suddenly fail this new trust check. This is an app architecture mismatch situation in a broader sense because the app was built and verified under one set of rules and Windows is now applying a stricter rulebook.
This is also why simply restarting your PC or reinstalling Steam the same way you did before does not fix it. The root cause is in Windows 11’s security settings, not in the Steam files themselves.
The good news is that once you know this, the fix becomes obvious. You need to adjust the Windows 11 settings that are doing the blocking. That is exactly what the next sections walk you through, starting with the single fix that resolves this for most people within two minutes.
Fix 1 Turn Off Reputation Based Protection (Works for Most People)
This is the fix I always try first. If you cannot install Steam on Windows 11 and keep hitting this error, Reputation-Based Protection is almost certainly the cause. Out of every method I have tested, this one resolves the problem for the majority of people and it takes about two minutes.
It is also the fix that three completely independent sources confirmed separately, which tells me it is targeting the actual root cause rather than just masking the symptom.
The reason this works comes back to what I explained in the previous section. Windows 11 uses a background security system that quietly evaluates files before allowing them to run. Reputation-Based Protection is one of the core parts of that system. When it does not recognize a file as coming from a trusted and well known publisher it blocks the file from launching.
Steam is a legitimate platform made by Valve. But depending on how you downloaded the installer, which version you have, or whether a recent Windows update changed the trust thresholds, Windows 11 can still flag it. Turning off this specific check tells Windows to stop blocking files it does not immediately recognize.
How to Turn Off Reputation Based Protection Step by Step
Follow these steps carefully. The whole process takes about two minutes.
Step 1: Click the Start menu and type Windows Security in the search bar. Open the Windows Security app when it appears.
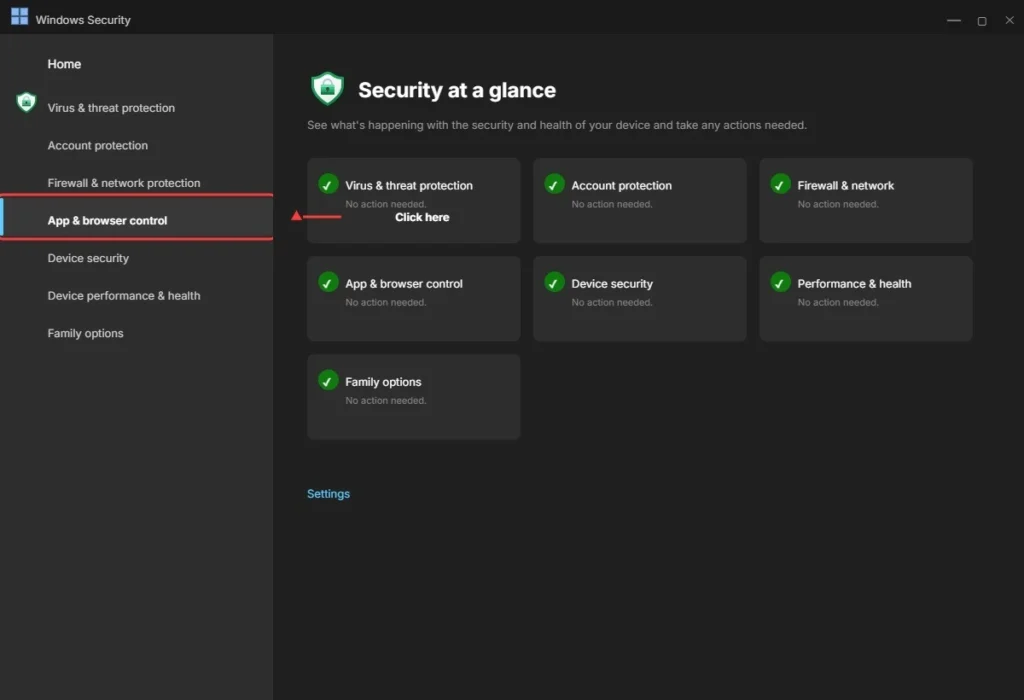
Step 2: Inside Windows Security, click on App and browser control in the left sidebar. This is the section that manages how Windows handles apps and files from the internet.
Step 3: On the App and browser control page, look for the link that says Reputation-based protection settings and click it.
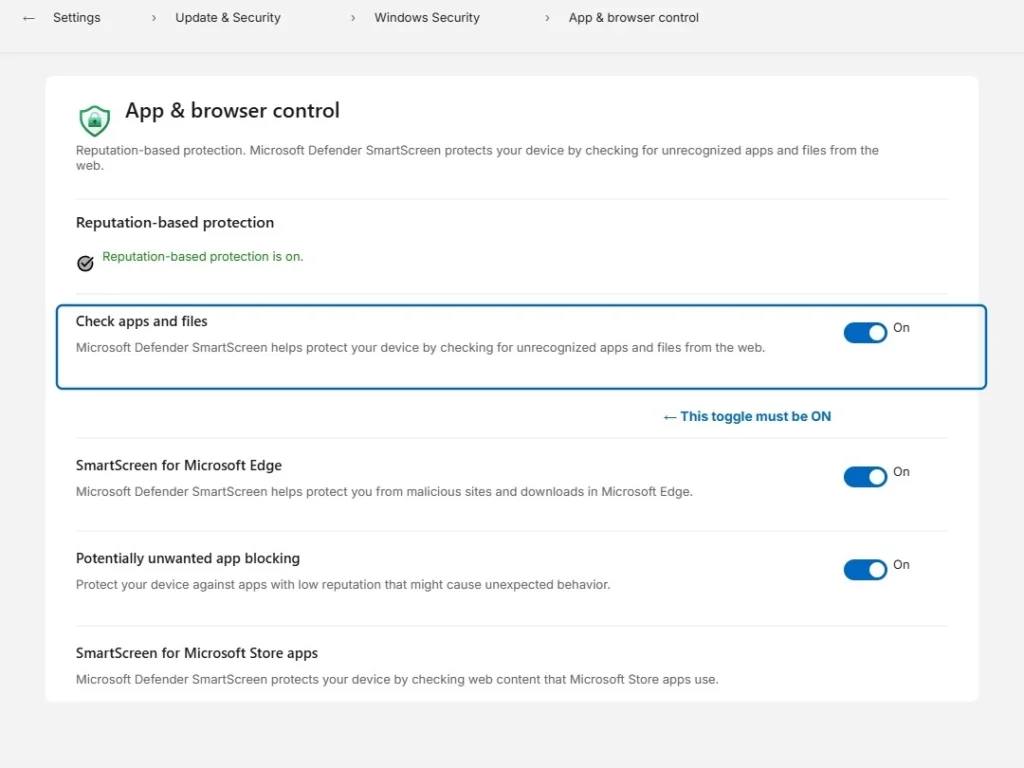
Step 4: You will see a toggle at the top labelled Check apps and files. This is the setting that is blocking Steam from running. Toggle it to Off.
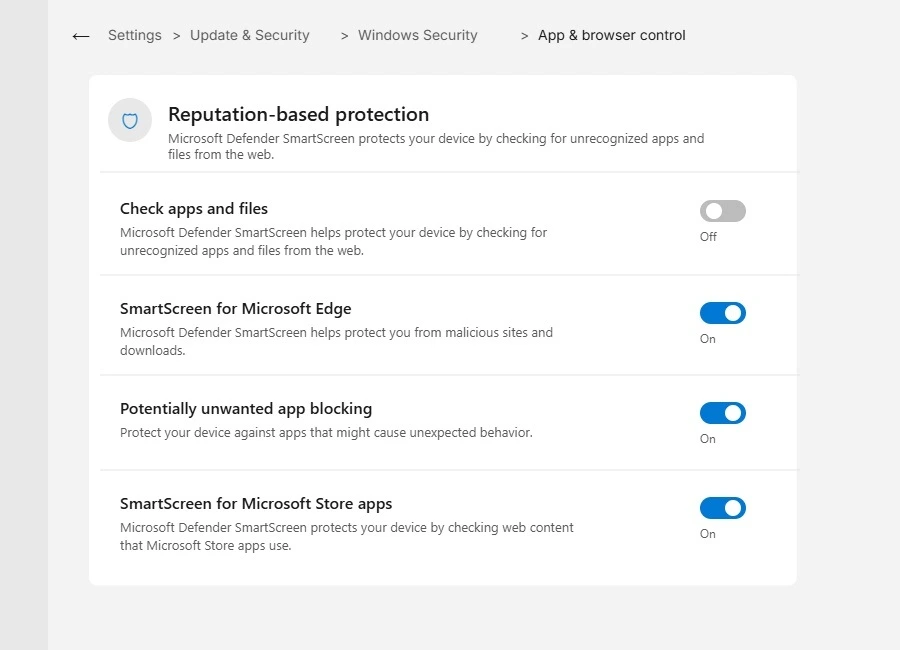
Step 5: Windows may ask you to confirm this change. Click Yes to proceed.
Step 6: This is the step most people skip and then wonder why the fix did not work. You must restart your PC before this change takes effect. The new app permissions do not apply to your active Windows session. A full reboot is required.
Step 7: After restarting, try opening or installing Steam again. In most cases the error will be gone completely.
Why the Restart Step Is So Important
I want to spend a moment on the restart because skipping it is the number one reason people think this fix did not work. Windows 11 settings that affect security layers and app permissions are not applied instantly. They are loaded when your system starts up.
If you toggle the setting off and immediately try to run Steam without restarting, Windows is still running under the old rules from your previous session. You will see the same error and assume the fix failed. It did not fail. You just need to let Windows reload its settings through a proper restart.
Windows loads security settings at startup, not mid-session. If you skip the restart and test Steam immediately, Windows is still running under the old rules. Reboot first, then test.
Is This Safe to Do?
This is a fair question and I want to answer it honestly. Turning off the Check apps and files toggle does reduce one layer of Windows 11’s automatic file screening. Microsoft built this feature to protect users from accidentally running harmful software.
For a known and trusted application like Steam downloaded directly from the official Valve website, the risk is extremely low. You are not disabling your firewall or your antivirus. You are simply telling Windows to stop pre-screening files before running them.
If you want to be cautious about your Windows 11 settings after Steam is installed and running, you can go back into the same Reputation-based protection settings menu and turn the toggle back on. Steam will already be running at that point and toggling it back on will not affect your existing installation.
This balance between getting things working and maintaining good security practices is something I always think about when walking through these fixes. Start with this one. It works for most people and it is fully reversible.
Fix 2 Enable Developer Mode in Windows 11 Settings
If Fix 1 did not fully resolve the issue for you, or if you want to apply an additional layer of permission alongside it, enabling Developer Mode is the next step I recommend. This fix works independently from the Reputation-Based Protection change, which means it targets a slightly different part of the Windows 11 permission system.
Before the steps, I want to clear something up. Developer Mode sounds like it is only for programmers but it is not. Microsoft built this feature into every copy of Windows 11 specifically to give regular users more control over what their system can install and run. It is not a hack. It is a legitimate setting.
Developer Mode is a built-in Microsoft feature that exists inside every copy of Windows 11. It is not a hack, a workaround, or anything unofficial. Microsoft designed it specifically to give users more control over what apps their system can install and run.
What Developer Mode Actually Does
By default, Windows 11 prefers applications that come through the official Microsoft Store or from publishers that meet Microsoft’s verification standards. This is a sensible default for most everyday users. But it also means that legitimate software from outside the Store, like Steam from Valve’s own website, can sometimes get caught in the restriction.
When you enable Developer Mode in your Windows 11 settings, you are telling Windows to expand its app permissions and allow software to install and run from any trusted source, not just the Microsoft Store. This directly addresses one of the root causes of the error you are seeing.
It is worth noting that enabling Developer Mode does not disable your antivirus, remove your firewall, or expose your system to new risks in any meaningful way for everyday use. It simply removes one layer of source-based restriction that was preventing Steam from running.
How to Enable Developer Mode Step by Step
This process takes about one minute and requires no technical background at all.
Step 1: Click the Start menu and open Settings. You can also press Windows key and I at the same time to open Settings directly.
Step 2: In the Settings menu, click on System in the left sidebar.

Step 3: Scroll down through the System options until you find For developers and click on it.
Step 4: At the top of the For developers page you will see the Developer Mode toggle. It will be set to Off by default. Click it to turn it On.
Step 5: Windows may show a confirmation prompt explaining what Developer Mode does. Read it and click Yes to confirm.
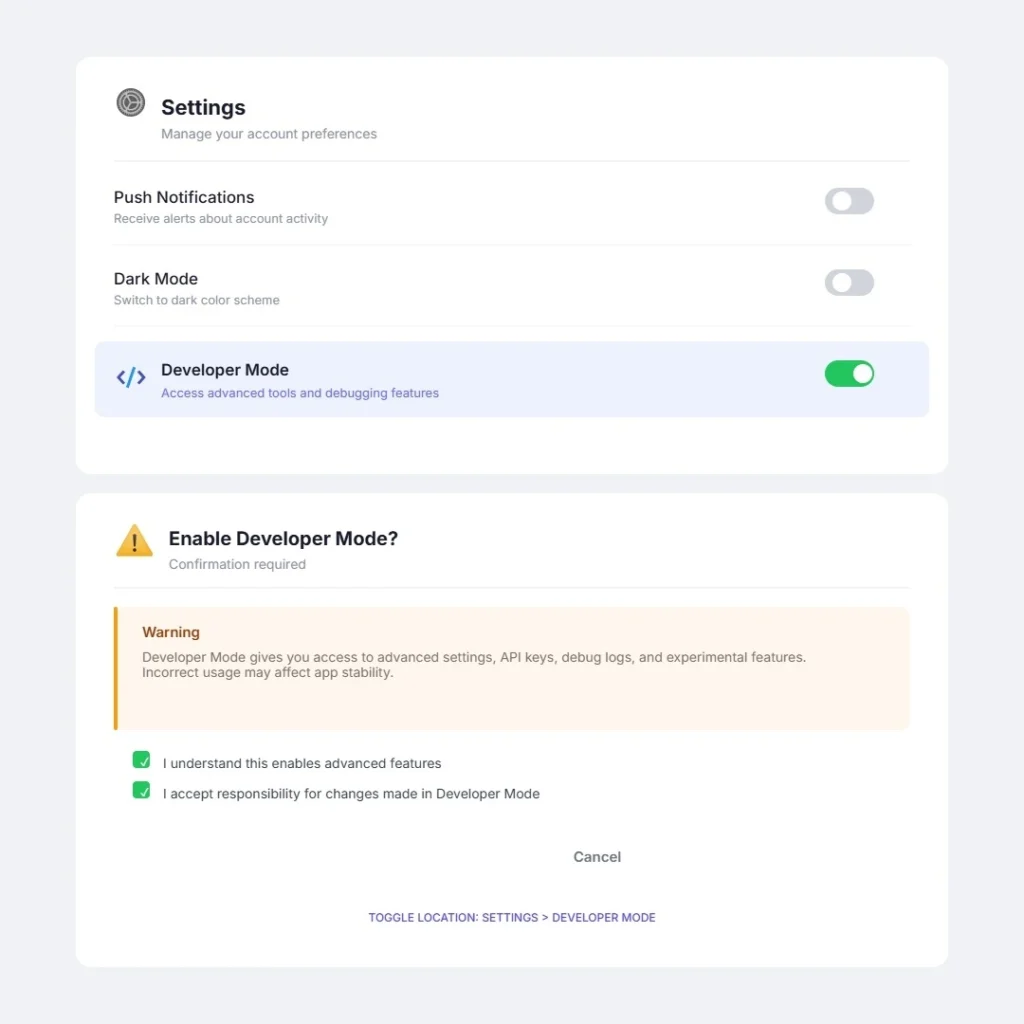
Step 6: As a system administrator level change, this setting adjusts how Windows handles app permissions across your session. I recommend restarting your PC after enabling it, just as with Fix 1, to make sure the new permissions load properly from startup.
Step 7: After restarting, try launching or installing Steam again.
Who This Fix Works Best For
In my experience this fix is especially effective for people who downloaded Steam directly from Valve’s website rather than the Microsoft Store. Windows 11 settings treat Store apps differently from external installers. If your Steam installer came from outside the Store, Developer Mode specifically unlocks the permission layer that was blocking it.
It also works well when combined with Fix 1. If you have already turned off Reputation Based Protection and Steam still will not run, adding Developer Mode on top of that covers a second restriction that the first fix does not touch.
Fix 1 removes the reputation block. Fix 2 removes the source restriction. Applied together they cover the two most common reasons Steam fails to launch on Windows 11, which is why most people are running Steam again after these two steps alone
Both are legitimate settings built by Microsoft for exactly this kind of situation. You are not doing anything unusual by using them. You are simply using the tools Windows 11 already provides to take control of your own system administrator level preferences.
Fix 3 Adjust User Account Control (UAC) Settings
Here is a fix that almost nobody talks about when it comes to Steam launch errors on Windows 11. I find this frustrating because User Account Control is one of the most common silent blockers I have seen, and most troubleshooting guides skip it entirely.
User Account Control, or UAC, is a Windows security feature that monitors changes being made to your system. Every time an app tries to install something, modify a system setting, or run with elevated permissions, UAC decides whether to allow it or ask for confirmation. The problem is that UAC does not always show you a visible prompt. Sometimes it just quietly blocks the action in the background and the only thing you see is an error message with no explanation.
This is exactly what happens with Steam installers on Windows 11. The installer needs system-level app permissions to write files and set up the Steam client properly. If UAC is set too high, it can block that process silently, which is why you end up staring at an error instead of a progress bar.
How to Lower UAC Settings Step by Step
This fix is straightforward and takes about one minute.
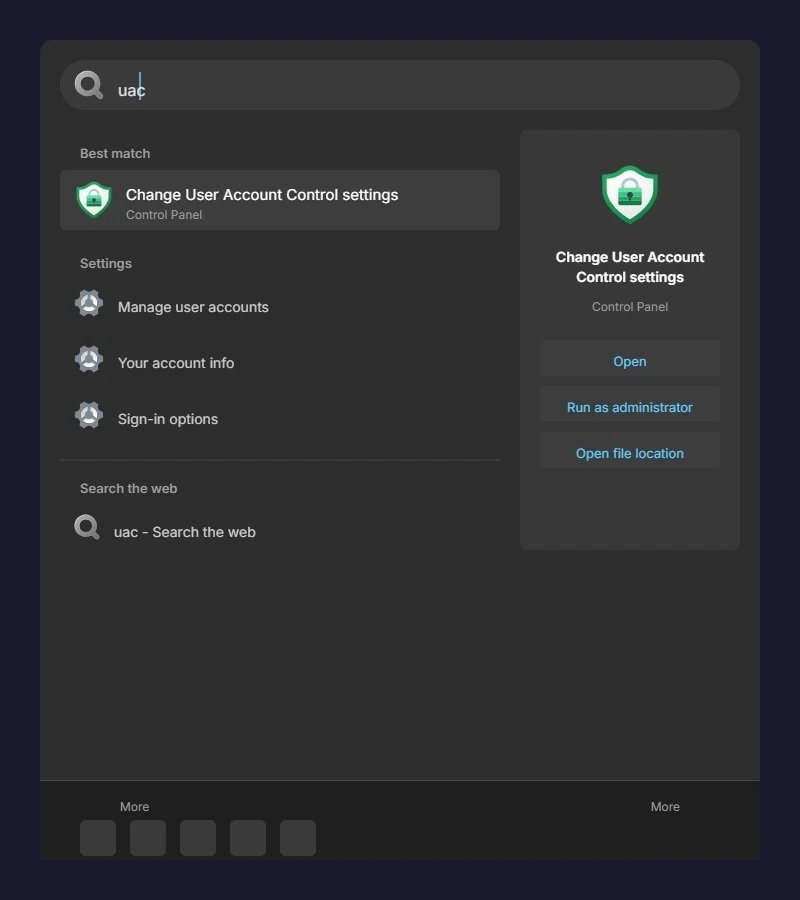
Step 1: Click the Start menu and type change user account in the search bar. The option that appears should say Change User Account Control settings. Click on it.
Step 2: A window will open with a vertical slider on the left side. By default this slider sits somewhere in the middle or upper range, meaning UAC is set to notify you about most changes apps try to make.
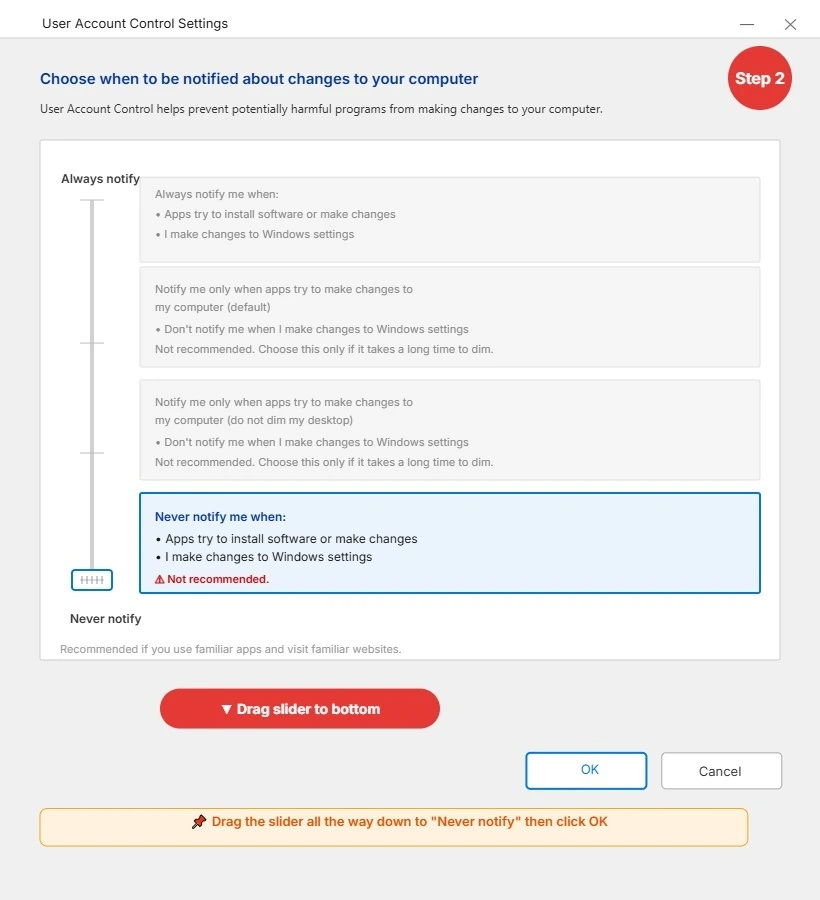
Step 3: Click and drag the slider all the way down to the bottom. The label at the bottom reads Never notify. This tells Windows to stop blocking or prompting for app installations and system changes.
Step 4: Click OK to save the change. Windows may ask for a system administrator confirmation before applying it.
Step 5: If you run into issues shutting down your PC during this process, this guide on fixing the Windows shutdown blocker error explains exactly what to do
Step 6: After restarting, try launching or installing Steam again. In most cases where UAC was the culprit, Steam will run without any issues at this point.
Once Steam is fully installed and running, you can go back into the same User Account Control settings window and move the slider back up to your preferred level. Lowering it is a temporary measure to get past the installation barrier, not a permanent configuration you have to keep.
Should You Run Steam as Administrator Instead?
This is a question I get asked fairly often and it is worth giving a clear answer because the two approaches are not the same thing.
Running Steam as administrator means right-clicking the Steam shortcut and selecting Run as administrator. This gives Steam elevated app permissions for that specific session. It can sometimes bypass UAC prompts without changing your system-wide UAC settings.
For most standard Steam games this approach works fine. Right-click the Steam.exe file, select Run as administrator, and see if it launches correctly. If it does, you can set it to always run as administrator by going into Properties then the Compatibility tab and checking the relevant box.
However, if you play games that use kernel-level protection software, do not use the Run as administrator method or the Compatibility Mode setting. Some security systems used by certain competitive games can flag these elevated launch configurations as suspicious behavior, which can create additional errors on top of the one you are already dealing with.
For those games the better approach is to lower UAC temporarily as described above, complete the Steam installation cleanly, then restore your UAC settings afterward. That way you install Steam correctly without triggering any conflicts with games that have strict launch requirements.
When in doubt about which approach to use, the UAC slider method is the safer and more universal option. It does not interfere with individual game settings and it works consistently across different Steam titles.
Fix 4 Use the Windows Compatibility Troubleshooter
If the first three fixes did not solve the problem for you, this next method takes a completely different approach. Instead of changing Windows-wide security settings, this fix targets the Steam executable file directly and lets Windows figure out the best way to run it on your specific system.
The Windows Compatibility Troubleshooter is a built-in diagnostic tool that most people never think to use. It works by testing the file against different program compatibility profiles and automatically applying the settings that give it the best chance of running correctly. I have seen this fix work particularly well for people who installed Steam on an older version of Windows and then upgraded to Windows 11 without doing a fresh Steam installation.
How to Run the Compatibility Troubleshooter on Steam
Follow these steps carefully. You need to locate the actual Steam executable file, not just the desktop shortcut.
Step 1: Open File Explorer and navigate to the folder where Steam is installed. The default location is usually the C drive inside Program Files or Program Files (x86). Look for a folder called Steam and find the file named Steam.exe inside it.
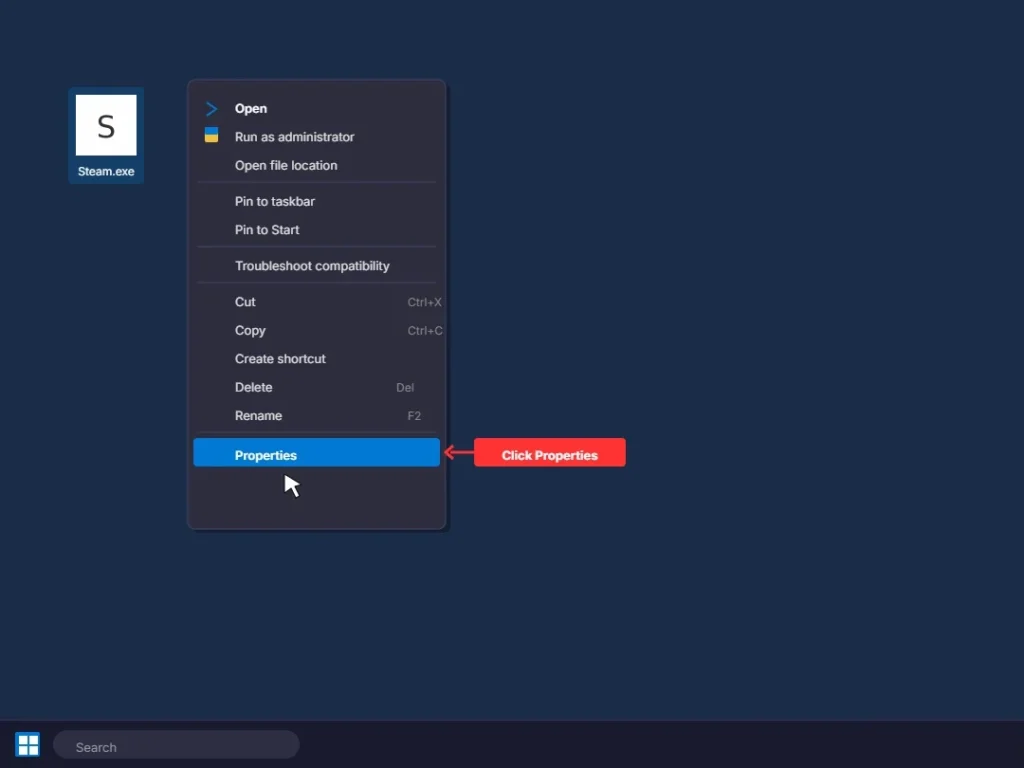
Step 2: Right click on Steam.exe and select Properties from the menu that appears.
Step 3: In the Properties window, click on the Compatibility tab at the top.
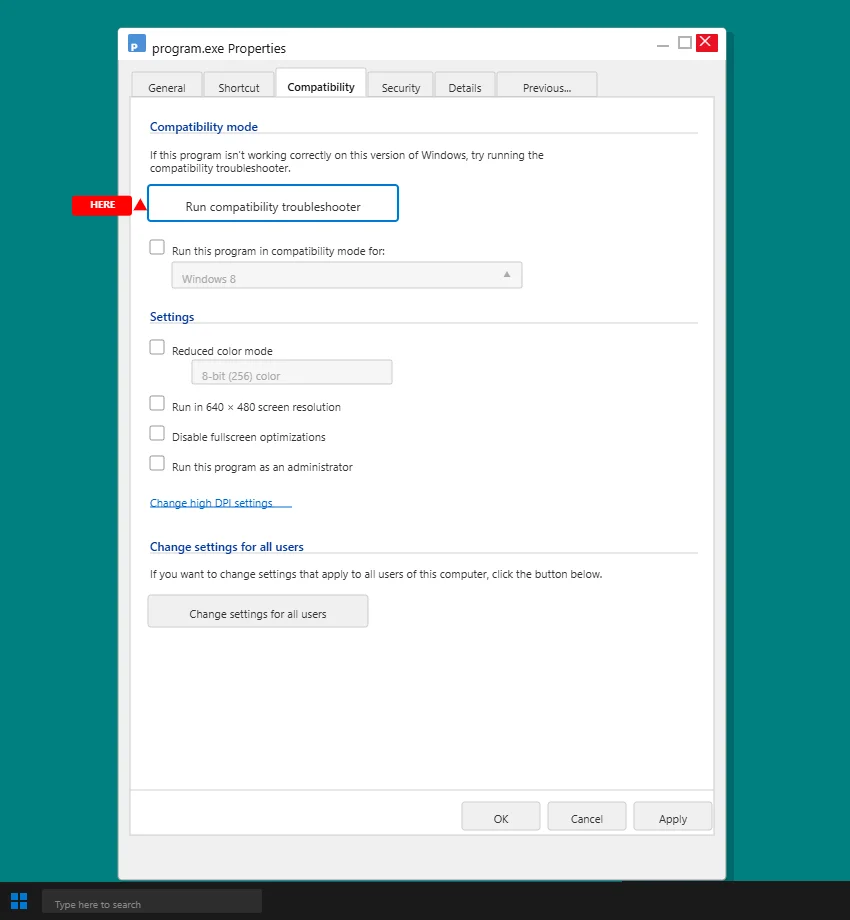
Step 4: Click the button that says Run compatibility troubleshooter. Windows will start scanning the file and testing it against known program compatibility profiles.
Step 5: Follow the on screen prompts. Windows will either detect a recommended setting automatically or ask you to test the program. If it suggests a setting, apply it and test Steam.
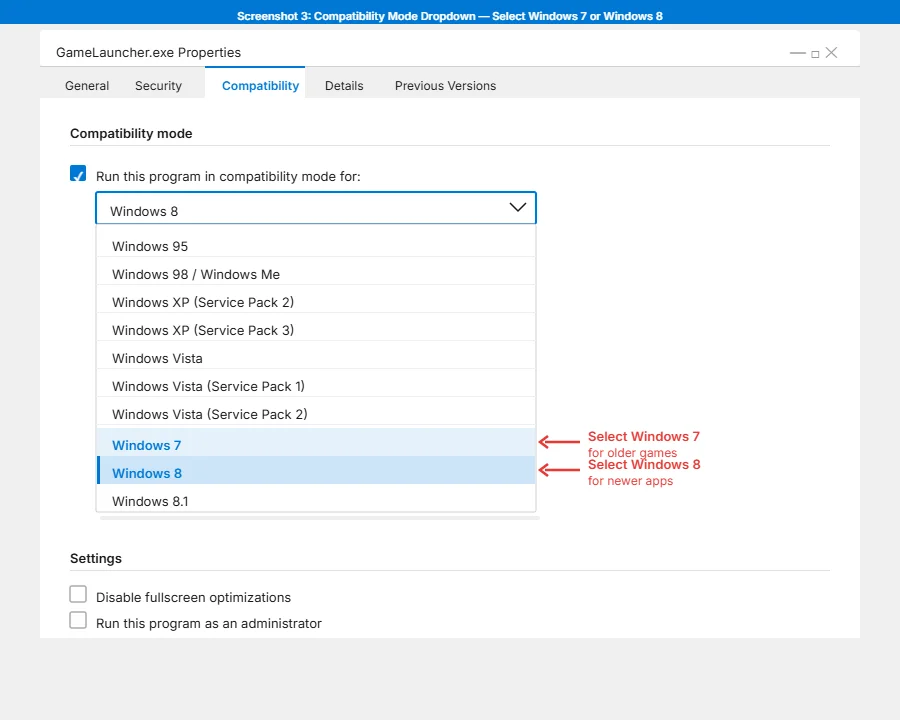
Step 6: If the automatic troubleshooter does not find a fix, go back to the Compatibility tab. Check the box that says Run this program in compatibility mode for and use the dropdown menu to select Windows 8 first. Click Apply and test Steam.
Step 7: If Windows 8 mode does not work, go back and change the dropdown to Windows 7 instead. Click Apply and test again. Most older Steam configurations respond well to one of these two options.
If Compatibility Mode Keeps Failing on Windows 11
Sometimes the compatibility troubleshooter runs successfully but Steam still does not launch cleanly. In that case the issue is usually a conflict with another setting that is still active. Apply Fix 1 and Fix 2 first, then run the troubleshooter again. That combination resolves the majority of cases where the troubleshooter alone did not work.
I recommend going back to Fix 1 and Fix 2 and making sure both are applied before running the troubleshooter again. Combining Reputation-Based Protection off with a compatibility mode setting often resolves cases where neither fix worked alone.
⚠️ Do NOT Use Compatibility Mode If You Play Valorant or CS2
This warning is important and I want you to read it carefully before applying this fix.
If you play competitive games that use kernel-level security software, do not apply Windows 11 compatibility mode to Steam or to those specific game launchers. Certain security systems used in competitive gaming can detect when a program is running under a compatibility profile and flag it as an unauthorized modification to the launch environment.
This can result in additional errors, login failures, or other launch problems on top of the one you are already dealing with. The operating system compatibility settings that help standard Steam games run smoothly can interfere with strict security checks in specific titles.
For players of those games, skip this fix entirely and focus on Fix 1 and Fix 2 instead. Those methods adjust system-wide permissions without touching individual program compatibility profiles, which means they do not interact with game security systems in the same way.
For everyone else playing standard Steam titles, the compatibility troubleshooter is a safe and effective tool. Use it without hesitation if the earlier fixes have not fully resolved your issue.
Fix 5 Check Your Antivirus and Windows Defender Settings
This is a fix that surprises a lot of people because it feels unrelated at first. You are trying to launch Steam, not scan a file for threats. So why would your antivirus be involved?
The answer is that antivirus software and Windows Defender do not wait for you to scan something manually. They monitor files in real time as your system tries to run them. When Steam’s installer or executable launches, your security software evaluates it in the background instantly. If it does not recognize the file signature or flags something unusual about the way the file is structured, it can block it from running before you even see the Steam loading screen.
This is one of the most overlooked causes of the software installation problem that people experience with Steam on Windows 11. The error message you see does not say “blocked by antivirus.” It just says the app cannot run. So most people never think to look at their security software at all.
I have seen this happen with completely legitimate, freshly downloaded Steam installers from the official Valve website. The antivirus blocking Steam is not because Steam is dangerous. It is because security software sometimes reacts to the way installer files behave during setup, which can look similar to how certain unwanted programs operate. A false positive blocks a real program.
How to Check If Antivirus Is the Problem
Before adding any exceptions, a quick way to test this is to temporarily pause your third-party antivirus if you have one installed and then try running Steam again. If Steam launches successfully with the antivirus paused, that confirms the security software was the blocker.
Do not leave your antivirus paused permanently. This test is just to confirm the cause. Once you know antivirus is responsible, the right fix is to add a proper exception rather than keep the protection turned off.
If you do not have a third-party antivirus and rely on Microsoft’s built-in protection, the section below covers exactly what to do with Windows Defender.
How to Add a Steam Exception in Windows Defender
Adding a Windows Defender Steam exception tells Microsoft’s built-in security software to stop scanning and blocking files in the Steam folder. Here is how to do it step by step.
Step 1: Click the Start menu and search for Windows Security. Open the app.
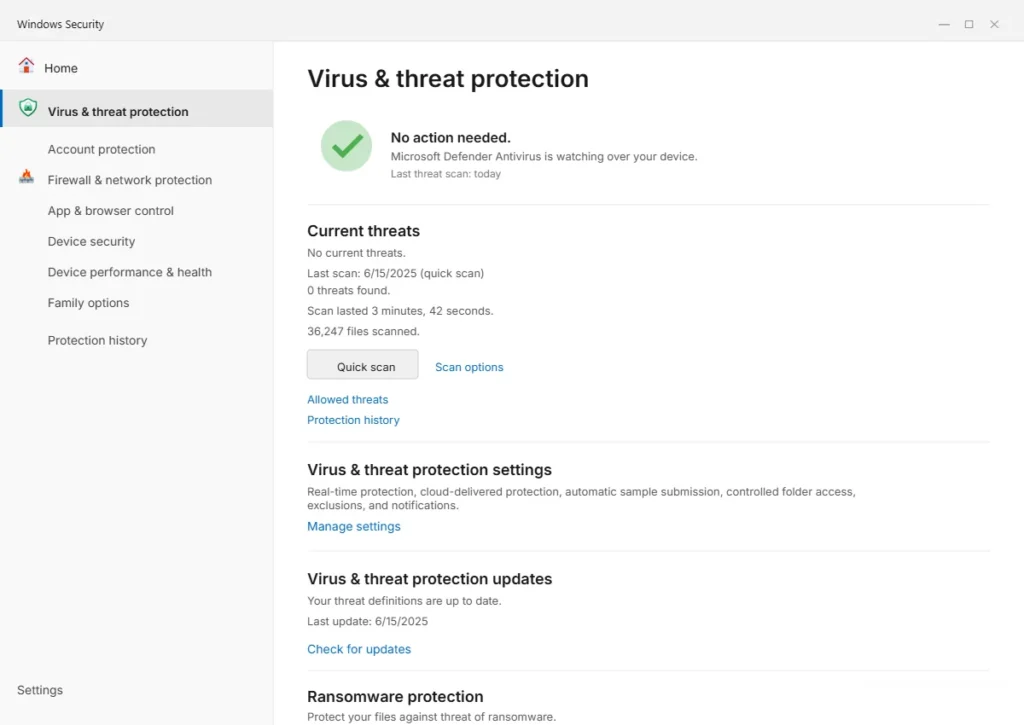
Step 2: Inside Windows Security, click on Virus and threat protection.
Step 3: Scroll down on that page until you see Virus and threat protection settings and click Manage settings underneath it.
Step 4: Scroll further down until you reach the Exclusions section. Click Add or remove exclusions.
Step 5: Click the Add an exclusion button. A dropdown will appear with options including File, Folder, File type, and Process.
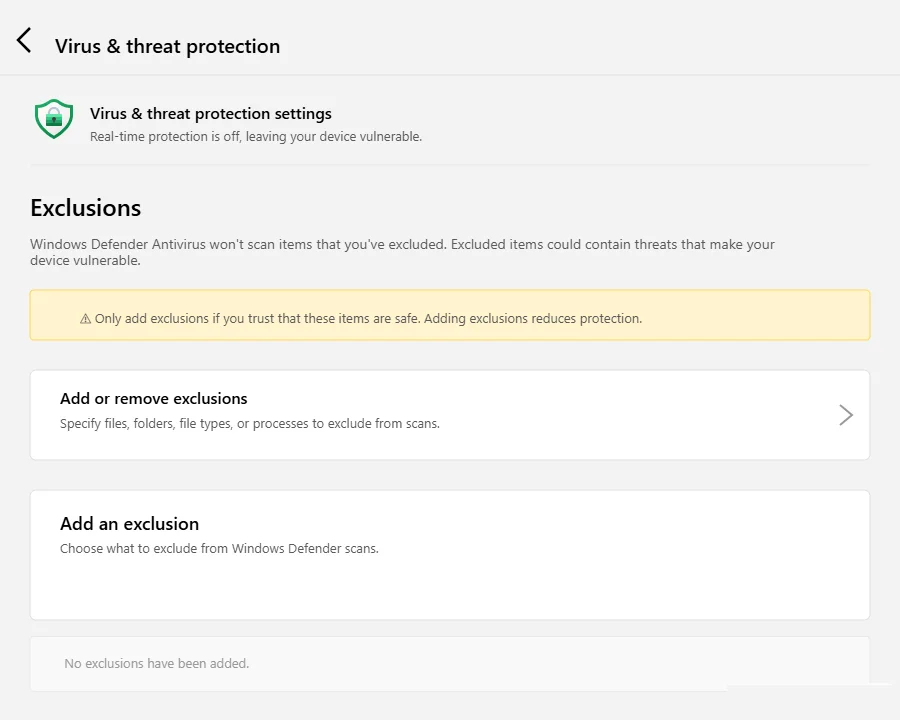
Step 6: Select Folder from the dropdown. A file browser window will open.
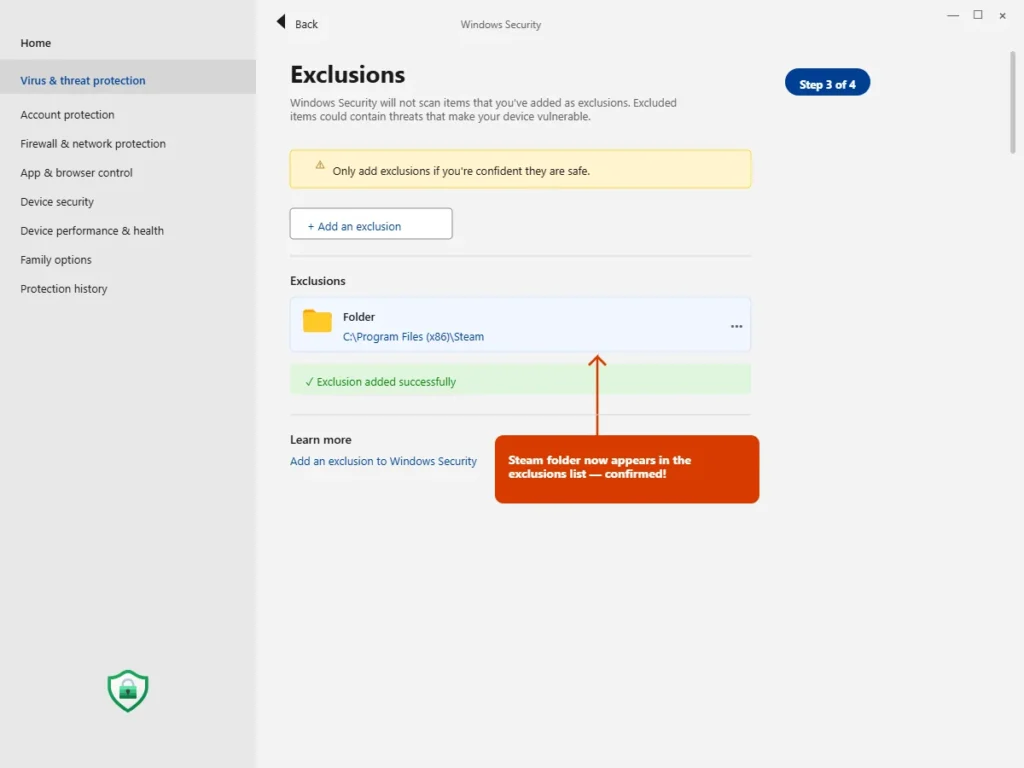
Step 7: Navigate to the folder where Steam is installed. The default path is usually C:\Program Files (x86)\Steam or C:\Program Files\Steam. Select the Steam folder and click Select Folder.
Step 8: Windows Defender will now exclude the entire Steam folder from real-time scanning. Try launching Steam again.
If You Use a Third Party Antivirus
The process for adding an antivirus blocking Steam exception in third-party software varies by program, but the general approach is the same. Open your antivirus settings, look for a section called Exclusions, Exceptions, or Safe List, and add the Steam installation folder to that list.
Most major antivirus programs have this feature and it takes about two minutes to configure. If you are unsure where to find it, searching your antivirus program name alongside the word “exclusions” will give you the exact steps for your specific software.
After adding the exception, restart Steam and test whether the error has cleared.
Fix 6 Download a Fresh Steam Installer Directly From Valve
If you have worked through the previous five fixes and Steam is still not launching, there is a strong chance the problem is not with your Windows settings at all. The issue might be with the Steam installer file itself.
This is something people rarely consider because the natural assumption is that if you downloaded a file and it saved to your computer, it is ready to use. But installer files can become outdated, partially corrupted during download, or flagged by Windows specifically because of their age. An installer you saved six months ago behaves very differently from a freshly downloaded one today, especially on Windows 11 where trust policies update with every major Windows release.
I have personally seen cases where someone tried every settings fix available and nothing worked, then downloaded a fresh installer from the official source and Steam launched on the first attempt. The old file was the problem the entire time.
Why Old Installer Files Cause This Error
When Valve Corporation releases an update to the Steam client, the installer package changes. The digital signature on the file gets refreshed, the internal file structure gets updated, and Windows 11 recognizes the newer version as a current and trusted package.
An older installer does not have these updated trust signals. Windows 11’s security checks look at the file’s signature date, its known reputation in Microsoft’s file database, and whether it matches current trusted publisher records. An outdated Steam installer can fail all three of these checks even if it installed perfectly on your computer two years ago.
This is why a fresh Steam install from the current download page often resolves a steam installation error Windows 11 has been blocking. You are not just getting the same file again. You are getting a file that Windows 11 currently recognizes and trusts.
How to Get a Fresh Steam Installer From Valve
Follow these steps to make sure you are starting from the cleanest possible position.
Step 1: If Steam is currently installed on your computer in any form, uninstall it first. Go to Settings then Apps then Installed apps, find Steam in the list, and select Uninstall. This removes the existing installation cleanly before you start fresh.
Step 2: After uninstalling, navigate to the Steam folder location on your drive (usually C:\Program Files (x86)\Steam) and check if any leftover files remain. If the folder still exists, delete it manually. This ensures no old or conflicting files interfere with the new installation.
Step 3: Open your web browser and go directly to the official Steam download page at store.steampowered.com. Do not use a saved bookmark from years ago. Type the address fresh or search for it to make sure you land on the current Valve Corporation page.
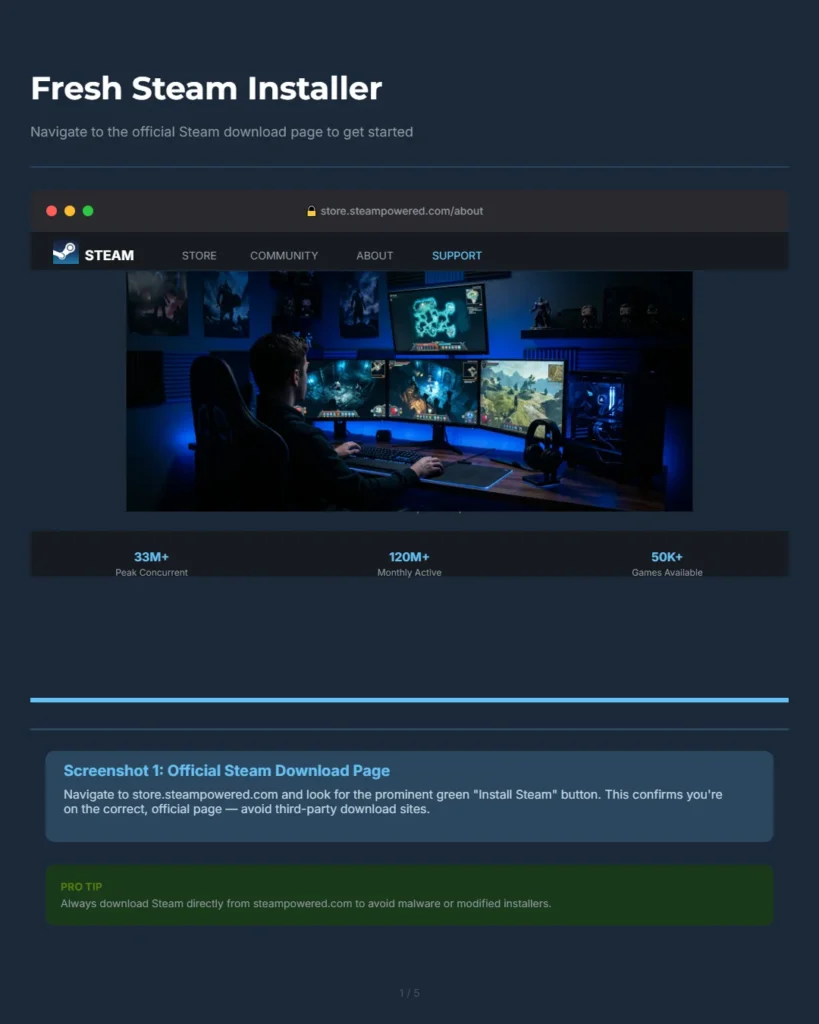
Step 4: Click the Install Steam button on the page. This downloads the latest version of the Steam installer directly from Valve’s servers. The file you download today will have the most current digital signature and trust credentials.
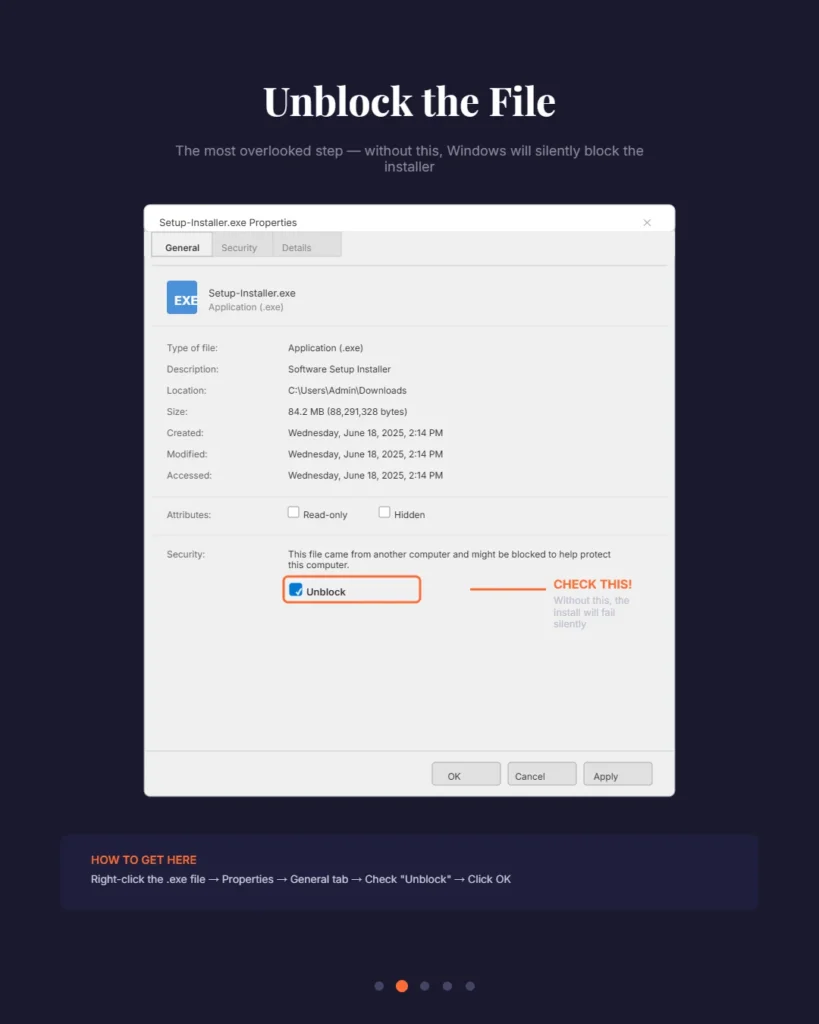
Step 5:Once the download finishes, right-click the installer file in your Downloads folder and select Properties. At the bottom of the General tab, Windows sometimes shows a security notice about files downloaded from the internet. If you see an Unblock checkbox next to it, tick it and click OK. This removes a standard download flag Windows adds to files from the web and is completely safe to do for files from official sources.
This is a one click step that removes a common download block Windows adds to files from the internet.
Step 6: Now run the installer. If you still have Reputation-Based Protection turned off from Fix 1, the installation should proceed without interruption. If you turned it back on, you may want to temporarily disable it again just for the installation, then re-enable it afterward.
Step 7: Follow the on-screen installation prompts and let the reinstall Steam Windows 11 process complete fully before launching Steam for the first time.
Why Going Directly to Valve Matters
I want to emphasize one thing about this fix. Always get your Steam installer from the official Valve Corporation website and nowhere else. Third-party download sites sometimes host older versions of the installer, and those older files are far more likely to trigger the exact trust and compatibility errors you are trying to fix.
A fresh file from the official Steam download page gives you the best possible starting point. It is the version Windows 11 is most likely to recognize, trust, and run without any intervention. Combined with the settings adjustments from the earlier fixes, this approach resolves even the most stubborn cases of the steam installation error Windows 11 displays.
Still Not Fixed? Run a System File Repair First
If you have applied every fix in this guide and Steam is still not launching, there is one more step that almost no troubleshooting guide covers. It is also the step that has saved me the most time on stubborn errors that have no obvious cause
It is also the step that has saved me the most time when dealing with persistent errors that make no logical sense.
The issue might not be with Steam at all. It might not even be with your Windows security settings. The real culprit in stubborn cases like this is often corrupted Windows system files sitting quietly in the background, breaking things without any obvious warning.
corrupted Windows system files can also trigger errors like the 0x80004005 error on Windows 11, which shares several root causes with this Steam issue.
Windows 11 relies on hundreds of core system files to function properly. These files manage everything from how apps launch to how permissions are applied across your system. When even a small number of these files become corrupted, either through a failed update, an interrupted installation, or a system crash, the effects show up in unexpected ways. Steam keeps crashing on Windows 11, Steam not responding errors, and Steam update failed messages that appear for no clear reason are all classic signs that something deeper is wrong at the system level.
The good news is that Windows 11 has a built in repair tool that most people never use. It is called the System File Checker and it scans your entire Windows installation, finds corrupted files, and replaces them automatically. Running it costs you nothing but a few minutes of waiting.
How to Run the System File Checker (SFC Scan)
This process requires opening Command Prompt as a system administrator. Follow these steps exactly.
Step 1: Click the Start menu and type CMD in the search bar. When Command Prompt appears in the results, do not just click it. Right-click on it and select Run as administrator. This is important. The scan will not work correctly without administrator-level access.
Step 2: A black Command Prompt window will open. Click inside it to make sure it is active, then type the following command exactly as written:
sfc /scannow
Press Enter to begin the scan.
Step 3: The scan will start immediately and a progress bar will appear showing the percentage complete. This process can take anywhere from five to fifteen minutes depending on your system. Do not close the window and do not interrupt the scan. Let it reach 100% completely before doing anything else.
Step 4: When the scan finishes, you will see one of three messages. It will either tell you that no integrity violations were found, that it found and repaired corrupted files, or that it found files it could not repair. All three outcomes give you useful information about what your next troubleshooting steps should be.
Step 5: Regardless of what the scan reports, restart your PC after it completes. This allows Windows to fully apply any repairs that were made during the scan.
Step 6: After restarting, try launching Steam again. In cases where corrupted system files were causing the problem, Steam will often open cleanly after this repair.
What to Check After the Repair
Once your system restarts and you attempt to launch Steam again, there are a few things worth checking as part of your final troubleshooting steps.
If Steam opens but behaves strangely, try launching it in offline mode first. Steam offline mode bypasses the need for an immediate server connection and can confirm whether the core client is functioning correctly before introducing network variables.
If Steam still shows a Steam update failed message after the SFC scan, it is worth checking your internet connection and temporarily disabling your firewall just long enough to let Steam complete its initial update download.
If Steam not responding continues even after the repair, the combination of the SFC scan result plus the earlier fixes in this guide will help you understand whether the problem is in Windows, in Steam, or in both. At that point a full clean reinstall using a fresh installer from the official Valve website, as covered in Fix 6, combined with the SFC repair, covers every possible base.
Running the system file scan is one of those troubleshooting steps that feels advanced but is genuinely simple to execute. And when it works, it fixes problems that no amount of settings changes can touch.
Is Steam Actually Compatible With Windows 11?
Let me answer this directly because I know this question is sitting in the back of your mind while you work through these fixes.
Yes. Steam is fully compatible with Windows 11. It always has been.
Valve Corporation officially supports Windows 11 across all versions of the Steam client. If you are running a modern PC with Windows 11 64-bit, your system meets every requirement Steam needs to run. There is no hardware barrier, no architectural conflict, and no official incompatibility between Steam and Windows 11.
So when you see that error message, the instinct to search “steam not compatible with windows 11” makes complete sense. The error sounds like a compatibility verdict. It sounds like your PC failed a test. But that reading of the message is incorrect and I want to clear it up completely.
What the Error Actually Means
The message “this app can’t run on your PC” is a Windows security policy response. It is not a compatibility assessment of your hardware or your operating system version. Windows is not saying your PC cannot run Steam. It is saying it is currently blocking the file from running based on its trust and permission settings.
This is an important distinction. A compatibility problem means the software genuinely cannot work on your system. A permission block means Windows has decided not to allow the file to run right now, and that decision can be changed.
Your PC is not the problem. Windows is blocking the file, not rejecting your hardware. The error message is misleading in its wording, but the underlying cause is entirely fixable through settings adjustments rather than hardware changes or system upgrades.
Steam and Windows 11 Work Together Perfectly
Valve Corporation actively maintains and updates the Steam client for Windows 11 compatibility. The platform releases regular client updates and officially lists Windows 11 as a fully supported operating system
The Steam client receives regular updates, and Valve actively maintains compatibility with each new Windows 11 release.
Gaming on Windows 11 is actually well supported across the Steam library. The platform runs thousands of titles on Windows 11 64-bit without any issues for the vast majority of users.
Once Steam is running, you can enhance your gaming experience learn how to connect a PS5 controller to PC for a seamless setup.
The error you experienced is not a sign of a broader platform problem. It is a specific friction point caused by Windows 11’s security settings interacting with Steam’s installer or executable file in a way that triggers a block.
When you understand the actual Windows 11 system requirements for Steam, which are simply a 64-bit processor, a supported version of Windows 11, and a stable internet connection for the initial setup, it becomes clear that almost any modern computer running Windows 11 is more than capable of running Steam without any issues.
The Error Is a Windows Policy Issue Not a Steam Issue
I want to say this one more time because it genuinely changes how you approach the fix. The “this app can’t run on your PC” error on Steam in Windows 11 is caused by Windows 11’s security and trust policies, not by Steam being incompatible with your system.
Knowing how to run Steam on Windows 11 is not about meeting special requirements or upgrading your hardware. It is about adjusting the right Windows settings so that Windows stops blocking a perfectly legitimate application from running.
Where to Start if You Skipped Straight to This Section
If you came directly to this section looking for a quick answer, here is your starting point. Go back to Fix 1 and turn off Reputation-Based Protection in Windows Security. That single change resolves the error for the majority of people within two minutes.
If Fix 1 does not work on its own, add Fix 2 by enabling Developer Mode. Between those two adjustments, most users have Steam running before they even need to try the remaining fixes.
Your PC is capable. Your version of Windows supports Steam. The only thing standing between you and gaming on Windows 11 right now is a permission setting that takes less than two minutes to change.
Frequently Asked Questions
Why does Steam say “This app can’t run on your PC” on Windows 11 when it worked before?
Windows 11, particularly after the 24H2 update, introduced stricter rules around which executable files it trusts. Steam’s installer may now get flagged even though it ran perfectly on Windows 10 or on an earlier version of Windows 11. The file itself has not changed but Windows is now holding it to a higher standard. Turning off Reputation Based Protection in Windows Security is the fastest fix for this specific situation and resolves it for most people immediately
Will turning off Reputation Based Protection make my computer less safe?
The risk is minimal when you are dealing with well-known software like Steam downloaded directly from Valve’s official website. You are not disabling your antivirus or your firewall. You are simply removing one layer of file screening that was blocking a trusted application. Once Steam is installed and running, you can go back into the same setting and turn it back on. Just avoid turning it off for files from unknown or unverified sources.
How do I know if my PC is 32-bit or 64-bit?
Press Windows key and R at the same time, type msinfo32, and press Enter. The System Information window will open. Look for the line that says System Type. If it says x64-based PC you are running a 64-bit system. If it says x86-based PC you are on a 32-bit system. Always download the version of Steam that matches your system type.
Can I use compatibility mode to fix Steam on Windows 11?
Yes, for most standard Steam games compatibility mode is a safe and effective fix. Right-click Steam.exe, go to Properties, open the Compatibility tab, and select Windows 8 or Windows 7 from the dropdown. However, do not apply this fix if you play games that use strict security software. That type of protection can flag compatibility mode settings as a launch environment modification and create additional errors on top of the one you are already dealing with. Stick to Fix 1 and Fix 2 for those titles instead.
What if none of the fixes work for Steam on Windows 11?
Open Command Prompt as administrator, type sfc /scannow, and press Enter. Let the scan complete fully without closing the window. This checks for corrupted Windows system files that could be silently blocking Steam regardless of your security settings. After the scan finishes and you restart your PC, try Steam again. If it still does not work, do a full clean uninstall of Steam, delete any leftover Steam folders manually, then download a fresh installer directly from the official Valve website and reinstall from scratch.
Do I need to restart my PC after changing Windows security settings?
Yes, and this is the most commonly skipped step. Changes to Reputation-Based Protection and Developer Mode do not apply to your current Windows session. They load at startup. If you change the setting and immediately test Steam without rebooting, Windows is still running under the old rules. Always restart your PC first, then test Steam again.