
How to Remove Installed Apps from Mac Completely (Without Leaving Junk Files)
If you want to remove installed apps from Mac or remove applications from MacBook, simply dragging them to Trash is not enough.
Many users believe this deletes the app completely, but macOS actually leaves behind hidden files, caches and system data.
I used to think uninstalling apps on my Mac was simple just drag the app to Trash and done. But I was wrong.
If you’re doing the same, your Mac is probably full of leftover junk files that are still taking up storage space even after deletion.
Think of it like this: installing an app spreads files across your Mac not just in Applications, but also in hidden folders like Library.
Deleting the app only removes one piece of the puzzle. When you drag the app to Trash, macOS only removes that one icon. Everything else stays behind.
I discovered this the hard way when my MacBook kept running low on storage even after I deleted over 20 apps. That is when I learned that a proper Mac app removal requires more than just a simple drag and drop.
What Files Stay After You Delete Apps on Mac
Let me break down exactly what stays on your system after you delete an app the usual way.
Preference Files are small files that store your app settings. They usually have names like com.developer.appname.plist and sit inside the ~/Library/Preferences folder.
Application Support Files include saved data, templates, and configuration files. You can find them inside ~/Library/Application Support. Some apps store hundreds of megabytes here.
Cache Files are temporary data the app created to load faster. These pile up inside ~/Library/Caches and can grow surprisingly large over time.
Login Items and Launch Agents are background processes that some apps set up to run automatically when you start your Mac. Even after you delete the app, these can keep running silently in the background.
Log Files are records the app created during its operation. They sit inside ~/Library/Logs and serve no purpose after the app is gone.
All of these files remain on your Mac unless you manually find and remove them.
How Much Storage Do These Junk Files Waste
You might think these leftover files are tiny and not worth worrying about. I thought the same thing until I checked.
When I removed a popular video editing app from my Mac using the drag to Trash method, the app itself was about 600 MB. But when I searched for its leftover files, I found over 1.2 GB of cached data and support files still sitting on my system. That is double the size of the app itself.
Now multiply that by every app you have ever installed and deleted over the years. On my Mac, I found nearly 8 GB of junk files from apps I had removed months ago. That is serious storage space wasted for no reason.
If your Mac storage keeps filling up even though you regularly delete apps, leftover files are almost certainly the reason. The good news is that you can remove all of them completely and I will show you exactly how in the next sections.
How to Delete Apps on Mac from Launchpad (30 Second Method)
If you want the fastest way to delete apps on Mac or get rid of apps on MacBook quickly, Launchpad is your best friend.
This method takes about 30 seconds and requires zero technical knowledge. I use it almost every time I need to quickly remove an app I downloaded from the App Store.
Launchpad works exactly like the home screen on an iPhone. You see all your apps displayed as icons in a grid. And just like on a phone, you can delete them with a quick click and hold.
I personally love this method because it feels intuitive. There is no digging through folders or searching for hidden files. You see the app, you hold it, and you remove it. Simple as that.
However, there is one important thing you should know. This method only works for apps you downloaded from the Mac App Store. If you installed an app from a website or a developer’s page, Launchpad will not give you the option to delete it. I will explain why in a moment.
Step by Step Launchpad Deletion
Here is exactly how I delete apps from Launchpad on my Mac.
- Click the Launchpad icon in your Dock. It looks like a grid of colorful squares. You can also open it by pinching four fingers together on your trackpad.
- Find the app you want to remove. If you have many apps, use the search bar at the top to type the app name.
- Click and hold the app icon until all the icons start to jiggle. This usually takes about two seconds.
- Look for the small X button that appears on the top left corner of the app icon.
- Click the X button and confirm the deletion when your Mac asks you.
That is it. The app is removed from your Mac. The whole process genuinely takes less than 30 seconds once you know where to click.
No X Button Showing Up? Here’s Why
This confused me the first time it happened. I held down an app icon, everything started jiggling, but there was no X button anywhere.
The reason is straightforward. Launchpad only shows the X button for apps downloaded from the Mac App Store. If you installed the app from any other source, macOS will not let you delete it through Launchpad.
In that case, you need to use the Finder method or a third party uninstaller to remove the app. I cover both of these methods in detail in the sections below.
Also, built in Apple apps like Safari and Messages will never show the X button because macOS protects them from accidental deletion.
How to Uninstall Apps on Mac Using Finder
Finder is the most common way to uninstall apps on Mac and remove applications on MacBook. Almost every Mac user I know starts here because it feels familiar and straightforward.
You open the Applications folder, find the app you want to remove, and get rid of it.
Finder is the most common way to uninstall apps on Mac. It works for all apps not just App Store ones. It works for every type of app whether you downloaded it from the App Store, a developer website, or anywhere else. Unlike Launchpad, Finder does not limit you to only App Store apps.
The Applications folder in Finder holds every app installed on your Mac in one place. That makes it easy to browse through your apps and decide which ones you no longer need. There are two simple ways to remove apps from here, and I will walk you through both of them right now.
If you prefer watching instead of reading, this step-by-step video will show you exactly how to completely uninstall apps on Mac and remove all leftover files.
Drag to Trash Method
This is the classic way most people remove applications from their Mac. It is fast and requires just one quick mouse movement.
- Open Finder from your Dock. It is the blue and white smiley face icon that is always visible.
- Click on Applications in the left sidebar. You will see a full list of every app installed on your Mac.
- Find the app you want to remove. You can scroll through the list or use the search bar in the top right corner to find it quickly.
- Click the app icon and drag it to the Trash icon in your Dock.
- Your Mac might ask for your administrator password. Enter it and the app moves to Trash.
I use this method when I am quickly cleaning up apps I tried once and never opened again. It takes about five seconds once you know where the app is.
Just remember that the app is not permanently gone until you empty the Trash. Right click the Trash icon and select Empty Trash to finish the job.
Right Click Move to Bin Method
If dragging feels awkward to you, there is another option that does the exact same thing.
- Open Finder and go to the Applications folder.
- Find the app you want to delete.
- Right click the app icon. On a trackpad you can do this by clicking with two fingers.
- Select Move to Bin from the dropdown menu.
- Enter your password if prompted.
I honestly prefer this method over dragging because it feels more precise. There is no risk of accidentally dropping the app into the wrong folder, which has happened to me before.
This same approach works perfectly when you need to remove a downloaded app from Mac that didn’t come from the App Store
Some Apps Have Their Own Uninstaller Check This First
Here is something a lot of people miss. Some apps come with a built in uninstaller that you should use instead of dragging to Trash.
Apps from companies like Adobe, Microsoft, and other major developers often include a dedicated uninstall tool. This tool removes the app along with its support files and background processes. If you skip it and just drag the app to Trash, you could leave behind a large amount of leftover data.
Before you delete any app through Finder, quickly check if the app has its own uninstaller inside the Applications folder. If it does, always use that first. It saves you from dealing with leftover files later.
How to Completely Remove Installed Apps from Mac (Including Hidden System Files)
This is the method I recommend to anyone who wants a truly clean uninstall and needs to know how to completely remove an application on Mac.
It goes beyond the simple drag to Trash approach and finds every hidden file connected to the app you want to remove.
When I first learned about this method, it changed the way I manage apps on my Mac. I realized that for years I had been leaving behind gigabytes of hidden system files without knowing it. This technique uses Finder’s built in search filters to uncover all those files and let you delete everything at once.
The best part is you do not need to download any third party software. Everything happens right inside Finder using tools Apple already provides. It takes a few extra steps compared to the basic method but the results are worth it.
Let me walk you through the entire process exactly as I do it on my own Mac.
Step 1 Search for the App Name in Finder
Start by opening Finder on your Mac. You can click the Finder icon in your Dock or press Command + N on your keyboard to open a new Finder window.
Now click on the search bar in the top right corner of the Finder window. Type the exact name of the app you want to remove. For example if you want to uninstall VLC, type “VLC” in the search bar.
Make sure you select This Mac from the options that appear below the search bar. This tells Finder to search your entire system and not just the current folder. This step is important because app files can be stored in many different locations across your Mac.
You will immediately see some results appear. But these are only the surface files. The real cleanup begins in the next step.
Step 2 Turn On System Files in Search Results
This is the step most people do not know about. Right below the search bar you will see a small plus (+) button. Click it to add a search filter.
A dropdown menu will appear. Click on the first dropdown that says Kind and select Other from the list. A new window will pop up with many filter options. Type “System files” in the small search box inside that window. When you see System files appear in the list, check the box next to it and click OK.
Now you will notice another dropdown that says aren’t included. Click on it and change it to are included. This is the key step that reveals all the hidden system files, cached data, preferences, and support documents connected to the app.
Your search results will now show many more files than before. These are the leftover files that stay behind when you use the simple drag to Trash method.
Step 3 Select All Files and Move to Trash
Now press Command + A to select all the files in your search results. Take a quick look through the list to make sure everything belongs to the app you are removing. Look for the app name in the file names and file paths to confirm.
Once you are confident, drag all the selected files to the Trash. Your Mac may ask for your administrator password. Enter it to authorize the deletion.
After everything moves to Trash, right click the Trash icon in your Dock and select Empty Trash to permanently remove the files from your Mac.
File Can’t Be Moved It’s in Use Quick Fix
Sometimes your Mac will show an error saying the file cannot be moved because it is currently in use. This happens when the app is still running in the background.
Open Activity Monitor from your Applications folder. Search for the app name in the process list. Select it and click the X button at the top to force quit the process. Now go back and try moving the files to Trash again. This fixes the issue every single time for me.
A Trick Most People Don’t Know Remove Apps from Storage Settings
I stumbled upon this method completely by accident. I was checking my Mac’s storage one day to figure out why my disk was almost full. While exploring the settings, I realized you can actually delete apps directly from the Storage section without even opening Finder.
Most Mac guides never mention this approach. I have read dozens of articles about removing apps from Mac and almost none of them talk about this hidden option. But it exists, it works, and it is built right into macOS.
What makes this method special is that it shows you exactly how much space each app is using. So instead of guessing which apps to remove, you can see the numbers right in front of you and make smarter decisions about what to keep and what to delete.
I find this method especially useful when my Mac is running low on storage and I need to quickly free up space. It saves me from opening Finder, scrolling through a long list of apps, and manually checking each app’s size. Everything is laid out in one clean view.
Step by Step Storage Settings Method
Here is the exact process I follow every time I use this method on my Mac.
- Click the Apple logo in the top left corner of your screen. This opens the main Apple menu.
- Select About This Mac from the dropdown menu.
- In the window that appears, click on More Info. This will open the System Settings window.
- Scroll down and click on Storage in the sidebar. You can also click on Storage Settings if that option appears directly.
- Wait a moment while your Mac calculates how your storage is being used. You will see a colorful bar showing different categories like Apps, Documents, Photos, and System Data.
- Click on Applications in the list. Your Mac will show you every installed app along with its exact file size and the last date you opened it.
- Find the app you want to remove. Right click on it and select Delete. Your Mac will ask you to confirm. Click Delete again and enter your password if prompted.
The app is now removed from your Mac. The whole process is smooth and takes less than a minute.
Bonus See Which Apps Take Up the Most Space
This is the part I love most about this method. When you open the Applications list inside Storage Settings, your Mac sorts every app by size from largest to smallest.
This gives you an instant overview of which apps are eating up the most storage on your system. I was genuinely surprised the first time I checked. I found apps I had completely forgotten about sitting at the top of the list and taking up several gigabytes of space.
My advice is to look for apps you have not opened in months. If the Last Accessed date shows a time from six months ago or longer, chances are you do not need that app anymore.
I make it a habit to check this list once every couple of months. It helps me keep my Mac clean and running efficiently without any extra effort. Think of it as a quick health check for your storage that takes less than two minutes.
Best Free Uninstaller Apps for Mac (Skip the Manual Work)
Not everyone wants to manually search through Library folders and delete files one by one. I completely understand that. Sometimes you just want a tool that does the heavy lifting for you.
If you don’t want to manually delete files, you can use a Mac uninstaller tool that removes everything automatically.After testing many options, I narrowed it down to two tools that I genuinely trust and use on my own Mac.
One is completely free and the other is a paid option with extra features. Both do an excellent job at finding and removing all the hidden files that stay behind when you uninstall apps the regular way.
If you frequently install and remove software on your Mac, having one of these tools can save you a lot of time and keep your system clean without any manual effort.
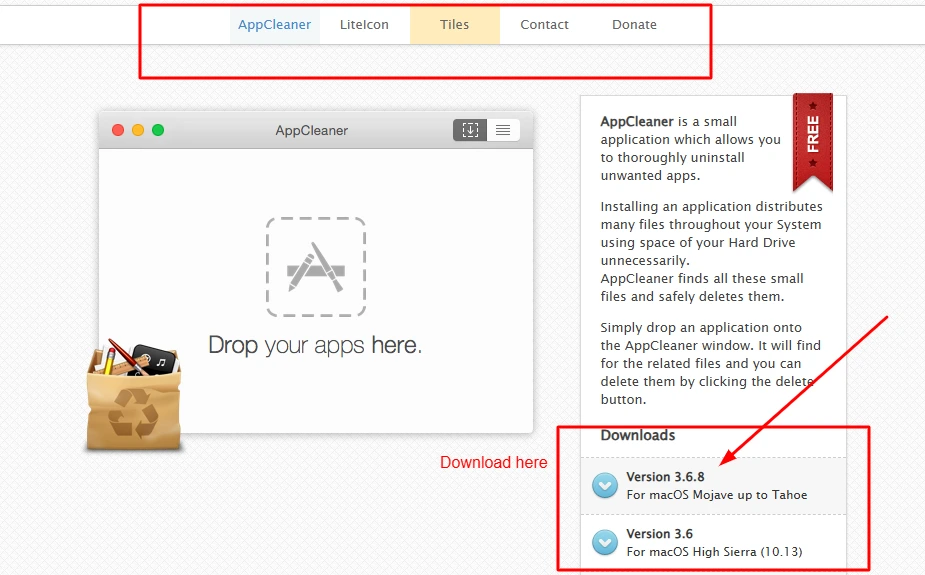
AppCleaner by FreeMacSoft (Free)
AppCleaner is my go to recommendation for anyone who wants a simple and free uninstaller app for Mac. It is lightweight, easy to use, and does exactly what it promises.
Here is how I use it. I open AppCleaner and then drag any app from my Applications folder into the AppCleaner window. Within seconds, it scans my entire system and shows me every file connected to that app. This includes preference files, caches, support documents, and even login items.
All I have to do is click Remove and everything gets deleted at once. No manual searching. No digging through hidden folders.
One thing I want to mention is that AppCleaner sometimes shows a “protected app” error if the app you are trying to remove is currently running. To fix this, go into AppCleaner’s Preferences and uncheck the option that says Protect running apps. Then quit the app you want to remove and try again.
You can download AppCleaner from the official FreeMacSoft website. It is completely free with no hidden costs.
CleanMyMac X by MacPaw (Paid)
CleanMyMac X is a more advanced option for users who want a complete Mac maintenance tool. It goes beyond just uninstalling apps.
The Uninstaller module inside CleanMyMac X works similarly to AppCleaner. You select the app you want to remove and it finds all the associated files automatically. But CleanMyMac X also offers features like system junk cleanup, performance optimization, and a quick security scan.
I have used CleanMyMac X on my MacBook Pro and the interface is polished and easy to navigate. It clearly shows the total size of files it will remove before you confirm the deletion.
The downside is the price. CleanMyMac X requires a paid subscription. If all you need is app removal, the free AppCleaner handles that job perfectly. But if you want an all in one Mac maintenance tool, CleanMyMac X delivers solid value.
Quick Comparison Which One Should You Use
Here is a simple breakdown to help you decide.
Choose AppCleaner if you only need to uninstall apps and remove leftover files. It is free, fast, and gets the job done without any extra features you do not need.
Choose CleanMyMac X if you want a full toolkit that handles app removal along with storage optimization and system cleanup. It is worth the investment if you use your Mac heavily every day.
For most people, I recommend starting with AppCleaner. It covers the most important task, which is completely removing unwanted apps from your Mac without leaving any junk behind.
Can You Remove Pre installed Apple Apps? Here’s What You Should Know
This is one of the most common questions I see from Mac users. When you buy a new Mac, it comes with dozens of Apple apps already installed. Some of them you may never use. So naturally you wonder if you can just delete them and free up that space.
The answer is yes and no. It depends on which app you are trying to remove.
Apple has changed its approach over the years. In older versions of macOS, most built in apps were locked and impossible to delete. But starting with macOS Monterey and continuing through Sonoma and Sequoia, Apple now allows you to remove many of the default apps that come with your Mac.
However, certain core system apps are still protected. Apple does not let you remove them because macOS depends on them to function properly. Trying to force delete these apps can cause serious problems with your system.
Let me break down exactly which apps you can safely remove and which ones you should leave alone.
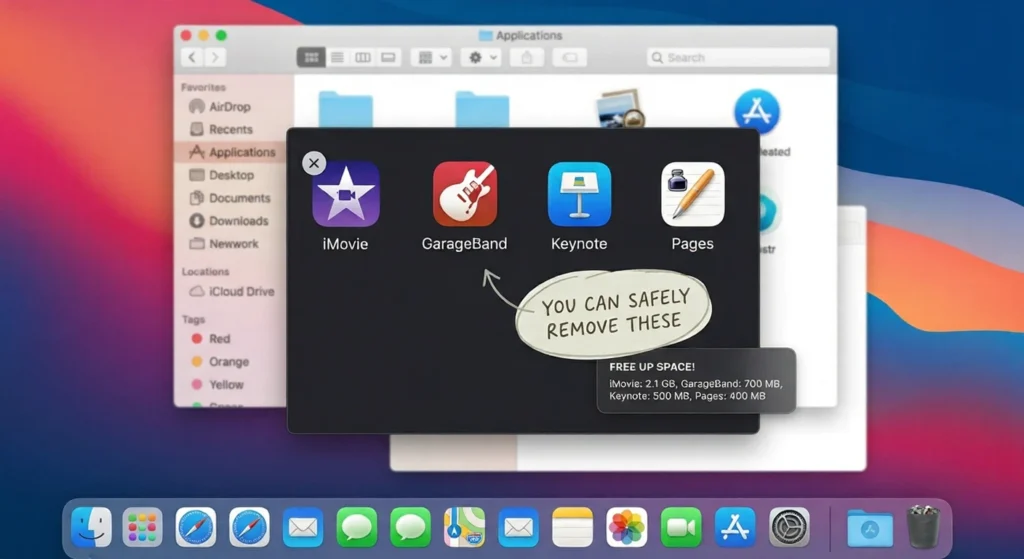
Built in Apps You Can Safely Delete
Apple now lets you delete several of the apps that come pre-installed on your Mac. These are apps that are not essential to how macOS works. Removing them will not harm your system in any way.
Here are some of the built in apps you can safely uninstall.
GarageBand takes up a significant amount of space. If you do not create music, you can remove it without any issues.
iMovie is another large app. Many users prefer other video editing software and never open iMovie at all.
Keynote, Pages, and Numbers are Apple’s productivity apps. If you use Microsoft Office or Google Docs instead, you can delete these.
Apple Books, Stocks, News, and Podcasts are apps that some users simply never touch. Removing them frees up space and declutters your Applications folder.
You can delete these apps using Launchpad or by dragging them to the Trash from Finder. Your Mac will not stop you.
System Apps You Should Never Remove
Some Apple apps are deeply connected to macOS itself. Deleting them could break important features or even make your Mac unstable.
Here are the apps you should never try to remove.
Finder is the heart of macOS. You literally cannot use your Mac without it.
Safari is tied to many system functions even if you use a different browser.
App Store is required for system updates and app installations.
System Preferences (System Settings) controls your entire Mac configuration.
Messages and FaceTime are linked to your Apple ID and iCloud services.
If you try to delete these apps, macOS will block you. The system protects them for a reason. I recommend leaving them alone even if you never use them.
How to Reinstall Apple Apps If You Change Your Mind
Here is the good news. If you delete an Apple app and later realize you need it, you can easily get it back.
Open the App Store on your Mac. Use the search bar to find the app you deleted. For example, search for “GarageBand” or “iMovie.”
Click the Download button and the app will reinstall for free. Apple does not charge you for any of the default apps that came with your Mac.
I have done this myself a few times. There is no penalty for removing and reinstalling Apple apps whenever you need them.
How to Uninstall Mac Apps Using Terminal (For Advanced Users)
Terminal is the command line tool built into every Mac. It lets you control your system using text commands instead of clicking buttons and dragging icons. For advanced users, Terminal offers a fast and powerful way to uninstall apps on Mac without opening Finder or Launchpad.
I want to be honest here. This method is not for everyone. If you are comfortable with the other methods I explained earlier, you probably do not need to use Terminal at all. But if you are a developer, a tech enthusiast, or someone who enjoys working with command line tools, this approach can save you time.
I personally use Terminal when I need to remove apps quickly while already working in a command line environment. It is also useful when Finder is acting slow or when I am managing my Mac remotely through SSH.
Before you try this method, please read the instructions carefully. Terminal commands execute immediately and do not ask for confirmation like Finder does. One wrong command can delete important files. Always double check the app name before pressing Enter.
Basic Terminal Uninstall Command
Here is the basic command I use to remove an app through Terminal.
Open Terminal from your Applications folder. You can also find it by searching “Terminal” in Spotlight.
Type the following command and replace “AppName” with the actual name of the app you want to remove.
textsudo rm -rf /Applications/AppName.app
Press Enter and type your administrator password when prompted. Your password will not appear on the screen as you type it. That is normal.
Once you press Enter again, Terminal will delete the app immediately. There is no confirmation message and no Trash step. The app is simply gone.
For example, if I want to remove an app called TextMate, my command would look like this.
sudo rm -rf /Applications/TextMate.app
If you installed an app through Homebrew, the process is even simpler. Just type the following command.
brew uninstall appname
Replace “appname” with the actual package name. Homebrew will remove the app and most of its associated files automatically. I use Homebrew for many of my development tools, and this command makes cleanup quick and easy.
When to Use Terminal Instead of Other Methods
Terminal is not the first method I recommend for most users. But there are specific situations where it becomes the best choice.
Finder is unresponsive. Sometimes Finder freezes or slows down. Terminal still works even when the graphical interface does not.
You are working remotely. If you connect to your Mac through SSH from another device, Terminal is your only option for managing files and apps.
You want faster bulk removal. Experienced users can script Terminal commands to remove multiple apps in one go instead of dragging each one to Trash individually.
The app refuses to delete normally. Some stubborn apps will not move to Trash through Finder. Terminal can force delete them when other methods fail.
My advice is to use Terminal only if you feel confident with command line tools. For everyday app removal, the Finder or Launchpad methods are safer and just as effective.
Where to Find and Delete Leftover Files Manually
If you want complete control over what stays on your Mac, you can manually hunt down leftover files after uninstalling an app. This method takes more time but gives you total visibility into exactly what you are removing.
I use this approach when I want to make absolutely sure an app is completely gone from my system. Third party tools are convenient, but sometimes I prefer to see the files myself and decide what to delete. It helps me understand how apps store data on my Mac.
The key is knowing where to look. macOS stores app related files in several hidden Library folders. These folders are not visible by default because Apple wants to protect users from accidentally deleting important system files. But once you know how to access them, the cleanup process becomes straightforward.
Here is how I navigate to these folders. Open Finder and press Command + Shift + G on your keyboard. A small window will appear asking you to enter a folder path. Type the path exactly as I show below and press Enter.
Let me walk you through each folder where leftover files typically hide.
~/Library/Application Support
This folder contains data that apps need to run properly. Things like saved settings, user data, templates, and plugins all live here.
To access it, press Command + Shift + G and type this path.
~/Library/Application Support
Look for folders with the name of the app you deleted. For example, if you removed Spotify, search for a folder named Spotify. Select it and move it to Trash.
Some apps store large amounts of data here. I once found over 2GB of cached files from a video editing app I had uninstalled months earlier.
~/Library/Caches
Cache files help apps load faster by storing temporary data. After you uninstall an app, these cache files serve no purpose and just waste storage space.
Navigate to this folder by typing the following path.
~/Library/Caches
Search for folders matching the app name or the developer name. Delete any that belong to apps you have already removed.
Clearing old cache files is completely safe. It will not affect any apps you are still using.
~/Library/Preferences
Preference files store your personal settings for each app. They are small files that usually end with .plist as the file extension.
Access this folder by entering the path below.
~/Library/Preferences
Look for files with names like com.developername.appname.plist. These files are tiny but can pile up over years of installing and uninstalling apps. Deleting them removes the last traces of an uninstalled app from your system.
~/Library/LaunchAgents and Login Items
Some apps install background processes that run automatically when you start your Mac. These are called LaunchAgents. Even after you delete the main app, these processes can keep running silently.
Check this folder by typing the path.
~/Library/LaunchAgents
Delete any files related to apps you have already removed.
You should also open System Settings and go to General then Login Items. Remove any entries for apps that no longer exist on your Mac. This stops them from trying to launch at startup.
What to Do When an App on Mac Refuses to Delete
Few things are more frustrating than trying to delete an app only to see an error message pop up saying the file cannot be moved. I have experienced this many times over the years, and I know how annoying it can be.
The good news is that stubborn apps can almost always be removed. You just need to understand why macOS is blocking the deletion and use the right approach to work around it.
There are three main reasons an app might refuse to delete. Either the app is still running in the background, the system is protecting certain files during normal operation, or macOS itself is blocking the deletion because the app is part of the system. Each situation requires a different solution.
Let me show you exactly how I handle each of these scenarios on my Mac.
Force Quit the App Using Activity Monitor
The most common reason an app will not delete is because it is still running. Even if you closed the app window, some apps keep running in the background. Your Mac sees the app as active and refuses to move it to Trash.
Here is how I fix this.
Open Activity Monitor from your Applications folder. You can also search for it using Spotlight by pressing Command + Space and typing Activity Monitor.
Once it opens, use the search bar in the top right corner to find the name of the app you want to delete.
Select the process from the list. Then click the X button in the toolbar at the top left of the window.
A prompt will appear. Click Force Quit to stop the process immediately.
Now go back to Finder and try deleting the app again. In most cases, this solves the problem right away.
Restart Your Mac in Safe Mode and Try Again
Sometimes an app is deeply embedded into startup processes. Even after force quitting, your Mac might automatically restart the app or its background services. When this happens, Safe Mode is the answer.
Safe Mode starts your Mac with only essential system processes running. Third party apps and their background services stay inactive. This gives you a clean window to delete stubborn apps.
Here is how I restart in Safe Mode.
Shut down your Mac completely. Wait a few seconds, then press and hold the Power button until you see the startup options screen.
Select your startup disk and hold the Shift key while clicking Continue in Safe Mode.
Your Mac will boot into Safe Mode. Open Finder, navigate to the Applications folder, and delete the app.
After that, restart your Mac normally. The app should be gone.
The App Is Protected by SIP What That Means
Some apps cannot be deleted no matter what you try. When you see a message about permission or protection, the app is likely guarded by System Integrity Protection.
SIP is a security feature Apple introduced to prevent critical system files from being modified or deleted. It protects core macOS apps like Finder, Safari, and App Store.
I strongly advise against disabling SIP. Removing system protected apps can make your Mac unstable or even unbootable.
If an app is protected by SIP, it is there for a reason. Leave it alone and focus on removing apps that macOS allows you to delete.
Mistakes That Can Mess Up Your Mac When Removing Apps
Removing apps from your Mac seems like a simple task. But over the years I have learned that small mistakes during the uninstall process can lead to bigger problems. Some mistakes waste storage space while others can actually affect how your Mac runs.
I want to share the most common errors I have seen and made myself. Knowing these mistakes upfront will help you avoid frustration and keep your Mac running smoothly.
None of these mistakes are catastrophic. But preventing them is much easier than fixing them later. Take a few extra seconds during the uninstall process and you will save yourself time and headaches down the road.
Deleting the Wrong System File by Accident
This is the mistake that worries me most. When you use the Finder search method to find hidden system files, the results can include files from multiple apps. If you select everything without checking carefully, you might delete files that belong to apps you still use.
I made this mistake once when removing an app whose name was similar to another app I had installed. I deleted all the search results without looking closely. The next day I realized that a completely different app stopped working properly because I had removed some of its support files.
Here is how I avoid this now. Before dragging files to Trash, I look at the file path for each item. I make sure the path includes the name of the app I am actually removing. If something looks unfamiliar or unrelated, I leave it alone.
Taking an extra 30 seconds to review the file list can save you from accidentally breaking an app you need.
Forgetting to Empty the Trash
This sounds almost too simple to mention. But you would be surprised how many people drag apps to Trash and assume the job is done. The truth is that files in your Trash still take up storage space on your Mac.
I have seen Macs with 10GB or more sitting in the Trash folder. All that space is technically available but locked up in deleted files that were never permanently removed.
After you uninstall an app, right click the Trash icon in your Dock and select Empty Trash. Only then is the app truly gone and the storage space recovered.
I make it a habit to empty my Trash at least once a week. It keeps my Mac clean and ensures I am actually benefiting from the apps I remove.
Not Checking Login Items After Uninstalling
Some apps add themselves to your login items when you install them. This means they automatically launch every time you start your Mac. The problem is that uninstalling the app does not always remove these login entries.
What happens next is strange behavior. Your Mac tries to launch an app that no longer exists. This can slow down your startup and sometimes cause error messages.
After removing an app, I always check my login items. Open System Settings, go to General, and click on Login Items. Look for any entries related to the app you just deleted. If you find one, select it and remove it.
This small step keeps your Mac booting quickly and without errors.
Deleting an App You Might Need Later Without Backup
This has happened to me more than once. I deleted an app thinking I would never need it again. A few weeks later I realized I needed it for a specific task. For free apps this is not a big deal. You just download them again. But paid apps and apps with license keys are a different story.
Before you uninstall a paid app, make sure you have the license key saved somewhere safe. Check your email for the original purchase receipt or write down the key in a secure notes app.
For apps downloaded outside the App Store, consider keeping the original installer file in a backup folder. This way you can reinstall the app later without searching for it online.
A little preparation before deleting saves a lot of frustration if you change your mind later.
Frequently Asked Questions
How do I remove apps in Mac completely?
To completely uninstall an app on Mac, open Finder and search for the app name. Click the plus button, select System files from Other, change “aren’t included” to “are included,” then select all results and move them to Trash. This removes the app along with all hidden leftover files like caches and preferences.
Does deleting an app on Mac remove all its files?
No, deleting an app on Mac by dragging it to Trash only removes the main application file. Leftover files remain in Library folders including Application Support, Caches, and Preferences. You need to manually delete these files or use a third party uninstaller like AppCleaner to remove everything completely.
How do I delete apps on Mac that won’t delete?
If an app won’t delete, first force quit it using Activity Monitor. If it still refuses, restart your Mac in Safe Mode by holding the Power button and selecting Continue in Safe Mode while holding Shift. Then try deleting the app again from Finder.
Can I reinstall built in Apple apps after deleting them?
Yes, you can reinstall any built in Apple app you deleted. Open the App Store, search for the app name like GarageBand or iMovie, and click Download. All default Apple apps are available for free re-download at any time
What is the best free app uninstaller for Mac?
AppCleaner by FreeMacSoft is the best free uninstaller for Mac. It automatically finds all files associated with an app including preferences, caches, and support files. Simply drag any app into AppCleaner and it will show you everything connected to that app before removal.
Conclusion
Learning how to remove installed apps from Mac properly makes a real difference in keeping your system clean and running efficiently. I have walked you through every method from the quick 30 second Launchpad deletion to the thorough manual Library folder cleanup.
The key takeaway is simple. Dragging an app to Trash is not enough. Those hidden leftover files will keep piling up and wasting your storage space unless you take the extra steps to remove them completely.
Whether you choose the Finder search method with System files enabled, use a free tool like AppCleaner, or manually clean the Library folders, the goal remains the same. Remove installed apps from Mac completely so nothing gets left behind.
Deleting apps on Mac is not as simple as dragging them to Trash.
To truly free up space, you need to remove hidden files as well.
Use Finder search, uninstall tools, or manual cleanup to keep your Mac fast and clutter free.
Now you know exactly how to uninstall apps on Mac the right way.
⚠️ Disclaimer
The tools, apps, and screenshots mentioned in this article are based on my personal experience and testing on my own Mac device. I am not affiliated with AppCleaner, FreeMacSoft, CleanMyMac X, or MacPaw in any way.
All screenshots shared in this guide are for educational and informational purposes only to help readers understand the process better. I do not use any sponsored or paid internal linking for the screenshots or tool demonstrations.
Results may vary depending on your macOS version, system configuration, and usage.


