
Why You Might Want to Disable Realtek Audio on Windows 11
If you’re looking for how to disable Realtek audio Windows 11, you’ve landed in the right place. Most people assume disabling audio means something broke but that’s not always the case.
Sometimes you intentionally want to turn off the onboard Realtek chip because you’ve switched to a better external DAC, you’re resolving device conflicts, or you just want to clean up your audio setup.
This guide covers every method that actually works, from Device Manager to BIOS, so you can pick the one that fits your situation
Use Case #1: Switching to an External DAC or Sound Card
If you’ve invested in a USB DAC or an external sound card, you want Windows using that device not the onboard chip built into your motherboard.
Realtek is standard on most computers and fine for casual use, but if you’re an audiophile, music producer, or serious gamer, you’ve likely upgraded for a reason.
The problem is Windows sometimes still defaults back to Realtek even after you plug in your external device. Disabling Realtek forces Windows to commit to your external audio interface, so your investment actually gets used
Here’s the thing: when you plug in an external audio device, Windows sometimes still tries to use Realtek as the default. That defeats the purpose of spending money on premium equipment.
By disabling Realtek audio, you force Windows to use your external device for everything. This ensures your high quality audio interface actually gets used instead of sitting there while Windows defaults to the cheap onboard chip.
External audio devices usually sound cleaner and have fewer latency issues than onboard audio. If you’ve made that investment disabling Realtek makes sure you’re actually hearing the benefit.
Use Case #2: Resolving Audio Conflicts Between Multiple Devices
When you have multiple audio devices connected a USB headset, Bluetooth speaker, and onboard Realtek Windows can struggle to determine which one should be the default. Applications may route audio to the wrong device entirely.
You could be trying to record a Zoom call and find the audio going to your speakers instead of your headset.
Applications may route audio to the wrong device. You might be trying to record a voice call in Zoom but the audio goes to your speakers instead of your headset.
This happens because Realtek is often set as the system default, and some applications just use whatever Windows says is default instead of letting you choose.
By disabling Realtek audio, you remove it from the equation entirely. Your other devices work without interference, and applications route audio more predictably.
I’ve seen this problem especially with gaming. A gamer might have a USB gaming headset they want to use, but Realtek keeps sneaking in as the default for certain games. Disabling it solves the problem without touching any of the devices that actually work.
Use Case #3: Removing Bloatware and Reducing System Overhead
Realtek doesn’t just install a driver it bundles the Realtek Audio Manager, a background application that launches on every startup, sits in your system tray, and consumes memory and CPU even when you’re not actively using audio.
If you don’t use onboard audio and never plan to, that’s wasted system resources on every single boot. Disabling Realtek frees up RAM and CPU cycles that your system could use elsewhere. On older computers or machines with limited resources, eliminating unnecessary background processes can make a real difference in startup speed and responsiveness. Background applications like Realtek Audio Manager can even interfere with system tasks
if you’ve ever seen a message saying program is preventing Windows from shutting down a background audio service is one of the common culprits. The Realtek Audio Manager also triggers notification popups asking which audio device you just plugged in. If you’re running external audio exclusively, those interruptions are pure clutter. Disabling Realtek eliminates them entirely.
Common Misconception: Disabling Is Not the Same as Fixing
Before you disable anything, there’s an important distinction worth understanding. If you’re searching because your sound stopped working, disabling Realtek is probably the wrong move. Most audio failures cutting out, crackling, or complete silence can be fixed without touching the disable option at all.
Microsoft recommends running the built-in Windows Audio Troubleshooter as your first step, which automatically detects and repairs the most common driver issues on Windows 11.
You can find the official instructions for running it directly on the Microsoft Official Guide to Fix Sound Problems in Windows 11 Microsoft Windows support page for fixing sound problems
If the troubleshooter doesn’t resolve it, a clean Realtek driver reinstall usually will. Disabling is for when Realtek works fine but you simply no longer want to use it. If you disable a broken driver instead of fixing it first, you risk ending up with zero audio and a harder problem to reverse.
Many audio issues can be fixed without disabling anything. If your sound is cutting out, crackling, or completely gone, the real solution is usually to update your Realtek audio driver, run the Windows Audio Troubleshooter, or reinstall the driver. These fixes restore your audio to working condition.
Disabling Realtek is different. Disabling is for when Realtek works fine but you don’t want it anymore because you’ve switched to something else.
If your audio is actually broken, try fixing it first before you disable it. You might end up needing Realtek audio as a fallback if your external device fails or if you reconnect to a device that needs the onboard audio.
The distinction matters because if you disable Realtek when you actually just needed to fix it, you might create more problems than you solve.
You could end up with no audio at all and have to reverse the process. So ask yourself: is Realtek broken, or do I just prefer not to use it? That answer determines whether you should fix or disable.
Method 1: How to Disable Realtek Audio on Windows 11 via Device Manager (Easiest)
Device Manager is the simplest way to disable Realtek audio on Windows 11. You can do this in just a few clicks without uninstalling anything or touching your system files. This method works quickly and you can reverse it anytime if you change your mind.
I’ll show you exactly how to find Realtek in Device Manager and disable it safely.
Step-by-Step: How to Find and Disable Realtek in Device Manager
Here’s exactly how to do it:
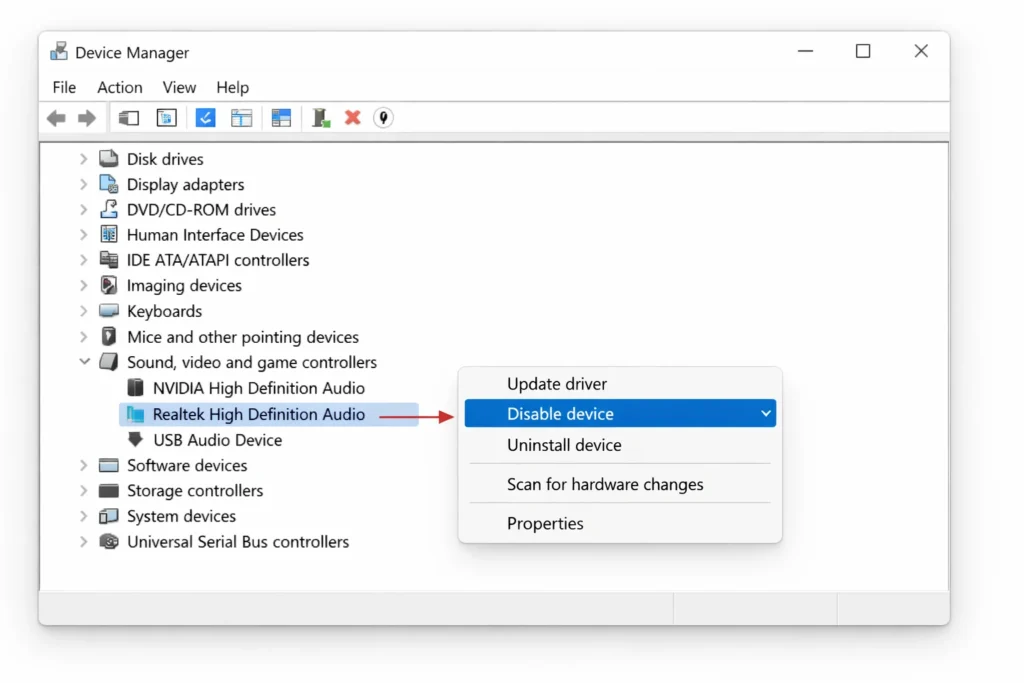
- Press Win + X and click Device Manager from the menu.
- Expand Sound, video and game controllers.
- Right-click Realtek High Definition Audio (or similar name).
- Click Disable device.
- Confirm when prompted.
Once Device Manager opens, look for a section called “Sound, video and game controllers.” Click the arrow next to it to expand that section. This is where Windows keeps all your audio devices listed. You should see “Realtek” or “Realtek High Definition Audio” or something similar in that list. The exact name depends on your motherboard and driver version.
Here’s the critical step: right-click directly on the Realtek audio device. A menu appears with several options. Look for the option that says “Disable device” and click it. That’s it. Windows will disable the Realtek audio device immediately.
You’ll notice a small down arrow or X appears next to Realtek in the Device Manager list. This symbol shows that the device is now disabled. Your speakers connected to the Realtek jack won’t work anymore, but the system remains completely stable.
The entire process takes less than two minutes. No restart required at this point, though you might want to restart later for other reasons.
What Happens After You Disable Realtek?
Once Realtek is disabled, your motherboard’s audio jacks go silent. USB headsets, Bluetooth speakers, and other external devices continue working normally Windows simply stops routing audio through the onboard chip. Worth noting:
Windows sometimes re enables Realtek automatically after a restart because its driver detection system treats a disabled audio device as something broken.
If that happens, just disable it again or use the BIOS method for a permanent fix If you have speakers or headphones plugged into your motherboard’s audio jacks, they’ll go silent. Windows stops routing any sound to those ports.
Here’s something important to know: Windows sometimes tries to re-enable Realtek automatically when you restart your computer. This happens because Windows has a built-in driver detection system that treats disabled audio as something that needs fixing. If you restart and Realtek comes back on, you’ll need to disable it again using the same steps.
If you have other audio devices plugged in like a USB headset or Bluetooth speaker, those continue to work normally. Windows just stops using Realtek as an option. This is actually helpful because it cleans up your audio device list and prevents Windows from trying to route sound to the disabled onboard audio by accident.
You won’t experience any system errors or crashes from disabling audio hardware. Windows doesn’t depend on Realtek for anything critical. Your computer runs exactly the same as before, just without onboard audio functionality.
Important: Check the “Attempt to Remove Driver” Box
There’s an important difference between disabling a device and actually removing its driver. When you use the basic Disable option, the driver files stay on your system which is why Windows can re enable Realtek after a restart.
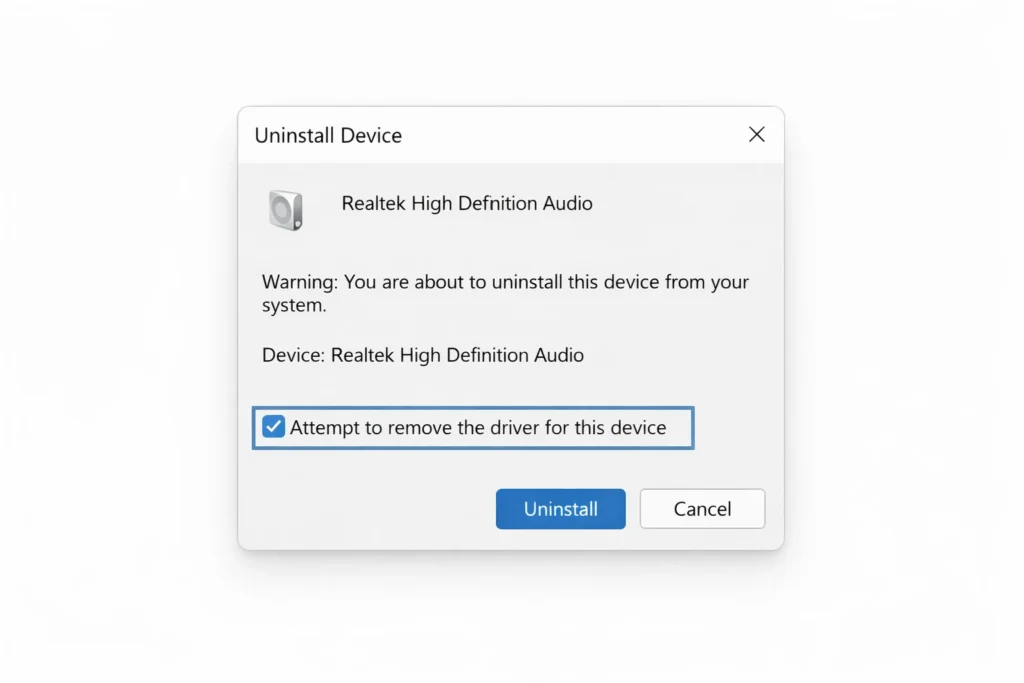
If you want more permanence, right click Realtek and choose Uninstall device instead. Check the box that says Attempt to remove the driver for this device before confirming. This deletes the actual driver files, making it harder for Windows to automatically reinstall
When you disable Realtek through Device Manager using the simple method I described, you’re only hiding the device. The driver files remain installed on your system.
Windows still has the Realtek driver sitting there, which is why it can re enable the device after you restart.
If you want total audio shutdown, locate Windows Audio and Windows Audio Endpoint Builder in the Services list. Stop both services and set their Startup type to Disabled. Every application loses sound immediately. In most cases, stopping only the Realtek Audio Universal Service is enough leave the core Windows Audio services running to keep your other devices functional
A window pops up asking if you want to check the box that says “Attempt to remove the driver for this device.” This checkbox is the key difference.
Checking that box tells Windows to delete the actual driver files, not just hide the device. This is more thorough, but it also means Windows can’t automatically reinstall it as easily.
If you’re planning to permanently disable Realtek, checking this box gives you better results.
For most people doing a simple disable, the basic “disable” option works fine. But if you’ve had problems with Windows re enabling Realtek after restarts, checking the driver removal box is worth trying.
Is Device Manager Disable Permanent?
Device Manager disabling is stable for most users but not guaranteed permanent. Windows 11’s automatic driver detection can re-enable Realtek after major updates or restarts.
Some systems keep it disabled indefinitely others don’t. If you need something that absolutely won’t reactivate itself, BIOS disabling is your only truly permanent option.
For everyday use cases like switching to a USB audio device, Device Manager is reliable enough.
When you disable Realtek through Device Manager, the setting stays disabled until you manually change it back or until Windows decides to re-enable it on its own.
Some computers keep Realtek disabled indefinitely after you do this. Others might re-enable it after a major Windows update or after you restart your system several times.
This happens because Windows 11 includes an automatic driver detection feature. If Windows detects that audio hardware is missing or disabled, it sometimes tries to fix that automatically.
It’s the same reason Windows automatically reinstalls drivers you’ve uninstalled. Your computer is trying to be helpful, but it can be annoying if you actually want Realtek disabled.
If you need something that absolutely will not re enable itself no matter what, the Device Manager method isn’t your most permanent option.
That would be disabling onboard audio through your BIOS settings, which survives Windows updates and prevents Windows from ever re enabling it because the hardware is turned off at the firmware level.
But for most situations where you’ve switched to a USB audio device or external sound card, the Device Manager disable method works great. It’s fast, it’s reversible, and unless Windows decides to reinstall the driver, your Realtek audio stays disabled.
Method 2:Uninstall Realtek Audio Driver Completely (More Thorough)
Uninstalling the Realtek audio driver removes the software from your system entirely, not just disabling the device. Once uninstalled, there are no driver files sitting in the background waiting to reactivate. You have two options for doing this Control Panel or Device Manager
Once the driver files are gone from your computer, Windows can’t automatically reactivate them as easily as it can with a disabled device.
You have two ways to uninstall the Realtek audio driver. I’ll walk you through both options so you can choose whichever feels more comfortable.
Option A: Uninstall via Control Panel (Programs and Features)
Open Control Panel → Programs and Features. 2. Scroll the list and find Realtek Audio Driver or Realtek HD Audio Manager (the name may vary slightly by version). 3. Click it, then click Uninstall at the top. 4. Confirm the uninstall and restart your computer when prompted.
This method is clean and doesn’t require navigating technical system tools. Recommended if you’ve never removed drivers before
Open the Windows search bar and type “Control Panel.” Click to open it. Once you’re in Control Panel, look for a section called “Programs” or “Programs and Features.” Click on “Programs and Features” to see a list of all installed software on your computer.
Scroll through the list until you find Realtek Audio Driver or Realtek HD Audio Manager. It might have a slightly different name depending on your driver version,
but it will definitely say Realtek. Click on it to select it, then click the “Uninstall” button that appears above the list.
A window pops up asking you to confirm the uninstallation. Click “Yes” to proceed. Windows removes the Realtek audio driver from your system. When the uninstallation finishes, you’ll see a message asking if you want to restart your computer.
You can choose to restart now or restart later, but you should restart fairly soon to complete the process.
This method works cleanly and doesn’t require you to dig into technical system tools. It’s the approach I recommend if you’ve never uninstalled drivers before.
Option B: Uninstall via Device Manager (More Complete)
Open Device Manager → Sound, video and game controllers. 2. Right-click Realtek and select Uninstall device. 3. In the dialog that appears, check Attempt to remove the driver for this device this is the key step. Without it, Windows keeps the driver files. 4. Click Uninstall and restart your computer.
This method is more thorough than Control Panel and leaves fewer leftover files This method is more thorough because it includes an option to specifically remove the driver files, not just hide the device.
Open Device Manager the same way as before. Press Windows key plus X and click Device Manager, or search for it in the Windows search bar. Navigate to “Sound, video and game controllers” and expand that section. Right-click on the Realtek audio device and select “Uninstall device.”
A dialog box appears with a checkbox that says “Attempt to remove the driver for this device.” This checkbox is crucial. If you leave it unchecked, Windows just hides the device but keeps the driver files. If you check the box, Windows actually deletes the driver files from your computer.
Check that box, then click “Uninstall.” Windows removes both the device and its driver software. When the process completes, restart your computer to finish the uninstallation.
The Device Manager method is more aggressive and more thorough than Control Panel. The driver removal checkbox ensures Windows doesn’t have the old Realtek files sitting around. This is worth doing if you’ve had problems with the driver reinstalling itself.
What to Expect: Windows May Reinstall Realtek Automatically
One thing to be aware of: Windows 11 may automatically reinstall the Realtek driver after you restart. This is completely normal Windows scans hardware on boot and installs drivers for any device it detects without one. For onboard audio specifically, it usually has the driver pre-cached in its own library.
If Realtek reappears after your restart, that doesn’t mean you did something wrong. Windows is just doing what it was designed to do. Occasionally this reinstallation process triggers broader Windows errors if you run into something like the 0x80004005 error on Windows 11 during driver changes, that guide covers the most reliable fixes.
The next section below covers exactly how to stop Realtek from reinstalling itself.
This happens because Windows has a built-in automatic driver detection system. When Windows boots up and detects that audio hardware is missing a driver, it often searches its driver library and automatically installs the correct driver without asking you. For onboard audio like Realtek, Windows usually has the driver already built into its system files.
You might restart your computer after uninstalling Realtek, and then discover that the Realtek audio driver is back. This is normal Windows behavior, not a sign that you did something wrong. Your computer is trying to be helpful by restoring drivers it thinks you need.
If this happens to you, don’t panic. You have options to prevent Windows from reinstalling the driver automatically. The next section about preventing Windows re-enabling covers solutions for this exact problem. Some users need to use a more permanent method like BIOS disabling if they want Realtek to stay removed for good.
Method 3: Disable Realtek Audio Windows 11 via Sound Settings (Quick Workaround)
If you don’t want to uninstall or disable drivers, there’s a simpler approach using Windows 11 Sound Settings. You can set a different audio device as your default and essentially push Realtek out of the way without removing anything from your system. This method is quick, doesn’t require a restart, and you can undo it instantly if you change your mind.
This is perfect if you just want Realtek to stop being your primary audio device but you want to keep the driver installed in case you need it later.
Step-by-Step: Set a Different Default Audio Device
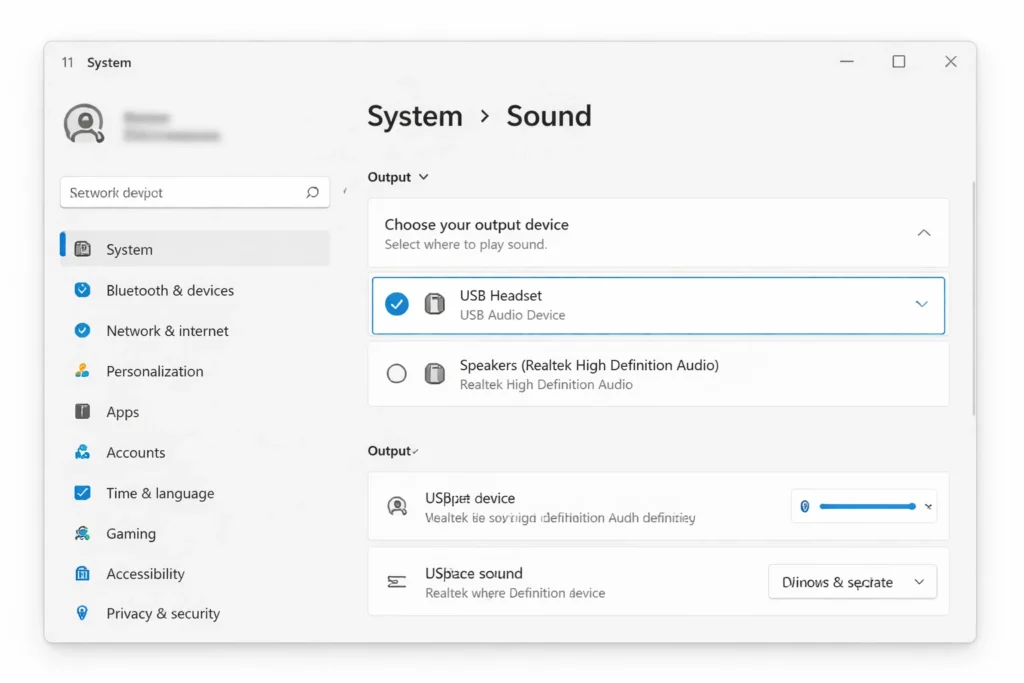
Press Win + I to open Settings. 2. Go to System → Sound. 3. Scroll to Volume and device preferences or Advanced. 4. Find your external device in the output list and click it to set it as default.
Windows instantly switches to your chosen device. No restart needed. Realtek remains installed but inactive as long as your preferred device stays selected
Once you’re in the Sound settings, scroll down until you see a section called “Volume and device preferences” or “Advanced.” Click on that to expand it. You’ll see a list of all your audio output devices. This list shows every audio device connected to your computer, including Realtek.
Look for your external device or the audio device you want to use instead. It might be a USB headset, Bluetooth speaker, external DAC, or anything else you’ve plugged in. Click on that device to select it as your default. Windows immediately switches to using that device for system sounds and most applications.
Once you set a different default device, Realtek stops being the primary audio output. Applications no longer automatically route sound to your onboard audio. Your chosen device becomes the go-to option for everything.
The entire process takes less than a minute. No restart needed. No driver changes. Just a simple settings switch that takes effect immediately.
Hide Realtek from the Available Devices List (Optional)
In the same Sound settings window, right-click Realtek in the device list and look for Hide or Don’t show this device. This removes it from your visible audio options without disabling or uninstalling anything. The driver stays intact Realtek just disappears from your menus
Note: this option isn’t available on all Windows 11 builds. If you don’t see it, that’s fine setting a different default device accomplishes the same practical result.
In the same Sound settings window, look for an option that says “Advanced” or “App volume and device preferences.” Depending on your Windows 11 version, this location might vary slightly. Click on Advanced options. You might see checkboxes or toggles next to each device.
Some versions of Windows 11 let you right-click on Realtek in the device list and select “Hide” or “Don’t show this device.” This removes Realtek from your visible audio device list without actually disabling or uninstalling it. The driver stays installed, but Realtek just doesn’t show up in your menus anymore.
Keep in mind that this hiding feature isn’t available on all Windows 11 versions. If you don’t see the option, that’s fine. Your default device being set to something other than Realtek accomplishes the same goal.
App-Specific Audio Routing (Advanced)
Not many people use this feature, but you can route audio from specific apps to different devices independently. Open Sound Settings → App volume and device preferences and you’ll see a list of installed apps.
Set Zoom to use your USB headset set your game to use your external DAC and leave everything else on your main speakers all at once. Each app holds its own preference separately from the global default
Open Sound settings again and look for “App volume and device preferences.” This feature lets you pick which audio output each installed app uses. Open the list and search for an app like Zoom, Microsoft Teams, Discord, or any game you use. Click on the app and select your preferred audio device for just that application.
For example, you could set Zoom to always use your USB headset while your main system sounds still go to your speakers. You could set gaming applications to use your external DAC while other software uses a different device. Each app can have its own audio routing preference.
This approach means Realtek stays installed and working, but specific apps never use it because you’ve told those apps to prefer something else. It’s the most flexible method if you want control without fully disabling anything.
When to Use This Method vs. Complete Disable
Use the Sound Settings method when you want to move away from Realtek without touching drivers. It’s ideal if you’re testing a new audio device and might switch back, or if you simply want Realtek out of the rotation without any risk.
The tradeoff: the Realtek driver still loads at startup and the Audio Manager still runs in the background. If reducing system resources matters to you, Device Manager disable or driver uninstall are the better paths.
Use this method if you’re trying a new audio device but might go back to onboard audio later. Use it if you just want Realtek out of the way but don’t mind the driver sitting there.
This is not the best choice if you want to free up system resources or prevent Realtek Audio Manager from running at startup. The driver still loads when your computer boots up even though you’re not using it. The application still consumes memory.
If you permanently don’t want Realtek anymore and you want to reclaim system resources, the Device Manager disable or driver uninstall methods are better choices. Those actually stop Realtek from running in the background.
But if you want the fastest, safest, most reversible option, Sound Settings is perfect. You can switch back to Realtek in ten seconds if you need to. There’s no risk of breaking anything. No restart required. No driver complications. Just change your default device and you’re done.
Method 4: Stop Realtek Audio Services via Services.msc (System-Level)”
This method goes deeper than Device Manager instead of disabling the device, you stop the background services that power Realtek entirely.
Services are processes that run automatically when Windows starts. By setting Realtek’s service to Disabled, you prevent it from launching at boot without touching the driver files.
This is a system-level approach that requires a bit more technical understanding, but it gives you precise control over what’s running on your computer.
Think of services as the invisible workers running behind the scenes. Realtek has several services that start automatically when Windows boots.
By stopping these services and setting them to disabled, you prevent Realtek from functioning without removing any files from your system.
Step-by-Step: Access Services and Stop Realtek Audio Service
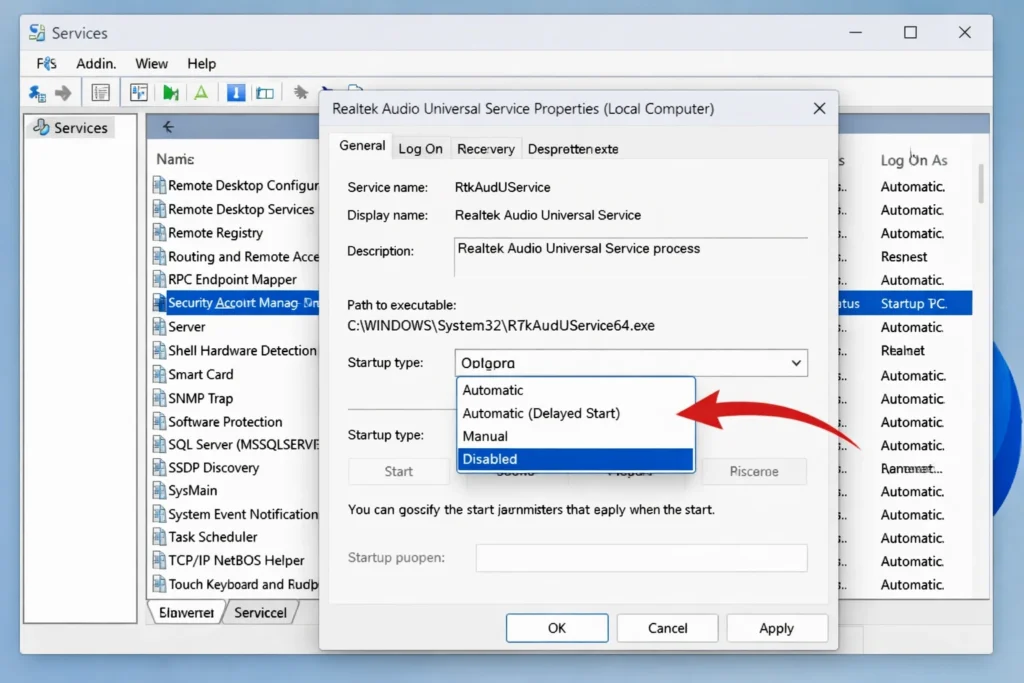
Press Win + R, type services.msc, and press Enter. 2. Scroll down to find Realtek Audio Universal Service. 3. Right-click it and select Stop to immediately halt the service. 4. Right-click again → Properties. 5. Change Startup type to Disabled. 6. Click Apply → OK.
Realtek Audio Manager will no longer launch at startup. Your other audio devices continue working normally.
The Services window opens, showing a list of all the background services running on your Windows 11 system.
The list is alphabetical, so scroll down until you find “Realtek Audio Universal Service.” This is the main service that powers Realtek audio on your system. Click on it to select it, then right-click to open the context menu. You’ll see several options including “Stop,” “Restart,” and “Properties.”
Click “Stop” to immediately halt the Realtek Audio service. The service stops running instantly without requiring a restart. You’ll notice the status column next to the service changes from “Running” to “Stopped.”
If you want to prevent the service from automatically restarting when you reboot your computer, right-click on the service again and select “Properties.” In the Properties window, find the “Startup type” dropdown menu. Change it from “Automatic” to “Disabled.” Click Apply and then OK. This ensures the service never starts again unless you manually change it back.
Stopping the Realtek Audio Universal Service disables the audio manager and prevents the Realtek application from launching. You lose the GUI configuration tool, but the underlying audio system still exists. This is a middle ground between just disabling the device and completely uninstalling the driver.
Additional: Stop Windows Audio and Windows Audio Endpoint Builder
If you want a more complete system-level disable, you can also stop the core Windows audio services that work alongside Realtek. These services are “Windows Audio” and “Windows Audio Endpoint Builder.”
Locate “Windows Audio” in the Services list. Right-click it and select “Stop.” Then find “Windows Audio Endpoint Builder” and stop that service as well. These two services work together to manage all audio on your system, including detecting and configuring audio devices.
Important note: if you stop the core Windows Audio service, your entire audio system goes silent. All applications lose sound. This is more aggressive than just stopping Realtek. Use this approach only if you want to disable audio completely, not just Realtek specifically.
In most cases, stopping just the Realtek Audio Universal Service is sufficient. The core Windows Audio services can remain running and support any other audio devices you have connected. This gives you the best balance of disabling Realtek while keeping your other audio options functional.
Set Service to “Disabled” to Prevent Auto-Start on Reboot
Simply stopping a service temporarily halts it, but Windows might restart it automatically when you reboot your computer. To make the change permanent, you need to set the startup type to “Disabled.”
Right-click on the Realtek Audio Universal Service and click “Properties.” The Properties window shows several tabs. Look at the “General” tab where you see “Startup type.” Click the dropdown menu that currently shows “Automatic” or “Manual.” Select “Disabled” from the list.
Click the “Apply” button to save your changes, then click “OK” to close the window. Windows now knows that you want this service disabled permanently. The next time you restart your computer, the Realtek Audio service does not automatically start.
If you ever want to re-enable the service, you simply come back to Services, right-click on Realtek Audio, select Properties, and change the startup type back to “Automatic.” Services respond immediately to startup type changes.
When to Use This Method
This services-level approach is best for users who understand Windows system architecture and feel comfortable working with Services. It’s ideal if you want to prevent the Realtek Audio Manager application from launching at startup without completely uninstalling the driver.
Use this method if you’re trying to reduce system resource consumption and clutter. The Realtek Audio Manager won’t run in the background anymore, freeing up memory and preventing notification popups. Your computer startup might be slightly faster without Realtek loading.
This is not the best choice if you want the absolute most permanent disable. BIOS disabling is more permanent because it disables hardware at the firmware level. But if you want system-level control that’s easy to reverse, Services.msc is excellent.
Advanced users often combine this method with others. You might disable Realtek in Device Manager and also set the service to disabled for a comprehensive approach. Just remember that stopping services requires understanding what each service does, so only disable services you recognize and understand.
Method 5: Permanently Disable Realtek Audio in BIOS (Most Permanent)
When you disable the onboard audio chip at the BIOS level, Windows cannot override that decision and no automatic driver reinstallation can bring it back.
This is the most permanent disable method available because you’re turning off the hardware itself at the firmware level, not just hiding it in Windows.
How to Access BIOS on Windows 11 (Dell, HP, Lenovo, ASUS, etc.)
Restart your computer. As soon as the screen powers on before Windows loads start pressing your BIOS key repeatedly. Common keys by manufacturer:
- Dell: F2
- HP / Lenovo: F10 or F2
- ASUS: Delete
- Acer: Delete or F2
- Others: Look for on-screen text like ‘Press [key] to enter Setup’
If you miss the window, Windows loads normally and you try again on the next restartThe key varies depending on your motherboard manufacturer, but the most common options are F2, F12, Delete, or Escape. Dell computers often use F2. HP and Lenovo frequently use F10 or F2. ASUS boards typically use Delete. Acer uses Delete or F2.
To enter BIOS, restart your computer. As soon as the computer powers on, before Windows loads, start pressing your specific key repeatedly. You’ll see a message on the startup screen like “Press F2 to enter Setup” or “Press Delete to enter BIOS.” That message tells you exactly which key to use.
If you press the wrong key, your computer simply continues booting into Windows and you can try again on the next restart. There’s no risk of damaging anything by pressing the wrong key during startup. Just restart and try the correct key next time.
Once you successfully enter BIOS, you’ll see a menu with various system settings. The interface looks different depending on your motherboard manufacturer, but the layout is usually similar. You navigate using arrow keys and confirm selections with Enter. Some BIOS versions use a mouse, but keyboard navigation is most common.
If you’re not sure which key to press, look up your specific computer model or motherboard brand plus “enter BIOS” online. You’ll find the exact key for your hardware in seconds.
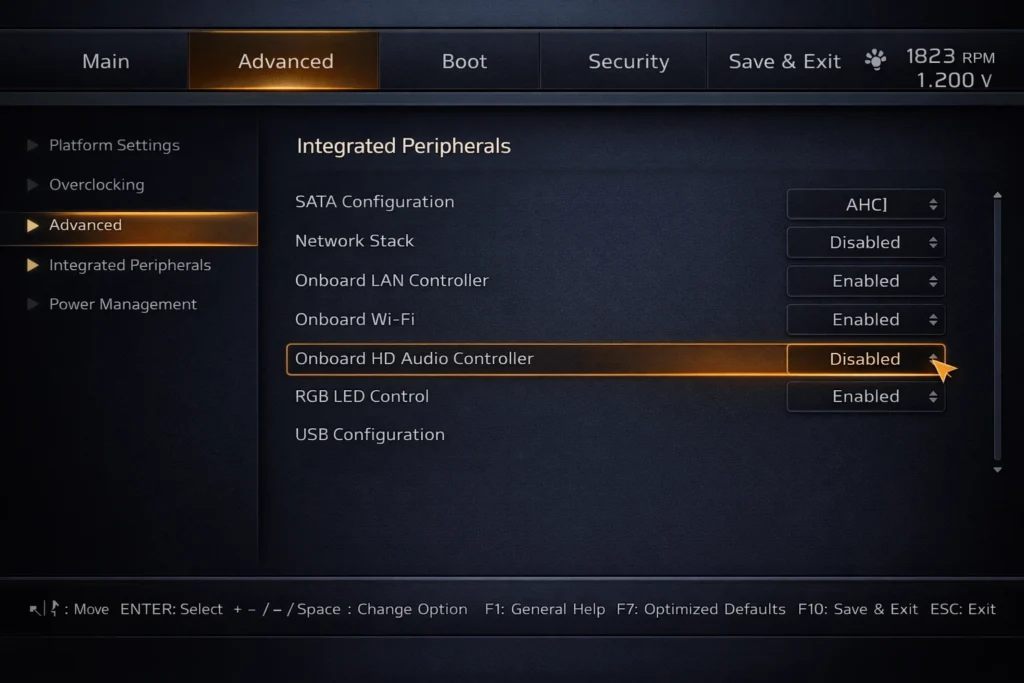
Finding the Onboard Audio Setting in BIOS
Once inside BIOS, navigate to Integrated Peripherals, Advanced, or Chipset the location varies by manufacturer.
Look for a setting labeled Onboard Audio, HD Audio, Integrated Audio, or Audio Device. It should show as Enabled. If you can’t locate it, consult your motherboard manual or search your specific model plus ‘disable onboard audio BIOS’ for exact navigation instructions.
This setting might be called “Onboard Audio,” “HD Audio,” “Audio Device,” “Integrated Audio,” or something similar. Different manufacturers use different names.
Look for a menu section called “Integrated Peripherals,” “Chipset,” “Advanced,” or “Devices.” Onboard audio settings are usually grouped with other integrated hardware components. Scroll through the menu options using your arrow keys until you find the audio-related setting.
The setting typically appears as a toggle with options like “Enabled” or “Disabled.” When you find it, note that “Enabled” means the onboard audio chip is currently active. This is where Realtek lives. You’ll change this to “Disabled” to turn off the hardware.
If you cannot find the audio setting after checking the obvious menu sections, try looking in “Advanced” or “System Configuration” sections. Some motherboards bury the audio settings deeper in submenus. If you’re still stuck, take a screenshot of your BIOS menu and search online for your specific motherboard model plus “disable audio BIOS.” That search usually returns clear instructions for your exact hardware.
Disable Onboard Audio and Save Changes
Select the Onboard Audio setting and change it to Disabled. Then navigate to Save and Exit (usually F10 or a labeled menu option), confirm the save, and let your computer restart.
Windows boots without ever detecting Realtek audio hardware no driver installs, no Audio Manager, no conflicts You’ll see options appear, usually “Enabled” and “Disabled.” Use the arrow keys to select “Disabled,” then press Enter to confirm your choice.
The setting now shows “Disabled.” The onboard audio chip is now turned off at the hardware level. Your Realtek audio is completely shut down at the firmware level.
Now you need to save your changes and exit BIOS. Look for a menu option that says “Save and Exit,” “Exit and Save,” or “Save Changes and Exit.” Press Enter on that option. Your computer asks for confirmation. Select “Yes” to confirm that you want to save the changes and reboot.
Your computer restarts. As it boots into Windows, the onboard audio chip never activates because BIOS has disabled it at the hardware level. Windows loads without any Realtek audio device available.
Advantages of BIOS Disable vs. Software Disable
BIOS disabling is the only method where Windows has zero ability to reverse your decision. The hardware is off before the OS even loads no Windows Update, no driver auto-detection, no reinstall can override a BIOS setting.
The Realtek Audio Manager never runs because there’s no device for it to manage. Startup is marginally faster and the unused chip draws no power. If other methods haven’t stuck, this one will
This method survives any future Windows update. It survives driver installation attempts. It survives uninstalls and reinstalls of anything. The hardware itself is off, so no software can turn it back on. You’ve essentially removed Realtek from your system’s hardware perspective.
The Realtek Audio Manager application never runs because there’s no Realtek device for Windows to manage. Your startup is slightly faster because BIOS doesn’t initialize audio hardware. Your system uses marginally less power because an unused chip is powered down.
If you’ve tried other methods and Windows keeps re-enabling Realtek after restarts or updates, BIOS disabling is the only solution that completely prevents that behavior. It’s the nuclear option for permanent disable.
Disadvantage: More Difficult to Reverse
The main downside is that reversal requires re-entering BIOS which can feel intimidating if you’re not comfortable there. In practice, it’s just one toggle and a save.
Find the same setting, switch it back to Enabled, save and exit. Realtek audio returns on the next startup as if nothing happened.
Only use this method if you’re confident you won’t need onboard audio again, or if you’re comfortable spending five minutes in BIOS to reverse it.
BIOS menus look technical and official, and the fear of accidentally changing the wrong setting keeps many people away. But honestly, changing one audio setting and saving is very safe.
You’re not touching critical system settings like boot order or power management. Just one simple toggle.
If you ever want to re-enable Realtek audio, the process is identical to disabling it. Find the setting, toggle it back to “Enabled,” save and exit. Your Realtek audio comes back immediately on the next restart. It’s fully reversible despite seeming permanent.
Use BIOS disabling only if you’re confident you won’t need Realtek audio again, or if you’re comfortable re-entering BIOS to reverse the change. For users who want an easier reversal option, the Device Manager or Sound Settings methods are better choices.
How to Prevent Windows from Re-Enabling Realtek (Critical Tip)
Disabling Realtek once isn’t always enough Windows has two automatic systems designed to restore drivers it thinks are missing, and they’ll work against you if you’re not aware of themYou disable the driver, restart your computer, and suddenly Realtek is back.
This isn’t a glitch. Windows is doing this intentionally because it has automatic systems designed to fix what it thinks are problems.
Understanding why this happens helps you prevent it from happening again.
Why Does Windows Keep Reinstalling Realtek?
Windows 11 runs two systems that cause this. First: automatic driver detection scans hardware at boot and installs drivers for any device missing one onboard audio included. Second:
Windows Update flags missing audio drivers as a problem and downloads replacements without asking. Both run silently in the background. The reinstall usually shows up after a major update or overnight scheduled maintenance
The first is automatic driver detection. When Windows boots up, it scans your hardware and checks if drivers are installed for every device it finds. If Windows detects audio hardware without a driver, it searches its built-in driver library and installs the correct driver automatically.
The second system is Windows Update. This includes a feature that automatically downloads and installs driver updates. Windows treats missing or disabled audio drivers as a critical issue because sound is important to most users. When you disable Realtek, Windows sees this as a problem that needs fixing.
Both systems run in the background without asking your permission. They’re designed to keep your computer running smoothly by ensuring all hardware has proper drivers. Unfortunately, if you intentionally disabled hardware, these automatic systems work against you.
This automatic reinstallation happens most commonly after a Windows Update runs or after you restart your computer. You might wake up one morning to find that a scheduled update ran overnight and brought Realtek back. It’s not malicious. It’s just Windows being overly helpful.
Solution 1: Disable Windows Update for Audio Drivers
Open Settings → System → Windows Update → Advanced Options and look for driver update controls. Disabling automatic driver updates reduces reinstallation frequency
but it applies to all hardware, not just audio. GPU drivers, printer drivers, and others would also require manual updates.
It’s a valid approach if you’re comfortable managing driver updates yourself, but not ideal for everyoneThis requires digging into Windows Update settings, but it’s doable.
Open Settings and go to “System” then “Windows Update.” Click on “Advanced options.” Look for an option called “Get the latest updates as soon as they’re available” or “Receive updates for other Microsoft products.” Find the toggle or option that mentions driver updates and turn it off.
Be aware that disabling driver updates has a tradeoff. You lose automatic driver updates for all hardware, not just audio. This means if you have printer drivers, graphics card drivers, or other device drivers that need updating, Windows won’t install them automatically. You’ll need to update those manually if needed.
This approach works but requires some ongoing attention. It’s not a complete solution because Windows might still use its built-in driver library to reinstall Realtek even if Windows Update is disabled. But it does reduce how often automatic reinstallation happens.
Solution 2: Use BIOS Disable (Most Effective)
BIOS disabling is the only method that completely prevents Windows reinstallation. If the hardware is off at the firmware level, Windows never detects an audio device, never triggers driver detection and never searches for updates.
There’s nothing to reinstall. Windows cannot install drivers for hardware that isn’t even detected by the system. BIOS disabling is the only solution that completely prevents Windows from ever bringing Realtek back.
The hardware is turned off at the firmware level, so Windows never sees an audio device to install drivers for. No automatic driver detection triggers. No Windows Update searches for audio drivers. The problem is solved at the source.
If you want zero chance of Realtek returning no matter what happens, BIOS disabling is your answer. It requires entering BIOS and changing one setting, but once it’s done, you’re finished. No more worries about Windows reinstalling the driver.
Solution 3: Immediately Disable After Windows Reinstalls
If Windows reinstalls Realtek, open Device Manager and disable it again it takes two minutes. Some users repeat this cycle after major updates and don’t mind. If you do mind, that’s your signal to use BIOS disabling instead.
Alternatively, switching to Sound Settings routing avoids the cycle entirely since Windows doesn’t automatically override default device preferencesThe process takes two minutes.
Open Device Manager, find Realtek in Sound controllers, right-click it, and select “Disable device” again. It disables immediately. If you want to prevent Windows from reinstalling it again, do this more frequently after updates or try one of the other solutions.
Some users find themselves in a cycle where they disable Realtek, Windows reinstalls it after an update, and they disable it again. This works if you don’t mind repeating the process occasionally, but it’s not ideal for a permanent solution. If this cycle frustrates you, combine this approach with BIOS disabling or use Sound Settings routing instead, which Windows doesn’t automatically override.
How to Re-Enable Realtek Audio If You Change Your Mind
Regardless of which method you used, re-enabling Realtek is straightforward. Each method has a direct reversal that takes just a few minutes.
Each disable method has a corresponding reversal process that takes just a few minutes.
The good news is that re-enabling is always simpler than disabling because you’re just undoing one action instead of figuring out a new process.
If You Used Device Manager Disable: Re-Enable via Device Manager
If you disabled Realtek through Device Manager, re-enabling is the quickest reversal. Open Device Manager using the same method as before. Press Windows key plus X and click Device Manager, or search for it in the Windows search bar.
Navigate to “Sound, video and game controllers” and expand that section. Look for Realtek in the list. You’ll notice it has a small down arrow or X icon next to it, indicating the device is disabled. Right-click on Realtek and select “Enable device.”
Windows immediately re-enables the Realtek audio device. The down arrow disappears, and the device returns to active status. Your onboard audio works again right away without needing a restart. You can test it by plugging in speakers or headphones to your motherboard’s audio jack.
This reversal takes less than one minute. It’s the fastest way to bring Realtek audio back if you only disabled the device without uninstalling the driver.
If You Uninstalled the Driver: Reinstall via Windows Update
Open Settings → System → Windows Update → Check for updates. Windows detects the missing audio driver and installs it from its built-in library.
If it doesn’t appear automatically, go to Advanced Options → Optional Updates → Driver Updates and look for Realtek entries there. After installation, restart to complete the process.
Open Settings and go to “System” then “Windows Update.” Click “Check for updates.”
Windows scans your system and looks for missing drivers. When it detects that your audio hardware lacks drivers, it searches its built-in driver library and automatically installs the correct Realtek driver for your system.
If the automatic installation doesn’t find the driver, click on “Advanced options” and look for “Optional updates” or “Driver updates.” Expand that section and you should see Realtek audio driver options available. Select the appropriate one and click “Download and install.”
Windows downloads and installs the driver. You’ll be asked to restart your computer to complete the installation. After the restart, Realtek audio is fully restored and working normally. This method is convenient because Windows handles everything automatically without you needing to download anything manually.
If You Uninstalled the Driver: Manual Reinstall from Realtek
Go to realtek.com and navigate to the Downloads section. Select the High Definition Audio Codecs driver for Windows 11 (64-bit).
The site may ask for an email address before download. Run the installer, follow the prompts, and restart when finished. Manual installation ensures you’re using the latest official version rather than whatever is cached in Windows’ driver library.
Open your web browser and search for “Realtek audio driver downloads” or go directly to the Realtek support website.
Find the driver for Windows 11 and make sure you select the correct version. Windows 11 runs only in 64-bit, so download the 64-bit version. You’ll need to provide your email address to download the file. Once the download completes, open the installer file and follow the on-screen installation prompts.
Click “Next” through the setup wizard and agree to the terms. Windows installs the Realtek audio driver from the official source. When installation finishes, restart your computer to apply the changes. After the restart, Realtek audio is restored and fully functional.
This manual method ensures you’re using the latest official driver directly from Realtek instead of relying on Windows’ built-in driver library, which might be slightly outdated.
If You Disabled via BIOS: Re-Enable in BIOS
Reversing a BIOS disable requires going back into BIOS and changing the setting back. Restart your computer and press the appropriate key during startup to enter BIOS. The key depends on your motherboard manufacturer, typically F2, F12, Delete, or Escape.
Navigate to the same section where you found the onboard audio setting. It’s usually under Integrated Peripherals, Chipset, or Advanced sections. Find the setting labeled “Onboard Audio,” “HD Audio,” or similar, and it should currently show “Disabled.”
Click on that setting and select “Enabled” to turn the onboard audio hardware back on. Then navigate to the “Save and Exit” menu option. Press Enter and confirm that you want to save changes and restart. Your computer reboots and the onboard audio hardware is activated at the BIOS level.
Windows detects the newly enabled audio hardware and either automatically installs drivers or prompts you to install them. Your Realtek audio is fully restored and working normally.
If You Disabled via Services: Re-Enable the Services
1. Press Win + R → type services.msc → Enter. 2. Find Realtek Audio Universal Service → right-click → Start. 3. Right-click again → Properties → change Startup type to Automatic → Apply → OK. 4. If you stopped the core Windows Audio services, repeat steps 2 3 for those as well.
Press Windows key plus R and type “services.msc” to open the Services application.
Scroll down to find “Realtek Audio Universal Service.” Right-click on it and select “Start” to begin the service immediately. Then right-click the service again and select “Properties.” Change the “Startup type” dropdown from “Disabled” to “Automatic” so the service starts automatically on future reboots.
Click “Apply” and “OK” to save your changes. The Realtek Audio service is now running and will continue running after you restart your computer. Your Realtek audio functionality is restored and the Realtek Audio Manager application can launch normally.
If you also stopped the core Windows Audio services, restart those as well using the same process. Set their startup type back to “Automatic.” Once all services are running, Realtek audio is fully operational.
Troubleshooting: “My Realtek Audio Won’t Disable” or “It Keeps Coming Back”
Sometimes the disable process runs into resistance. Here are the four most common problems and exactly how to handle them.
You might find that the device refuses to disable, or it mysteriously reappears after you’ve already disabled it. These problems are more common than you’d think, and they usually have simple solutions once you understand what’s causing them.
Let me walk you through the most common issues and how to fix them.
Problem: Realtek Re-Enables After Windows Update
The most frequent complaint is that Realtek audio keeps coming back after you’ve disabled it. You disable the device, everything works fine for a while, and then suddenly Realtek is active again. This almost always happens after a Windows Update runs.
Windows Update includes an automatic driver installation feature that treats missing or disabled audio drivers as problems that need fixing. When an update runs, Windows scans your hardware and automatically reinstalls drivers for any device that appears to be missing one. Your disabled Realtek audio device triggers this automatic reinstall.
The solution depends on how permanent you want the disable to be. If you can tolerate re-disabling Realtek occasionally after major updates, just repeat the Device Manager disable process when it comes back. If you want a solution that survives all updates, use the BIOS disable method instead. BIOS-level disabling prevents Windows from ever detecting the hardware, so no update can bring it back.
You can also try disabling automatic driver updates in Windows Update settings, though this affects all hardware, not just audio.
Problem: Realtek Device Still Appears in Device Manager After Uninstall
Sometimes you uninstall the Realtek driver completely, but the device still shows up in Device Manager as if nothing happened. This occurs because Windows hides disabled or disconnected devices by default, but the entries remain in the system.
Remove the last sentence entirely: “Showing hidden devices is an important troubleshooting step that many people don’t know about.
This reveals devices that Windows normally hides. You’ll see Realtek appear in the list, often grayed out or with a different icon indicating it’s a hidden device.
Right-click on the Realtek device and select “Uninstall device” again. This time, make sure you check the box that says “Attempt to remove the driver for this device.” Click “Uninstall” and restart your computer. The hidden device entry disappears completely because you’ve removed both the device entry and the driver files.
Showing hidden devices is an important troubleshooting step that many people don’t know about. It reveals the true state of your system and lets you clean up leftover device entries that normal view doesn’t show.
Problem: Realtek Device Disappeared from Device Manager
The opposite problem also happens. You’re trying to disable Realtek, but you open Device Manager and the Realtek audio device isn’t listed anywhere. You expand Sound controllers and it’s simply not there. This suggests either a hardware detection problem or severe driver corruption.
You can force Windows to rediscover it using the “Add legacy hardware” feature. Open Device Manager and click on the “Action” menu at the top. Select “Add legacy hardware.”
A wizard appears asking if you want Windows to automatically detect hardware or if you want to manually select it.
Choose automatic detection and let Windows scan your system. Windows searches for any hardware that isn’t properly recognized and attempts to install drivers for it. This process can take a few minutes.
If automatic detection finds the Realtek audio device, Windows reinstalls the driver and the device reappears in Device Manager.
You can then disable it using the normal method. This approach is useful when Realtek has completely vanished from your system but you know the hardware is physically present.
Problem: Device Manager Won’t Let Me Disable Realtek
Occasionally, you right-click on Realtek in Device Manager and the “Disable device” option is grayed out or missing entirely.
This happens on some prebuilt computers where the manufacturer has locked certain hardware settings to prevent users from accidentally breaking audio functionality.
If Device Manager won’t let you disable Realtek through the standard method, your best workaround is to use BIOS disabling instead. BIOS operates at a level below Windows, so manufacturer locks in Windows settings don’t apply.
You can disable the onboard audio chip at the BIOS level regardless of what Windows allows or doesn’t allow.
Alternatively, you can try using the Sound Settings method to set a different default audio device and simply ignore Realtek.
This doesn’t truly disable the hardware, but it achieves the practical result of preventing Realtek from being used.
Quick Reference: Which Method Should You Use?
Choosing the right method to disable Realtek audio depends on what you want to accomplish and how comfortable you are with technical processes. I’ve covered five different methods in this guide, and each one serves a different purpose. Let me help you pick the best option for your situation.
Decision Tree: Pick Your Method
The fastest way to choose is to ask yourself what outcome you want. Here’s a simple decision guide based on your specific needs:
If you want the quickest and most reversible option, use Device Manager disable (Method 1). This takes less than two minutes, requires no restart and you can re enable Realtek anytime with just a few clicks. Perfect if you’re not sure whether you want to keep it disabled permanently.
If you want to ensure the driver doesn’t reinstall itself, try uninstalling the driver completely (Method 2). This removes the driver files from your system though Windows might still reinstall them automatically after updates. It’s more thorough than just disabling but not completely permanent.
If you just want to set a different default audio device, use Sound Settings routing (Method 3). This is the least invasive approach.
You’re not removing or disabling anything. You’re just telling Windows to use a different audio device as your default. Realtek stays installed but inactive.
If you want system-level control and understand services, use Services.msc (Method 4). This stops the Realtek audio services from running in the background, which prevents the Realtek Audio Manager from launching at startup. Best for advanced users who want to reduce system resource usage.
If you want a permanent solution that survives all Windows updates, use BIOS disable (Method 5). This is the most permanent option available. BIOS level disabling turns off the hardware before Windows even starts, so no update or reinstall can bring it back.
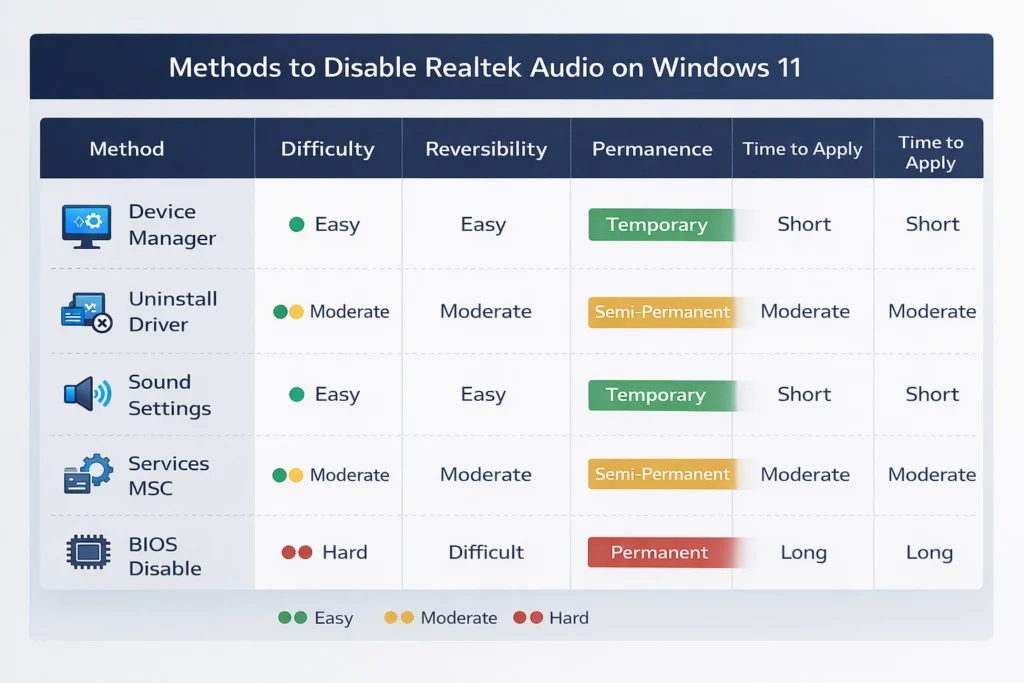
Method Comparison Table
Here’s a quick comparison showing how each method stacks up:Here’s a quick comparison showing how each method stacks up:
| Method | Difficulty | Reversibility | Permanence | Time to Apply | Requires Restart |
|---|---|---|---|---|---|
| Device Manager | Easy | Very Easy | Medium | 2 minutes | No |
| Uninstall Driver | Easy | Easy | Medium-High | 3 minutes | Yes |
| Sound Settings | Very Easy | Instant | Low | 1 minute | No |
| Services.msc | Advanced | Moderate | Medium-High | 5 minutes | Yes |
| BIOS Disable | Moderate | Moderate | Very High | 5 minutes | Yes |
Device Manager offers the best balance of ease and effectiveness for most users. Sound Settings is fastest but least permanent. BIOS disable requires more effort but guarantees permanence.
Beginner Recommendation
If you’re new to disabling audio devices and not sure which method to choose, I recommend starting with Device Manager (Method 1). Open Device Manager, find Realtek in Sound controllers, right-click it, and select Disable device. Done.
Try that first and see if it solves your problem. If Windows keeps re-enabling Realtek after updates and that frustrates you, move up to BIOS disable (Method 5) for a truly permanent solution. Start simple, then escalate to more permanent methods only if needed.
Most people find that Device Manager disabling is enough for their needs. It’s quick, safe, and fully reversible if you change your mind later.
Frequently Asked Questions About Disabling Realtek Audio
Will disabling Realtek audio break my computer or make Windows unstable?
Windows has automatic driver detection that treats missing or disabled audio drivers as problems.
When Windows Update runs or your computer restarts, the system automatically searches for and reinstalls drivers it thinks are missing. To prevent this, use BIOS disable which stops Windows from detecting the hardware entirely
Why does Windows keep re-enabling Realtek after I disable it?
Windows has automatic driver detection that treats missing or disabled audio drivers as problems that need fixing. When Windows Update runs or your computer restarts,
the system automatically searches for and reinstalls drivers it thinks are missing. To prevent this, use BIOS disable which stops Windows from detecting the hardware entirely
Do I need to uninstall Realtek drivers if I just want to disable the device?
No, you don’t need to uninstall the driver to disable the device. Disabling in Device Manager hides the device without removing files,
while uninstalling removes driver files entirely from your system. Disabling is simpler and more reversible since you can re-enable a disabled device instantly without downloading anything.
Can I disable Realtek for specific apps only without disabling it globally?
Yes, you can route specific apps to different audio devices without disabling Realtek globally.
Open Sound Settings and go to App volume and device preferences to choose which audio device each application uses individually.
Many apps like Teams, Discord and games also have audio device settings built into their own preferences.
Is it bad to disable Realtek Audio Manager if I’m not using it?
No, it’s perfectly safe to disable Realtek Audio Manager if you’re not using onboard audio.
The manager is just the configuration application that runs in your system tray and consumes system resources even when inactive.
Disabling it frees up memory, prevents unnecessary notifications, and can slightly improve startup speed.
Now you know how to disable Realtek audio in Windows 11 using five different methods. Choose the approach that best fits your needs and technical comfort level.
")

