
How to Extract Photos From Damaged Android Phone: What You Need to Figure Out First
I know exactly how panic sets in when your Android phone screen shatters and you can’t access thousands of irreplaceable photos. Last month, I watched my friend spend six hours trying random recovery methods on her broken Galaxy S22, making the situation worse with each failed attempt. Here’s the truth: you can extract photos from damaged android phone successfully, but only if you identify your exact damage type first
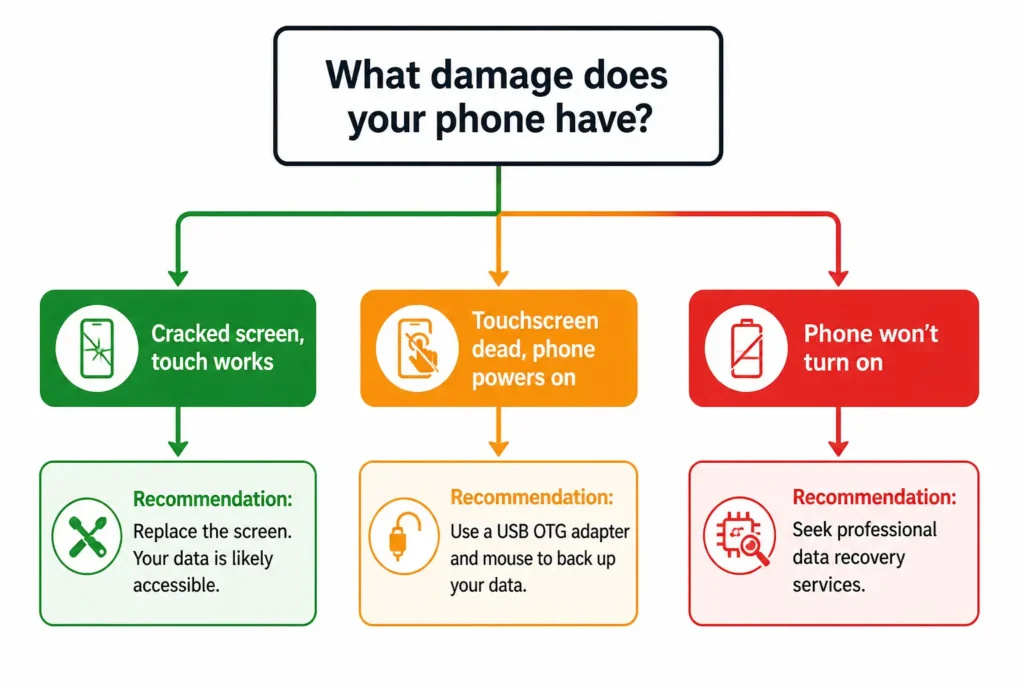
Before you try anything, you need to answer one simple question: what kind of damage are you actually dealing with?
Not all broken android phone data recovery situations are the same. The method that saves your photos in one situation can be completely useless in another. Taking two minutes to identify your damage type will point you directly to the methods that will actually work for damaged phone photo retrieval and help you skip the ones that won’t
There are three damage scenarios I see most often, and each one has its own recovery path.
Scenario A — Your Screen Is Cracked But the Touchscreen Still Responds
If your screen has cracks but your finger still controls the phone normally, you’re in the best possible position for android screen cracked photo recovery. A cracked screen with working touch response means your phone remains fully functional. For other display issues like horizontal lines or display distortions the recovery methods may differ, but extracting photos from damaged android phone in this touchscreen-responsive situation is straightforward and doesn’t require special hardware
You can unlock your phone, navigate your settings, and authorize a USB connection just like normal. This means you can plug your phone into a Windows PC and use the AutoPlay import feature to copy your photos directly. You can also open Google Photos on your phone and start a manual backup immediately.
In this scenario, think of your phone as a fully working device that just happens to look damaged. The cracked display does not affect how the phone communicates with your computer or cloud services. Start with the USB connection method or check Google Photos first before trying anything else.
Scenario B — Your Screen Is Broken and the Touchscreen Is Not Working (But the Phone Still Powers On)
This is the most common situation I help people with, and it’s what most of my android touchscreen not working retrieve photos methods are designed for.
Your phone has power, the Android system runs normally, but the touchscreen malfunction means unresponsive android screen data recovery requires external control methods like a USB mouse or HDMI adapter I’ve seen this exact scenario dozens of times – the phone vibrates when you press the power button, but the screen is either black or unresponsive to touch.
Here is something important I learned from watching people recover their own devices: a broken touchscreen does not mean your data is locked away forever.
Android phones with broken touchscreens can still be controlled through external input devices like a USB mouse, an HDMI adapter connected to a TV or monitor, or screen mirroring software like Vysor running on your laptop.
One creator I came across shared how he solved this exact problem using a USB mouse plugged into his Samsung Galaxy S10 via an OTG adapter. The phone responded to mouse clicks just like touch inputs, which let him navigate to his files and back up his photos. The touchscreen was completely dead but the phone worked perfectly through external control.
If your phone powers on but the touchscreen is unresponsive, sections four through eight of this article are your primary focus. Start with the OTG mouse method since it requires the least technical setup.
A quick way to confirm your phone is still powered on even when the screen appears completely black is to press the power button and listen or feel for a vibration. If the phone vibrates, the device is alive and running. That single confirmation changes everything because it means you have real options available to you.
Scenario C — Your Phone Will Not Turn On At All
This is the most challenging dead android phone data extraction situation, and I want to be completely honest about what that means.
When an Android phone won’t power on at all, your recovery options become significantly more limited, but they’re not zero. I’ve helped people recover photos from phones that seemed completely dead – sometimes it’s just a charging issue, other times it requires professional data recovery service
A completely unresponsive phone could mean several things: the battery has completely drained, the charging port is damaged,
the display is broken but the phone is actually still running, or in more serious cases, there has been hardware failure at the motherboard level.
Before assuming the worst, try a different charging cable and a different power source. Some phones look completely dead simply because the charging port is damaged and the battery has run flat. If you’re experiencing charging problems,
check out our complete guide on why phones won’t charge and how to fix them for detailed troubleshooting steps. Give the phone at least thirty minutes on a working charger before concluding it truly won’t power on.
If the phone genuinely will not respond to charging or any button combination, the first two things to check are your Google Photos backup and whether the phone has an SD card. Neither of these requires the phone to be working. If your photos were syncing to Google Photos automatically, they may already be safe regardless of what happens to the device.
For phones that are truly dead with no response, professional data recovery services are sometimes the only realistic path forward. I cover what that process actually involves and what it costs in section eleven.
The Bottom Line Before You Read Further
Identifying your damage scenario is not just a formality. It is the single most important step because it determines which methods are worth your time. A smashed android screen data access situation where the phone still powers on has entirely different solutions than a phone that will not turn on at all.
Once you know which scenario matches your situation, you can move directly to the sections that apply to you and skip the rest. That approach will save you hours of frustration and give you the best possible chance of getting your photos back safely.
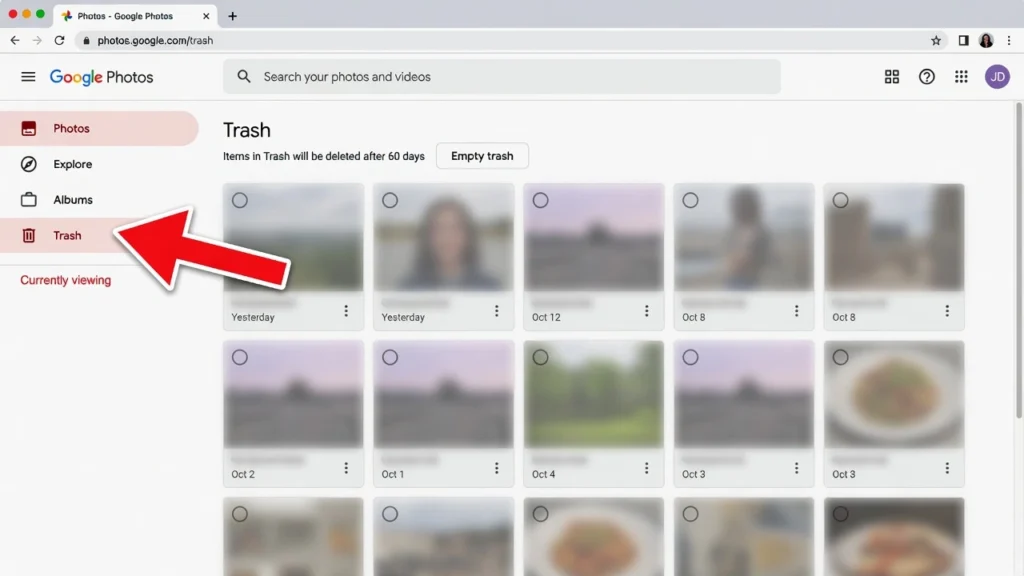
Check Google Photos First — Your Photos Might Already Be Safely Backed Up
Before buying anything, check your cloud storage first. Seriously – I can’t tell you how many people I’ve helped who spent entire weekends fighting with cables and adapters, only to find their photos sitting safely in Google Photos the whole time
Last week alone, I helped three people who found their photos safely stored in Google Photos after thinking they’d lost everything
Google Photos automatically backs up your photos if you ever turned on the backup feature, even just once. That cloud storage sync happens in the background without you thinking about it.
Your broken Android phone might be unusable, but your photos could already be sitting safely in your Google account waiting for you to access them from any other device.
This is the fastest possible way to retrieve photos from a broken Android screen, and it takes less than five minutes to check.
How to Check Google Photos From Any Device
Open a web browser on your computer or borrow someone else’s phone for a moment. Go to photos.google.com and sign in using the same Google account that was connected to your broken phone. If you are not sure which account that was, try the email address you use most often or the one you remember setting up when you first got the phone.
Once you sign in, look at the Photos tab. Every photo and video that was synced from your broken device will appear here. You can scroll through everything, download individual photos, or select multiple images and save them all to your computer in one go.
Here is something important that most people miss: check the Trash folder inside Google Photos. Photos you thought were deleted might still be there. Google Photos keeps deleted items in the Trash for sixty days before permanently removing them. I have seen people recover photos they accidentally deleted weeks ago simply because they remembered to check that folder.
If you prefer using a phone instead of a computer, download the Google Photos app on any working Android or iPhone. Sign in with your broken phone’s Google account. All your synced photos will appear instantly. You can then download them to the new device or share them to cloud storage for safekeeping.
If you’re unsure whether you ever enabled Google Photos backup or want to understand how the automatic sync works, Google’s official backup and sync guide explains exactly what gets backed up and when. I always recommend reading through their backup settings documentation because many people don’t realize that Google Photos only backs up photos when your phone is connected to Wi-Fi and charging. This means your most recent photos from the day your phone broke might not have synced yet, which is why it’s still worth trying the hardware recovery methods even if you find some photos in the cloud.”
What If Auto-Backup Was Never Turned On?
I completely understand the panic you feel right now if you realize backup was never enabled. Take a breath. You still have real options available to you.
Most of the methods I cover in this article do not require any cloud backup to work. The OTG mouse method, the HDMI adapter approach, Vysor screen mirroring, and SD card recovery all pull photos directly from your phone’s internal storage. Whether or not you ever set up a Google Photos backup makes zero difference to those recovery techniques.
I came across a real story from someone whose partner dropped a Huawei phone and completely shattered the screen. That person had never enabled any cloud backup service at all. Every single photo was still trapped on the device with no cloud copy. They recovered everything using a simple USB-C to HDMI adapter and a USB mouse. The lack of a backup did not stop the recovery. It just meant they had to use a hardware method instead of a cloud method.
Broken Android backup photos are recoverable as long as the internal storage itself is not physically destroyed. A cracked screen or broken touchscreen does not damage the storage chip where your photos actually live. The data is still there. You just need a way to access the phone and authorize the file transfer.
If the cloud check did not work for you, do not lose hope. Move on to the next section and start with the SD card check or the USB connection method. You are going to get those photos back.
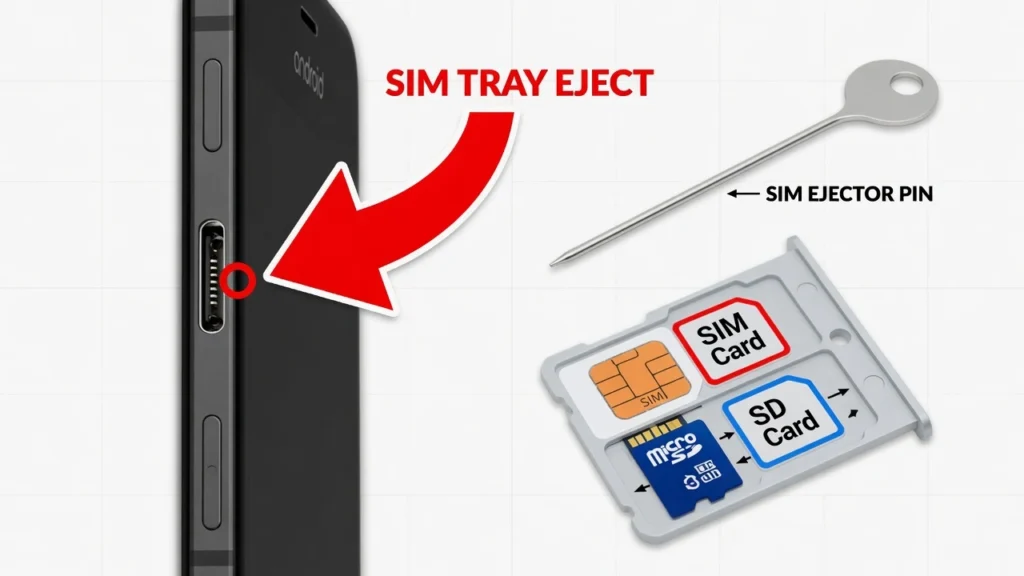
Does Your Phone Have an SD Card? This Takes 30 Seconds
If your Android phone has a removable SD card, this is the fastest possible recovery method you can try. Removing the SD card from a damaged phone and reading it on another device takes less than a minute and requires no technical skills whatsoever.
An Android SD card is a small removable storage chip that sits in a tray on the side of some Android phones. If your photos were saved to the SD card instead of the phone’s internal memory, you can pull the card out and access those photos immediately on any computer or working phone with a card reader.
The catch is that most modern Android phones either do not have an SD card slot at all, or the phone saved your photos to internal storage by default even if a card was installed. I want to set that expectation upfront so you know what to expect before you start.
How to Remove and Read the SD Card
Look along the edges of your phone for a small tray with a tiny hole next to it. This is the SIM and SD card slot. Most phones place the SD card slot on the top edge or left side of the device. If you do not see a tray anywhere, your phone does not support SD cards and you can skip this section entirely.
To remove the card, you need a SIM ejector tool. This is the small metal pin that came in your phone’s original box. If you do not have that tool anymore, a straightened paperclip works just as well. Insert the pin into the small hole next to the tray and push gently. The tray will pop out slightly so you can pull it free with your fingers.
Once you have the tray out, look carefully at the cards inside. Most phones have two slots in the same tray: one for the SIM card and one for the SD card. The SD card is the larger one, usually labeled with a brand name like SanDisk or Samsung. Remove only the SD card and leave the SIM card in place.
To read the SD card, you need either an SD card reader that plugs into your computer’s USB port or another working Android phone with an SD card slot. Insert the card into the reader or the other phone. Your computer or phone will recognize the card as external storage. Open the file browser and look for a folder called DCIM. Your photos should be inside that folder.
If your photos appear on the SD card, copy everything to your computer immediately and store the files in multiple locations for safety.
Photos Not on SD Card? Here Is Why
Android phones save photos to internal storage by default, not to the SD card. Even if your phone has an SD card installed, the camera app automatically stores new photos in the phone’s built-in memory unless you manually changed that setting.
Internal storage is the memory built directly into the phone’s hardware. You cannot remove internal storage the way you can remove an SD card. This is why android screen cracked photo recovery often requires methods beyond simple SD card removal.
If you checked your SD card and found no photos there, do not be discouraged. The photos are almost certainly still safe on the phone’s internal storage. A cracked screen does not damage the internal memory chip where your photos actually live. You just need a different method to access that damaged android internal storage, and I cover multiple ways to do exactly that in the sections ahead.
The SD card check takes thirty seconds and costs nothing to try. If your photos are there, you just saved yourself a lot of time. If not, move on to the next method with confidence that your photos are still recoverable through other approaches.
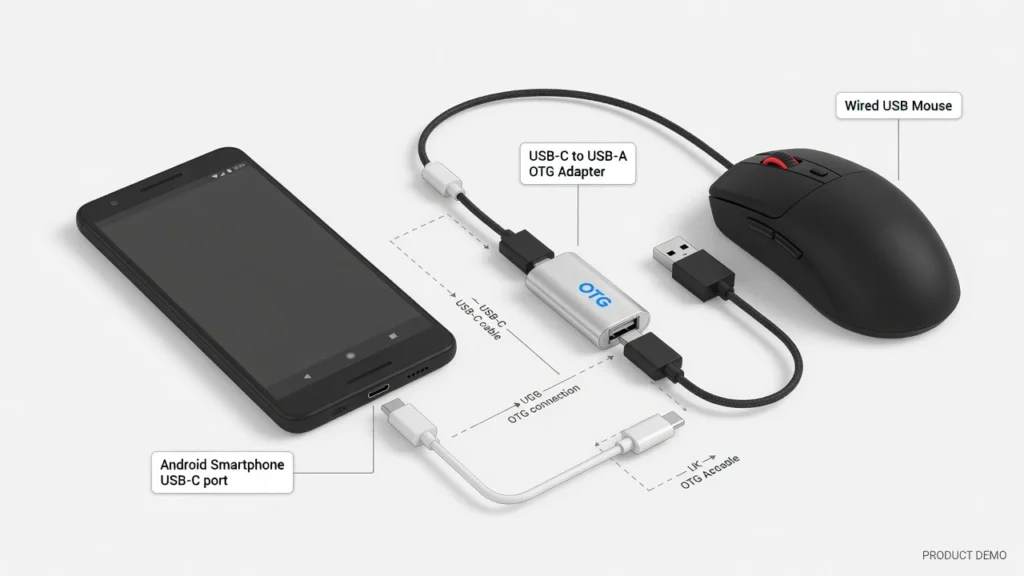
The OTG Mouse Method — Extract Photos When Your Android Touchscreen Isn’t Working
If your Android touchscreen is not working but the phone still powers on, you can control the entire device using a regular computer mouse. This works because Android phones support USB On-The-Go technology, which allows you to connect external input devices like mice and keyboards directly to your phone through a small adapter called an OTG cable.
The OTG mouse method turns your broken touchscreen into a non-issue. The mouse cursor replaces your finger. Every click becomes a tap. You navigate your phone exactly as you would normally, except you are using a mouse instead of touching the screen.
I came across someone who used this exact method to recover photos from his Samsung Galaxy S10 after the screen broke. He spent forty-five minutes blindly clicking where the passcode numbers would be until he unlocked the phone, then used the mouse to access his files and back everything up. That patience saved all his photos without spending a penny on repairs.
What You Need (You Might Already Have It)
The OTG mouse method requires two things: a USB mouse and an OTG adapter. The good news is you might already own both items without realizing it.
Any USB mouse works for this method. You can use a wired mouse or a wireless mouse with a USB receiver. Gaming mice, office mice, cheap mice from the dollar store — all of them work the same way. If you have a mouse sitting in a drawer somewhere, grab it now.
The OTG adapter is a small connector that converts your phone’s charging port into a standard USB port. For phones with USB-C charging ports, you need a USB-C to USB-A OTG adapter. For older phones with micro USB ports, you need a micro USB to USB-A OTG adapter.
Here is something most people do not know: if you own a Samsung phone, check the original box the phone came in. Samsung includes a free OTG adapter in the box with many of their Galaxy models. The person who recovered his Samsung Galaxy S10 photos found the adapter sitting unused in his phone box the entire time. He did not need to buy anything.
If you do not have an OTG adapter already, you can buy one online for around five dollars or pick one up at most electronics stores the same day. Make sure the adapter matches your phone’s charging port type.
As an alternative to a mouse, you can also connect a USB keyboard using the same OTG adapter. A keyboard lets you type commands, enter passcodes, and navigate menus using arrow keys. Some people prefer using both a mouse and keyboard together for full control.
How to Enter Your Passcode When You Can’t See the Screen
This is the hardest part of the OTG mouse method, and I want to be completely honest with you about what it takes. If your screen is black or completely unreadable, you will need to unlock your phone without being able to see what you are doing.
Connect the OTG adapter to your phone’s charging port, then plug your mouse into the adapter. The phone should recognize the mouse immediately and display a cursor on the screen. If your screen is visible even partially, you will see a small pointer appear. If the screen is completely black, the cursor is still there even though you cannot see it.
Now comes the patience part. You need to visualize where your phone’s lock screen passcode pad sits and use the mouse to click the numbers in the correct sequence. Picture your unlock screen in your mind. Where does the number one sit? Where is the number five? Use your muscle memory to guide the cursor.
The creator I mentioned earlier spent forty-five minutes clicking blindly before he successfully unlocked his phone. That might sound frustrating, but think about it this way: forty-five minutes of patient clicking saved him from losing hundreds of photos and paying for an expensive screen repair. The time investment was absolutely worth it.
If you have another working phone that is the same model, you can create a visual guide. Hold the working phone next to your broken one and use it as a reference for where to position your clicks. Some people even trace the number pad layout onto a piece of clear tape and stick that tape onto the broken screen as a physical guide.
Once you enter the correct passcode, the phone unlocks and you gain full access. The hard part is over. From this point forward, you can navigate your Android phone using the mouse just like you would use your finger.
Using Smart View to See Your Screen on a TV
After you unlock your phone with the OTG mouse, the best next step is to mirror your phone’s display onto a TV or monitor so you can actually see what you are doing. This is where android phone display broken data recovery becomes dramatically easier.
Most Android phones include a built-in screen mirroring feature. Samsung calls it Smart View. Other brands call it Screen Cast, Wireless Display, or Miracast. The feature works the same way regardless of the name: it sends your phone’s screen wirelessly to a compatible TV or streaming device.
To enable screen mirroring using your mouse, swipe down from the top of the phone screen by moving the mouse cursor to the very top edge and clicking. This opens the quick settings panel. Look for an icon that says Smart View, Screen Cast, or has a symbol that looks like a screen with waves coming from it. Click that icon with your mouse.
Your phone will scan for nearby devices. Make sure your TV or streaming device is powered on and connected to the same Wi-Fi network as your phone. When your TV appears in the list, click it. Your phone screen will appear on the TV within a few seconds.
Now you can see everything clearly on the large screen while controlling the phone with your mouse. Navigate to your photos, select the ones you want to save, and transfer them to cloud storage or another device. The combination of OTG mouse control and Smart View screen mirroring gives you complete access to a phone that would otherwise be completely unusable.
This method works even when the Android touchscreen is not working at all. The USB connection between the mouse and phone bypasses the broken touch layer entirely. You are interacting directly with the Android operating system through the OTG adapter, which means broken screen mirroring becomes possible even in situations where touching the screen does absolutely nothing.
Connect to a Computer via USB and Copy Photos Directly
If your phone screen is cracked but the touchscreen still responds normally, you have access to the simplest android file transfer method I recommend.
A standard USB connection between your Android phone and a Windows computer lets you copy photos directly without any special software, adapters, or technical setup. I’ve used this method hundreds of times – it’s my go-to approach when the touchscreen still works
This method works because your phone can authorize the file transfer connection normally when the touchscreen is functional. You can tap the permission prompts, navigate the settings, and interact with your device just like you always have.
The cracked screen might look terrible, but it does not affect the Android file transfer process at all.
The USB connection method gives you two different approaches: the automatic Windows AutoPlay import or manual file copying through File Explorer. Both routes achieve the same result, but AutoPlay is faster if you just want to grab your photos quickly.
Windows AutoPlay — The Fastest Route
Connect your phone to your computer using a USB cable that supports data transfer, not just charging. When your phone connects properly, Windows will detect it as a new device and AutoPlay will pop up automatically with a list of actions you can take.
Look for an option that says “Import photos and videos” and click it. Windows will then ask you where the photos are coming from. Select “From a connected device” and choose your phone from the list. The import wizard will scan your phone and show you all the photos and videos it finds.
You can preview the photos in the import window, select which ones you want to transfer, and choose where to save them on your computer. Click the Import button and Windows will copy everything to your chosen folder. This AutoPlay import method handles the entire Android file transfer process automatically without requiring you to navigate through phone folders manually.
The AutoPlay route works well if you want to grab all your photos at once and save them in a standard location like your Pictures folder. Windows organizes the imported photos by date and creates subfolders automatically to keep everything sorted.
Using File Explorer Manually
If AutoPlay does not appear or you prefer more control over the copying process, you can navigate to your phone’s files manually through File Explorer. Open File Explorer on your computer and click “This PC” in the left sidebar. Your connected Android phone should appear in the list of devices.
Here is something important that confuses many people: when you first click on your phone in File Explorer, the folders might appear completely empty. This does not mean your photos are missing. The empty folders appear because your phone has not yet authorized your computer to access its internal storage.
Check your phone screen for a notification or popup asking about file access permissions. Tap “Allow” or “Transfer files” on your phone to authorize the connection. Once you grant permission, go back to File Explorer on your computer and refresh the view. The folders will no longer be empty.
Navigate to the DCIM folder on your phone. This folder contains all the photos taken with your camera. You can also check the Download folder for images you saved from the internet or messaging apps. Select the photos you want to copy, then drag and drop them to a folder on your computer or right-click and choose Copy.
Manual file copying gives you more control over which specific photos you transfer and where you save them. You can organize the photos into custom folders on your computer instead of relying on Windows automatic organization. This approach works better if you only need certain photos rather than everything on the device.
The key to successful damaged android internal storage access through USB is patience with the authorization process. Once your computer and phone establish the trusted connection, copying photos becomes as simple as moving files between folders.
Mirror Your Broken Android Screen to a PC Using Vysor (No Touch Needed)
Vysor is a free software application that mirrors your Android phone’s screen directly onto your computer, allowing you to control the device using your laptop’s mouse and keyboard. This broken screen mirroring method works even when your phone’s display is completely black, making it one of the most powerful recovery techniques available for severely damaged devices.
What makes Vysor incredibly valuable is that it bypasses the need for a working touchscreen entirely. As long as your Android phone powers on and can connect via USB, Vysor can display the phone’s interface on your PC screen and let you interact with everything normally. The software essentially turns your computer into a remote control for your broken phone.
I discovered this method from someone who used it to recover data from an Android phone with a completely unresponsive screen. Even though the phone’s display was pitch black, Vysor successfully mirrored the interface and allowed full file access through the computer. Without Vysor and the proper drivers, most computers cannot bypass the security authorization required to view internal files of a damaged device.
What You Need Before Starting
Before you can use Vysor for screen mirroring, you need to gather a few essential items and install the necessary software on your computer.
First, make sure you have a USB cable that supports data transfer, not just charging. Many cables that come with cheap chargers only carry power and cannot transfer data between devices. If your cable only charges the phone but does not allow file transfer when connected to a computer, Vysor will not work properly.
Download and install the Vysor application on your Windows PC or laptop. The software offers both free and paid versions, but the free version provides everything you need for basic screen mirroring and file recovery. You can download Vysor directly from their official website.
You also need to install Android Debug Bridge drivers on your computer. These ADB drivers allow your PC to communicate properly with Android devices through the USB connection. Most Vysor installations include the necessary drivers, but you may need to download them separately if the automatic installation fails.
Make sure your computer recognizes your phone when connected via USB. If Windows shows a notification about installing device drivers when you plug in your phone, let that process complete before proceeding with Vysor setup.
Step-by-Step Vysor Setup and Screen Mirroring
Connect your Android phone to your computer using the USB data cable. Even if your phone’s screen appears completely black, proceed with the connection as long as the device vibrates or shows some sign of power when you press the power button.
Open the Vysor application on your computer. If your phone is properly connected and the drivers are installed correctly, Vysor should detect the device automatically. Look for your phone’s name or model number in the Vysor interface.
Click the “View Device” button in Vysor. This command tells the software to establish a mirroring connection with your phone. Within a few seconds, a new window should open on your computer displaying your phone’s screen interface, even if that screen appears black on the actual device.
Here comes the critical step that makes file recovery possible: look for a permission prompt on the mirrored screen asking about file access or USB debugging authorization. Use your computer’s mouse to click “Allow” on this mirrored prompt. This grants your computer permission to access the phone’s internal storage.
The screen mirroring connection should now be fully established. You can use your mouse cursor to navigate the Android interface exactly as you would use your finger on a working touchscreen. Every mouse click registers as a screen tap, and you can scroll by clicking and dragging.
Copying Your Photos After Vysor Connects
Once you have authorized the connection through the Vysor mirrored screen, you can access your phone’s files through File Explorer on your computer. Open File Explorer and navigate to “This PC” where your Android device should now appear as a connected drive.
Click on your phone in the File Explorer list. The folders should no longer appear empty because you granted file access permission through the Vysor interface. If the folders still seem empty, try refreshing the File Explorer view or disconnecting and reconnecting the USB cable.
Navigate to the DCIM folder to find photos taken with your camera, or check the Download folder for images saved from the internet or messaging apps. You can now browse through your files, photos, and videos and simply copy and paste them into a folder on your laptop for safekeeping.
The combination of Vysor screen mirroring and File Explorer access gives you complete control over damaged Android internal storage access. This method works reliably even in situations where the physical screen is completely non-functional, making it an invaluable tool for Android file transfer when traditional methods fail.
What makes this approach particularly effective is that you maintain full visual control over the recovery process through the mirrored display while simultaneously gaining file system access through the authorized USB connection.
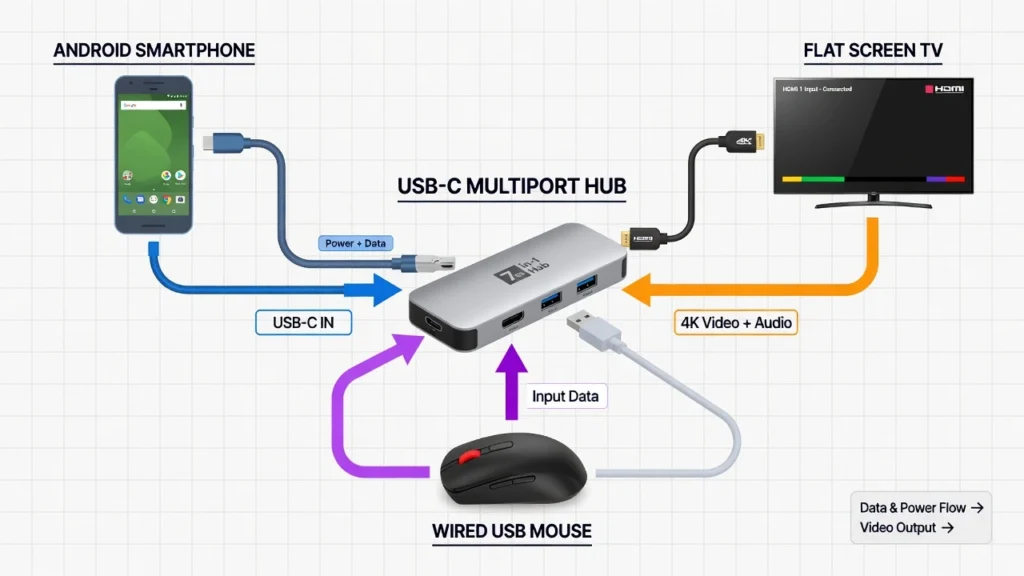
Connect Your Broken Phone to a TV or Monitor With an HDMI Adapter
You can display your broken Android phone’s screen on a TV or computer monitor using a USB-C to HDMI adapter, giving you full visual access to the device even when the phone’s display is completely destroyed. This external monitor connection method works by sending your phone’s video output directly to a larger screen while allowing you to control the device using an external USB mouse or keyboard.
The HDMI adapter approach solves the biggest problem with broken screen mirroring: you can see exactly what you are doing on a large, clear display instead of squinting at a cracked or black phone screen. This method transforms android phone display broken data recovery from a frustrating guessing game into a straightforward process you can complete with full visual control.
I came across a real success story that perfectly illustrates the value of this method. Someone’s partner dropped her Huawei phone and completely shattered the screen, making it impossible to see or touch anything. Professional repair shops quoted between £120 and £150 just to replace the screen. Instead of paying that fee, they bought a £20 USB-C to HDMI adapter and recovered all the photos themselves. The adapter completely bypassed the need for any screen repair.
Does Your Phone Actually Support HDMI Output? Check This First
Before you buy any adapter, you absolutely must verify that your specific phone model supports USB-C video output, also known as Alt Mode. This compatibility check will save you from wasting money on hardware that will not work with your device.
Not all Android phones can send video signals through their USB-C charging ports. Many flagship phones from Samsung’s Galaxy S series and Huawei’s P series include this feature as standard. However, most budget Android phones do not support external monitor connection through USB-C, regardless of what adapters you buy.
To check your phone’s compatibility, search online for your exact phone model followed by “USB-C Alt Mode” or “video output support.” Look for official specifications from the manufacturer or reliable tech review sites. If you cannot find clear confirmation that your phone supports video output, the HDMI adapter method will not work for your device.
This compatibility check is crucial because USB-C adapters with HDMI ports cost between $15 and $40. Buying an adapter without confirming compatibility first means you might spend money on hardware that cannot help your specific situation. Always verify support before making any purchase.
What Hardware You Need (Under $30 Total)
Once you confirm your phone supports video output, you need three pieces of hardware to complete this screen mirroring setup. The total cost should stay well under $30 for everything.
First, get a multi-port USB-C hub that includes an HDMI port, at least one USB-A port, and a USB-C charging pass-through port. The charging port is important because displaying video drains your phone’s battery quickly, and you need to keep the device powered throughout the recovery process.
Second, you need an HDMI cable to connect the adapter to your TV or computer monitor. Most households already have an HDMI cable from connecting game systems, streaming devices, or laptops to TVs. Any standard HDMI cable works perfectly for this purpose.
Third, get a USB mouse or keyboard to control your phone once the screen appears on the external display. A basic wired USB mouse costs under $10 and gives you the precision you need to navigate your phone’s interface on the large screen.
The USB On-The-Go functionality in modern Android phones powers the connected mouse directly through the adapter, so you do not need batteries or wireless connectivity. Everything runs through the single USB-C connection to your phone.
How to Unlock Your Phone When the Screen Is on the Monitor
Connect the USB-C adapter to your phone’s charging port, plug the HDMI cable between the adapter and your TV or monitor, and connect your USB mouse to one of the USB-A ports on the adapter. Make sure your TV or monitor is set to the correct HDMI input channel.
When you first establish the connection, the external display will show only your phone’s lock screen. This is normal behavior, not a problem with your setup. The HDMI output initially provides limited access until you unlock the device completely.
You need to unlock your phone to trigger full screen mirroring. If you can see the lock screen on your TV, use the connected mouse to enter your PIN or pattern. If the phone screen is completely black and you cannot see the lock screen at all, you will need to unlock the device blindly using the same muscle memory technique covered in the OTG mouse section.
Once you successfully unlock your phone, the full Android interface will appear on the external monitor. You now have complete visual access to your device and can use the mouse to navigate exactly as you would use your finger on a working touchscreen.
Samsung DeX Launched Instead of Normal Screen? Do This
Samsung phones sometimes automatically launch DeX mode when connected to an external display via HDMI. DeX creates a desktop-like environment instead of mirroring your normal phone interface. While DeX works fine for file access, you might prefer the standard phone interface for photo recovery.
If your Samsung phone launches into DeX mode automatically, simply press the Escape key on your connected USB keyboard to exit back to the normal Android interface. You can also disable DeX from the notification panel if you prefer to prevent it from launching automatically in the future.
Once you exit DeX mode, your phone’s standard interface will appear on the external monitor, and you can proceed with screen mirroring and photo recovery exactly as you would with any other Android device.
Samsung Users — Two Extra Methods Worth Trying
If you own a Samsung Galaxy phone, you have access to three exclusive recovery methods that other Android users cannot use. Samsung has developed specialized software applications that work directly with their devices to provide easier file transfer and screen mirroring options, even when the phone’s display is damaged or unresponsive.
These Samsung-specific tools often work better than generic Android recovery methods because they are designed specifically for Galaxy devices. Samsung DeX allows direct PC control without any adapters, Samsung Flow enables wireless file transfer to computers, and Samsung Smart Switch can move everything to a new device wirelessly.
The best part about these Samsung methods is that they integrate seamlessly with the company’s ecosystem. If you already use Samsung devices or software, these tools will feel familiar and intuitive, making Android file transfer much simpler than trying to learn completely new recovery applications.
Samsung DeX on PC — No Adapter Needed, Just a USB Cable
Samsung DeX is a free application that turns your Windows computer into a control center for your Galaxy phone. Unlike the HDMI adapter method, Samsung DeX requires only a standard USB cable and creates a desktop-like interface on your PC where you can access all your phone’s files directly.
Download the Samsung DeX application from Samsung’s official website and install it on your Windows computer. Connect your damaged Samsung phone to the computer using any USB cable that supports data transfer. The DeX software will detect your phone automatically once the connection is established.
Here comes the tricky part if your screen is broken: when DeX first connects, a “Start Now” prompt appears on your phone screen that you need to tap to authorize the connection. The prompt appears in the bottom-center area of your phone’s display. Even if you cannot see your screen clearly, tap that general area to approve the DeX connection.
Once you authorize the connection, Samsung DeX will prompt you to unlock your phone. You can enter your PIN or pattern using your computer’s keyboard while looking at the DeX window on your PC screen. This makes unlocking much easier than trying to enter a passcode blindly on the phone itself.
After unlocking, the Samsung DeX interface opens on your computer, giving you complete access to your phone’s file system. Open the file manager within DeX, navigate to the DCIM folder where your photos are stored, and simply drag and drop the entire folder to your PC desktop. Samsung DeX makes Android file transfer as simple as moving files between folders on your computer.
Samsung Flow — Transfer Photos Wirelessly to Your PC
Samsung Flow creates a wireless connection between your Galaxy phone and your Windows computer, allowing you to transfer photos without any cables or adapters. This method works particularly well if you can use one of the previous methods to set up the wireless pairing initially.
Install the Samsung Flow application on both your damaged phone and your Windows PC. You will need to use an external monitor setup or Samsung DeX to navigate your phone and complete the initial pairing process between the devices. Once paired, the wireless connection allows ongoing file transfer even if your phone screen becomes completely unusable later.
The Samsung Flow interface includes a plus button that lets you select individual photos or entire albums and send them wirelessly to your PC. The transfer happens over your local Wi-Fi network, so both devices need to be connected to the same wireless network for the process to work.
Samsung Flow also includes a Smart View feature that enables broken screen mirroring wirelessly to your computer. This screen mirroring capability means you can see and control your phone’s interface on your PC screen without any physical connection, making it extremely useful for ongoing file management after the initial setup.
Samsung Smart Switch — Move Everything to a New Phone
Samsung Smart Switch transfers your complete phone setup to a new Samsung device wirelessly, including photos, contacts, apps, and even your home screen layout. This method works best when you are upgrading to a replacement phone and want to move everything at once rather than just extracting photos.
To use Samsung Smart Switch with a damaged phone, you need to open the app on your broken device first. Use the external monitor method from the previous section to navigate to Samsung Smart Switch on your damaged phone. The app comes pre-installed on most Galaxy devices or can be downloaded from the Galaxy Store.
Open Samsung Smart Switch on your new Samsung phone as well. Select “Receive data” on the new phone and “Send data” on the broken phone. Both devices will search for each other over Wi-Fi and establish a direct wireless connection for the transfer process.
Samsung Smart Switch lets you choose exactly which data types to transfer: photos, videos, contacts, text messages, app data, and device settings. The wireless transfer can take anywhere from 10 minutes to several hours depending on how much data you are moving, but the process requires no supervision once it begins.
This Samsung Smart Switch method essentially creates a complete backup of your broken phone and restores everything onto your new device, making it the most comprehensive solution for users who need to replace their damaged phone entirely rather than just extract specific photos.
How to Use ADB Commands to Extract Photos From a Damaged Android Phone
ADB commands let you extract photos directly from your damaged Android phone’s internal storage using text commands on your computer. ADB stands for Android Debug Bridge, and it creates a direct communication channel between your computer and your phone that bypasses the need for any screen interaction once the connection is established.
The ADB method works by sending specific commands from your computer to your phone that tell the device to copy files from its internal storage to your computer’s hard drive. This approach can extract photos even when your screen is completely black or the touchscreen is totally unresponsive.
However, I need to be completely honest with you about a major limitation: to extract photos from damaged phone USB debugging must have been enabled on your device before the screen broke. If you never turned on USB debugging in your phone’s developer settings, the standard ADB method will not work for your situation.
Important: Does USB Debugging Need to Be Pre-Enabled?
Yes, USB debugging mode must have been activated on your Android phone before the screen damage occurred. This is a developer setting that allows your computer to send commands directly to your phone, and you cannot enable it after your screen becomes unusable.
Most regular phone users never turn on USB debugging because it requires navigating to hidden developer options in the Android settings menu. If you are not sure whether you ever enabled this feature, you probably did not. Android Debug Bridge cannot connect to phones that do not have USB debugging pre-activated.
If USB debugging was not enabled before your screen broke, skip directly to the TWRP workaround section below. That alternative method works around the USB debugging requirement, but it only applies to phones with custom recovery software installed.
For everyone else who never enabled USB debugging and does not have custom recovery, the ADB command method will not work for your situation. Move on to the Vysor or HDMI adapter methods instead, as those approaches do not require any pre-configuration to be successful.
Setting Up ADB on Your Windows Computer
Download the Android SDK Platform Tools from Google’s official developer website. The download is a small zip file that contains the ADB program and related tools. Extract the zip file to a folder on your computer that you can easily find later, such as C:\adb.
Open the folder where you extracted the ADB files. You should see files named adb.exe, fastboot.exe, and several others. Hold the Shift key and right-click in any empty space inside the folder. Select “Open PowerShell window here” or “Open command window here” from the menu that appears.
Connect your damaged Android phone to your computer using a USB cable that supports data transfer. Make sure your phone is powered on even if the screen appears completely black. The Android Debug Bridge connection happens at the system level and does not require a visible display.
Your computer is now ready to send ADB commands to your phone. The command window you opened is already pointing to the correct folder, so you can start typing commands immediately.
The Exact Commands to Extract Your Photos
Start by confirming that your computer can communicate with your phone. Type this command exactly as shown and press Enter:
adb devices
If the connection works properly, you will see your phone’s serial number appear in the command window. If you see “unauthorized” or no devices listed, USB debugging was not enabled and ADB cannot proceed.
Next, verify that your phone’s photo directory exists by typing:
adb shell ls /sdcard/
This command lists the contents of your phone’s main storage directory. You should see folder names including DCIM, Download, and others appear in the command window.
Now extract your photos using this command:
adb pull /sdcard/DCIM C:\RecoveredData
This ADB command copies your entire DCIM photo folder from the phone’s internal storage to a new folder called RecoveredData on your computer’s C drive. The process may take several minutes depending on how many photos you have stored on the device.
The command window will show progress as files copy from your damaged android internal storage access to your computer. When the copying finishes, you can navigate to C:\RecoveredData on your computer to find all your recovered photos.
No USB Debugging? Try This TWRP Workaround Instead
If your phone has TWRP custom recovery installed, you can use ADB commands even without USB debugging pre-enabled. TWRP enables Android Debug Bridge access by default when the phone boots into Android recovery mode.
Power off your phone completely, then boot into recovery mode by holding Volume Up and Power buttons simultaneously until the TWRP interface appears. TWRP recovery bypasses the normal Android system and provides direct access to the file system.
Once TWRP loads, connect your phone to your computer and use the same ADB pull commands shown above. The commands work identically in recovery mode, but TWRP eliminates the USB debugging requirement that blocks most users from accessing ADB functionality.
For phones with unlocked bootloaders but no permanent custom recovery, you can temporarily boot a recovery image using fastboot commands. This advanced technique requires downloading a compatible recovery file and using fastboot boot commands to load it temporarily without permanent installation.
Android Data Recovery Software — When to Use It and What Actually Works
Android data recovery software for damaged phone situations can be genuinely helpful, but only in specific scenarios where your phone’s hardware is functional but the software has failed. These programs work by connecting to your phone via USB and using specialized commands to scan the device’s storage and extract recoverable files.
Here’s the reality about recovery software: it can’t work miracles. If your phone is truly dead from hardware failure, no app is going to magically resurrect it.
However, when your phone powers on but has system crashes, corrupted files, or software-related issues preventing normal access, the right recovery software can sometimes retrieve your photos successfully.
I want to be completely honest with you: the Android data recovery software market is flooded with questionable products that make unrealistic promises. Many tools claim they can recover photos from any damaged device, but the reality is much more limited.
The legitimate software options work best as supplements to the manual methods covered in previous sections, not as miracle solutions.
When Software Recovery Actually Makes Sense
Recovery software works best for phones that power on normally but have software-related problems preventing file access, while physically damaged android recovery typically requires hardware-based solutions
The ideal scenarios include Android system crash photo recovery where the phone boots but apps freeze or crash repeatedly, situations where your computer detects the phone but cannot access the file system, and cases where you accidentally deleted photos and need to recover them from the device’s internal storage.
Software tools cannot help when your phone is completely dead, has severe water damage, or suffers from hardware failures like a damaged motherboard. These physical problems require either manual recovery methods or professional repair services. The software approach also fails when your phone’s USB port is broken and cannot establish a connection with your computer.
If your phone falls into the software crash category, recovery applications can sometimes retrieve data from non-functional android devices by bypassing the corrupted Android system and accessing the storage directly. The success rate depends heavily on the specific type of software problem affecting your device.
DroidKit for System Crashes — Step by Step
DroidKit specializes in android system crash photo recovery scenarios where your phone’s hardware works fine but the Android operating system has become corrupted or unstable. This tool can repair some types of system crashes and extract photos during the repair process.
Connect your damaged phone to your computer and launch the DroidKit application. Select “From System Crash Device” from the main menu, then choose “Photos” as the data type you want to recover. The software will guide you through putting your phone into Recovery Mode to obtain a PDA code.
Enter the PDA code when prompted, and DroidKit will download the appropriate firmware for your specific phone model. Follow the on-screen instructions to put your phone into Download Mode, then click “Fix Now” to begin the system repair process.
After DroidKit repairs the corrupted Android system, the software will scan your phone’s internal storage for recoverable photos. You can preview the found images and select which ones to export to your computer. This process works specifically for software crashes and system corruption, not physical hardware damage.
Warning — Watch Out for Fake Recovery Software
The data recovery category attracts numerous scam products that prey on people’s desperation to recover lost photos. Many fake recovery software applications promise impossible results, charge high fees, or worse, install malware on your computer while claiming to recover your files.
Signs of legitimate recovery software include verifiable company information, realistic feature descriptions, free trial versions that let you scan before paying, and positive reviews from established technology websites. Red flags include promises to recover photos from completely dead phones, extremely high success rate claims, pressure to pay immediately, and software from unknown companies with no contact information.
Stick to established tools from reputable software companies with track records in the data recovery field. Read recent reviews from multiple sources before downloading any recovery software. When in doubt, try the free manual methods covered in earlier sections first, as these approaches often work better than questionable third-party recovery applications.
When Your Phone Won’t Turn On — Recovering Photos From a Dead Android
Dead android phone data extraction is the most challenging photo recovery scenario you can face, but a phone that appears completely unresponsive is not always truly dead. Before assuming the worst, you need to distinguish between phones that have hardware failures and phones that simply cannot power on due to charging problems, battery issues, or display failures.
When an Android phone won’t turn on at all, the recovery options become significantly more limited and expensive. However, many phones that seem completely dead actually have fixable problems that prevent them from displaying any signs of life. A systematic approach to android phone won’t turn on photo recovery starts with eliminating the most common causes before moving to advanced recovery methods.
I want to set realistic expectations upfront: if your phone has suffered severe water damage, motherboard failure, or other serious hardware problems, photo recovery may require professional services that can cost hundreds or even thousands of dollars. The success rate for truly dead phones varies dramatically depending on the specific type of hardware failure.
First — Make Sure Your Phone Is Actually Dead
Many phones that appear completely dead actually have charging port problems, depleted batteries, or power button malfunctions that prevent normal startup. Before pursuing expensive recovery options, spend fifteen minutes testing different charging approaches that might revive your device.
Try a completely different charging cable and power adapter, preferably borrowed from someone else’s working setup. Plug the phone into a wall outlet instead of a computer USB port, as wall chargers provide more power. If your phone supports wireless charging, place the device on a wireless charging pad for at least thirty minutes.
Hold the power button for a full thirty seconds even if nothing appears to happen. Some Android phones require extended power button presses to force a restart when the system has frozen completely. Try the power button combined with volume up or volume down buttons, as different manufacturers use different button combinations for forced restarts.
Check for any signs of life during charging: LED indicator lights, vibration when pressing buttons, or warming of the device body. Even if the screen remains black, these signs indicate that android phone hardware failure data recovery might be possible using the screen replacement or external display methods covered in previous sections.
If the charging port appears damaged or loose, try gently cleaning it with compressed air or a soft brush to remove debris that might prevent proper charging connections.
The Last DIY Option — Replacing the Screen to Regain Access
If your phone shows signs of power but the display remains completely black, the problem might be a failed screen rather than a dead device. Screen replacement can restore full functionality if the underlying Android system is working normally.
Replacement screens are available online for most Android phone models, typically costing between twenty and eighty dollars depending on your phone’s age and popularity. Many replacement screen kits include the basic tools needed for installation, though the repair requires careful disassembly of your device.
Search for model-specific screen replacement tutorials on YouTube before ordering parts. These videos show the exact steps required for your phone and help you assess whether the repair difficulty matches your comfort level with small electronics work.
Screen replacement makes sense when your phone was working normally before the display failed and when the photos you need to recover are worth more than the cost of a replacement device. This android phone hardware failure data recovery approach works best for recent damage where you know the internal components remain functional.
What Professional Data Recovery Actually Involves
Professional data recovery services use specialized equipment and techniques to retrieve data from non-functional android devices with serious hardware problems. These services represent the last resort for truly dead phones with motherboard damage, water damage, or complete system failure.
Professional recovery techniques include chip-off data extraction, where technicians remove the storage chip from your phone and read it using specialized equipment. Logic board repair involves fixing damaged circuits on the phone’s motherboard to restore basic functionality long enough for data extraction. Some facilities use recovery boxes and other proprietary tools designed specifically for retrieving data from damaged mobile devices.
Professional android phone motherboard damage recovery costs typically range from one hundred to over one thousand dollars depending on the complexity of the damage and the techniques required. Success rates vary significantly based on the type of failure, with water damage and impact damage having different recovery prospects.
Consider professional recovery when your photos have irreplaceable sentimental or business value that justifies the high cost. Most services offer evaluation fees around fifty dollars to assess whether recovery is possible before committing to the full service cost.
The reality is that some hardware failures make data recovery impossible regardless of the money spent. Professional services will honestly assess your device and tell you if recovery is feasible before beginning expensive procedures.
Special Situations — Water Damage, Boot Loops, and Completely Locked Phones
These three scenarios require completely different approaches than standard broken screen recovery because each situation involves additional complications beyond simple display damage. Water damaged android photo recovery demands immediate action to prevent further damage, boot loop situations require software repair techniques, and locked phones with forgotten passcodes have very limited recovery options.
I want to address these edge cases specifically because most recovery guides ignore them entirely, leaving people with these problems without clear guidance. Each situation has its own dos and don’ts that can mean the difference between successful photo recovery and permanent data loss.
The key is recognizing which special situation you are dealing with and following the specific protocol for that problem rather than trying generic recovery methods that might make things worse.
Water Damaged Android — Do Not Make This Mistake
If your phone has been exposed to water, do not attempt to charge it or turn it on immediately. This is the biggest mistake people make with water damaged devices. Applying power to wet electronics can cause short circuits that permanently destroy components that might otherwise be recoverable.
Remove the phone from water immediately and power it off if it is still running. Do not press any buttons unnecessarily. Remove the SIM card and SD card if accessible, and gently shake out any visible water from ports and openings.
Here is where most people get it wrong: rice does not effectively absorb moisture from inside sealed electronics. Instead, use silica gel packets if you have them, or place the phone in a container with uncooked rice only as a last resort. The most effective approach is using a fan to circulate air around the device in a warm, dry environment.
Wait at least forty-eight hours before attempting to power on the device. Once the waiting period ends, try the Vysor or ADB methods if the phone powers on but the screen remains non-functional. Water damaged android photo recovery often succeeds when the storage components survive even if the display fails.
For phones that were completely submerged or exposed to salt water, professional data recovery services offer the best chance of photo recovery, as these situations often require specialized cleaning and component repair.
Android Stuck in Boot Loop — Can You Still Get Photos?
Yes, you can often recover photos from Android phones stuck in boot loops by accessing Android recovery mode or using specialized software repair tools. A boot loop occurs when your phone repeatedly restarts during startup and never reaches the main Android interface.
Try booting into recovery mode by holding Volume Up and Power buttons simultaneously during one of the restart cycles. If your phone has TWRP custom recovery installed, you can use ADB commands to extract photos directly from recovery mode without needing the main Android system to function.
For phones without custom recovery, software tools like DroidKit can sometimes repair android boot loop photo recovery situations by reflashing the system firmware while preserving user data. This process repairs the corrupted software that causes the boot loop while keeping your photos intact.
As a last resort, flashing stock firmware can fix boot loops, but this process often erases user data including photos. Only attempt firmware flashing if you have exhausted all other recovery options and understand that data loss is likely.
Forgot Your Passcode on a Broken Phone
I need to be completely honest: locked broken android phone photo extraction with a forgotten passcode has very limited solutions. Modern Android encryption makes bypassing security extremely difficult, even with technical tools.
Your best option is using the OTG mouse method to attempt passcode entry by feel and memory. Take your time and try common number combinations you might have used. Remember that too many failed attempts will trigger a factory reset on some devices, which erases all data permanently.
ADB commands cannot bypass Android encryption or screen locks on modern devices. Professional data recovery services also cannot break encryption without the passcode. If your Google account is still logged in and you enabled Smart Lock features, those might provide alternative unlock methods through the external display setup.
If all passcode attempts fail, factory reset may be the only way to regain access to the device, but this permanently erases all photos and data stored on the phone.
Before You Hand Your Phone to a Repair Shop — Do This First
Before giving your damaged phone to any repair shop, protect your privacy by performing a factory reset to erase all personal data. Repair technicians can access your photos, messages, banking apps, and saved passwords if you hand over an unlocked device without wiping it first.
Use the external monitor and mouse method from Section 7 to navigate your phone’s settings. Connect your phone to a TV or monitor via HDMI adapter, then use a USB mouse to control the interface. Navigate to Settings, then Accounts and Backup, then Reset, and finally Factory Data Reset.
Make absolutely certain you have extracted all your photos using one of the earlier methods before performing the factory reset, as this process permanently erases everything on the device. Sign out of your Google account before the reset to prevent any linked data access.
Complete Method Comparison — Which One Should You Try First?
Here is a complete comparison of all broken android phone data recovery methods to help you choose the right approach for your specific situation:
| Method | Cost | Difficulty | Works For | Time | Prerequisites |
|---|---|---|---|---|---|
| Google Photos Check | Free | Easy | All scenarios | 5 minutes | Internet access |
| SD Card Removal | Free | Easy | All scenarios | 2 minutes | Phone has SD card |
| USB Connection | Free | Easy | Scenario A only | 10 minutes | Working touchscreen |
| OTG Mouse | $5-10 | Medium | Scenario B | 45+ minutes | OTG adapter |
| HDMI Adapter | $20-30 | Medium | Scenario B | 30 minutes | Alt Mode support |
| Vysor Software | Free | Medium | Scenario B | 20 minutes | USB cable |
| Samsung DeX | Free | Easy | Samsung only | 15 minutes | Samsung phone |
| ADB Commands | Free | Hard | Scenario B | 30 minutes | USB debugging enabled |
| Recovery Software | $50-100 | Medium | System crashes | 1-2 hours | Software compatible |
| Professional Service | $100-1000+ | N/A | Scenario C | Days/weeks | Severe damage |
Start with Google Photos and SD card checks since they are free and take minutes. For broken touchscreens, try the OTG mouse method first. One person saved £120-150 in repair costs using a £20 HDMI adapter, while another spent 45 minutes with an OTG mouse to recover everything.
Samsung users should try DeX before other methods. Only consider professional data recovery service when photos are irreplaceable and hardware is severely damaged.
Can I extract photos from my damaged Android phone if I never set up a Google backup?
Yes, you can extract photos from damaged android phone without any backup. Methods like OTG mouse, HDMI adapter, and Vysor work directly with internal storage. One person recovered everything from a phone with zero cloud backup using a £20 adapter.
Does my phone need to be powered on for these methods to work?
Most methods to extract photos from damaged android phone require power (check for vibration when pressing buttons). SD card removal and cloud checks work regardless. Professional services handle completely dead phones.
Will Vysor work if my phone screen is completely black?
Yes, Vysor can extract photos from damaged android phone with black screens. It mirrors your phone interface to your computer as long as the device powers on and connects via USB.
Do I need USB debugging enabled before my screen broke?
USB debugging is required for ADB commands to extract photos from damaged android phone. However, OTG mouse and Vysor methods work without USB debugging, making them better for most users
How much does it cost to recover photos from a damaged Android phone?
Free methods include Google Photos, SD card, and Vysor. Low-cost options are OTG adapters ($5-10) and HDMI adapters ($15-30). Professional services cost $100-1000+ depending on damage type.


