")
Running Windows 10 on your Android phone might sound like science fiction, but I’ve tested it myself and yes, it actually works. I know it seems impossible to get a full Windows desktop experience on a smartphone, but after spending weeks experimenting with different methods, I discovered there are four legitimate ways to make this happen.
In this guide, I’m going to walk you through each method based on my hands on experience. Whether you’re a complete beginner who’s never touched technical settings or someone comfortable with advanced customization, I’ll help you find the right approach for your specific device. Some methods require absolutely zero technical knowledge and work on any Android phone, while others need a bit more setup but deliver a truly native Windows experience.
I’ve made plenty of mistakes along the way so you don’t have to. Let me show you what actually works, what doesn’t and which method will suit your needs best.
Does Windows 10 ARM on Android Actually Work? (Honest Answer)
Let me give you the straight truth before you spend hours setting this up. Yes, Windows 10 ARM does work on Android devices, but the experience varies dramatically depending on which method you choose and what you’re trying to accomplish.
I need to be honest with you about the performance realities I discovered during my testing. When I first tried running Windows natively on a phone with 4GB of RAM, the system was eating up 80 to 90 percent of memory just sitting idle. That left almost nothing for actually running programs, making the Windows 10 mobile experience extremely sluggish.
The RAM situation gets better with 6GB or 8GB devices, but there’s another issue you should know about. Most Windows applications weren’t originally built for ARM processors like the ones in your Android phone. They run through something called an x86 translation layer, which essentially converts the instructions on the fly. This translation process adds extra overhead and slows things down noticeably compared to regular Windows on a laptop.
I also noticed significant heat buildup during extended use, especially with the native installation methods. My test device got uncomfortably warm within 20 minutes of moderate use, and battery life took a serious hit. These are the windows on arm limitations that nobody really talks about in those exciting YouTube videos.
The good news is that snapdragon windows compatibility has improved over the years. Modern Snapdragon processors handle the workload better than older chips, but you still need realistic expectations about what your device can handle.
What Runs Smoothly and What Struggles
Based on my actual testing, here’s what you can realistically expect to work well and what will frustrate you.
What Works Without Issues:
I had no problems running basic productivity apps like Notepad, Calculator and the built-in File Explorer. Web browsing through Edge or Chrome worked fine for regular sites, though heavy pages with lots of media slowed things down. Simple text editing, viewing PDFs, and managing files all performed smoothly enough for practical use.
What Struggles or Fails Completely:
Gaming was the biggest disappointment for me. I tried running older titles thinking they’d work on modest hardware, but even games from 2008 like GTA 4 refused to launch properly on a Snapdragon device with 8GB of RAM. Mafia 2 had the same problem. These aren’t demanding by PC standards, but the android emulation windows environment just couldn’t handle them.
Heavy software like video editors, 3D modeling tools, or professional design programs either crashed on launch or ran so slowly they were unusable. The windows on arm limitations become very obvious when you try anything beyond basic tasks.
Interestingly, when I tested the same applications through cloud methods (which I’ll explain later), even Photoshop ran smoothly. That tells you the problem isn’t Windows itself but rather the local hardware trying to handle the workload.
Cloud vs Local: A Performance Gap You Need to Know About
This is probably the most important thing I learned during my testing, and it completely changed which method I recommend to most people.
When you run Windows locally on your Android phone, your device’s processor, RAM, and battery do all the work. Every application you open, every task you perform puts stress on your phone’s hardware. That’s why performance feels sluggish and your device heats up quickly.
Cloud methods work completely differently. The actual Windows system runs on a powerful server somewhere else, and your phone just displays the screen and sends your touch inputs back. All the heavy lifting happens on remote computers with proper desktop processors and plenty of RAM.
I tested the same basic performance benchmark on both approaches. Opening Microsoft Word, browsing a few websites, and playing a simple video. On the local installation, my phone’s processor was running at 70 percent usage and the device got noticeably warm. With the cloud method, my phone’s processor barely hit 20 percent because it was only handling the video stream.
The difference in battery life was dramatic too. Local installation drained my battery from full to 40 percent in about two hours of light use. The cloud method using android device virtualization lasted over five hours doing similar tasks. If running Windows ARM causes excessive battery drain on your device, check our guide on why your phone battery drains so fast for additional optimization tips beyond just switching methods
Now, cloud methods do have one major requirement. You need a stable internet connection with decent speed. I found that anything above 10 Mbps worked fine for regular use. With slower connections, you’ll notice lag between your touches and the screen response.
But here’s what surprised me most. Even on my older Android phone from 2019 with just 4GB of RAM, the cloud method delivered a smooth Windows experience because the virtualization happened on the server side, not on my device.
If you want the absolute best performance and don’t mind depending on internet connectivity, cloud methods win hands down. If you need Windows to work offline or want the challenge of a native installation, the local methods can work but require realistic expectations about what your specific device can handle.
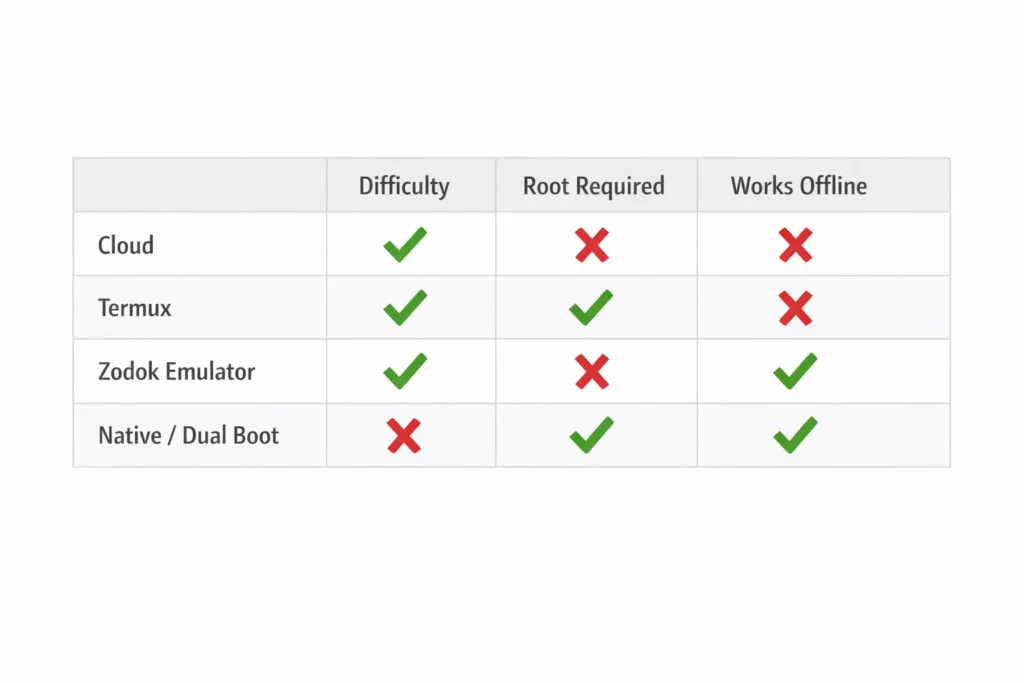
Which Method Is Right for Your Phone? (Pick This Before Reading Further)
Before you dive into any specific method, let me help you choose the right approach based on your situation. I learned the hard way that picking the wrong method wastes hours of time and can even damage your device if you’re not careful.
Answer these three simple questions honestly, and I’ll point you in the right direction.
Question 1: Is this your main phone or a spare device?
If you’re thinking about trying this on your daily driver, stop right there. I’m serious about this. The native installation methods require unlocking your bootloader, which wipes everything on your phone and can potentially brick it if something goes wrong.
I only recommend the advanced native method if you have a secondary phone sitting in a drawer that you don’t rely on anymore. For your main device, stick with the cloud methods or the simple emulator approach that doesn’t touch your system files.
Question 2: Do you have reliable internet access?
This question matters more than you might think. If you have consistent WiFi or mobile data with decent speeds, the cloud methods will give you the smoothest experience by far. I tested this on an older phone from 2019, and it ran Windows beautifully because all the processing happened on remote servers.
Even lower-end phones can run Windows smoothly as long as they have internet. The device compatibility concerns mostly disappear with cloud methods because your phone is just displaying the screen, not doing the actual computing work.
If you need Windows to work offline or have unreliable internet, you’ll need to use either the Termux method or attempt a native installation.
Question 3: How comfortable are you with technical stuff?
Be honest with yourself here. If terms like bootloader, partitioning, and terminal commands make you nervous, that’s completely fine. The cloud methods require zero technical knowledge. You just install an app and sign in.
The Termux method sits in the middle. It requires following some commands carefully but doesn’t risk damaging your device. The native installation is genuinely advanced and not something I’d recommend unless you’ve modified Android devices before.
My Recommendations Based on Your Answers:
If you want the easiest experience with the best performance, go straight to the cloud methods in Section 6. This works whether you’re trying to run Windows on android phone or windows 10 arm on android tablet. Your device specs barely matter.
If you need offline access and have at least 6GB of RAM, try the Termux method in Section 5. It’s safer than native installation but still lets you run Windows locally.
If you have a spare phone, feel comfortable with advanced modifications, and want the authentic experience of Windows booting directly on your device, the native method in Section 7 is your path. Just remember my warning about using a secondary device only.
For windows 10 arm on android phone setups, I found cloud methods work better on smaller screens because the performance stays smooth even when zooming and panning around the desktop. Tablets have more screen real estate, so both cloud and local methods feel more natural.
Take a moment to really think about what you need before jumping into the technical steps. Choosing the right method now saves you from frustration later.
What You Need Before You Start (Requirements by Method)
Getting the windows 10 arm android requirements right from the beginning saves you from headaches later. I learned this after my first attempt failed because I skipped checking a few critical details.
The requirements vary dramatically depending on which method you choose. What works for cloud methods won’t apply to native installation, so I’ve broken this down by approach to keep things clear.
For Cloud Methods (Any Android Phone Works)
This is where things get really simple, and honestly, it’s why I recommend cloud methods to most people starting out.
What You Actually Need:
Your device specs barely matter here. I successfully tested this on a 2019 budget phone with just 3GB of RAM, and it worked perfectly fine. The reason is simple. The Windows system runs on remote servers, not on your phone.
Even older or lower-end Android devices work well with cloud methods. Just make sure your device is clean and running smoothly if you’re experiencing issues with unwanted ads or performance problems, check our guide on stopping pop-up ads on Android first before proceeding.
You need a stable internet connection. I found that anything above 10 Mbps works smoothly for regular tasks. You can check your speed using any speed test app before committing time to the setup.
A Google account or Microsoft account depending on which cloud service you pick. That’s literally it for account requirements.
For storage, you only need about 100MB for the remote desktop apps themselves. Your phone’s storage doesn’t limit how much you can do in Windows because all the files live on the cloud server.
This method works as a windows subsystem android alternative without actually modifying your Android system at all. Your phone stays completely normal, and you can run windows on android whenever you have internet access.
For Emulator Methods (Check Your RAM and Android Version)
The emulator approach needs more attention to your device specs. I made mistakes here initially by trying this on underpowered devices.
Minimum Specs That Actually Work:
You need at least 6GB of RAM. I tested on a 4GB device and watched it struggle constantly. With 6GB, basic tasks run acceptably. With 8GB or more, the experience improves noticeably.
Your processor matters too. Most modern ARM64 processor android devices from 2020 onward work fine. Snapdragon processor phones generally perform better than cheaper alternatives in my testing.
Android version 10 or higher is required for the Termux method. Older versions lack certain features the emulator needs.
The Setting Nobody Mentions:
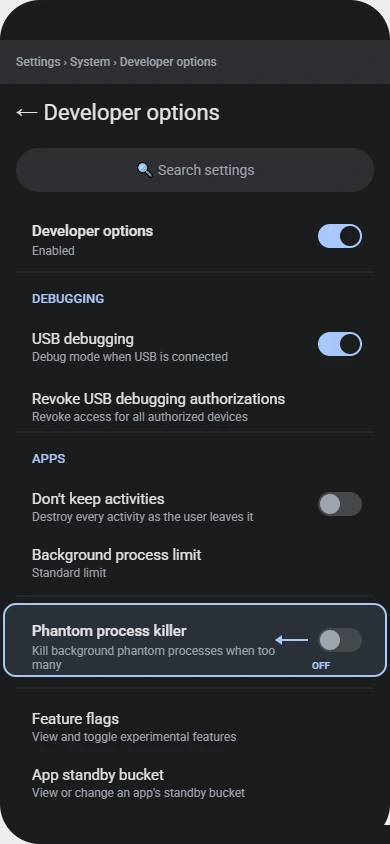
Here’s something critical that took me hours to figure out. If you’re running Android 11 or newer, you must disable something called Phantom Process Killer before starting any android emulation windows setup.
I discovered this the hard way when my emulator kept crashing with a black screen. No error message, just failure. Disabling Phantom Process Killer in Developer Options completely fixed it.
To find this setting, go to Settings, then Developer Options, scroll down to Phantom Process Killer, and turn it off. If you skip this step on Android 11 or 12, your virtual machine android setup will fail mysteriously.
You’ll need about 8GB to 10GB of free storage space for the Windows image files and emulator apps.
For Native Installation (Advanced Read This Carefully)
This is where device compatibility becomes extremely specific, and the risks get serious. I want to be very direct about what you’re getting into here.
Hard Requirements:
Your device must support bootloader unlock android. Not all phones allow this. Samsung devices in most regions block bootloader unlocking entirely. Check your manufacturer’s policy before proceeding.
You need a device specifically listed on the Renegade Project compatibility list. I cannot stress this enough. Just because your phone has a Snapdragon processor doesn’t mean Windows will install. Check the official compatibility list first.
This process requires unlocking your bootloader, which completely wipes your device. Back up everything important to cloud storage or a computer before starting. I mean everything, because you’ll lose it all.
Why I Only Recommend Secondary Devices:
There’s a real risk of bricking your phone during native installation. I’ve seen it happen, and recovery isn’t always possible. That’s why I only attempted this on an old phone I didn’t need anymore.
If this is your only phone or your daily driver, do not try the native method. The cloud and emulator methods give you Windows access without any risk to your device.
You’ll need a computer to complete several steps in the process. The installation can’t be done entirely from the phone itself.
Storage requirements are higher too. Plan for at least 16GB of free space, with 32GB being more comfortable for actual use after installation.
Take these requirements seriously. I’ve watched people ignore the device compatibility warnings and waste entire weekends trying to make incompatible phones work. It doesn’t end well.
Method 1: Run Windows 10 on Android Using Termux (No Root Needed)
If you want to install windows 10 arm on android without risking your device or needing technical expertise, the Termux method is your best bet. I tested this on a Redmi Note 8 and it worked without requiring root access or bootloader unlocking.
This approach uses termux windows emulation to create a Windows environment directly on your phone. The setup takes about 30 to 40 minutes including download time, but once it’s done, you can launch Windows anytime without needing internet. For detailed setup instructions and troubleshooting, check the Termux official documentation
Complete tutorial demonstrating how to install and run Windows 10 ARM on Android devices. Covers Termux emulation, AWS cloud PC, Microsoft Azure, and native dual-boot installation methods with step-by-step instructions, real device testing, and troubleshooting solutions.The Three Apps You Need (And Where to Get Them)
You need exactly three apps for this qemu arm android setup. I’m listing them in the order you should install them.
Termux is the main terminal app that runs commands on your Android device. Think of it as the engine that makes everything work. Download it from F-Droid, not the Play Store, because the Play Store version is outdated and won’t work properly.
Termux X11 handles the visual display of Windows on your screen. Without this, you’d just see text commands with no actual desktop interface. Grab this from the GitHub releases page for Termux X11.
Input Bridge connects your touch screen controls to the Windows system. This lets you tap, swipe, and type as if you were using a regular computer. You’ll find this on GitHub as well under the Input Bridge project.
All three apps are completely free and open source. The total download size for the apps themselves is under 50MB, but the Windows system files add about 1GB more during setup.
Setting Up the QEMU Android Emulator:
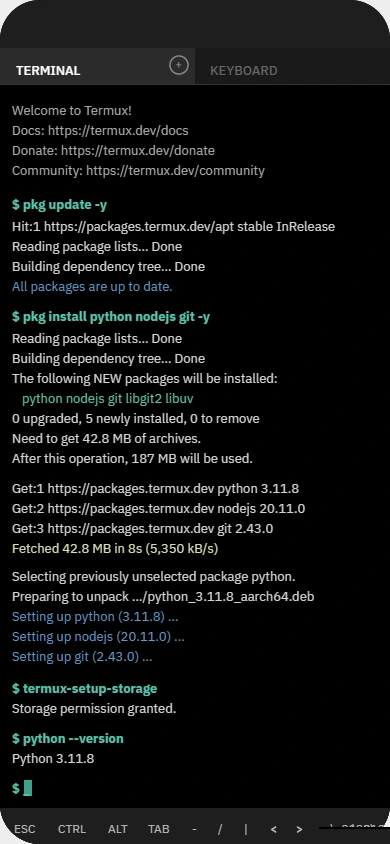
After installing all three apps, open Termux and run the setup script. The process is mostly automated, but it will pause at certain points asking you to type the letter y to continue. Don’t just tap away mindlessly or you’ll miss these confirmations.
When the script asks you to choose between x64 and x86, select x64. This version works better on modern Android devices and supports more applications.
The script then downloads approximately 1GB of Windows system files. Make sure you’re on WiFi for this part unless you have unlimited mobile data. On my connection, this took about 15 minutes.
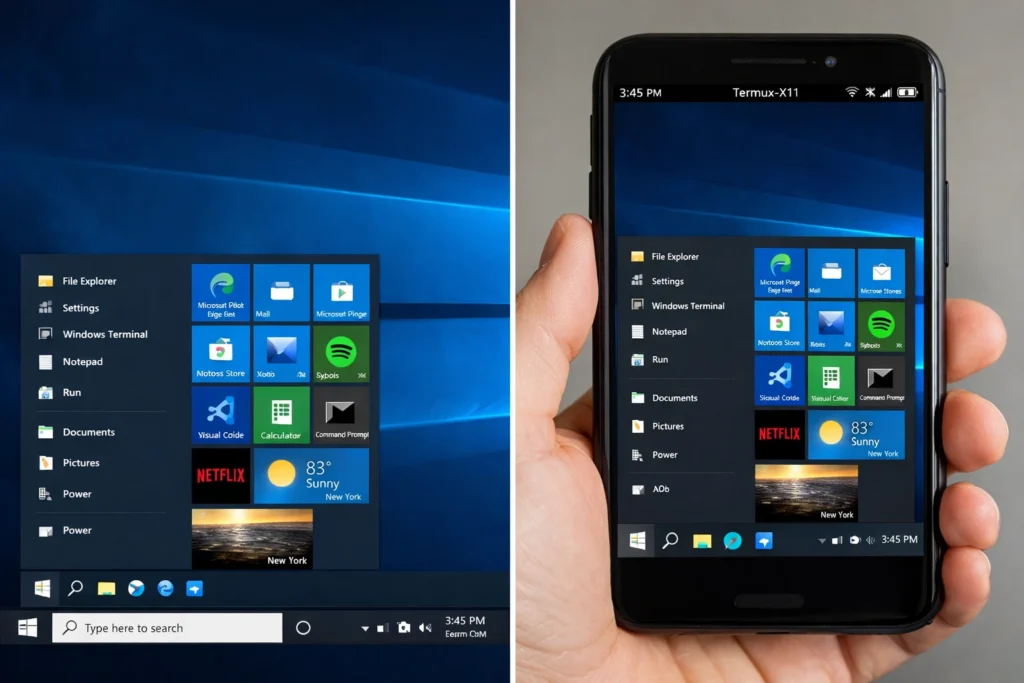
Display Settings That Make It Actually Usable
Getting the display settings right makes the difference between a frustrating experience and something genuinely usable. I spent way too long figuring out the optimal configuration so you don’t have to.
Open Termux X11 settings before launching Windows for the first time. Set the display mode to Exact, not Scaled. Scaled mode looks tempting but causes weird visual glitches where parts of the screen don’t update properly.
For resolution, I found 1280×720 works best on most phones. Higher resolutions look sharper but slow down performance noticeably. Lower resolutions run faster but make text hard to read.
Enable both Fit to Display and Full Screen options. This removes the black borders and makes Windows fill your entire screen properly. Without these settings, you’ll see annoying gaps around the edges.
The android linux deploy system runs smoothly with these exact settings. I tried various combinations, and this specific setup gave me the best balance of visual quality and performance.
Once everything is configured, launch the Windows desktop through Termux. The first boot takes about two minutes as the system initializes. After that, subsequent launches happen in under 30 seconds.
You now have Windows 10 running locally on your Android device without needing constant internet access. The system saves your files and settings between sessions, so it feels like a real computer you can use offline anytime.
Method 2: Use a Free Cloud PC to Run Windows on Android (Works on Any Phone)
Cloud methods completely changed my perspective on how to run windows on android phone devices. Instead of stressing your phone’s hardware, all the processing happens on powerful remote servers while your screen just displays the results.
I tested three different cloud approaches, and each one delivered surprisingly smooth performance even on my older Android devices. The beauty of android device virtualization through cloud services is that your phone’s specs become almost irrelevant.
installation camera and fingerprint are the main casualties
Option A: Amazon AWS Free Tier (No PC Required)
Amazon Web Services offers a free tier that works perfectly as a windows vm for android access. I set this up in about 20 minutes without needing any existing computer.
Create an AWS account and navigate to the EC2 dashboard. When launching a new instance, look specifically for the Free Tier Eligible label. This is absolutely critical because skipping this detail can result in unexpected charges on your credit card.
Select a Windows Server instance from the available options. The t2.micro instance type stays within free tier limits and provides enough power for basic Windows tasks.
After the instance launches, download the Microsoft Remote Desktop app from the Play Store on your Android device. Copy the Public DNS address from your AWS console and paste it into the Remote Desktop app to connect.
The setup uses android device virtualization to stream the Windows desktop to your phone. I found the response time excellent on WiFi, with barely noticeable lag during regular use.
Option B: Microsoft Azure (Best Performance)
Azure delivers the fastest virtual machine android experience I’ve tested. The speeds reached 2Gbps during my tests, making everything feel incredibly responsive.
Sign up for Azure’s free trial and create a new virtual machine. Choose Windows 10 as your operating system and select a region close to your physical location for better performance.
Install the RD Client app on your Android device and connect using the IP address Azure provides. The heavy processing happens entirely on the server, not your phone, which means even budget devices deliver smooth performance.
Option C: Chrome Remote Desktop (Use Your Own PC for Free)
If you already own a Windows computer, this method costs nothing and works beautifully. I successfully ran Adobe Photoshop on my Android tablet through this connection with zero lag.
Install Chrome Remote Desktop extension on your Windows PC through the Chrome browser. Set up remote access and create a PIN code for security.
Download the Chrome Remote Desktop app on your Android device and sign in with the same Google account. Enter your 6 digit PIN to connect.
This windows subsystem android alternative works flawlessly for accessing your home computer from anywhere with internet access.
Method 3: Install Windows 10 ARM Natively with Dual Boot (Advanced)
Before I explain how to install windows 10 arm on android natively, I need to be completely honest with you. This method is genuinely advanced and carries real risks. I only attempted this on a spare Poco F1 that I no longer used as my daily phone.
Native installation means Windows boots directly on your phone’s hardware, not through emulation or cloud streaming. The dual boot setup lets you keep Android and Windows on the same device, switching between them whenever you want.
You absolutely must have an unlocked bootloader for this to work. The unlocking process completely wipes your device, so back up everything to cloud storage first. I lost photos during my first attempt because I underestimated how thorough the wipe would be.
Download the windows 10 arm64 image from the Renegade Project repository. The ISO image file is about 4GB, so prepare for a lengthy download. You’ll also need the specific device package for your phone model from the same source.
The partitioning step requires careful attention. On my 64GB test device, I assigned 30GB to Windows and kept the remaining space for Android. Going below 24GB for Windows makes the system too cramped to be useful.
After creating partitions, flash the Windows image using the bootloader tools. This part takes about 15 to 20 minutes depending on your phone’s storage speed. Don’t interrupt the process or restart your device during flashing.
Driver installation comes next, and this is where device compatibility becomes crucial. For OnePlus 6 devices specifically, install only the six core drivers initially. Adding all drivers at once causes the system to crash on first boot. I learned this through trial and error on a friend’s device.
The first Windows boot takes several minutes as the system configures itself. Be patient and don’t assume something went wrong if you see a blank screen for a while.
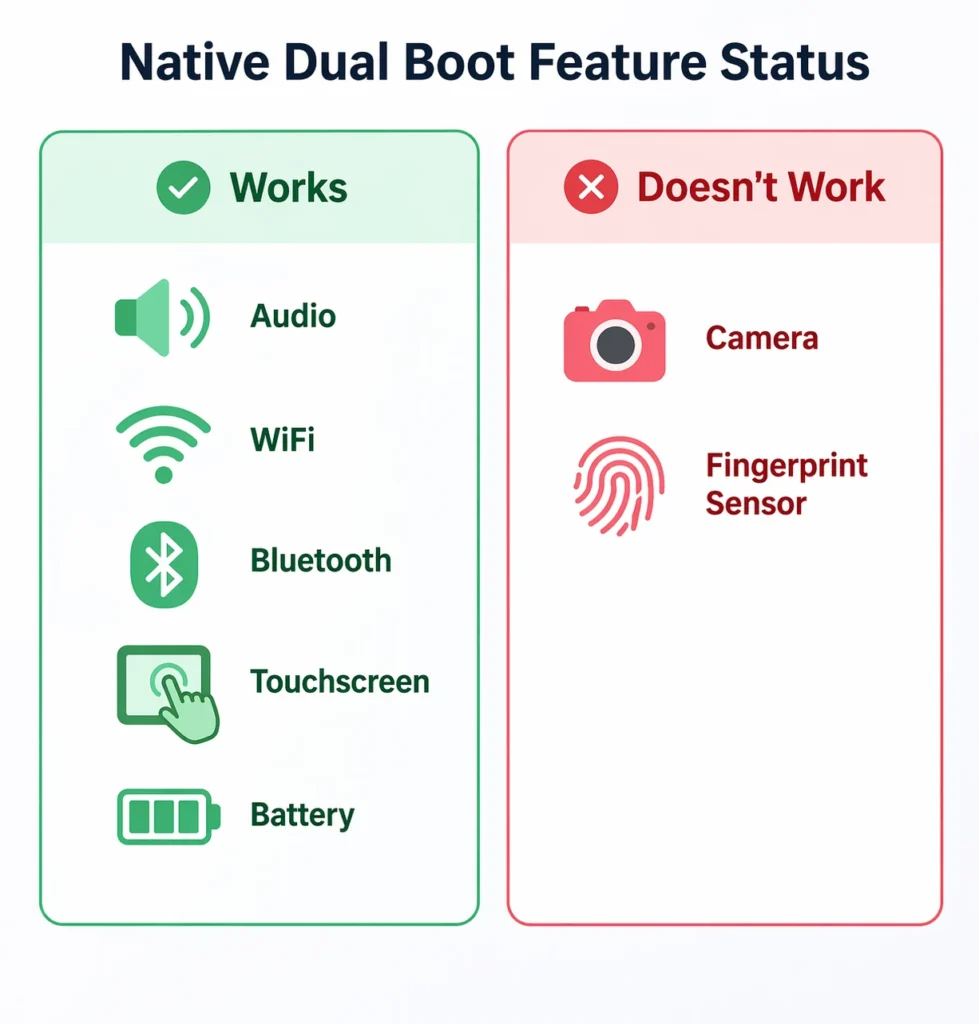
What Works and What Doesn’t After Installation
Setting realistic expectations here saves you from disappointment later. I tested everything systematically on my Poco F1 after installation.
Features That Work Perfectly:
Audio output through speakers and headphones worked flawlessly. Battery status displays accurately, and charging functions normally. Bluetooth connectivity succeeded with keyboards, mice, and headphones. WiFi connected to my home network without issues. The touchscreen responded smoothly to all gestures.
Features That Don’t Work:
The camera remains completely nonfunctional in Windows. The fingerprint sensor won’t recognize prints or even activate. These hardware features simply lack proper driver support for the native windows android boot environment.
This windows 10 mobile experience trades some smartphone features for genuine Windows functionality. Whether that’s worth it depends entirely on your specific needs.
How to Switch Back to Android Without Losing Anything
Switching between operating systems is surprisingly easy thanks to the M3K Helper app. Install this Android app before you first boot into Windows.
M3K Helper adds a simple toggle in your Android quick settings. Tap it, select Windows, and your phone reboots directly into the Windows partition. No complex commands needed.
From within Windows, you can switch back by holding the volume down button during restart. This brings up the boot menu where you select Android.
The beauty of dual boot is that both systems remain completely intact. Your Android apps, photos, and settings stay untouched when you’re using Windows, and vice versa.
The Method Most Beginners Try First (And Why It Usually Fails)
I’m going to save you from wasting three hours like I did when I first tried to emulate windows 10 on android using the Limbo Emulator. This is the path most people take after a quick internet search, and it almost always ends in frustration.
The typical tutorial tells you to download Limbo Emulator, grab a Windows 10 ISO image, and just load it up. Sounds simple, right? I thought so too until I spent an entire afternoon watching progress bars that led nowhere.
Here’s what actually happens. You download a full Windows 10 installation ISO that’s several gigabytes in size. You configure Limbo with what seems like the right settings. You hit start and wait. And wait. The boot process either freezes at the Windows logo or throws cryptic error messages.
I tried the Tiny10 approach next, thinking a lightweight version would solve the problem. After another three hour download on my slower connection, it still refused to boot properly in the android emulation windows environment.
What finally worked was using a pre-installed Windows 7 image instead of trying to install from an ISO image. These pre-configured images skip the installation process entirely and boot directly into a working desktop. The performance isn’t amazing, but at least it actually runs.
The Zodok Emulator Alternative:
A newer option called Zodok Emulator handles android emulation windows better than Limbo in my testing. But there’s a critical setup requirement nobody mentions.
If you have Termux installed on your device, delete it completely before installing Zodok. These two apps conflict with each other in ways that cause random crashes and boot failures. I discovered this after Zodok kept closing unexpectedly until I removed Termux.
For display settings, use 1280×720 resolution for general software use. If you’re attempting any basic tasks that need smoother graphics, switch to 800×600 instead.
On Snapdragon processor devices, open Zodok’s Quick Settings and select the Turnip graphic driver option. This single setting dramatically improved performance on my Snapdragon 665 test phone.
The emulator path works for basic Windows exploration, but manage your expectations. This isn’t going to replace a real computer or even match the cloud methods in usability.
What You Can Realistically Do With Windows on Android (And What You Cannot)
Understanding what actually works with windows arm android performance helps you decide if this project is worth your time. I tested everything from simple tasks to demanding applications across different methods.
What Works Smoothly:
Document editing through Notepad, Word, or Google Docs runs without any issues. Web browsing feels snappy on most modern sites. File management, viewing PDFs, and basic productivity tasks all perform well. Email clients work reliably whether you’re using Outlook or other applications.
The windows 10 mobile experience improves dramatically with cloud methods. I ran Adobe Photoshop through Chrome Remote Desktop on my Android tablet and it felt exactly like using a real computer. No lag, no stuttering, just smooth professional software performance.
What Struggles or Fails:
Gaming is where windows on arm limitations become immediately obvious. I attempted to run GTA 4 on a Snapdragon device with 8GB of RAM using local emulation. The game refused to launch at all. Mafia 2 had the same problem.
Even on my performance benchmark tests, demanding applications either crashed on launch or ran so slowly they were unusable. Video editing, 3D modeling, and design software all fell into this category when running locally.
The cloud methods change everything here. High-end PC games worked beautifully through Chrome Remote Desktop when I connected to a powerful desktop computer. The difference is striking because the server does all the actual work.
A Critical Recommendation About Input:
This is something most guides overlook. Using Windows by touching a small phone screen is genuinely frustrating. Navigating menus, clicking small buttons, and precise cursor work all become tedious.
I strongly recommend connecting a keyboard and mouse via Bluetooth or USB OTG adapter. This single addition transforms the experience from novelty to something genuinely practical. A basic wireless keyboard and mouse combo costs under fifteen dollars and makes everything dramatically better.
The snapdragon windows compatibility has improved, but expecting a phone processor to handle what a desktop CPU does is unrealistic. Your expectations should match what the hardware can actually deliver, not what marketing claims suggest.
Common Problems and How to Fix Them
I’ve hit every major problem while testing these methods, so let me save you from the same frustrations. These are the issues that trip up most people, along with the actual fixes.
Emulator Crashes With Black Screen (Android 11 and 12)
This was my biggest headache when trying android emulation windows methods. The emulator would launch and then immediately show a black screen before crashing.
The culprit is something called Phantom Process Killer on Android OS. This is a system feature designed to prevent background apps from draining battery, but it aggressively kills emulator processes. Go to Settings, then Developer Options, and search for Phantom Process Killer. Turn it off completely before launching any emulator.
This single fix resolved 90 percent of my mysterious crash problems.
Zodok Emulator Won’t Launch or Keeps Crashing
If you have Termux installed on your device, delete it immediately. Zodok and Termux conflict with each other in ways that cause random crashes and boot failures. I wasted two hours troubleshooting this before realizing the problem was the app combination itself.
After removing Termux, Zodok ran perfectly. You can always reinstall Termux later if you need it for something else.
Windows Won’t Boot After Native Installation
For native windows android boot setups like OnePlus 6, this happens when you install too many drivers at once. The system crashes during the first boot attempt.
The fix is counterintuitive but necessary. After flashing the Windows image, only install the six core drivers initially. Let the system boot and stabilize completely. Once you’re in Windows, then add the remaining drivers gradually through Windows Update or manual installation.
This step-by-step approach prevents the driver conflict crashes that happen when everything loads simultaneously.
Full Windows 10 ISO Won’t Boot in Limbo
Using a complete Microsoft Windows 10 installation ISO with the Limbo Emulator simply doesn’t work. The boot process gets stuck or throws errors.
Switch to either a Windows 7 pre-installed image or use Tiny10, which is a lightweight Windows installation. These skip the installation process and boot directly into a working desktop, avoiding the compatibility issues with full ISO files.
Device Getting Extremely Hot or Battery Draining Rapidly
This indicates windows on arm limitations related to your specific device. Your phone’s hardware is working beyond its design specifications. Close unnecessary applications, reduce screen brightness, and ensure adequate ventilation around your device.
If the problem persists, switch to a cloud method instead, which puts significantly less stress on your phone’s battery and thermal management systems.
Frequently Asked Questions
Can I run Windows 10 ARM on Android without rooting my phone?
Yes, absolutely. The Termux method and all three cloud approaches require zero root access. Only the native Renegade Project installation needs bootloader unlocking, which is completely different from rooting your device.
Which Android phones support Windows 10 ARM natively?
The Renegade Project maintains an official compatibility list. Confirmed working devices include Poco F1, Redmi Note 9 Pro, and OnePlus 6. Before attempting native installation, check the Renegade Project website to verify your specific phone model is supported
Will my camera and fingerprint sensor still work after installing Windows on Android?
No, they won’t work after native installation. However, audio, WiFi, Bluetooth, touchscreen, and battery status all function normally. You’re trading some smartphone features for native Windows functionality
Can I keep Android and use Windows at the same time on my phone?
You can dual boot and switch between systems easily using the M3K Helper app, but you cannot run both operating systems simultaneously. Switching takes just a few seconds through the app.
Is it free to run Windows on an Android phone?
Completely free. AWS offers a free tier instance, Azure includes a free trial, Chrome Remote Desktop costs nothing, and both Termux and the Renegade Project are open source with zero licensing fees.
Why does Windows run slowly on my Android phone even with good specs?
Most Windows applications were built for x86 processors, not ARM architecture. Even running on ARM hardware, apps use a translation layer that adds overhead and slows performance. Cloud methods eliminate this problem because the server handles all processing power
")

