
So Your Android Screen Has Horizontal Lines Here Is What It Means
If you’ve just noticed horizontal lines on your phone screen Android, you’re probably feeling worried and that’s completely normal. Those unexpected streaks across your display can look alarming, but here’s the good news: in many cases, horizontal lines on your Android phone are fixable, especially if you catch them early.
Horizontal lines are basically a sign that something is interrupting the normal signal flow between your phone’s display and its internal hardware. Think of it like static on a TV sometimes it’s just a bad connection that can be reset and other times it points to a deeper issue
This Android display problem can range from a simple software glitch (which you can fix yourself in minutes) to hardware damage that needs professional repair.
Most people panic and assume their phone screen is not working properly and needs immediate replacement. But according to real world tech repair experience, a significant number of cases especially lines appearing on your Android phone that appear suddenly without any physical damage are actually software-related and can be resolved at home with the right steps
The key is knowing what type of problem you’re dealing with before you start trying random fixes. That’s exactly what this guide will help you figure out. First, we’ll diagnose whether your issue is software or hardware problem, then walk you through every possible fix in order from easiest to most advanced
By the end, you’ll know exactly what caused your horizontal lines on phone screen android and whether your phone is fixable without spending a cent.
Let’s start by understanding what actually causes these lines in the first place.
What Causes Horizontal Lines on Your Android Phone Screen?
Before you start trying random fixes, it’s crucial to understand what causes horizontal lines on your phone screen. The root cause determines whether you can fix this yourself in minutes or whether you’ll need professional help. Let’s break down the most common causes into two clear categories: software problems (which you can fix at home) and hardware problems (which need a different approach)
Software Causes (These Are Fixable at Home)
If your phone hasn’t been dropped, exposed to water, or left in extreme heat, there’s a good chance your horizontal lines are caused by a software glitch. These are the easiest to fix because they don’t involve any physical damage to your screen.
Display driver software bugs are one of the most common software culprits. This software tells your screen what to show and how to show it. When a display driver crashes or gets corrupted (often after a buggy system update), it can cause visual glitches like horizontal lines, flickering, or colour distortion
Third-party apps especially unofficial or cloned apps can also introduce GPU rendering issues that mess with your display. According to real troubleshooting experience shared by Android users, downloading camera apps from sketchy sources, using pirated games, or installing heavily modded apps can conflict with your phone’s graphics processing and cause Android screen flickering lines.
Even legitimate apps can sometimes have bugs that only show up on certain Android operating system versions or phone models. These app causing screen issues Android problems are often easily fixable by clearing the app’s cache or uninstalling it entirely
Corrupted system settings are another sneaky cause. Sometimes a simple setting gets glitched out (like your display colour profile or GPU overlay settings), and your screen starts acting up. The good news? These can usually be reset without losing any of your personal data.
Finally, an outdated Android OS can cause display problems if your phone’s software is trying to run on old code that’s no longer optimized for your hardware. Manufacturers regularly push updates that fix known display bugs so if you’ve been putting off that system update, it might actually be the solution.
Hardware Causes (These Need a Different Approach)
Now let’s talk about the harder truth: most persistent horizontal lines are actually caused by physical screen damage. If your lines appeared suddenly after any kind of physical trauma to your phone, this is almost certainly your situation.
Drop damage is the #1 cause. Even if your screen didn’t shatter, the internal touchscreen digitizer or the connection between your display and motherboard can get damaged from impact. You might not see any visible cracks, but internally, something shifted or broke.
Water damage is another major cause. Even if your phone is water-resistant, prolonged exposure to moisture (like using it in a steamy bathroom or getting caught in the rain) can cause water damage phone screen issues. Water can seep into the display connectors and cause short circuits that show up as lines or flickerin
Overheating can permanently damage both LCD display and AMOLED display panels. Leaving your phone in a hot car, charging it under a pillow, or gaming for hours while it’s plugged in can cause phone overheating screen lines. If your phone regularly overheats when charging,
you may also have a charging problem that needs diagnosis Our complete charging guide covers not only phones that won’t charge at all, but also charging-related heat issues, slow charging and hardware failures that cause both charging problems and display damage. Addressing charging issues early can prevent the cascade of damage that leads to display lines.
AMOLED screens are especially sensitive to heat prolonged exposure can cause AMOLED screen damage where pixels literally burn out, leaving permanent lines and screen burn in Android issues
Dead pixels are another hardware issue. According to tech repair professionals, dead pixels happen when a portion of the screen stops receiving electrical signals. Unlike stuck pixels (which show a single incorrect colour), dead pixels appear as black dots or lines because that part of the screen has completely failed.
In all these hardware cases, no amount of software resets will fix the problem—you’re looking at either a screen replacement or a new phone.
How to Fix White Horizontal Lines on Phone Screen Android
Here’s something most articles don’t tell you: the colour of your horizontal lines actually tells you something important about what’s wrong.
White horizontal lines on phone screen usually indicate a different type of problem than black horizontal lines on phone screen or coloured lines. White lines most commonly point to LCD backlight bleed (where the backlight behind your LCD display is unevenly distributed) or a display driver error that’s misfiring the brightness signal.
This is actually better news than black lines, because white line issues are more often software-related and fixable.
White lines most commonly point to LCD backlight bleed (where the backlight behind your LCD screen is unevenly distributed) or a display driver error that’s misfiring the brightness signal.
This is actually better news than black lines, because white line issues are more often software related and fixable.
Black horizontal lines on phone screen, on the other hand, usually mean complete pixel death those pixels are receiving zero signal and appear black because they’re off. This is almost always hardware damage.
Coloured lines like green, purple, or pink horizontal streaks are a telltale sign of AMOLED screen damage. AMOLED displays use organic materials that can degrade or get damaged, and when they do, you get these weird colour glitches.
If you’re seeing coloured lines, especially on a Samsung, OnePlus, or Xiaomi phone (which all use AMOLED), it’s likely physical panel damage.
Here’s the practical takeaway: if your lines are white and they flicker or change, try the software fixes first there’s a decent chance you can resolve it. If your lines are black, coloured, or perfectly static and unchanging, you’re probably dealing with hardware damage, and software fixes won’t help.
Here’s a quick visual overview of the most effective fixes from a real Android troubleshooter demonstrating each method on an actual device:
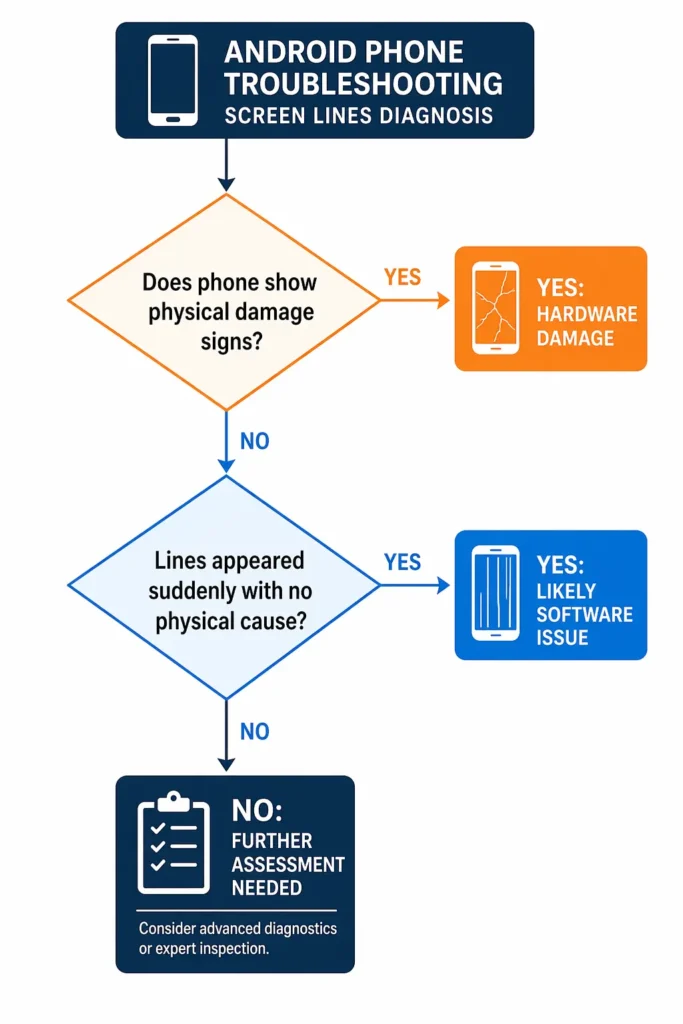
Is It a Software Problem or Hardware? How to Tell Before You Try Anything
Here’s the truth: most people waste hours trying software fixes when their problem is actually hardware damage or worse, they immediately assume their phone is broken when a simple restart would have fixed it.
Before you try a single fix from the next section, spend just 2 minutes running these two quick diagnostic tests. They’ll tell you exactly what kind of hardware vs software problem phone you’re dealing with, so you only try the fixes that actually apply to your situation
This is the single most important step competitors skip entirely and it’s the difference between fixing your phone in 5 minutes versus spending an entire afternoon frustrated with solutions that were never going to work for your specific case.
According to real troubleshooting experience from tech repair professionals, the first thing you should do is check your phone’s physical history.
Ask yourself:
- Did I drop my phone recently?
- Has it been exposed to water or extreme heat (like leaving it in a hot car)?
- Did the lines appear immediately after any kind of physical trauma?
If the answer to any of these is yes, there’s a very high chance you’re dealing with physical screen damage and software fixes won’t help skip straight to Section 8 about professional repair
But if your lines appeared out of nowhere with no physical cause, or if they come and go randomly, you likely have a software issue and that’s fixable at home.
The Safe Mode Test (Takes 2 Minutes)
Safe Mode is Android’s built-in diagnostic tool that temporarily disables all third-party apps and runs your phone using only the core system software. This is the single best way to isolate app causing screen issues Android problems from true hardware damage
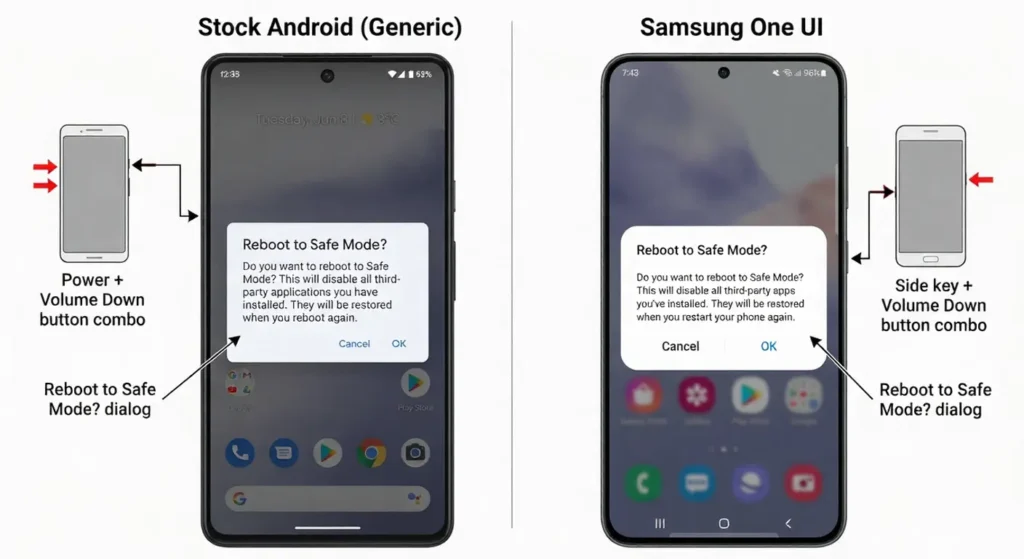
Here’s how to boot into Safe Mode on most Android phones:
- Press and hold the Power button until the power menu appears
- Long-press the “Power off” option (don’t tap it hold it)
- A prompt will appear asking if you want to reboot to Safe Mode
- Tap OK
- Your phone will restart with “Safe Mode” displayed in the corner
(For Samsung devices: Power off the phone completely, then press Power + Volume Down together until the Samsung logo appears, then release Power but keep holding Volume Down until the phone fully boots.)Now look at your screen carefully. Are the horizontal lines still there?
Now look at your screen carefully. Are the horizontal lines still there?
If the lines DISAPPEAR in Safe Mode → This confirms it’s a software problem specifically, a third party app conflict. One of the apps you’ve installed is causing Android screen flickering lines or display rendering issues. Your next step is to uninstall recently added apps one by one (start with unofficial apps, camera mods, or heavy games) and reboot normally each time until you identify the culprit.
If the lines are STILL THERE in Safe Mode → This points to either a system level software bug (like a corrupted display driver) or hardware damage. Move on to the Restart Test below.
To exit Safe Mode, just restart your phone normally.
The Restart Test and Physical Damage Check
If your lines persisted in Safe Mode, the next diagnostic step is a simple full restart—not just locking the screen, but a complete power cycle that clears your phone’s RAM and resets all active processes.
How to do a proper restart:
- Press and hold the Power button
- Tap Restart (or Reboot)
- Wait for your phone to completely shut down and boot back up
Watch your screen carefully during the boot process specifically, when the manufacturer logo appears (Samsung, Xiaomi, OnePlus, etc.). Are the horizontal lines visible before Android even loads?
If lines appear during boot (before you see the lock screen) → This is hardware damage. The lines are physically present on the display panel or in the connection between the screen and motherboard, which means no software fix will resolve it. You’ll need to skip to Section 8 about professional screen replacement.
If lines only appear AFTER Android loads → There’s still a chance this is a software issue—specifically a display driver error or GPU rendering conflict. In this case, the fixes in Section 5 (especially the Developer Options GPU settings and software update) are worth trying
Now do a quick physical inspection checklist:
✅ Check for visible cracks on the screen even tiny hairline cracks can damage the touchscreen digitizer underneath
✅ Check the charging port for moisture or water residue signs of water damage phone screen issues
✅ Feel the back of the phone is it warmer than usual? Persistent overheating can cause internal display damage
✅ Recall the last 48 hours did your phone fell and screen lines appeared after any impact, even if you didn’t think it was serious at the time?
If any of these physical checks raise red flags, you’re almost certainly dealing with hardware vs software problem phone on the hardware side, and the most realistic path forward is professional repair or replacement.
But if everything checks out clean, and your horizontal lines only started recently with no clear physical cause, you still have a good shot at fixing this yourself with the software solutions in the next section
Lines Appearing Only in One App? This Is a Different Problem Entirely
Before you panic and assume your screen is broken, here’s a scenario that catches a lot of people off guard: what if the horizontal lines only show up inside one specific app like Discord, Instagram, a mobile game, or a messaging app but the rest of your phone looks perfectly normal?
If that’s your situation, you don’t have a screen problem. You have an app causing screen issues Android specifically, a rendering bug inside that one app. This is completely different from the hardware or system-level software issues we discussed earlier, and it needs a completely different fix.
This is a phone screen glitch at the app level, not a display hardware failure. According to real troubleshooting experience demonstrated by Android users, this exact scenario happens more often than you’d think especially with apps that use custom graphics rendering, like gaming apps, video players, or heavily modded social media clients.
The fix? You don’t need to replace your screen or reset your entire phone. You just need to force stop and clear the cache for that specific app. In most cases, this solves the problem in under 2 minutes.
Force Stop and Clear Cache for the Problem App
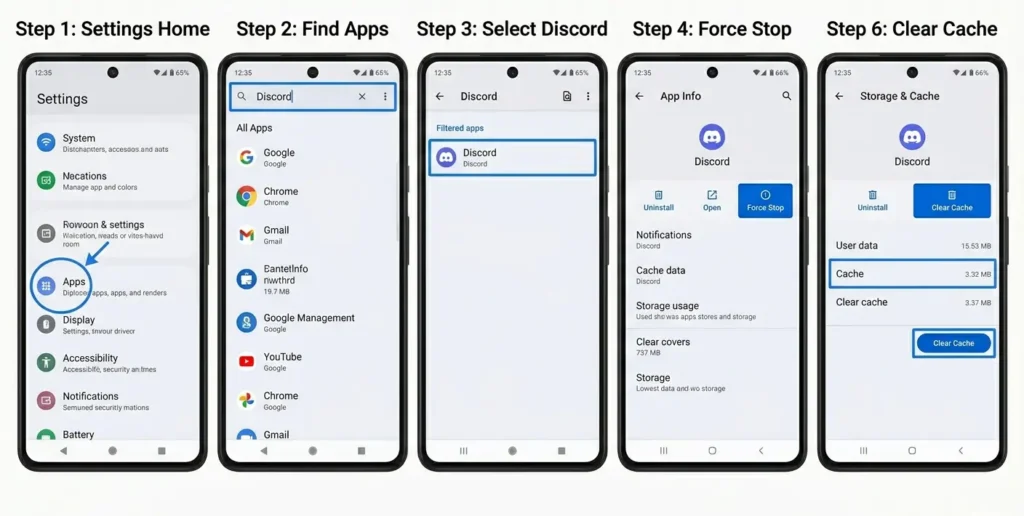
Here’s the exact step-by-step process to fix app causing screen issues Android problems—this was demonstrated live in a real troubleshooting video where Discord was showing horizontal lines but the home screen was fine:
Step 1: Open your phone’s Settings
Tap the Settings app (the gear icon)
Step 2: Go to Apps
Look for Apps (on some phones it’s called Applications or App Manager)
Step 3: Find the problem app
Scroll through the list and tap on the app where you’re seeing the lines (for example, Discord, Instagram, YouTube, etc.)
Step 4: Force Stop the app
Tap Force Stop at the top or bottom of the screen
→ This completely shuts down the app and clears it from your phone’s RAM
Step 5: Clear Cache
Tap Storage (or Storage & Cache)
Then tap Clear Cache
→ This deletes temporary data the app stored that might be corrupted
Step 6: Restart the app
Go back to your home screen and open the app again
Check if the lines are gone
What just happened? When you clear cache android for a specific app, you’re deleting all the temporary files that app created things like image thumbnails, video previews and rendering data. Sometimes these files get corrupted (especially after an app update or if your phone crashed while the app was running), and that corruption shows up as visual glitches like horizontal lines.
If clearing cache didn’t work, try this next step:
Advanced Step: Uninstall and Reinstall the App
- Long-press the app icon on your home screen
- Tap Uninstall (or drag it to the Uninstall area)
- Go to the Google Play Store
- Search for the app and reinstall it fresh
This gives you a completely clean installation with no leftover corrupted data. According to the video demonstration, this fixed the Discord lines issue when cache clearing alone didn’t work.
One more thing to try: If you’re still seeing lines in one app after reinstalling, go to Settings > Display > Screen Colors (or Color Profile) and switch between different modes (Vivid, Natural, Pro, etc.).
Some apps don’t play nicely with certain colour profiles and switching can reset the app’s rendering behaviour. This is mentioned specifically in Video 8 as a secondary check that worked for some users.
How to Fix Horizontal Lines on Your Android Phone Screen All Methods
Now that you understand what’s causing your horizontal lines, it’s time to try the fixes. Here’s the good news: most horizontal lines on android phone screen fix issues can be resolved without ever opening your phone or visiting a repair shop.
I’m going to walk you through 10 different methods, ordered from easiest to most technical. Start with Fix 1 and work your way down. Each fix takes just a few minutes, and many people will solve their problem within the first three attempts. Don’t skip ahead try them in order, because the simplest fixes often work best.
Important: After each fix, restart your phone and check if the lines are gone before moving to the next one. If a fix doesn’t work, move on there’s no harm in trying multiple approaches.
Fix 1 Restart Your Phone (Start Here)
This is the #1 most overlooked fix, and it actually works surprisingly often. A simple restart clears your phone’s RAM and resets any temporary glitches that might be causing display problems.
Here’s how to restart your phone:
- Press and hold the Power button on the side of your phone
- Wait for the power menu to appear
- Tap Restart (or Reboot)
- Wait 10-15 seconds for your phone to completely shut down
- Your phone will boot back up automatically
When your phone is restarting, watch your screen. If the horizontal lines appear while the manufacturer logo is loading but disappear once Android fully loads, this is a good sign it means your software update android or system might have a glitch that a restart can temporarily fix.
Why this works: Think of your phone’s RAM like a desk. When you restart, you’re cleaning off the desk entirely. Any temporary files or processes causing display issues get wiped away.
Expected result: If lines disappear after restart, congratulations you fixed it. If they return later, move to the next fix. If they persist after restart, continue to Fix 2.
Fix 2 Let the Phone Cool Down
If your phone is warm or hot to the touch, phone overheating screen lines is your problem. Heat damages the delicate circuits inside your display, and cooling it down often resolves temporary lines. However, if your phone keeps overheating even after cooling, this indicates a deeper hardware issue often related to battery problems.
If you suspect battery overheating, we have a complete diagnostic guide that covers both battery drain causes and heat-related issues in detail. Addressing the root cause of overheating can prevent both display damage and battery failure
How to cool down your phone:
- Power off your phone completely
- Remove the case if you’re using one (cases trap heat)
- Don’t use a freezer or ice — this can damage internal components
- Leave it in a cool room for 15–20 minutes
- You can gently place it on a cool surface (but avoid condensation from AC vents)
- Power it back on and check if the lines are gone
How to check if your phone is overheating:
- Is the back of the phone warm or hot to the touch?
- Has the phone been running heavy games, video recording, or charging while in use?
- Was the phone recently left in direct sunlight or in a hot car?
If any of these are true, overheating is almost certainly part of your problem.
Why this works: When your phone overheats, the LCD or AMOLED display panel can temporarily malfunction. As the temperature drops, the panel stabilizes and lines often disappear.
Important warning: If your phone keeps overheating even after cooling, this indicates a deeper hardware issue (battery, charger, or processor problem). Skip ahead to Section 8 about professional repair.
Fix 3 Check for a Software Update
Manufacturers release updates specifically to fix display bugs and display driver software errors. If you haven’t updated your phone in a while, a buggy OS version might be causing your lines.
How to check for updates:
- Open Settings
- Scroll down and tap About Phone
- Look for System Update or Software Update
- Tap Check for Updates
- If an update is available, tap Download and Install
- Your phone will restart and install the update (this takes 10–30 minutes)
Why this matters: Every Android version (and every phone manufacturer’s custom version) has bugs when it first releases. Google and Samsung and Xiaomi constantly push patches that fix these bugs—including display rendering issues that cause lines.
Expected result: After the update installs and your phone reboots, check if the lines are gone. Updates often fix display problems because they include driver updates and rendering fixes.
Fix 4 Clear the Settings App Cache
Here’s a fix that almost no one knows about: your phone’s Settings app itself can get corrupted, and when it does, it can cause display configuration errors that show up as lines. Clearing the Settings app cache fixes this without deleting any of your personal data.
This is completely different from a factory reset you’re only clearing temporary files from one system app.
How to clear Settings cache:
- Open Settings
- Tap Apps (or Applications)
- Search for Settings in the app list
- Tap on the Settings app
- Tap Storage (or Storage & Cache)
- Tap Clear Cache this will delete temporary files only
- Go back and tap Force Stop
- Wait 10 seconds, then restart your phone
What’s happening: The Settings app stores temporary configuration data. If this data gets corrupted (often after a failed update or system crash), it can cause the entire display system to malfunction.
Why this is better than factory reset: A full factory reset would delete all your apps, photos, and settings. Clearing cache only removes temporary junk files your personal data is completely safe.
Expected result: Many users see lines disappear immediately after this fix because it clears corrupted display configuration data.
Fix 5 Remove Unofficial Third Party Apps
If you’ve installed apps from unofficial app stores, downloaded modded versions of popular apps, or installed heavily pirated games, these are almost certainly causing your android screen flickering lines.
Unofficial apps often have buggy code and don’t go through Google’s security checks. They can introduce rendering conflicts that damage your display.
How to identify and remove problem apps:
- Think about what apps you’ve installed in the last week or two
- Specifically look for:
- Camera apps from non-official app stores
- Games downloaded from websites (not Google Play Store)
- Modded versions of popular apps
- Any app with strange permissions requests
- Open Settings > Apps
- Find the suspicious app and tap it
- Tap Uninstall
- Restart your phone
Quick test: Go into Safe Mode (see Fix 7 below). If your lines disappear in Safe Mode, a third-party app is definitely the cause.
Why this works: Third-party apps that mess with GPU rendering or display settings can cause lines. Removing them eliminates the conflict.
Expected result: If you uninstall the problem app and the lines disappear, you’ve found your culprit. You can reinstall the app from the official Google Play Store if you want a safe version.
Fix 6 Reset All Settings (Not a Factory Reset)
This is a game-changer because it refreshes your entire system configuration without deleting a single photo, contact, or app.
A factory reset deletes everything. Reset All Settings only resets system-level configurations (like Bluetooth, WiFi, display settings, notification settings, etc.)—your personal data stays completely untouched.
How to Reset All Settings:
- Open Settings
- Tap the search icon (magnifying glass) at the top
- Type Reset
- You should see Reset All Settings as an option
- Tap it
- You’ll see a warning: “This will reset all settings to their defaults. Your apps and data will not be deleted.”
- Tap Reset All Settings to confirm
- Your phone will restart and reapply default configurations
What gets reset:
✅ Display settings (brightness, colour profile, refresh rate)
✅ Sound and vibration settings
✅ Bluetooth and WiFi connections
✅ Notification settings
What does NOT get deleted:
✅ Your photos and videos
✅ Your contacts and messages
✅ Your installed apps
✅ Your login credentials
Why this works: Over time, system settings can get corrupted, especially display-related settings. Resetting them to defaults often clears whatever glitched configuration was causing your lines.
Expected result: After reset, your phone will look slightly different (default wallpaper, etc.), but your data is 100% safe. Many users see lines disappear because display rendering settings have been refreshed.
Important: You’ll need to re-enter WiFi passwords and re pair Bluetooth devices after this reset.
Fix 7 Boot Into Safe Mode and Test
You’ve already learned about Safe Mode in Section 3 (the diagnostic section), but it’s also a fix. If lines disappear in Safe Mode and reappear when you exit, a third-party app is causing the problem.
How to boot into Safe Mode (most Android phones):
- Press and hold the Power button until the power menu appears
- Long-press the “Power off” option (hold it, don’t just tap)
- A dialog will ask: “Reboot to Safe Mode?”
- Tap OK
- Your phone restarts with “Safe Mode” written in the corner
For Samsung phones specifically:
- Power off completely
- Press Power + Volume Down together
- Hold until the Samsung logo appears
- Release Power but keep holding Volume Down
- Wait for Safe Mode to load
What to do in Safe Mode:
Check if your lines are still visible. If they disappear in Safe Mode, the problem is a third-party app causing screen issues android.
Go back to your app list and start uninstalling recently added apps one by one (restart after each uninstall) until you find the one causing lines.
If lines are still present in Safe Mode, skip to the next fix it’s a system-level issue, not an app.
To exit Safe Mode: Simply restart your phone normally.
Expected result: If this fix works, you’ve identified which app is causing your problem. Remove that app and you’re done.
Fix 8 Adjust Display Colour Profile
Sometimes your display rendering can get stuck in a bad state, and switching between colour profiles resets it. This is a super quick fix that takes 30 seconds.
How to switch colour profiles:
- Open Settings
- Tap Display (or Display & Brightness)
- Look for Screen Color or Color Profile or Display Color
- You should see options like:
- Pro (most vivid)
- Vivid (bright)
- Default (natural)
- Bright (very bright)
- Switch to a different profile than what you’re currently using
- Check if lines disappear
- If not, switch to another profile and check again
Why this works: Your phone’s android display problem might be caused by the current colour profile’s rendering settings being corrupted. Switching profiles forces the GPU to use a different set of rendering parameters, which often clears the glitch.
Quick wins:
- If you’re on “Pro,” switch to “Default”
- If you’re on “Vivid,” switch to “Bright”
- Cycle through all available options (usually 3–4)
Expected result: This fix is hit or miss, but when it works, lines disappear instantly. It’s worth trying because it takes almost no time.
Fix 9 Developer Options GPU Settings
This is for technically confident users. Your phone’s GPU (graphics processor) can sometimes get stuck in a rendering conflict that causes display lines. Adjusting Developer Options settings can fix this.
⚠️ Warning: Don’t change settings here unless you know what you’re doing. Stick to the exact steps below.
How to enable Developer Options:
- Open Settings
- Tap About Phone
- Find Build Number (usually near the bottom)
- Tap Build Number 7 times rapidly
- You’ll see a message: “You are now a developer”
- Go back to Settings
- You’ll now see Developer Options in the menu
- Tap Developer Options
For Xiaomi/MIUI phones specifically:
Step 3 changes to: Find MIUI Version (not Build Number) and tap it 7 times
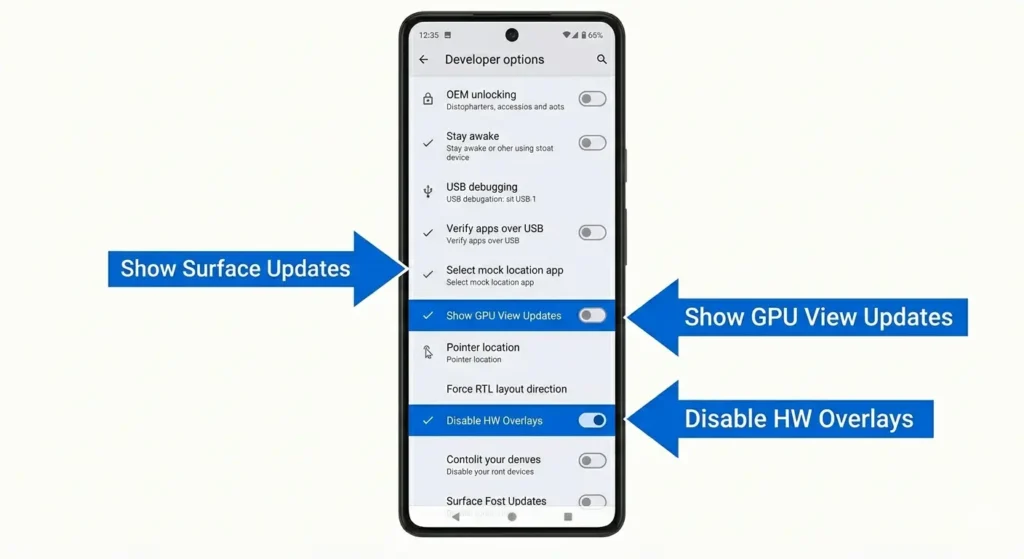
Now adjust the GPU settings:
- In Developer Options, search for or scroll to Show Surface Updates
- Turn this OFF (disable it)
- Search for Show GPU View Updates
- Turn this OFF
- Search for Disable HW Overlays (Hardware Overlays)
- Turn this ON (enable it)
What these settings do:
- Show Surface Updates OFF = Stops constant GPU refresh signals
- Show GPU View Updates OFF = Disables GPU debugging display
- Disable HW Overlays ON = Forces GPU to render differently
Together, these settings resolve GPU rendering issue conflicts that cause lines.
Why this works: When the GPU gets stuck in a rendering loop or conflicts with display drivers, these settings force it to use different rendering paths, which usually clears the problem.
Expected result: Restart your phone after these changes. Many users see lines disappear because the GPU rendering conflict has been resolved.
If it doesn’t work: Go back to Developer Options and revert these changes to their original state.
Fix 10 Factory Reset as Last Software Resort
If you’ve tried Fixes 1 9 and nothing worked, a factory reset is your last hope before accepting that this is a hardware problem.
⚠️ CRITICAL WARNING: Factory Reset deletes EVERYTHING on your phone. Photos, apps, messages, settings gone. Only do this if you’ve backed up your data.
Before you factory reset:
- Back up your data:
- Google Account: Go to Settings > Google > Manage your Google Account > Storage > Backup to back up photos, contacts, messages, apps, and settings to Google Drive (Google handles this automatically if your Google Account is set up)
- Or manually back up photos to Google Photos, contacts to Google Contacts, etc.
- Write down important information like WiFi passwords (they’ll be deleted)
How to factory reset:
- Open Settings
- Go to General Management (on Samsung) or search for Reset
- Tap Reset or System Reset
- Tap Reset all Settings (safer) or Factory Data Reset (complete wipe)
- You’ll see another warning
- Tap Reset
- Your phone will restart and begin the reset process (takes 5–10 minutes)
After reset:
- Your phone will restart and show the setup screen
- Sign in with your Google Account
- Restore your backed-up apps, photos, and contacts from Google Drive
Expected result: If lines disappear after factory reset, the problem was software corruption that couldn’t be fixed any other way.
If lines persist after factory reset: This confirms your problem is physical screen damage or a hardware failure. Skip to Section 8 about professional repair software fixes won’t help anymore.
Brand-Specific Tips for Samsung, Xiaomi, OnePlus and Realme Users
Here’s something most generic tech articles completely miss: Android doesn’t work the same way on every phone. Samsung Galaxy, Xiaomi, OnePlus, and Realme phones all customize Android differently, which means entering Safe Mode, accessing Developer Options, and finding diagnostic tools are in completely different places depending on your brand.
Since 90.5K of the global searches for this keyword come from India and Southeast Asia—where these four brands dominate the market—this section is designed specifically for you. No more searching YouTube videos trying to find the right steps for your specific phone
Samsung Galaxy Built-In Display Diagnostic + Easy Safe Mode
Samsung Galaxy phones have the easiest Safe Mode entry of any Android brand, plus a hidden display diagnostic tool most users never find.
How to enter Safe Mode on Samsung:
- Press and hold the Power button until the power menu appears
- Long-press the “Power off” option (hold it, don’t just tap)
- A dialog appears: “Reboot to Safe Mode?”
- Tap OK
- Your phone restarts with “Safe Mode” in the corner
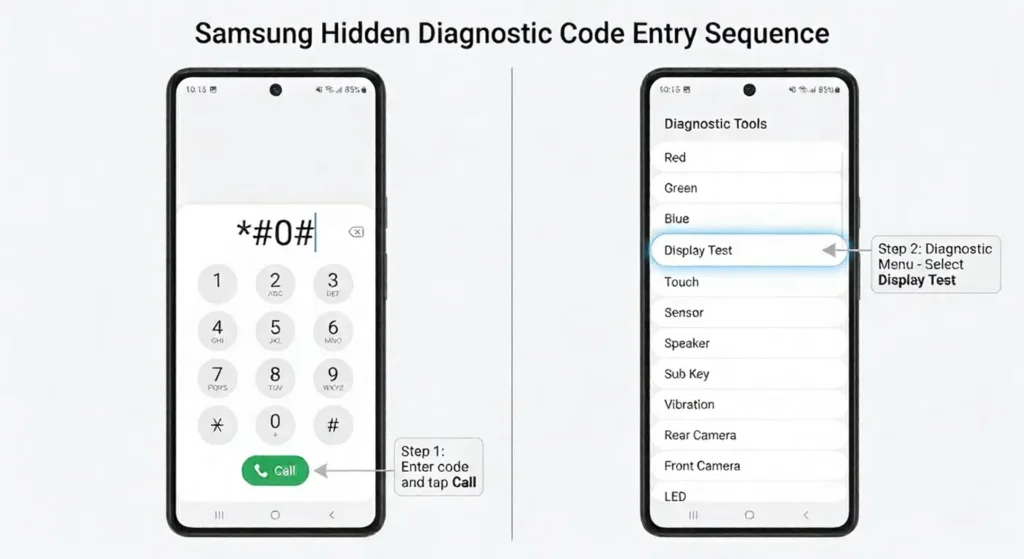
Samsung’s Secret Display Diagnostic:
Samsung phones have a built-in diagnostic mode that can identify display problems:
- Open the Phone app (the dialer)
- Dial *#0*# (yes, just these characters)
- A hidden diagnostic menu appears
- Tap Display or LCD
- You’ll see test patterns and colour bars
- Check if lines appear during these tests
If lines appear in the diagnostic, it confirms hardware damage. If the diagnostic looks perfect but lines appear elsewhere, it’s a software issue.
Developer Options on Samsung:
To access Developer Options (for GPU fixes):
- Settings > About Phone
- Tap Build Number 7 times
- Go back to Settings
- You’ll see Developer Options at the bottom
Samsung-Specific Note: On newer Samsung phones (One UI 5.0+), some settings have moved. If you can’t find something, try searching for it in Settings using the search bar at the top
Xiaomi (MIUI) Different Developer Options Path
Xiaomi phones use MIUI instead of stock Android and this changes where everything is located. Most importantly, you tap “MIUI Version” instead of “Build Number” to access Developer Options—and many people waste hours looking for Build Number on Xiaomi phones because it’s completely hidden.
How to enter Safe Mode on Xiaomi:
- Press and hold the Power button until the power menu appears
- Long-press Power off (hold it)
- A dialog asks: “Reboot to Safe Mode?”
- Tap OK
(Xiaomi’s Safe Mode entry is almost identical to Samsung.)
Developer Options on Xiaomi (MIUI) The Critical Difference:
This is where Xiaomi differs from every other Android brand:
- Open Settings
- Tap About Phone
- Look for “MIUI Version” NOT “Build Number” (Build Number is usually hidden or doesn’t exist on Xiaomi)
- Tap “MIUI Version” 7 times rapidly
- You’ll see a message: “Developer mode enabled”
- Go back to Settings
- You’ll now see Developer Options (usually at the bottom under “Advanced settings”)
Once in Developer Options on Xiaomi:
The GPU settings are the same as other Android phones:
- Show Surface Updates = OFF
- Show GPU View Updates = OFF
- Disable HW Overlays = ON
Xiaomi-Specific Display Settings:
Xiaomi has extra display options most users don’t know about:
- Settings > Display and Brightness
- Look for Color Temperature or Display Color
- Try switching between different modes
- Also check Night Light settings sometimes this being enabled can cause weird display glitches
OnePlus Clean Android, Quickest Safe Mode
OnePlus uses OxygenOS, which is very close to stock Android. This is actually great news because Safe Mode and Developer Options are in nearly the same places as Pixel phones.
How to enter Safe Mode on OnePlus:
- Press and hold the Power button until the power menu appears
- Long-press Power off
- A dialog asks: “Reboot to Safe Mode?”
- Tap OK
Developer Options on OnePlus:
- Settings > About Phone
- Tap Build Number 7 times
- Go back to Settings
- Scroll down to find Developer Options
OnePlus Display Settings to Try:
- Settings > Display
- Look for Color or Color Calibration
- OnePlus sometimes has a “Vibrant” vs “Natural” toggle try switching between these
- Also check Refresh Rate if it’s set to a non-standard refresh rate, try changing it to 60Hz or 120Hz and see if lines appear differently
Why OnePlus Matters: OnePlus phones are popular in India, but they’re often overlooked in generic Android guides. OnePlus users can usually follow stock Android guides more closely than Samsung or Xiaomi users, which is a relief if you’re troubleshooting.
Realme Similar to OnePlus, Plus Realme’s Diagnostic Mode
Realme phones also use a near stock Android OS (based on ColorOS), so most fixes are straightforward. Realme has bonus diagnostic tools that can help identify android display problem issues.
How to enter Safe Mode on Realme:
- Press and hold the Power button until the power menu appears
- Long-press Power off (hold it)
- A dialog asks: “Reboot to Safe Mode?”
- Tap OK
Developer Options on Realme:
- Settings > About Phone
- Tap Build Number 7 times
- Go back to Settings
- Scroll to find Developer Options
Realme’s Hidden Diagnostic Menu:
- Open the Phone app (dialer)
- Dial *#3646633*# (or try *#6633# if the first doesn’t work)
- A diagnostic menu appears
- Look for Display or LCD Test
- Run the test and watch for lines
Realme Display Settings:
- Settings > Display & Brightness
- Look for Color Mode or Display Color
- Realme sometimes has “Vivid” or “Natural” modes try switching
- Also check if Eye Comfort or Eye Comfort Mode is enabled sometimes this setting can cause display glitches on Realme devices
Regional Note: Realme is hugely popular in India and Southeast Asia. If you’re a Realme user, this section is written specifically for your phone’s menus and settings locations.
A Better Workaround The OLED Saver App
If dark mode alone isn’t enough, and you’re stuck with android screen flickering lines caused by hardware damage that you can’t afford to repair right now, there’s an app that actually works better: OLED Saver.
This app doesn’t fix your screen either let’s be clear about that. But it can make a damaged or flickering screen usable again, sometimes dramatically improving the display stability.
What OLED Saver does:
OLED Saver adjusts the way your phone’s GPU and display panel render images by controlling brightness at a very granular level. It stabilizes the electrical signals going to your display, which can reduce or eliminate flickering and lines caused by AMOLED screen damage.
According to a real-world video demonstration where someone with severe screen flickering tested OLED Saver live, the difference was dramatic: lines that were constantly visible became almost invisible with the app enabled.
How to install and use OLED Saver:
Open Google Play Store
Search for “OLED Saver” (look for the one by the developer with the highest ratings). The app is maintained and regularly updated on Google Play Store’s official OLED Saver app page, where you can also read verified user reviews and check the latest version compatibility with your Android device.
Tap Install (the app is under 1MB, so it’s tiny)
Open the app
You’ll see a Enable Service or Start Protection button
Tap it to activate the app
This is crucial: OLED Saver works by adjusting display brightness in a way that stabilizes the panel.
- Once the app is active, look for Brightness settings in the app
- Start with a medium brightness level (around 50%)
- Check if your lines improve
- If they’re still bad, try moving the slider lower (this reduces stress on the panel)
- If it gets too dark, move it higher
- Find the “sweet spot” where your display looks best and lines are minimized
Important notes about OLED Saver:
⚠️ The app must stay enabled 24/7 to work if you restart your phone, you need to re-enable it (it should start automatically, but check)
⚠️ It uses a small amount of battery, but not significant
⚠️ It does NOT fix the underlying hardware damage it’s a workaround, not a solution
⚠️ If your lines are caused by a software issue (not hardware), this app won’t help
Who should use OLED Saver:
- You have confirmed hardware damage (from the diagnosis in Section 3)
- Your phone still works but the lines are annoying
- You cannot afford screen replacement right now
- You want a temporary solution while saving money for a repair
Honest expectation:
According to real testing from the video demonstration, OLED Saver can reduce flickering and lines by 50–80% in some cases. In others, it helps less. The key is finding your phone’s optimal brightness settingwhat works for one phone might not work for another.
If OLED Saver doesn’t help:
Your lines are either caused by a software issue (go back to Section 5 and try the fixes you might have skipped) or your hardware damage is too severe for a software workaround to help. In that case, Section 8 about professional repair is your next step.
When to Stop Trying Fixes and Take Your Phone to a Repair Centre
At some point, you need to accept that DIY fixes aren’t going to work, and your phone needs professional help. The challenge is knowing when that point is. Try the wrong fix on a broken phone display, and you might actually make the problem worse. But wait too long, and you’re wasting time on solutions that were never going to work.
Here’s how to know it’s time to stop trying and start calling a repair centre.
Signs That Confirm It Is a Hardware Problem
By now, you’ve tried the software fixes and possibly the hardware workarounds. If any of these signs are true, physical screen damage is your problem, and no amount of software fixing will help:
Lines appear at the boot screen (before Android loads)
This is the #1 most reliable indicator of hardware damage. If you see horizontal lines while the manufacturer’s logo is loading—before the Android lock screen even appears—your display panel or its connection to the motherboard is physically damaged. Software can’t fix this because the problem exists before your operating system even loads.
Lines are visible in the camera’s viewfinder
Open your Camera app and take a photo. Look at the preview screen. If lines appear in the camera preview but not necessarily everywhere else, this is a display connection issue. The camera is trying to display an image, and the broken display connection shows up as lines.
Lines persist even in Safe Mode
You ran the Safe Mode test from Section 3 and lines are still there? That rules out third-party app conflicts. Combined with other signs, this confirms hardware damage.
Physical damage is visible on your screen
Cracks, a shattered screen, visible chips, or a loose bezel all indicate broken phone display damage. Even hairline cracks can damage the internal touchscreen digitizer and display connectors.
Your phone was recently dropped or exposed to water
If your phone fell and screen lines appeared immediately after, or if you got your phone wet and lines appeared within hours, the impact or water damage caused the problem. Timeline matters: hardware damage shows up immediately, not days later. (Software problems can show up suddenly too, but they usually appear after system updates, not after physical events.)
Water damage indicator is triggered
Your phone has a small sticker inside (usually under the battery compartment or SIM card slot) that changes colour when exposed to moisture. If it’s been triggered and lines appeared after water exposure, you have water damage phone screen issues.
Your touchscreen is not responding properly
If your touchscreen not responding alongside the lines, or if the touch input is delayed or inaccurate, your touchscreen digitizer (the part that detects your touch) is likely damaged along with the display. This requires professional repair.
It’s been over a week since you tried all software fixes
If you’ve completed all 10 fixes from Section 5, tried Safe Mode, tried the workarounds, and lines are still there after a week, accept that this is hardware. You gave software every reasonable chance.
Repair vs Replace A Quick Cost Decision
Here’s the reality most people don’t know: sometimes buying a new phone is cheaper than fixing your current one.
Understanding the cost equation will help you make the right financial decision. This is where most people get stuck they know they need repair but don’t know if it’s worth it.
Get a repair estimate first:
- Contact an authorised service centre for your phone brand (Samsung, Xiaomi, OnePlus, etc.)
- Tell them you have horizontal lines on your display
- Ask for a screen replacement quote
- Get it in writing if possible
The 30% rule:
According to real repair professionals, screen replacement typically costs about 30% of your phone’s original retail price.
Here’s what that means:
- If your phone originally cost $300, screen replacement is roughly $90
- If your phone originally cost $1000, screen replacement is roughly $300
- If your phone originally cost $200, screen replacement is roughly $60
Now compare this to alternatives:
Option A: Repair at authorised service centre
✅ Genuine parts
✅ Warranty on the repair (usually 3–6 months)
✅ Works like new after repair
❌ More expensive (30% of original price)
Option B: Third-party repair shop
✅ Cheaper (sometimes 40–50% less)
✅ Faster turnaround
❌ May use non-genuine parts
❌ No manufacturer warranty
❌ Risk of additional damage from inexperienced technicians
Option C: Buy a refurbished phone
✅ Often cheaper than screen replacement
✅ Comes with some warranty
✅ Like getting a “new” phone
❌ May have other wear and tear
The decision framework:
Ask yourself: Is the repair cost more than 30–40% of your phone’s current market value?
Example 1: You bought your phone for $500 two years ago.
- Repair estimate: $150 (30% of original)
- Current market value of similar used phone: $200–250
- Decision: Repair makes sense $150 is less than buying a used replacement
Example 2: You bought your phone for $400 three years ago.
- Repair estimate: $120 (30% of original)
- Current market value of similar used phone: $100–150
- Decision: Consider buying a refurbished phone instead $150 might get you a better device with warranty
Example 3: You bought your phone for $1200 one year ago.
- Repair estimate: $360 (30% of original)
- Current market value of similar used phone: $600–700
- Decision: Definitely repair it’s the cheapest option
Warranty and insurance considerations:
⚠️ Standard manufacturer warranties do NOT cover accidental damage (drops, water exposure, physical damage)
✅ Extended insurance plans or accidental damage coverage MAY cover this, depending on your plan
✅ Check if your phone came with AppleCare+, Samsung Care+, or similarthese often cover screen replacement at a discounted rate
If you have active accidental damage insurance, your screen replacement might only cost $50–100 instead of the full price. Call your insurance provider first before getting a repair quote.
If you decide to replace your phone instead of repairing it, we have a complete guide on transferring all your data to a new Android phone that covers photos, contacts, messages, and settings without losing anything.
This guide also explains which data from your iPhone transfers if you’re switching from Apple, so you’ll be fully prepared before purchasing a replacement device.
My recommendation:
- Get the official repair quote
- Compare it to the cost of a refurbished phone from a reputable seller
- If repair is less than 35% of the phone’s current market value, repair
- If repair is more than that, seriously consider a refurbished or budget new phone
| Original Price | Repair Cost (approx. 30%) | Current Market Value | Decision |
| $200 | $60 | $100 – $150 | GREEN: Repair Makes Sense |
| $400 | $120 | $100 – $150 | ORANGE: Consider Refurbished |
| $1000 | $300 | $600 – $700 | GREEN: Definitely Repair |
How to Stop Horizontal Lines From Coming Back
Once you’ve fixed your phone, don’t let it happen again. Most people focus on repair but ignore prevention and end up with the same problem months later. How to prevent lines on android screen requires understanding the real-world causes and changing your phone habits.
The good news: prevention is simple and free. Just avoid the specific scenarios that damage displays.
Prevention Tip #1: Use a Screen Protector
A quality tempered glass screen protector ($5–15) absorbs impact that would otherwise crack your display. If you drop your phone, the protector cracks instead of your screen. Replace the protector; your actual screen stays safe.
Why it matters: Most android screen damage starts with physical impact. A protector is your first line of defence.
Prevention Tip #2: Never Leave Your Phone in a Hot Car
This is the #1 preventable cause of phone overheating screen lines. Dashboard temperatures can reach 140–160°F (60–70°C) in minutes. This heat permanently damages AMOLED and LCD panels, causing lines that don’t go away.
The rule: If you wouldn’t leave a pet in your car, don’t leave your phone there.
Prevention Tip #3: Avoid Back Pocket Storage
Sitting on your phone puts pressure on the display and internal connectors. Over time, this constant pressure causes AMOLED screen damage and can crack the screen internally (you might not see external damage). Back pocket storage is one of the most common causes of hidden screen damage.
Better option: Front pocket or bag storage always.
Prevention Tip #4: Don’t Charge While Gaming or in Direct Sunlight
Charging generates heat. Gaming generates heat. Direct sunlight generates heat. Combined, they create dangerous temperatures that damage your display panel and cause screen burn-in android issues.
The rule: If you’re gaming, don’t charge. If you’re in direct sun, keep the phone in shade or turn it off. Never do both simultaneously.
Prevention Tip #5: Keep Your Software Updated
Outdated Android versions accumulate display driver bugs. Each update fixes known issues. Skipping updates means bugs pile up until your display starts glitching.
The practice: Enable automatic updates or manually check monthly. This prevents software-related lines from developing in the first place.
Quick Summary What to Do Right Now
Confused about where to start? Use this decision tree. Based on your situation, you’ll know exactly which fixes to try first.
Decision Tree
Did your phone get dropped, wet, or left in extreme heat?
→ YES: Skip to Section 8 (professional repair). Hardware is damaged.
→ NO: Continue below.
Do horizontal lines on phone screen android appear only in ONE app?
→ YES: Go to Section 4. Force Stop + Clear Cache that app.
→ NO: Continue below.
Did lines appear suddenly with NO physical cause?
→ YES: Try Fixes 1–9 in Section 5 (software solutions).
→ NO: Skip to professional repair assessment.
Software fixes didn’t work after one week?
→ YES: Go to Section 8. Get repair quote vs replacement cost.
→ NO: Keep trying remaining fixes in Section 5.
Can’t afford repair right now?
→ YES: Try OLED Saver workaround (Section 7).
→ NO: Get professional repair estimate.
Repair costs more than 30–40% of phone’s value?
→ YES: Consider buying refurbished or new phone instead.
→ NO: Get the screen replaced at authorised service centre.

Does dark mode actually fix horizontal lines on Android?
No. Dark mode only hides lines visually by changing background colour it doesn’t repair the screen or fix software bugs. Use it as a temporary visual workaround while you try actual fixes from Section 5.
How do I know if horizontal lines are software or hardware?
Boot into Safe Mode (Section 3). Lines disappear = software problem (try app fixes). Lines persist in Safe Mode = hardware damage (skip to professional repair).
Will a factory reset fix horizontal lines?
Factory reset fixes software corruption but not hardware damage. Try softer resets first (Reset All Settings, clear cache) and always back up data before attempting a full factory reset.
How much does it cost to fix horizontal lines on a phone screen?
Screen replacement typically costs 30% of original phone price. Compare this to refurbished phone costs sometimes buying new is cheaper than repair
What causes white horizontal lines specifically?
White lines usually indicate LCD backlight bleed or display driver error (less often complete pixel death). Try software update and colour profile reset first


