
Why You Might Want to Lock Apps on Android
I’ll be honest with you. I never thought much about locking apps on my Android phone until I handed it to a friend so he could check Google Maps for directions. Within seconds, he’d accidentally swiped into my photo gallery.
Nothing embarrassing, but that moment got me thinking about all the other apps I definitely wouldn’t want someone casually browsing through
Quick Answer: Locking apps on Android helps you protect sensitive information in specific apps like banking, messages, or social media when you lend your phone to someone or share it with family members.
You can do this using built-in features on most Android phones or through third-party apps if your device doesn’t have a native option.
My phone holds more personal information than I ever expected. My banking app has access to my accounts. WhatsApp is full of private conversations I wouldn’t want anyone reading. My email contains work documents and personal information and my gallery stores photos I’m definitely not ready to share with the world. And if you have kids who love grabbing your phone to watch videos, you know exactly what I’m talking about
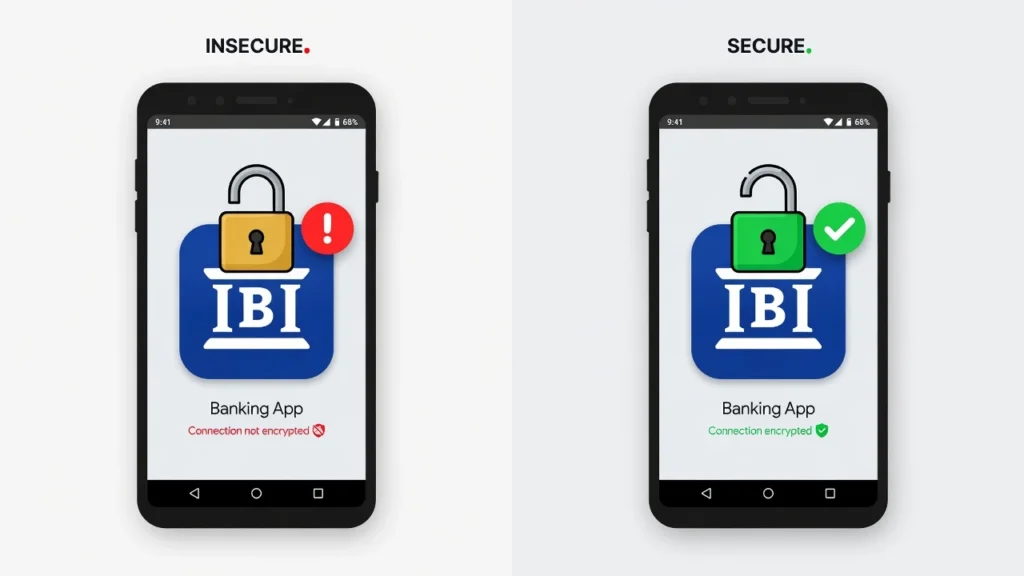
This is where Android app privacy becomes incredibly important. Locking individual apps gives you a simple way to prevent app access on Android without having to lock your entire phone every time you hand it to someone.
Here’s something about mobile security that most people miss. Your phone’s lock screen only protects your device when it’s off or sleeping.
But once someone has your phone already unlocked in their hand, they technically have access to everything on it. That’s exactly the gap app locking fills.
I’ve found this feature useful in so many everyday situations. When I lend my phone to a colleague to use a specific app, I don’t want them accidentally opening my messages. When my nephew wants to play a game on my phone,
I need to make sure he can’t wander into my work email or accidentally make purchases. Even when I’m showing someone photos from a recent trip, I want app access control so they don’t swipe into albums I’d rather keep private
Even when I’m showing someone photos from a recent trip, I want app access control so they don’t swipe into albums I’d rather keep private.
The good news is that Android makes this pretty easy once you know where to look. Some phones have built-in app lock features that work beautifully, while others need a little help from a trusted third-party app. Either way, setting this up takes just a few minutes and gives you real peace of mind.
In the sections ahead, I’m going to walk you through every method I’ve tested to lock apps on Android, starting with the options that don’t require downloading anything extra.
Lock Apps Without Downloading Anything (Screen Pinning Method)
Here’s something most people don’t know about Android. Your phone already has a built-in feature that lets you lock it to a single app without downloading anything extra. It’s called Screen Pinning, and I honestly wish more people knew about it because it works on practically every Android phone out there.
Screen Pinning is perfect when you want to hand your phone to someone for a specific task but don’t want them wandering into your other apps. I use this all the time when someone needs to make a quick call, check directions, or watch a video on my phone. Once Screen Pinning is active, that person can’t switch to any other app or access your home screen until you unpin it.
The best part? This feature works whether you have a Samsung, Xiaomi, Google Pixel, or any other Android device. It’s baked right into the Android security settings, so you don’t need to worry about compatibility or downloading sketchy third-party apps.
What is Screen Pinning?
Screen Pinning locks your Android phone to a single app and prevents anyone from switching to other apps until you release it. Think of it as temporary lock screen protection for one specific app.
When I activate Screen Pinning, the person using my phone can interact with that specific app normally. If I pin Google Maps, they can search for locations, get directions, and use everything inside Maps. But they can’t press the home button to leave, swipe to recent apps, or pull down the notification shade to access other things.
Screen Pinning gives you complete app access control without affecting how the app itself works
I find this incredibly useful when lending my phone to someone who just needs to use the camera, look something up quickly, or make a phone call. The person gets to do what they need, and I get peace of mind knowing they can’t accidentally or intentionally browse through my messages, photos, or email.
How to Enable Screen Pinning (Step by Step)
Turning on Screen Pinning takes less than a minute. I’ve done this on several Android phones, and while the exact wording might vary slightly, the process is nearly identical across devices.
Here’s how I set it up:
- Open your phone’s Settings app.
- Use the search bar at the top and type “Screen Pinning” or “Pin Windows.” This is the fastest way to find the Android security settings you need.
- Tap on the Screen Pinning option when it appears in the search results.
- Toggle the switch to turn Screen Pinning on.
Once Screen Pinning is enabled, you can start using it immediately. Here’s how I actually pin an app:
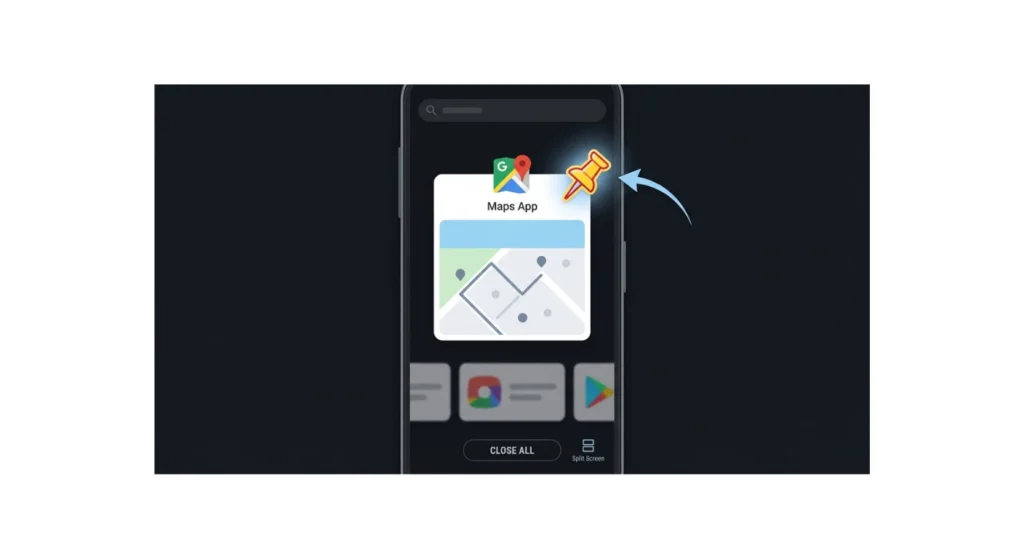
- Open the app you want to lock your phone to. Let’s say it’s Google Maps.
- Tap the Recent Apps button. This is usually the square icon or the three vertical lines at the bottom of your screen.
- Find the app you just opened in the recent apps list.
- Tap and hold the app’s icon at the top of its preview card.
- Select “Pin this app” from the menu that pops up.
Your phone will now stay locked to that app. The person using your phone can do whatever they need within Google Maps, but they can’t leave the app or access anything else on your device.
How to Unpin an App
When you’re ready to take back full control of your phone, unpinning is simple. I do this by pressing and holding the Back button and the Recent Apps button at the same time for about two seconds.
Your phone will ask you to confirm, and once you do, Screen Pinning releases and you’re back to normal. The app stays open, but you can now switch between apps freely again.
The button combination varies slightly depending on your phone’s navigation style. If you use gesture navigation instead of the traditional three-button layout, you’ll usually unpin by swiping up from the bottom and holding for a second. The first time you pin an app, your phone actually shows you a quick on-screen instruction, so just follow what it tells you
Screen Pinning isn’t a permanent lock like the app lock features built into some phones, but it’s incredibly handy for temporary situations. I consider this method my go-to option whenever I need quick lock screen protection without any setup hassle.
How to Put a Lock on Apps Using Built-In Settings
Most modern Android phones come with a built-in app lock feature, and this is honestly my preferred way to secure apps. You don’t need to download anything, you don’t have to worry about permissions, and the feature is designed specifically for your phone’s operating system.
The challenge is that Android runs across dozens of phone brands, each with its own custom interface and settings menu. A Samsung phone has different menus than a Xiaomi, which looks nothing like a Google Pixel or OnePlus setup. But once you know the path for your specific brand, the whole process takes just a few minutes
I’ve tested the built-in app lock feature on several different Android phones, and I’m going to walk you through each major brand so you can find the exact steps for your device.
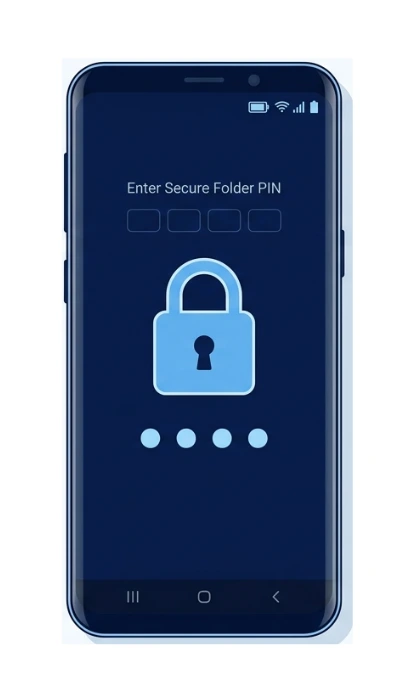
Samsung: Secure Folder vs App Lock
Samsung actually gives you two options for locking apps, and I need to be honest about which one I recommend.
The first option is Samsung’s Secure Folder feature, which is genuinely impressive if your phone has it. Secure Folder creates a completely separate space on your phone with its own security layer. When you add an app to Secure Folder, you get a completely separate instance of that app. This means you could have two different WhatsApp accounts on the same phone, two different Instagram profiles, or two separate email inboxes.
Here’s how I set up Secure Folder on my Samsung phone:
- Open Settings and search for “Secure Folder.”
- Tap on Secure Folder and follow the prompts to set it up.
- You’ll need to grant permissions for features like Calendar and Contacts to work properly.
- Choose your security method. I typically use a Pattern or PIN, but you can also set up a Password if you prefer something longer.
- You can also enable Fingerprint access alongside your pattern or PIN for faster unlocking.
- Once Secure Folder is set up, tap the plus button inside the app to add apps you want to hide and lock.
- Select the apps you want to add, then tap Add.
The apps will now exist only inside Secure Folder, completely separate from your main phone. This method is what Samsung considers the safest way for users to protect their data.
Now, Samsung phones also have a basic App Lock feature separate from Secure Folder. This is simpler but less powerful. I mention it because not all Samsung phones have Secure Folder available, so the basic App Lock is a solid backup option.
One important thing I learned is that third-party app lockers can cause performance issues on Samsung devices. Since Samsung already gives you Secure Folder, I always recommend using that instead of downloading another app. Your phone will run faster, and you get better security without the potential slowdown.
Xiaomi / MIUI: Privacy Password Method
On my Xiaomi phone, the built-in app lock feature is called Privacy Password, and it’s located in a slightly different place than other brands.
Here’s the exact path I follow on my Xiaomi phone:
- Open Settings.
- Scroll down and tap Apps or Application Manager (the name varies by model).
- At the bottom of the menu, you’ll find App Lock. Tap on it.
- Tap the Turn On button.
- You’ll be asked to set a security method. Choose Pattern, PIN, or Password depending on what you prefer.
- Draw or enter your chosen code twice to confirm it.
- The system might ask if you want to create a Mi account. This is optional, but I recommend it because it helps with password recovery if you forget your code. You can choose Not Now if you prefer not to link an account.
- Once that’s done, a list of all your apps appears. Toggle the switch next to any app you want to lock.
Here’s a pro tip I discovered while using this feature. In the App Lock settings, you can access Lock Settings and choose “When device is locked or after exiting app.” This is much better than the default timeout setting because your apps will lock immediately every single time you close them, rather than staying unlocked for several minutes.
Realme / Oppo: Privacy Password
Realme and Oppo phones run ColorOS, which has a privacy password feature that works beautifully. The menu path is a bit different from Xiaomi’s approach, but the end result is the same strong app protection.
Here’s how I do it on my Realme phone:
- Open Settings.
- Look for Fingerprint, Face & Password and tap on it.
- Select Privacy Password from the submenu.
- Enter your current security code to gain access (this is your device’s main lock code).
- In the Privacy Password menu, tap on App Lock.
- Toggle the switches next to whichever apps you want to secure.
Once you complete this, those apps will require your Privacy Password before they can be opened. I like this method because it works on almost all modern Android devices using ColorOS, especially Realme and Oppo phones. The feature integrates nicely with your device’s overall security framework.
OnePlus & Huawei
OnePlus and Huawei phones both include built-in app lock features, though the menu location varies depending on your specific model and software version. On OnePlus, I usually find the App Lock feature under Settings then Security or Utilities.
On Huawei phones running EMUI, it typically sits under Settings then Security then App Lock. If you can’t find it right away, the Settings search bar method I mentioned earlier will take you straight there.
Since these features vary more between specific models, I recommend using the Settings search function (which I’ll explain in just a moment) to find the exact option on your device quickly.
Google Pixel: Private Space & Digital Wellbeing Workaround
Google Pixel phones handle app security differently than most Android brands. Rather than a dedicated app lock menu, Google built its solution into either Android 15’s Private Space feature or through Digital Wellbeing controls, depending on which Pixel model you have
If you’re running Android 15 on a newer Pixel phone, you have access to Private Space. This feature works similarly to Samsung’s Secure Folder by creating a separate, locked space for sensitive apps. You set up a separate lock for Private Space, and only apps inside this space are protected.
For older Pixel phones, Digital Wellbeing is your best workaround. The Focus Mode feature lets you restrict access to specific apps during set times. It won’t stop someone from opening an app with a password prompt the way other methods do, but it does limit when those apps are available, which gives you meaningful control over time lock apps on Android
Pro Tip: Use Settings Search if You Can’t Find App Lock
If you’re having trouble navigating through menus to find your phone’s app lock feature, there’s an easier way. Instead of hunting through Settings, use the search bar at the top of the Settings app.
Just type “App Lock” into the search bar and Android will show you exactly where that feature is on your specific phone. This works incredibly well because it cuts through all the menu confusion caused by Android fragmentation. I use this shortcut all the time when I’m helping friends with their phones.
- Open Google Play Store on your phone.
- Search for “AppLock” and look for the version made by App Lock LLC.
- Tap Install and wait for the app to download.
- Once installation finishes, open the app.
- You’ll be asked to create a PIN on your first launch. Choose a four-digit PIN, a six-digit PIN, a Pattern, or even a Knock Code if your phone supports it.
- Enter your chosen code twice to confirm it.
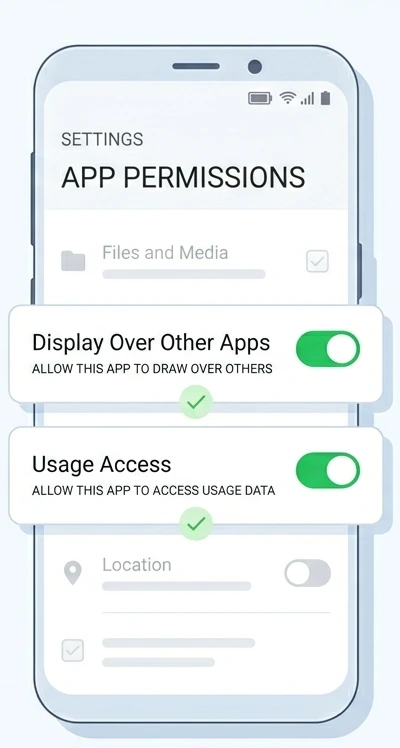
- Here’s the critical part: AppLock requires specific system permissions to function. The app will guide you through granting “Show Over Other Apps” and “Detect Launched App” permissions. You must enable both of these, or the app lock won’t work properly.
- Once permissions are granted, a list of all your installed apps appears. Toggle the switch next to any app you want to lock.
Best Third-Party App Lockers (When Your Phone Lacks Built-In)
Not every Android phone comes with a built-in app lock feature. If you’re using an older device from two to four years ago, or if you’re running stock Android on a phone that simply doesn’t include this feature, a third-party app locker is your solution.
The good news is that several reliable app lock software options exist in the Google Play Store. I’ve tested a few of them, and I’m going to share the ones that actually work well and won’t slow down your phone.
Before you finalize your choice, here’s one more thing worth knowing. When I tested third-party app lockers on older Android devices, some of them did impact performance noticeably. If your phone is already sluggish or your battery drains quickly,
a third-party app locker could make that worse. In that case, the built-in method is almost always better since native features don’t add that same kind of overhead. If you’re already dealing with battery drain issues, check out my complete guide to fixing fast battery drain, which covers both software and hardware causes that might be interacting with any new apps you instal
AppLock (Most Popular Choice)
AppLock is by far the most popular third-party app locker on Android, with over 10 million downloads and a 4.6-star rating. I’ve used this app on older Android phones, and it’s straightforward to set up and reliable once you get everything configured correctly.
Here’s exactly how I install and set up AppLock:
- Open Google Play Store on your phone.
- Search for “AppLock” and look for the version made by App Lock LLC.
- Tap Install and wait for the app to download.
- Once installation finishes, open the app.
- You’ll be asked to create a PIN on your first launch. Choose a four-digit PIN, a six-digit PIN, a Pattern, or even a Knock Code if your phone supports it.
- Enter your chosen code twice to confirm it.
- Here’s the critical part: AppLock requires specific system permissions to function. The app will guide you through granting “Show Over Other Apps” and “Detect Launched App” permissions. You must enable both of these, or the app lock won’t work properly.
- Once permissions are granted, a list of all your installed apps appears. Toggle the switch next to any app you want to lock.
AppLock’s popularity comes down to how flexible it is. Four different security methods means you can pick whatever works best for your habits. I personally use the Pattern method because I find it faster than typing a PIN, but plenty of people prefer the six-digit PIN for extra security. It really just depends on what feels right to you.
Norton App Lock (Most Trusted Brand)
If brand trust matters to you, Norton App Lock is worth considering. Norton has been in the security software space for decades, so their app locker comes with built-in credibility. The setup process is similar to AppLock, and it handles the basics reliably without a steep learning curve
Norton App Lock offers similar functionality to AppLock. You can lock individual apps with a PIN or pattern, and the setup process is fairly straightforward. The main difference is that Norton brings brand recognition and a solid reputation behind it.
If you already use Norton’s antivirus software on your phone, using their app locker makes sense for consistency. However, if you’re just looking for basic app locking and AppLock is working well for you, there’s no urgent reason to switch.
Important: Permission Setup Required
Here’s something critical that I learned the hard way. Most third-party app lockers simply don’t work if you don’t grant the correct app permissions Android requires.
When you install AppLock or Norton App Lock, the apps will ask you to enable specific system permissions. This is where many people run into problems. They install the app, set up their PIN or pattern, and then nothing happens. The app doesn’t actually lock anything because the required permissions were never enabled.
The most commonly needed permissions are called “Display Over Other Apps” and “Usage Access.” Without these, the app lock software can’t detect when you’re trying to open a locked app or prevent access to it. It’s not the app failing to work, it’s just missing the permissions it needs to function.
When your app locker asks you to grant permissions, pay attention and go through with it. Navigate to your phone’s Settings, find App Permissions or Application Permissions, and enable what the app is asking for.
If you’re curious about why Android requires these specific permissions for app lockers to function, Google’s official Android Developers documentation explains how app overlay permissions work and why they’re necessary for this type of security feature. Once those permissions are properly set, everything works smoothly.
Before you finalize your choice, here’s one more thing worth knowing. When I tested third-party app lockers on older Android devices, some of them did slow down noticeably. If your phone is already running a bit sluggish, a third-party app locker could make that worse. In that case, the built-in method is almost always the better choice since native features don’t add that same kind of overhead
If you’re using an older device and you notice your phone feels slower after installing a third-party app locker, it’s worth testing whether the app locker is the cause. You can always uninstall it and try one of the built-in methods instead, which are generally lighter on system resources.
When choosing a third-party app locker, always look for apps with high ratings (4.5 stars or higher) and large user bases (at least a few million downloads). This usually means the app is stable, regularly updated, and trusted by many people.
Lock Apps with Fingerprint or Face ID
Most app locking methods on Android support biometric authentication, which means you can use your fingerprint or face to unlock your apps instead of typing a PIN or drawing a pattern every time. I switched to fingerprint unlocking for my banking app months ago and honestly I’d never go back. It takes less than a second and nobody can watch over my shoulder and memorize a code
Whether you’re using a built-in app lock feature or a third-party app, biometric authentication works the same way. During initial setup, you create your primary security method like a PIN or pattern first. Then the system prompts you to register your fingerprint or face, and from that point forward, you can unlock your protected apps with just a touch or a glance
The nice thing about biometric unlocking is that it feels natural and fast. I can open my banking app with a single fingerprint touch instead of fumbling with a six-digit PIN. It’s more secure than having to type your code in public where someone might see it, and it’s actually more convenient than any password-based method.
Let me walk you through how biometric authentication works with different app locking methods.
With built-in app lock features on phones like Samsung, Xiaomi, Realme, and OnePlus, the process is straightforward. After you set your initial PIN or pattern, the system automatically asks if you want to enable fingerprint or face unlock. I simply touch the fingerprint sensor a few times to register my fingerprint, or I position my face in front of the camera for face ID setup. Once registered, my fingerprint or face becomes my primary way to unlock those locked apps.
I simply touch the fingerprint sensor a few times so the phone can register my fingerprint, or position my face in front of the camera if it’s a face ID setup. Once registered, my fingerprint or face becomes my primary way to unlock those locked apps.
On Google Pixel phones using Private Space, you can similarly add biometric unlock alongside your PIN. During Private Space setup, you’ll be prompted to register your fingerprint or face. This means you don’t have to enter a long code every time you want to access your Private Space apps.
If you’re using a third-party app locker like AppLock, the same principle applies. After you create your initial PIN or pattern, AppLock typically prompts you to enable fingerprint unlock.
You register your fingerprint, and then any time you try to open a locked app, you can authenticate with your fingerprint instead of typing your code.
Here’s something important I discovered while testing these features. Not all Android phones have the same biometric sensors. Newer phones usually have fast, reliable fingerprint sensors built into the display. Some phones have fingerprint sensors on the back.
And some newer phones support face unlock technology. Whichever biometric option your phone has, app locking features will work with it.
One thing to keep in mind is that biometric authentication is only as secure as your phone’s biometric sensor. Most modern phones have sophisticated fingerprint and face recognition, but they’re not absolutely foolproof.
If you’re protecting extremely sensitive information, you might want to use a longer PIN or pattern alongside biometric unlock rather than relying on biometric alone.
The beauty of password protecting apps through biometric authentication is that you get strong security without the friction. You don’t have to remember complex codes, you don’t have to worry about someone watching you enter your PIN, and you don’t have to take extra time unlocking your apps. It’s security that feels effortless.
Lock Apps for Kids (Parental Controls)
If you’re a parent, locking apps on your child’s Android phone works differently than protecting your own privacy. You’re not just locking individual apps; you’re managing screen time, controlling access to inappropriate content, and keeping your child safe while still letting them use their phone responsibly.
Google Family Link is Google’s official parental controls tool for Android, and it’s the most comprehensive option available. I consider it the gold standard for parents who want real control over their child’s device without being overly restrictive.
Google Family Link lets you do several things from your own phone. You can see which apps your child is using and how much time they’re spending on each one.
You can set daily screen time limits so the phone locks down after a certain number of hours. You can approve or block specific apps before your child can download them. And you can even see your child’s location in real time.
Here’s how I set up Google Family Link for a child’s device:
First, you install the Family Link app on both your phone and your child’s phone. On your child’s phone, you set up a Google account specifically for them if they don’t already have one.
Then you link their account to yours through the Family Link app on your phone. Once that connection is established, you can start setting rules and restrictions from your phone.
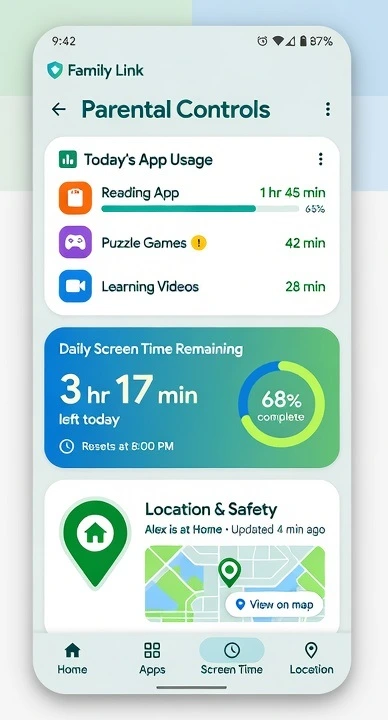
The screen time management features are what I find most useful. You can set bedtime schedules so the phone automatically locks at night.
You can set daily limits so after your child has used their phone for, say, two hours, it stops letting them open new apps. This isn’t quite the same as locking individual apps with a password, but it’s much more effective for parental control because your child can’t bypass it.
Google Family Link also lets you approve app downloads before they happen. Your child sees an app they want, and instead of being able to download it immediately, a request goes to your phone. You review it and either approve or deny the request.
This prevents accidental downloads of inappropriate apps or expensive in-app purchases.
The location tracking feature is something I know many parents appreciate. You can see where your child is at any given moment by checking the Family Link app on your phone. It’s not invasive, but it does give you peace of mind knowing where your child is.
One thing to understand is that Google Family Link is different from the app locking methods I described earlier. You’re not password-protecting specific apps like WhatsApp or Instagram. Instead, you’re controlling overall device usage patterns and managing which apps your child can access at all.
If your child is old enough to have their own phone, Family Link gives you reasonable oversight without treating them like they have no privacy at all.
It sets boundaries while still allowing them to use their phone for legitimate purposes like schoolwork, staying in touch with friends, and entertainment.
The parental controls Android offers through Family Link have improved significantly over the years. Google regularly updates the app with new features based on parent feedback.
It’s free to use and integrates seamlessly with Android devices, so there’s no need to download extra third-party parental control apps unless you need features beyond what Family Link offers.
Common Mistakes That Leave Your Apps Unprotected
I’ve helped several people set up app locks on their Android phones, and I’ve noticed the same mistakes happening over and over. The frustrating part is that these aren’t complicated errors. They’re easy to avoid once you know what to watch for. Most people don’t realize they’ve made a mistake until they try to use their app lock and discover it doesn’t actually work.
Let me share the five biggest mistakes I see people make when setting up app locks, so you can avoid them entirely.
Skipping Account Creation During Setup
When you first enable an app lock feature on your phone, the system often prompts you to create or link an account. Many people skip this step because they think they’ll remember their PIN or pattern forever. I understand the impulse, but this is risky.
If you ever forget your app lock code and didn’t create a recovery account, you could lose access to those locked apps. You might need to factory reset your phone to regain access, which wipes everything. Taking sixty seconds to create a recovery account during initial setup saves you from potential disaster later.
Not Granting Required Permissions
This is the single most common reason third-party app lockers don’t work at all. You install AppLock or Norton App Lock, set up your PIN, lock some apps, and then nothing happens. The app locker simply doesn’t prevent access to your apps.
The problem isn’t the app failing. The problem is missing permissions. When your app locker asks you to enable “Display Over Other Apps” or “Usage Access” permissions, you have to actually go into your Android security settings and enable them. Without these permissions, the app lock software can’t detect when someone tries to open a locked app. I learned this the hard way by assuming the app would just work after installation.
Not Testing Your Lock
Before you hand your phone to someone or think your apps are actually protected, test the lock. Go back to your home screen and try opening one of your locked apps. It should immediately prompt you for your password, PIN, pattern, or fingerprint.
I cannot stress this enough. I’ve seen people confidently hand their phone to someone thinking their apps were locked, only to realize later that the lock never actually activated. Testing takes thirty seconds and prevents embarrassment or privacy breaches.
Using Third-Party Apps on Samsung When Secure Folder Exists
If you own a Samsung phone, using a third-party app locker when Secure Folder is available is unnecessary and potentially problematic. Samsung’s Secure Folder is purpose-built for your device and doesn’t cause performance issues like some third-party options do.
I tested this myself on a Samsung device. Secure Folder works flawlessly and is designed specifically for Samsung’s operating system. If you’re using AppLock or another third-party locker on Samsung when Secure Folder is available, you’re making your phone work harder than necessary.
Leaving Timeout Settings on Default
When you set up an app lock feature, pay attention to the lock timeout settings. Many phones lock apps only after a certain amount of time has passed since you closed them. The default is often five to ten minutes.
This means if you close your banking app and hand your phone to someone two minutes later, that app is still unlocked. The person can open it without entering a code. To fix this, find your app lock settings and change the timeout to “When device is locked” or “Immediately after exiting app.” This ensures your apps lock instantly every time you close them, giving you real protection instead of a false sense of security.
These mistakes are completely preventable. Take your time during setup, follow the prompts carefully, test everything before trusting it, and choose the right method for your specific phone brand.
Doing these things takes just a few extra minutes but makes the difference between an app lock that actually works and one that doesn’t protect you at all
How to Test Your App Lock (Important Step)
After you’ve gone through all the steps to lock apps on Android, the most critical thing you can do is actually test whether your lock works. I can’t tell you how many people skip this step, only to discover later that their apps weren’t actually protected. Testing takes just a few minutes and prevents a lot of regret.
The process is simple. Go back to your home screen and try opening one of the apps you just locked. Tap on it and see what happens. If your app lock is working correctly, the app will immediately prompt you for your password, PIN, pattern, or fingerprint before allowing access. Nothing should happen until you provide the correct authentication.
When I test how to lock specific apps on Android, I always verify each method before trusting it. I’ll lock my banking app, close it, go back to the home screen, and try opening it again. I confirm that the lock screen appears before the app opens. If everything works as expected, I know my apps are actually protected.
Pay attention to exactly what appears when you try to open a locked app. With built-in app locks, you’ll typically see a pattern screen, PIN pad, or biometric prompt depending on what you chose during setup. With third-party app lockers like AppLock, you’ll see a similar security screen. The important thing is that this screen appears every single time you try to open that locked app.
Test a few different locked apps if you’ve locked more than one. Not every app behaves exactly the same way, and you want to make sure your lock method is consistent across all your protected apps. I also recommend testing after the first time you close a locked app to ensure the timeout settings are working correctly.
If you test your app lock and it doesn’t work, don’t panic. Go back and check the most common issues. Did you actually enable all required permissions? Did you complete the setup process all the way through? Did you select the apps you wanted to lock? Usually, the problem is something simple that’s easy to fix.
Testing is the verification step that confirms all your effort actually paid off. It’s the difference between thinking your apps are protected and knowing they’re protected. Before you hand your phone to anyone else or rely on this security, make sure you’ve completed this crucial test.
How to Remove or Disable App Lock
Sometimes you need to unlock apps you previously locked. Maybe you no longer want certain apps protected, or you’re switching to a different security method. The good news is that removing or disabling app locks on Android is just as straightforward as setting them up.
The process depends on which app locking method you used. If you set up app lock using your phone’s built-in feature, the steps are simple.
Go back to Settings, find Apps or App Lock depending on your phone brand, and locate the app lock settings. You’ll see a list of all the apps you locked. Simply toggle the switch off next to any app you want to unlock.
When I need to disable app lock on Android phones I’m testing, I follow the same path I used to enable it. Settings → Apps → App Lock, then toggle off the switches for whichever apps I want to remove the lock from. The apps return to normal immediately, no longer requiring authentication to open.
If you’re using a third-party app locker like AppLock, the process is similar but happens within the app itself. Open AppLock and navigate to the Locked section.
You’ll see all your protected apps listed there. Tap the lock icon next to any app you want to unlock, and it moves back to the Unlocked section.
You can also completely disable how to lock apps on Android by turning off the entire app lock feature if you don’t need it anymore.
In your phone’s settings, toggle off the main App Lock switch, and all protections are removed at once. This is useful if you’re no longer concerned about app privacy or you’re switching to a different security method.
If you uninstall a third-party app locker entirely, make sure you’ve unlocked all your apps first. Removing the app without unlocking your apps might lock you out of them until you reinstall the app locker.
Frequently Asked Questions
Can I lock apps on Android without downloading another app?
Yes. Use Screen Pinning, which works on every Android phone without any downloads. Alternatively, most Android phones have built-in app lock features in their settings. Samsung has Secure Folder, Xiaomi has Privacy Password, and Realme, OnePlus, and Huawei all include native app lock options. Search “App Lock” in your Settings to find your phone’s built-in method.
Which method should I use if I have a Samsung phone?
Samsung Secure Folder is your best option. It’s more secure than third-party app lockers and won’t cause performance issues like some third-party apps do. Secure Folder also lets you run two accounts of the same app on one device, which is a bonus feature other methods don’t offer.
What is the best free app lock for Android?
AppLock is the most popular choice with a 4.6-star rating and over 10 million downloads. It’s reliable and easy to use. If you prefer a trusted security brand, Norton App Lock is an excellent alternative from a well-known company. Both are free and work effectively.
Can I lock apps with my fingerprint on Android?
Yes, absolutely. Both built-in app lock features and third-party app lockers support fingerprint authentication. During initial setup, you’ll be asked if you want to enable fingerprint unlock. Simply register your fingerprint, and from then on, you can unlock your locked apps with just a touch
What if I can’t find the App Lock setting on my phone?
Use the Settings search bar. Open Settings, tap the search icon at the top, and type “App Lock” or “Privacy.” Your phone will immediately show you where this feature is located. This works across all Android brands and saves time navigating through menus


