
Why Won’t My Phone Charge? Real Fixes for Every Type of Problem
I know how frustrating it feels when you plug in your phone and nothing happens. If you are wondering why won’t my phone charge, you are not alone this is one of the most common tech problems people face every single day.
You need your phone for work, for staying in touch with family, and for just about everything else in your daily life. When it stops charging, panic sets in fast.
Over the years, I have helped dozens of friends and family members fix their charging problems, and I have learned something important. Not all charging issues are the same. When you understand which type of problem you are dealing with, you can fix it much faster.
Let me walk you through the four main types of charging problems I see all the time. Once you identify which one matches your situation, you will know exactly where to start.
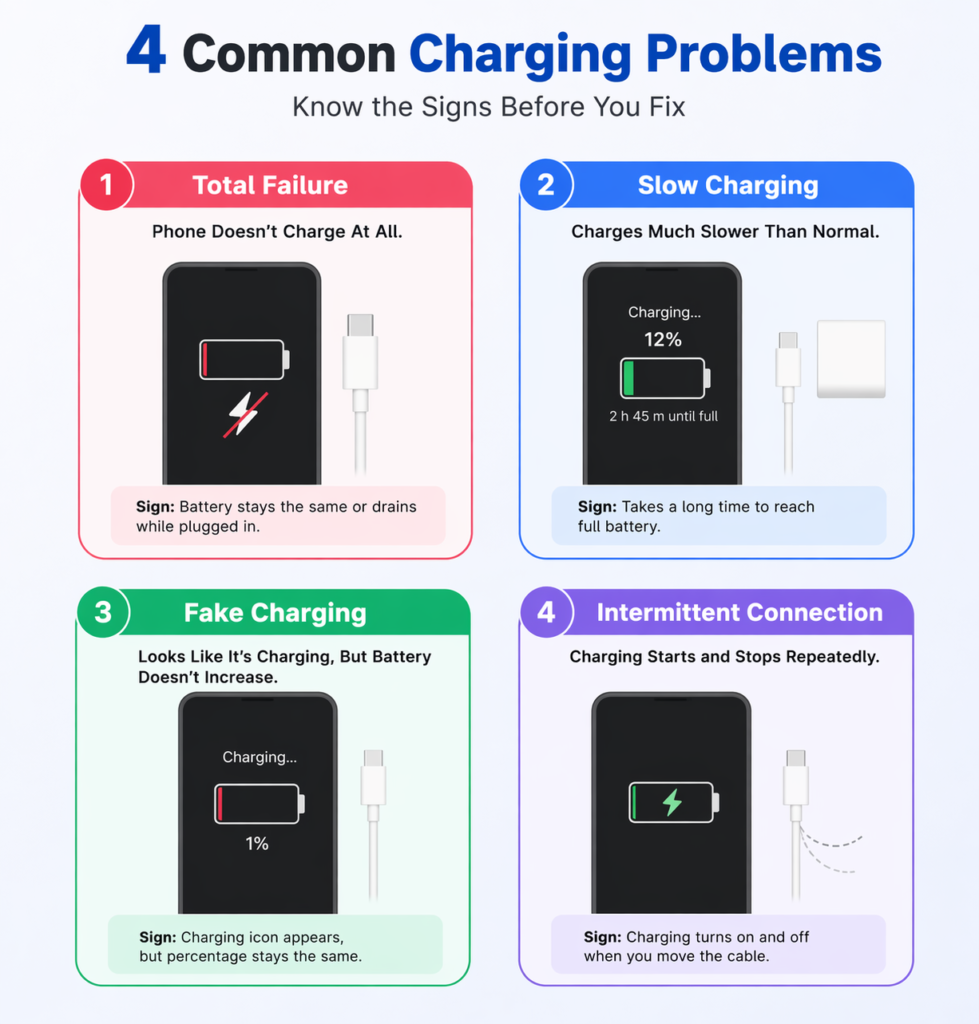
The 4 Types of Phone Charging Problems
Type 1: Total Failure (Nothing Happens at All)
This is when you plug in your phone and absolutely nothing happens. No charging icon appears on the screen. No vibration. No sound. The battery percentage stays exactly where it is or the phone stays completely dead.
If your phone died and won’t charge at all, this is your problem type. It feels like the worst situation, but honestly, it is often the easiest to fix. In most cases, the issue is with your cable, your charger, or built up dust in your charging port.
I have seen phones that looked completely dead come back to life after a simple port cleaning or a cable swap. So do not lose hope yet.
Type 2: Slow Charging (Taking Forever to Reach 100%)
Your phone is charging, but it takes way longer than it used to. Maybe it used to take two hours to fully charge, and now it takes six or even eight hours. You plug it in overnight and wake up to find it is only at 60%.
This type of problem sneaks up on you. Your phone is charging slowly so gradually that you might not notice at first. But when you track it, the drop in speed becomes obvious
But when your phone is plugged in and not charging as fast as it should, something is blocking the full power flow.
Common causes include a worn out cable that cannot carry enough current anymore, a partially clogged charging port, or software settings that limit charging speed without you realizing it.
Type 3: Fake Charging (Icon Shows But Percentage Stays the Same)
This one drives people crazy. Your phone shows the charging icon. It looks like everything is working. But when you check the battery percentage, it has not moved at all. Sometimes it even goes down while the phone is plugged in.
I call this fake charging because your phone recognizes that something is plugged in — your phone charger is not working properly even though it appears connected — and no actual power is flowing to the battery
The connection is just barely there, enough to trigger the charging symbol but not strong enough to deliver electricity.
This usually happens when your charging port is about 90% blocked with compressed lint, when your cable is extremely low quality, or when your phone is running too hot and has activated thermal protection.
Type 4: Intermittent Connection (Only Charges at Certain Angles)
You know this problem if you have to hold your charging cable at a weird angle to keep your phone charging. You find that one position where it works and you are afraid to move. You might prop your phone up with a book or lean the cable against something to maintain the connection.
This is the most annoying type because it seems to work, but only with constant babysitting. The truth is, this behavior damages your phone more every single day you keep doing it.
If you are asking why won’t my charger stay in my phone or why it only works at specific angles the answer involves either compressed debris or bent internal pins
Why This Matters
Here is the good news I want you to hear right now. About 90% of all these charging problems can be fixed at home without spending a cent on repairs.
The reason most people struggle is that they try random fixes without knowing what type of problem they actually have. They restart their phone when the real issue is a dirty port. Or they buy a new cable when the problem is actually software related.
When you know your problem type, you know which solutions to try first. You save time, you save money, and you avoid the frustration of fixes that were never going to work for your specific situation.
Before jumping into fixes, take one minute right now to identify which type matches your situation. Everything in the sections ahead is organized around these four types. Starting with the right section gets you to the fix faster.
Trust me, this one minute of diagnosis will save you hours of trial and error.
Step 1: Test Your Charging Cable and Power Adapter
Before you start taking your phone apart or worrying about expensive repairs, I always tell people to check the simplest things first. Your charging cable and power adapter are the most common culprits when your phone charger is not working.
I cannot count how many times someone was ready to buy a new phone, only to discover a faulty charging cable was the entire problem. These charging accessories wear out faster than the phone itself because we bend them, pull them, and toss them in bags every single day..
Let me show you exactly how to test whether your cable or adapter is causing your charging problem.
How to Test for a Faulty Charging Cable
Your charging cable takes a beating. You wrap it up tight, you yank it out by the cord instead of the plug, and you let it dangle off the edge of tables. All of this creates weak points that eventually fail.
The Visual Inspection
Start by looking closely at your cable from end to end. I mean really look at it under good light. Here is what I check for:
Near the connectors: This is where cables fail most often. Look at both ends where the cable meets the Lightning or USB-C plug.
Do you see any splits in the plastic jacket? Can you see the wires peeking through? A charging cable that is frayed or cracked at the connectors is the number one cause of sudden charging failure even a tiny crack means the cable is dying.
Along the length: Run the cable through your fingers. Feel for any spots where it seems thinner, harder, or differently textured than the rest. These are signs of internal wire breakage even if the outside looks fine.
The plug itself: Check if the metal connector looks bent, discolored, or corroded. If you see any green or black marks on the metal, that is oxidation and it blocks electrical contact.
I once had a charging cable that looked perfect on the outside. But when I bent it near the phone end, I could feel a crunchy sensation inside. That crunch was broken wires shifting around. The cable was dead even though it had no visible damage.
The Wag Test
This is my favorite quick test, and it works like magic to reveal a dying cable. Here is how you do it:
Plug your cable into your phone like normal. Now gently wiggle and move the cable where it connects to your phone. Move it up, down, left, right, and rotate it slightly.
Watch your phone screen carefully. If the charging icon appears and disappears as you move the cable, your cable has internal damage. The wires inside are broken but still touching sometimes when you bend it just right.
A good cable should stay connected no matter how you gently move it. If you see that charging symbol flicker on and off, replace the cable immediately. No amount of careful positioning will fix it, and using it actually damages your phone’s charging port over time.
The Swap Test
If you have access to another cable, try it. Borrow one from a family member or use the one from another device. Plug it into your phone and see if it charges normally.
If the second cable works perfectly, you know for certain your original cable was faulty. Problem solved.
If the second cable also fails, then your cable is not the issue. Move on to testing your power adapter or checking your phone itself.
I always keep a spare cable around for exactly this reason. It takes 30 seconds to swap cables and that simple test saves so much troubleshooting time.
How to Tell If Your Power Adapter is Dead
Your power adapter is that little block that plugs into the wall. People often blame the cable when the real problem is the adapter quietly failing.
Test It With Another Device
Take your power adapter and plug in a different device. If you have another phone, a tablet, or even a portable speaker that uses the same type of adapter, connect it and see if it charges.
If the other device charges fine, your adapter works. The problem is somewhere else.
If the other device also refuses to charge or charges extremely slowly, your power adapter is faulty and needs replacement.
Check for Physical Damage
Look at your adapter carefully. I check these things:
The prongs: Are they bent, loose, or damaged? Bent prongs cannot make solid contact with the wall outlet.
The body: Are there any cracks in the plastic? Does it feel unusually hot when plugged in? A cracked or overheating adapter is dangerous and should be replaced immediately.
The cable connection: If your adapter has a removable USB port, check inside that port. Sometimes lint and dust pack in there just like in your phone’s port.
I had a power adapter once that seemed completely fine but would only work in certain outlets. Turns out one of the prongs was slightly bent inward. I could not see it just by looking, but when I compared it side by side with a new adapter, the difference was obvious.
Try Different Power Sources
This step eliminates so many variables at once. Here is what I do:
Try a different wall outlet. Sometimes the outlet itself is dead or delivering weak power. I have been in older homes where certain outlets barely work.
Try a different room. Plug into an outlet in another room entirely. This rules out any issues with that particular circuit.
Plug directly into the wall. If you normally use a power strip or surge protector, bypass it and go straight to the wall outlet. Power strips can fail without any visible signs.
Use a computer USB port. Plug your cable into a laptop or desktop computer’s USB port. If your phone charges from the computer but not from the wall adapter, you know the adapter is the problem.
I learned this lesson when my phone would not charge one night. I tried three different cables and got nowhere. Finally I plugged the whole setup into a different outlet across the room and it charged instantly. The original outlet had stopped working.
What About Charging Speed?
Even if your phone is charging, pay attention to how fast it charges.
A faulty or dying power adapter often delivers reduced power before it fails completely and the signs are easy to miss if you are not looking for them
If your phone used to charge to full in two hours but now takes five or six hours with the same cable and adapter, the adapter is likely wearing out. The internal components degrade over time and cannot supply full power anymore.
Replace it before it stops working entirely and leaves you with a dead phone at the worst possible moment.
Quick Checklist Before Moving On
Before you decide your cable and adapter are fine, run through this quick list:
- I visually inspected my cable for damage
- I performed the Wag Test and the connection stayed solid
- I tested my cable with another device or tried a different cable
- I checked my power adapter for physical damage
- I tested my adapter with another device
- I tried at least two different wall outlets
- I plugged directly into the wall, not a power strip
If you checked all those boxes and your phone still refuses to charge, the problem is not your charging accessories. Time to look at the phone itself.
If you found a frayed cable or a dead adapter in these tests, that is your answer. Replace it and you are likely done
Replace that faulty part and you will likely be back to normal charging right away.
Step 2: Force Restart Your Phone (iPhone and Android)
Sometimes your phone is not physically broken at all. The problem is software, not hardware. I have seen perfectly healthy phones refuse to charge simply because the operating system got confused or crashed.
When you force restart your phone, you clear out software glitches that affect charging this is one of the most effective ways to restart to fix charging problems without touching any hardware
The key is doing it correctly. Most guides tell you to hold the buttons for just a few seconds, but I have learned through experience that you need to hold much longer when dealing with a software glitch. Let me show you the right way.
Why Software Glitches Stop Charging
Your phone’s charging system is not just hardware. Software controls when charging starts, how fast it charges, and how the battery communicates with the power system.
Sometimes that software freezes or crashes. When it does, your phone might not recognize that you plugged in a charger even though everything is physically fine. The charging icon does not appear. The battery percentage does not move. It looks exactly like a hardware failure, but it is actually just confused software.
I have found this happens most often when people use chargers that are not original or certified. Non original charging accessories can send signals that the phone’s software does not understand. The system gets stuck trying to figure out what is plugged in and eventually just stops responding.
A force restart clears all of that out and lets the phone start over with a clean slate.
How to Force Restart an iPhone (Models 8 Through 16)
If you have an iPhone 8 or any newer model including the iPhone 16, the button sequence is the same. This works for iPhone 8, 8 Plus, X, XR, XS, 11, 12, 13, 14, 15, and 16 series.
Here is exactly what you do:
Step 1: Press and immediately release the Volume Up button. Do not hold it. Just a quick press and let go.
Step 2: Press and immediately release the Volume Down button. Again, quick press and release.
Step 3: Press and hold the Side button. This is the power button on the right side of your phone. Keep holding it.
Step 4: Keep holding that Side button for at least 15 to 20 seconds. Do not let go early.
Standard Apple iPhone support instructions say to hold until the Apple logo appears and then release. That is correct for a normal restart.
But when you are dealing with an iPhone that is not charging and might have a software problem, I recommend holding it longer.
Count to 20 in your head. It feels like a long time. Your screen might go black. That is normal. Just keep holding.
Eventually the Apple logo will appear on your screen. Once you see that logo, you can let go of the button. Your iPhone will now boot up fresh.
After it restarts, plug in your charger again and see if it recognizes the connection. While your iPhone is restarting, it is worth knowing that a fresh restart also clears up other common iPhone glitches if you use features like scheduled texts on iPhone, restarting regularly keeps those running smoothly too
What If Nothing Happens?
If you press the buttons and absolutely nothing changes on your screen, your phone might be completely dead. The battery could be so drained that it does not have enough power even to show you the restart process.
In that case, plug your phone into a charger and leave it alone for at least 30 minutes. Do not try to turn it on. Just let it sit and charge.
After 30 minutes, try the force restart sequence again. Often the phone just needed a tiny bit of power before it could respond to your button presses.
How to Force Restart a Samsung Galaxy or Android Phone
Android phones work a little differently depending on the manufacturer, but most modern Android devices use a similar method.
For Samsung Galaxy phones and most other Android devices, here is what works:
Step 1: Press and hold the Power button and the Volume Down button at the same time.
Step 2: Keep holding both buttons together for 15 to 20 seconds.
Again, I emphasize the longer hold time. Most instructions say 7 to 10 seconds, but when your Android phone is not charging and you suspect a software issue, holding longer ensures the restart actually completes.
You will feel the phone vibrate. You might see the screen go black. Keep holding until you see the manufacturer logo appear. For Samsung, you will see the Galaxy logo. For Google Pixel, you will see the Google logo.
Once that logo shows up, you can release the buttons. Your phone will restart fresh.
For Older Samsung Models
If you have an older Samsung phone with a physical home button, the process is slightly different:
Press and hold the Power button and the Home button together for 15 to 20 seconds. Same idea, just different buttons.
For Google Pixel Phones
Google Pixel phones use the same method as most modern Android devices. Press and hold Power and Volume Down together for 15 to 20 seconds.
If your specific Android model does not respond to these button combinations, check your phone manufacturer’s support website for the exact force restart method for your model. But the Power plus Volume Down combo works for about 90% of Android phones made in the last five years.
Why the Longer Hold Time Matters
I learned this the hard way. I used to follow the standard advice and hold the buttons for just 5 or 7 seconds. Sometimes it worked. Sometimes it did not.
Then I started experimenting with longer hold times when phones seemed really stuck. The difference was dramatic. Phones that would not restart with a 5 second hold would suddenly spring back to life after a 20 second hold.
The reason is simple. When your phone has a serious software glitch, the normal restart command gets ignored. The system is too frozen to respond. But when you force the hardware to cut power by holding those buttons long enough, it bypasses all the software and forces a true restart.
Think of it like this. A 5 second hold is like knocking politely on a door. A 20 second hold is like opening the door yourself and walking in. When the software is frozen, polite knocking does not work. You need to force your way in.
The Charger Quality Connection
Here is something most people do not realize. The type of charger you use affects how stable your phone’s software runs.
Using chargers that are not certified by Apple or your Android phone manufacturer can cause system crashes. After a force restart fixes your charging, take a moment to check your apps are all behaving normally sometimes crashes hide apps from your home screen, and here is how to unhide apps on iPhone if any went missing.
I have seen this happen repeatedly. Someone buys a cheap charger online or borrows a random cable, and suddenly their phone starts acting weird. Apps crash. The screen freezes. And yes, charging stops working.
The reason is that non original chargers sometimes send incorrect voltage signals or power fluctuations. Your phone’s software tries to manage these weird signals and eventually just gives up and crashes.
When you restart to fix charging issues caused by a software glitch, also take a moment to think about what charger you have been using. If it is not an original charger or at least a certified one, that might be why your phone crashed in the first place.
Switching to a quality OEM charger or MFi certified charger and then doing a force restart often solves the problem permanently because the phone now receives clean, stable power it can actually recognize.
After the Restart
Once your phone finishes restarting, plug in your charger and watch carefully. You should see the charging icon appear within a few seconds. The battery percentage should start climbing.
If the restart worked, your phone will charge normally now. The software glitch is gone and everything is communicating properly again.
If your phone still refuses to charge even after a proper force restart, then you know the problem is not a simple software issue. You need to move on to the next troubleshooting steps like checking your charging port or looking at hardware problems.
But try this restart first. It takes less than a minute and it fixes a surprising number of charging issues without any technical work required.
I keep this trick in my back pocket for every phone problem, not just charging. A good force restart clears out so many little glitches that build up over time. It is like giving your phone a fresh start without losing any of your data or settings.
Step 3: Clean Your Charging Port the Right Way
I am going to be completely honest with you. A dirty charging port is the number one reason phones stop charging, and most people have no idea how much junk builds up inside that tiny hole.
Every time you put your phone in your pocket or your purse, you are basically using your charging port like a tiny vacuum.
It sucks up lint, dust and pocket fuzz constantly. When lint in the charging port gets compressed over weeks and months, it forms a hard little plug at the bottom — and a dirty charging port is the number one reason cables stop making contact.
When your charging port is dirty, your cable cannot make proper contact with the internal pins. Sometimes it will not connect at all. Other times it connects just barely, giving you that frustrating situation where charging only works at certain angles.
The good news is that cleaning your port is something you can absolutely do yourself at home. I have done it dozens of times. Let me walk you through the safest and most effective methods.
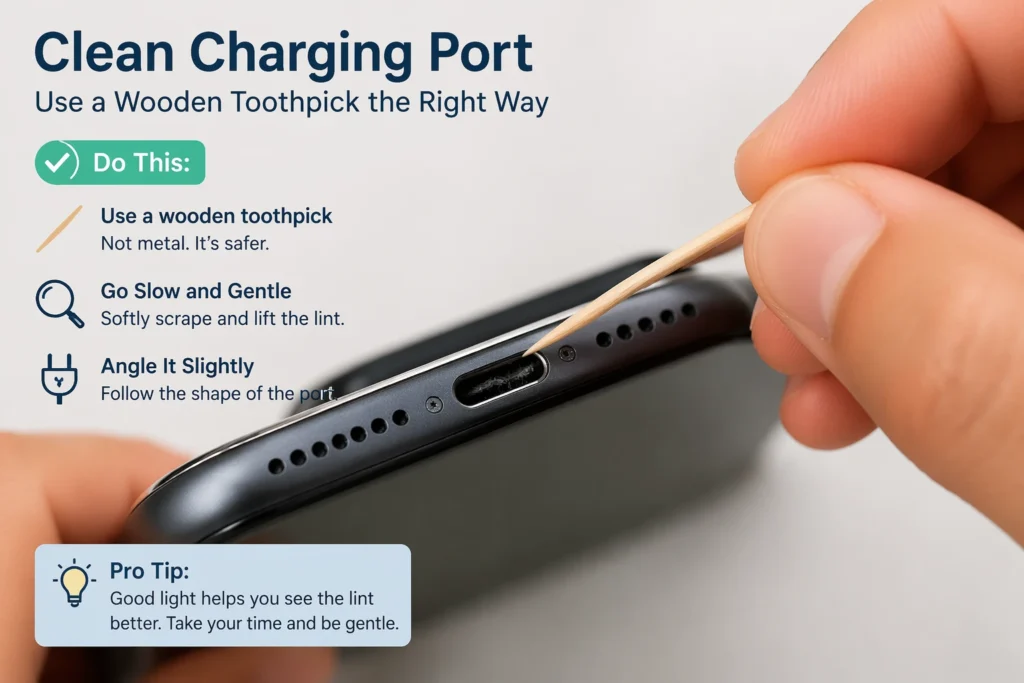
Method 1: Dry Cleaning with a Wooden Toothpick (Safest)
This is the method I recommend you try first. It is safe, effective, and you probably already have everything you need at home.
What You Need
All you need is a wooden toothpick. That is it. Do not use metal tools. I repeat, do not use metal.
I know it is tempting to grab a paperclip, a safety pin, or a sewing needle because they are thin and seem perfect for getting into tight spaces. But metal objects can conduct electricity if your phone has any residual charge. Worse, metal can scratch or bend the delicate pins inside your charging port.
Those internal pins are tiny and fragile. One bent pin causes USB port damage that requires professional repair and no amount of cleaning can fix a physically bent pin.
The Cleaning Process
Step 1: Power off your phone completely. Do not just lock the screen. Actually turn it off. This is a safety step that prevents any possibility of electrical issues while you are working inside the port.
Step 2: Find good lighting. I like to do this near a window during the day or under a bright lamp. You need to see what you are doing.
Step 3: Look inside the port. Shine a light directly into your charging port and look carefully. Whether you have a Lightning connector on an iPhone or a USB-C port on an Android phone, check what you can see.
You might be shocked at what is in there. I once cleaned a port that had so much gray lint packed inside it looked like a tiny felt pad.
Step 4: Insert the toothpick gently. Slide the wooden toothpick into the port. Do not jam it in. Gentle pressure only.
You will feel the toothpick touch the back of the port. That is the wall where the pins live. Do not push hard against that wall.
Step 5: Scrape along the bottom and sides. Use the toothpick to gently scrape the bottom of the port and the sides. You are trying to loosen any lint in the charging port that has gotten compressed down there.
Move the toothpick around in small motions. You will start to see debris coming out. Sometimes it comes out in tiny pieces. Other times you will pull out a surprising chunk of compressed lint.
Step 6: Take your time. This process can take 10 to 15 minutes if your port is really dirty. Do not rush it.
I usually scrape a bit, pull the toothpick out to see what came out, then go back in for more. Each pass removes a little more buildup.
Step 7: Check your progress. After you think you have gotten everything, shine your light into the port again. The internal pins should be visible and the port should look much deeper than it did before.
If you still see dark buildup or the port looks shallow, keep cleaning. You want to see shiny metal pins at the back of the port, not a layer of gray or black crud.
How Often Should You Do This?
I recommend cleaning your charging port every six months as preventative maintenance. You do not need to wait until you have a problem.
Think of it like changing the oil in your car. Regular maintenance prevents bigger problems down the road. A quick two minute port cleaning every few months keeps lint from building up to the point where it blocks charging completely.
If you work in a dusty environment or you keep your phone in your pocket all day every day, you might need to clean it more often. I clean mine every three months just to stay ahead of the problem.
Method 2: Deep Clean with Alcohol (For Stubborn Buildup)
Sometimes dry cleaning with a toothpick is not enough. If your port has carbon buildup or sticky residue from months of use, you need something stronger.
I learned this method from a phone repair technician I know, and I have used it myself on ports that looked completely blocked
But you need to be careful and follow the steps exactly.
What You Need
You need one of these cleaning liquids:
- Isopropyl alcohol (90% or higher concentration)
- Rubbing alcohol (at least 70%)
- Nail polish remover that contains acetone
You also need either a soft bristled toothbrush or a wooden toothpick with tissue paper wrapped around the tip.
Why These Liquids Are Safe
I know it sounds scary to put liquid near your phone’s charging port. But these specific liquids are actually safer than water.
They evaporate extremely fast because they have a very low boiling point. When you apply a tiny amount to the port, it cleans the surface and then disappears into the air within seconds. There is no water left behind to cause damage.
Regular water is dangerous for electronics because it stays wet and can cause short circuits. These fast evaporating liquids do not have that problem as long as you use them correctly.
The Deep Cleaning Process
Step 1: Power off your phone. Always turn it completely off before cleaning with any liquid.
Step 2: Choose your tool. You can either use a soft toothbrush dipped in the cleaning liquid, or you can wrap a small piece of tissue paper around the tip of a wooden toothpick and dip that in the liquid.
I prefer the tissue wrapped toothpick for precision, but both methods work.
Step 3: Apply a small amount of liquid. Dip your tool into the isopropyl alcohol or acetone. You want it damp, not dripping wet. Shake off any excess.
Step 4: Gently scrub inside the port. Insert your damp tool into the charging port and gently scrub back and forth. You are removing carbon deposits, oxidation, and sticky buildup that dry cleaning cannot touch.
Spend about 5 to 10 minutes on this. Move the tool around to reach all surfaces inside the port. The alcohol breaks down the gunk and the mechanical scrubbing removes it.
Step 5: Check in sunlight. This is my favorite trick. Take your phone outside or hold it under bright light. Look into the charging port.
The internal pins should look shiny and metallic. If you see dark spots or a dull finish, there is still buildup in there. Clean some more.
When the pins are shiny and clean, you are done. The difference between a dirty port and a clean one is dramatic when you look at it in direct sunlight.
Step 6: Let it dry. Even though these liquids evaporate fast, I always give the port a few extra minutes to be absolutely sure it is dry.
You can use a hair dryer on the cool or low setting to blow air through the port. Do not use high heat. Just gentle airflow to make sure any remaining liquid evaporates completely.
Wait at least 5 minutes after cleaning before you plug anything in.
My Experience With This Method
I have used this alcohol cleaning method on phones that seemed completely dead. Phones that would not charge no matter what cable I tried. After a thorough cleaning with isopropyl alcohol and a toothbrush, they started charging perfectly again.
The buildup inside ports is often invisible to the naked eye. You cannot see the thin layer of oxidation or carbon on the metal pins. But it is there, blocking the electrical connection. The alcohol dissolves it and restores clean metal to metal contact.
This method is especially good if you live in a humid climate or if your phone has been exposed to moisture in the past. Humidity causes corrosion on the charging pins and alcohol cleans that right off.
Why Your Charger Falls Out or Won’t Stay In
Here is a frustrating problem I hear about constantly. People ask me why won’t my charger stay in my phone and the answer is almost always one of two things You have to hold it at just the right angle to keep it connected.
This happens for two main reasons.
Compressed Lint Pushing the Connector Out
When lint in your charging port gets compressed, it does not just sit at the bottom. It takes up space. Your charging cable cannot insert all the way because the lint is in the way.
The cable goes in about 80% of the way and then stops. It feels like it is plugged in, but it is not actually making full contact with the pins. The slightest movement makes it disconnect.
I have pulled out chunks of compressed lint from ports and been amazed at how solid they are. The lint gets packed down so hard it feels like a piece of foam. No wonder the cable would not go in all the way.
If your charger will not stay in your phone, clean the port thoroughly using the methods I described above. I guarantee you will find debris in there pushing the connector out.
Port Wear From Angled Charging
This one is a habit you need to break immediately if you do it.
Some people find one specific angle where their charger connects and then they prop the phone up at that angle. Maybe you lean the cable against a book. Maybe you balance the phone on its side. You do whatever it takes to maintain that magic angle where charging works.
Every time you do this, you are bending the internal pins inside your charging port. Those pins are designed to make contact when the cable is inserted straight. When you force the cable to sit at an angle, you are gradually bending those pins out of position.
Do this enough times and the pins become permanently bent. Now your port only works at weird angles because the pins are no longer in their proper positions.
I have seen charging ports where the pins are so bent that no amount of cleaning will fix them. The port needs professional replacement at that point.
If you find yourself holding your cable at an angle to make it work, stop doing it right now. Clean your port instead. Fix the real problem instead of developing a habit that will destroy your port completely.
The Lightning Connector and USB-C Difference
Whether you have an iPhone with a Lightning connector or an Android phone with a USB-C port, the same cleaning principles apply. Both types of ports collect debris and both need regular cleaning.
USB-C ports are slightly wider than Lightning ports, which means they can sometimes accumulate even more lint before you notice a problem. But they are also a bit more durable in my experience.
Lightning ports are narrower and the pins are more delicate. You need to be extra gentle when cleaning an iPhone charging port.
Either way, clean ports mean reliable charging. It is that simple.
How You Know the Port is Clean
Here is how you know you did a good job cleaning:
Your charging cable slides in smoothly and seats completely. You should feel it click into place or bottom out firmly.
The cable stays put without wobbling. No more loose connections.
Charging starts immediately when you plug in. The charging icon appears within two seconds.
You do not need to adjust the angle or wiggle the cable to maintain the connection.
If your port checks all those boxes after cleaning, you nailed it. You just saved yourself a trip to the repair shop and probably 50 dollars or more in repair costs.
Regular port cleaning is one of the easiest and most effective ways to keep your phone charging reliably for years. Do not skip this step.
Why Won’t My Phone Charge Past 80%? (iPhone and Android Explained)
Have you ever plugged in your phone overnight and woken up to find it sitting at exactly 80%? You check the charging cable. It is connected. The charging icon is showing. But the percentage just will not budge past 80.
I get messages about this all the time from confused friends and family. They think their phone is broken or their battery is dying. But here is the truth. Your phone is not broken at all. It is actually trying to protect your battery.
This is a feature, not a bug. Let me explain what is happening and why your phone won’t charge past 80 in certain situations.
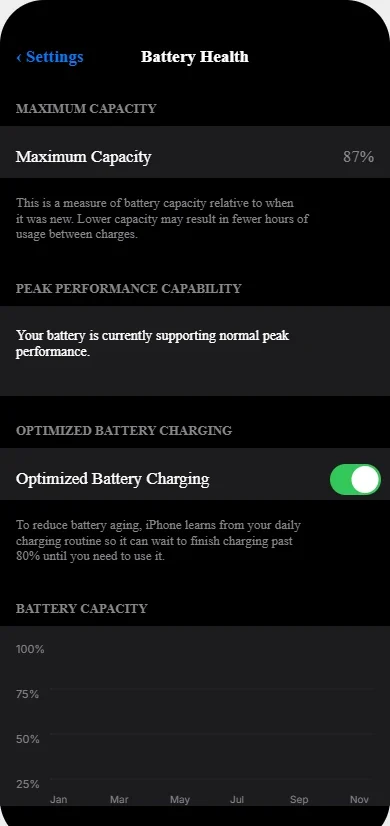
What is Optimized Battery Charging?
Modern smartphones have a built-in feature designed to extend the lifespan of your battery. Apple calls it Optimized Battery Charging on iPhones. Android manufacturers have similar features with different names depending on the brand.
Here is how it works. Your phone learns your daily charging habits over time. If you charge your phone overnight every night, your phone notices that pattern.
Instead of charging straight to 100% and then sitting there fully charged for hours, your phone gets smart about it. It charges to 80% fairly quickly, then it pauses. It waits until about an hour before you typically wake up, and only then does it finish charging to 100%.
Why does it do this? Because lithium-ion batteries, which power all smartphones, degrade faster when they stay at 100% charge for long periods. Keeping the battery between 20% and 80% most of the time actually makes it last longer over the years you own the phone.
So when your phone stops charging at 80%, it is deliberately protecting your battery health by reducing the number of complete charging cycles the battery has to endure
How to Know If This Feature is Active
On your iPhone, you will see a small notification on the lock screen when Optimized Battery Charging is active. It says something like “Charging On Hold” and tells you when it will resume to reach 100%.
Many people miss this notification because it is subtle. You glance at your phone, see 80%, and assume something is wrong. But if you look carefully, that message is there telling you the phone is managing the charge intentionally.
On Android phones, the notification varies by manufacturer. Samsung calls it “Protect Battery” and it might stop charging at 85% instead of 80%. Google Pixel phones have adaptive charging. The exact percentage and the name differ, but the concept is the same across all brands.
Is This Actually Good For Your Battery?
Yes, absolutely. I have tested this myself by comparing phones with this feature enabled versus phones where I turned it off.
Lithium-ion batteries have a limited number of charge cycles before they start to lose capacity. A charge cycle is basically one full drain and recharge of the battery. Every battery can only handle a certain number of these cycles before it degrades.
When you keep your battery at 100% for hours every night, you are stressing the battery chemistry. It wears out faster. Over two or three years, you will notice significantly reduced battery life.
But when you let the phone manage charging and keep the battery between 20% and 80% most of the time, you reduce that stress. Your battery health stays better for longer.
I have an iPhone that is over three years old and still shows 92% battery health because I have always used Optimized Battery Charging. My friend has the same model phone from the same year, and his battery health is down to 78% because he disabled the feature and charged to 100% constantly.
The difference is real and measurable.
When You Actually Need to Turn It Off
That said, there are times when you do not want this feature active. I turn it off temporarily in certain situations.
If I am about to leave the house and I need my phone at 100% right now, I do not want to wait for the optimization to finish. I need full charge immediately.
If I am traveling and my charging routine is completely different from normal, the feature can get confused and not work properly. It is easier to just disable it for the trip.
If I am using my phone heavily for navigation, photography, or video recording all day, I want it fully charged before I leave. Battery protection is great for long term health, but sometimes you just need maximum battery right now.
The point is, you have control. You can turn the feature off when you need to and turn it back on when you do not.
How to Turn Off Optimized Battery Charging on iPhone
If you want to disable this feature on your iPhone, here is exactly how to do it.
Step 1: Open the Settings app on your iPhone.
Step 2: Scroll down and tap on Battery.
Step 3: Tap on Battery Health & Charging. On older iOS versions this might just say Battery Health.
Step 4: You will see a toggle switch labeled Optimized Battery Charging. Tap it to turn it off.
Step 5: Your iPhone will ask if you want to turn it off until tomorrow or turn it off completely. Choose the option that makes sense for you.
If you only need full charge right now for today, choose “Turn Off Until Tomorrow.” The feature will automatically turn back on the next day and continue protecting your battery.
If you want it off permanently, choose “Turn Off.” But honestly, I recommend leaving it on most of the time for better long term battery health.
Once you turn it off, your phone will immediately resume charging to 100% if it was paused at 80%.
Where to Find This on Different iPhone Models
This feature exists on any iPhone running iOS 13 or newer. That includes iPhone 6s and later models. The location in settings is the same regardless of which model you have.
If you have an iPhone 15 or iPhone 16 with the newest iOS version, you might see additional battery optimization options. Apple keeps adding more features to protect battery health. But the main Optimized Battery Charging toggle is always in the same place.
How to Disable Battery Protection on Android
Android is a bit trickier because every manufacturer does this differently. Let me walk you through the most common options.
Samsung Galaxy Phones
If you have a Samsung phone, here is how you adjust battery protection:
Step 1: Open Settings.
Step 2: Tap Battery and Device Care or just Battery depending on your model.
Step 3: Tap Battery again if needed to see battery settings.
Step 4: Look for a setting called Protect Battery or Battery Protection.
Step 5: Toggle it off if you want the phone to charge all the way to 100% every time.
Samsung’s version typically limits charging to 85% instead of 80%. Same idea, slightly different percentage.
Google Pixel Phones
Google Pixel phones have Adaptive Charging built in:
Step 1: Open Settings.
Step 2: Go to Battery.
Step 3: Tap Adaptive Preferences or Battery Saver depending on your Android version.
Step 4: Look for Adaptive Charging and toggle it off if you want.
Pixel phones are smart about this. They only activate adaptive charging when they detect you are charging overnight based on your alarm settings. It is less intrusive than other implementations.
Other Android Brands
If you have a OnePlus, Xiaomi, Oppo, or other Android phone, the setting is usually somewhere in the Battery section of Settings. Look for words like:
- Optimized Charging
- Battery Protection
- Smart Charging
- Adaptive Battery
The exact name varies, but the concept is always the same. The phone learns your habits and manages charging to extend battery lifespan.
If you cannot find it, check your phone manufacturer’s support website. Search for “battery optimization” plus your specific phone model and you will find instructions.
Should You Keep This Feature On or Off?
My honest recommendation is to leave it on.
I know it can be frustrating to see your phone stuck at 80% when you are used to seeing 100%. But that frustration is worth it for the long term benefit.
Battery replacements are expensive. On an iPhone, replacing the battery costs anywhere from 50 to 90 dollars depending on the model. On flagship Android phones, it is similar or sometimes even more.
If this feature extends your battery health by even one extra year before you need a replacement, it has already saved you money and hassle.
Plus, think about it this way. Do you really need 100% charge every single day? Most people do not. If 80% gets you through your normal day, then let the phone manage the rest.
I have been using optimized charging on all my devices for years now. My batteries last longer, hold charge better, and I rarely think about battery health anymore. The phone handles it for me.
But if you have a specific reason to need 100% charge, now you know exactly how to disable the feature temporarily or permanently. The choice is yours and you can change it anytime.
Your phone is trying to help you. Sometimes the best thing you can do is let it.
What to Do When Your Phone Won’t Turn On or Charge (Emergency Methods)
This is the scariest scenario when your phone won’t turn on or charge and the screen is completely black. If your phone died and won’t charge no matter what you plug in, do not assume it is permanently broken.
I have brought back phones that looked completely hopeless using these exact techniques
I have been in this exact situation more times than I can count, both with my own phones and helping other people. That moment of panic when you think your phone is permanently dead is awful. But before you rush to the store to buy a new phone, try these emergency recovery methods.
I have brought back phones that looked completely hopeless using these exact techniques. Sometimes a phone that won’t turn on or charge just needs the right sequence of steps to wake it back up.
The 30-Minute Rule for Completely Dead Phones
When your phone died and won’t charge no matter what you try, the first thing you need to do is nothing. I know that sounds backwards, but hear me out.
Plug your phone into a charger and then walk away. Leave it alone for at least 30 minutes. Do not touch it. Do not try to turn it on. Do not press any buttons. Just let it sit there plugged in.
Here is why this matters. When a phone battery drains completely to zero, it enters a protective state. The battery shuts down to prevent damage. In this state, the phone needs time to absorb just enough charge to wake up the charging circuits.
During those first 30 minutes, your phone might not show any signs of charging at all. The screen stays black. No icons appear. It looks exactly like a dead phone that is not charging. But internally, the battery is slowly accepting tiny amounts of power.
I learned this the hard way. I used to panic when a dead phone did not respond immediately to being plugged in. I would unplug it, try a different cable, try a different outlet, and waste time switching things around. All that accomplished was resetting the charging process back to zero each time.
Now I know better. Plug it in once with a good cable and charger, then give it 30 full minutes of uninterrupted charging time before you do anything else.
The 3% Threshold You Need to Know
Here is something most people do not understand about how phones boot up. Your phone needs about 3% battery charge before it has enough power to turn on the operating system.
Think about it like trying to start a car with a dead battery. You cannot just touch the jumper cables and immediately start the engine. The battery needs a few minutes of charging first to build up enough power to crank the starter.
Your phone works the same way. Even if the battery is receiving charge, it will not show you anything on the screen until it crosses that 3% threshold. Before that point, the phone is charging but it is using every bit of incoming power just to charge the battery. Nothing is left over to power the screen or run the operating system.
This is why the 30 minute wait is so important. It gives the battery time to climb from zero to at least 3% so the phone can actually boot up and show you it is alive.
After 30 minutes, try pressing the power button. If you are lucky, the phone will show the low battery icon or the charging screen. If it does, great. Let it continue charging normally.
If it still shows nothing, do not give up yet. Leave it charging for another 30 minutes. Extremely dead batteries sometimes need a full hour before they can respond.
What If You Switched Cables or Outlets?
If you swap cables or change outlets while troubleshooting, you need to wait an additional 10 minutes after each change.
Every time you unplug the phone, you interrupt the charging process. When you plug it back in with a different cable or into a different outlet, the charging circuits have to recognize the new power source and restart the whole process.
Give it 10 minutes minimum after any change before you make another change. Otherwise you are just chasing your tail and never giving anything enough time to actually work.
I keep a timer on my watch when I am troubleshooting a completely dead phone. It forces me to be patient and not make changes too quickly. That patience has saved many phones that I would have given up on otherwise.
The Emergency “Button + Plug” Rescue Technique
If the 30 minute charge did not work, this is the technique that has saved more dead phones for me than anything else. It is not something you will find in official support documents, but it works.
This method forces the phone into a special recovery menu by combining button presses with plugging in the charger at exactly the right moment.
How to Do It
Step 1: Unplug your phone from the charger completely.
Step 2: Press and hold both the Power button and the Volume Down button at the same time. Keep holding them.
Step 3: While still holding both buttons, plug the charging cable into your phone. The timing here is critical. You need to plug it in while your fingers are already pressing and holding the buttons.
Step 4: Keep holding both buttons for 10 to 15 seconds after you plug in the cable. Do not let go early.
Step 5: Watch the screen carefully. You should see either the phone start to boot normally, or you will see a special menu appear with options.
If you see a menu with text options appear, you did it right. This is the recovery or bootloader menu. Your phone is alive.
Step 6: Here is the important part. Do not touch anything. Do not select any menu options. Just leave the phone sitting on that screen with the charger plugged in.
Leave it there for 30 minutes. Yes, another 30 minute wait. I know it feels like forever, but this is what allows the battery to charge while the phone is in this low power menu mode.
Step 7: After 30 minutes, press the Power button once. The phone should exit the menu and either boot normally or show you a charging screen.
Why This Works
When a phone crashes or the battery management system gets confused, the normal boot process can fail. The phone tries to turn on, cannot, and just stays black.
By forcing it into the recovery menu, you bypass the normal boot process. The phone enters a minimal power state where it can charge the battery without trying to run the full operating system.
After 30 minutes of charging in this state, the battery has enough power and the system has reset enough that a normal boot becomes possible again.
I have used this technique on iPhones and Android phones that seemed completely bricked. It does not work 100% of the time, but it works often enough that it should be one of your first emergency attempts.
The Key is Timing
The hardest part of this technique is the timing. You need to be holding the buttons before you plug in the cable. If you plug in first and then press the buttons, it usually does not work.
Practice the motion a few times without the cable. Get comfortable holding both buttons with one hand so your other hand is free to plug in the cable smoothly.
When you do it for real, move deliberately. Hold the buttons firmly, then plug the cable in with confidence. The whole sequence from start to finish should take about 3 seconds.
Samsung Galaxy Recovery Mode Charging (2-Hour Method)
Samsung phones have their own special recovery method that works incredibly well when the standard techniques fail. This is specifically for Samsung Galaxy phones including the A series, S series, and Note series.
Method 1: The Quick Samsung Recovery
This is similar to the button and plug technique but uses Samsung specific buttons.
Step 1: Unplug your phone.
Step 2: Press and hold the Power button and the Volume Down button together.
Step 3: Immediately plug in your charger while holding both buttons.
Step 4: Keep holding both buttons until you see the Samsung logo appear on the screen.
Step 5: Once you see the logo, release the buttons. The phone should begin charging normally.
If this works, your phone will boot up or at least show the charging animation within a few minutes.
Method 2: The 2-Hour Recovery Mode Charge
If Method 1 does not work, this is the more intensive Samsung recovery technique. It takes patience but it has an extremely high success rate.
Step 1: Unplug your Samsung phone from all cables.
Step 2: Press and hold the Power button and the Volume Up button at the same time. Notice this uses Volume Up, not Volume Down like the previous method.
Step 3: While holding both buttons, plug in your charging cable.
Step 4: Keep holding both buttons until you see a menu appear. This is the Android Recovery menu. It will have options like Reboot, Wipe Data, and Apply Update.
Step 5: Do not select anything. Just leave the phone on this menu screen with the charger connected.
Step 6: Now comes the hard part. Walk away and leave it alone for two full hours.
I know two hours sounds like an incredibly long time. But Samsung phones in deep discharge need this long to charge enough in recovery mode before they can boot normally.
During these two hours, the phone stays in the recovery menu using minimal power while the battery charges. The screen stays on but dim. The charging happens slowly and steadily.
Step 7: After two hours, press the Power button one time. Do not hold it, just press it once.
The phone should turn off the recovery menu and restart on its own. When it boots back up, the battery should show somewhere between 30% and 60% charge depending on how dead it was originally.
My Success Rate With This Method
I have used the two hour Samsung recovery method on at least a dozen phones that seemed completely dead. It worked on all but one of them.
The one that did not work had actual hardware damage from water exposure. Every other phone that was just deeply discharged came back to life after this process.
The key is really leaving it alone for the full two hours. I set a timer and walk away. Do something else. Watch a movie. Go for a walk. Just do not touch the phone.
Every time I got impatient and checked it early, it did not work. When I followed the process exactly and gave it the full time, it worked.
When These Methods Do Not Work
If you tried all three of these emergency techniques and your phone still shows no signs of life, you likely have a hardware problem rather than just a dead battery.
Possible hardware issues include:
A completely failed battery that can no longer hold any charge at all. Batteries do eventually die permanently after enough years of use.
A damaged charging port that cannot make electrical connection even with a good cable.
Internal motherboard damage from water exposure, physical impact, or component failure.
At this point, your best option is to take the phone to a professional repair shop. They have specialized equipment that can test the battery, the charging circuits, and the motherboard to figure out exactly what failed.
But before you do that, make absolutely sure you tried all the emergency methods I described. Give each one enough time to work. Do not rush through the steps.
I cannot tell you how many times someone told me their phone was dead and unfixable, and then I walked them through one of these emergency techniques and the phone came right back. Sometimes phones just need the right combination of patience and button presses to wake back up.
Your phone that died and won’t charge might not be as dead as you think. Give these methods a real try before you give up on it.
How to Check Your Phone Battery Health (Is It Time to Replace?)
Sometimes the reason your phone is not charging properly has nothing to do with cables, ports, or software. The battery itself is just worn out.
All lithium-ion batteries degrade over time due to basic electrochemical wear. If your battery drains unusually fast even after charging, read my guide on why your phone battery drains so fast battery degradation and fast drain are closely connected problems.
Every time you charge and discharge your battery, it goes through what is called a charging cycle. After hundreds of these cycles, the battery cannot hold as much power as it used to.
I have seen phones that charge to 100% but die within three hours of normal use. I have seen batteries that drop from 60% to 10% in minutes. These are clear signs of battery degradation that no amount of port cleaning or cable swapping will fix.
The good news is that both iPhones and Android phones give you tools to check your phone battery health. You can see exactly how much capacity your battery has lost and whether it is time for a battery replacement.
Let me show you how to check this and what the numbers actually mean.
Understanding Battery Degradation
When your phone is brand new, the battery has 100% of its designed capacity. If the specs say it has a 3000 mAh battery, it actually holds 3000 mAh of charge.
But lithium-ion batteries lose capacity with every charging cycle. A charging cycle does not mean plugging in your phone once. It means using 100% of the battery’s capacity total, whether that happens in one session or spread across several days.
For example, if you drain your battery to 50% and then charge it back to 100%, that is half a cycle. Do that twice and you have completed one full charging cycle.
Most phone batteries are designed to retain about 80% of their original capacity after 500 complete charging cycles. For most people, that works out to about two to three years of normal use.
After that point, battery degradation accelerates. By the time you hit 1000 cycles, you might be down to 70% or even 60% capacity.
What this means in practical terms is that a battery showing 75% health will only hold 75% as much charge as it did when new. Your phone that used to last all day now dies by mid afternoon, even though you are using it the same way.
Signs Your Battery is Failing
Before you even check the numbers, there are physical signs that tell you a battery is degraded:
Rapid battery drain. Your phone used to last a full day. Now it barely makes it to lunch time with the same usage patterns.
Sudden shutdowns. The phone shows 30% or 40% battery and then suddenly dies as if it hit 0%. This happens because the battery cannot deliver stable power anymore.
Slow charging. A degraded battery often charges more slowly than it used to, even with the same charger.
Phone gets hot while charging. A little warmth is normal, but if your phone gets uncomfortably hot during charging, the battery might be struggling.
Swelling. This is the most serious sign. If your phone’s back cover is bulging, if there is a gap between the screen and the frame, or if the phone no longer sits flat on a table, your battery is swelling. This is dangerous. Stop using the phone immediately and get the battery replaced.
I once had a phone where I noticed the screen was starting to lift at one corner. I ignored it for a week thinking it was just the adhesive loosening. When I finally took the back off, the battery had swelled to nearly twice its normal thickness. It was on the verge of rupturing.
Never ignore swelling. A battery replacement is far less expensive than the consequences of ignoring a swollen battery
How to Check iPhone Battery Health
Apple makes it very easy to check your iPhone’s battery health. The feature is built right into iOS.
Step 1: Open the Settings app on your iPhone.
Step 2: Scroll down and tap Battery.
Step 3: Tap Battery Health & Charging. On older iOS versions this might just say Battery Health.
Step 4: Look at the number shown under Maximum Capacity.
This percentage tells you how much charge your battery can hold compared to when it was new. A brand new iPhone shows 100%. As the battery degrades, this number drops.
Below that, you will see a line that says Peak Performance Capability. If your battery health is good, it will say your battery is supporting normal peak performance. If your battery has degraded significantly, you will see a message saying performance management has been applied.
What the Numbers Mean on iPhone
Here is how I interpret iPhone battery health percentages:
100% to 95%: Your battery is essentially like new. No concerns at all.
95% to 85%: Normal degradation for a phone that is one to two years old. Battery life is slightly reduced but still good.
85% to 80%: Noticeable battery life reduction. You might need to charge during the day now when you did not before. Still functional but degrading.
Below 80%: Apple considers this the threshold for battery replacement. At this point, your battery is holding significantly less charge and performance management features might kick in to prevent random shutdowns.
Below 70%: Your battery is severely degraded. I strongly recommend replacement at this level.
I replace my iPhone battery when it drops below 80%. Some people wait until 75% or even 70%, but I find that 80% is the sweet spot where the cost of replacement is worth the improvement in daily usability.
How Many Charging Cycles on iPhone
Unfortunately, Apple does not show you the actual number of charging cycles in the settings. But you can estimate based on how long you have owned the phone and how heavily you use it.
If you charge your phone from about 20% to 100% once per day, that is roughly one charging cycle per day. Multiply by 365 days and you can estimate your yearly cycles.
Most people complete about 300 to 400 cycles per year with normal use. Heavy users might hit 500 or more.
How to Check Android Battery Health
Android is more complicated because different manufacturers handle this differently. Let me cover the most common methods.
Samsung Galaxy Phones
Samsung has built in battery diagnostics in their Device Care feature.
Step 1: Open Settings on your Samsung phone.
Step 2: Tap Battery and Device Care. On older Samsung models this might just be called Device Care.
Step 3: Tap Battery.
Step 4: Tap the three dot menu icon in the top right corner.
Step 5: Select Battery Health or Diagnostics.
Step 6: You will see information about your battery’s condition. Samsung typically shows this as a status like Good, Normal, or Weak rather than a specific percentage.
Some newer Samsung models do show a percentage like iPhone does. If yours shows a percentage, interpret it the same way as iPhone battery health.
Google Pixel Phones
Google Pixel phones do not have a detailed built in battery health checker in the standard settings. You have two options.
Option 1: Check in Settings for basic info
Step 1: Go to Settings.
Step 2: Tap About Phone.
Step 3: Look for Battery Information or Battery.
This usually shows you very basic info like whether the battery is good or needs service, but not detailed percentages.
Option 2: Use the Pixel Diagnostic App
Google has a diagnostic tool that can check battery health more thoroughly, but it is not always visible in regular settings. You might need to download it separately or access it through support features.
Other Android Brands
For OnePlus, Xiaomi, Oppo, Realme, and other Android phones, the battery health feature location varies widely.
Generally, look in Settings under Battery or Device Care. Some brands have it under About Phone. If you cannot find it, search your phone’s settings for “battery health” using the search bar at the top of settings.
Third-Party Battery Health Apps
If your Android phone does not have built in battery health checking, you can use third-party apps. I have used several over the years and these are reliable:
AccuBattery: This is my favorite. It monitors your charging habits over time and calculates battery health based on actual usage data. The longer you use it, the more accurate it gets.
Battery HD: Simple interface that shows battery health percentage and estimates remaining battery life.
CPU-Z: This app shows detailed hardware information including battery health, voltage, and temperature.
Download one of these directly from the official Google Play Store only avoid third party APK downloads. Use it for a few days and it will give you a reliable battery health estimate
The accuracy is not as good as built in manufacturer tools, but it gives you a solid idea of whether your battery is healthy or degraded.
When Should You Replace Your Battery?
This is the question everyone asks. My rule of thumb is simple.
Replace when battery health drops below 80%. At this point, you have lost enough capacity that daily use becomes frustrating. You are constantly looking for chargers. Your phone dies at inconvenient times.
Replace immediately if you see physical swelling. Do not wait. A swollen battery is a safety hazard.
Replace if your phone shuts down randomly. Even if the health percentage looks okay, random shutdowns mean the battery cannot deliver stable power. It needs replacement.
Replace if the phone is over three years old and battery life is noticeably worse. Even if the health number is not terrible, the real world experience matters more than the number.
Battery replacement is not cheap. For iPhones, expect to pay 50 to 90 dollars depending on the model. For flagship Android phones, prices are similar. Budget phones sometimes cost almost as much to replace the battery as buying a used replacement phone.
But if you like your phone and everything else works fine, battery replacement gives you another one to two years of good use. It is almost always cheaper than buying a new phone.
I replaced the battery in my iPhone after two and a half years when it hit 78% health. The difference was dramatic. It felt like I had a new phone again. I got another full 18 months of use out of it before upgrading.
How to Slow Down Battery Degradation
While you cannot stop battery degradation completely, you can slow it down:
Avoid extreme temperatures. Do not leave your phone in a hot car or out in freezing cold. Heat especially degrades batteries fast.
Do not let it drain to 0% regularly. Try to keep your battery between 20% and 80% most of the time. This reduces stress on the battery chemistry.
Use optimized charging features. Let your phone manage overnight charging to reduce time spent at 100%.
Avoid fast charging all the time. Fast charging generates more heat and wears batteries faster. Use it when you need it, but regular charging is gentler on the battery.
Use original or quality chargers. Cheap chargers can deliver unstable power that degrades batteries faster.
I follow these habits and my batteries consistently last longer than average. My current phone is almost two years old and still shows 91% battery health because I have been careful with charging habits.
Check your phone battery health today. Know where you stand. If your battery is healthy, great. If it is degraded, at least now you know why your phone is not holding a charge like it used to.
Sometimes the fix is not cleaning ports or buying new cables. Sometimes you just need a fresh battery.
Phone Overheating While Charging? Here Is What Is Happening and How to Fix It
Have you ever plugged in your phone after using it heavily and noticed it refuses to charge? The charging icon might flicker on and off, or the battery percentage stays frozen or even drops while the phone is plugged in.
I see this happen all the time, especially with people who like mobile gaming or who use their phone for video calls and navigation. They use their phone hard, the battery drops to 5% or 10%, they plug it in, and suddenly the phone is not charging even though everything appears connected properly.
The culprit is heat. Your phone overheating while charging is one of the most common but least understood reasons for charging failure.
Let me explain what is happening and how to fix it.
How Heat Stops Your Phone From Charging
Modern smartphones have built in thermal protection systems. These are safety features designed to prevent damage to the battery and internal components when temperatures get too high.
When your phone’s internal temperature crosses a certain threshold, usually around 113 to 122 degrees Fahrenheit depending on the manufacturer, the charging system automatically shuts down or slows to a crawl.
This is not a malfunction. It is your phone protecting itself.
Lithium-ion batteries are sensitive to heat. When a battery gets too hot while charging, chemical reactions inside the battery can become unstable. In extreme cases, this can cause permanent battery damage or even safety hazards.
So your phone makes a simple decision. When it detects high temperature, it stops accepting charge until it cools down. Safety wins over convenience.
The problem is that most people do not realize this is happening. They see their phone not charging and assume the cable is bad, the port is dirty, or something is broken. They try different cables and different outlets when the real issue is simply that the phone is too hot.
Why Gaming and Heavy Apps Cause This
The number one cause of phone overheating while charging is trying to charge the phone immediately after intensive use.
Gaming is the biggest offender. Mobile games, especially graphics intensive ones, push your phone’s processor and graphics chip to maximum performance. This generates significant heat inside the phone.
I have measured phone temperatures after 30 minutes of gaming. The back of the phone can easily reach 105 to 110 degrees Fahrenheit just from the game. The internal processor is even hotter, sometimes hitting 140 degrees or more.
When you finish gaming and your battery is down to 5%, your natural instinct is to plug in the charger right away. But the phone is already hot from gaming. Now you are trying to add more heat from the charging process.
The phone’s temperature spikes even higher. The thermal protection kicks in. Charging stops or becomes extremely slow.
Other activities that cause this same problem:
Long video calls. Using the camera and running video processing for 30 minutes or more heats up the phone considerably.
GPS navigation. Keeping the screen on, running GPS, and processing maps for a long drive makes the phone hot.
Recording video. Especially 4K video recording, which maxes out the processor.
Using the phone in direct sunlight. Even light tasks make the phone hot when the sun is beating down on it.
Streaming video for hours. Binge watching shows on your phone keeps the screen and processor running continuously.
I learned this lesson the hard way during a summer road trip. I used my phone for GPS navigation for three hours straight in a hot car. When we stopped for lunch, my phone was at 8% battery. I plugged it in and it would not charge. The phone felt uncomfortably hot to touch. I thought the charger was broken or the port was damaged.
Then I let the phone sit powered off for 10 minutes. When I turned it back on and plugged it in, it charged perfectly. The phone had just been too hot from the GPS and the sun exposure.
The Worst Thing You Can Do
The absolute worst thing you can do is continue using intensive apps while your phone is plugged in and the battery is very low.
I see this constantly. Someone is playing a game, their battery hits 2%, they plug in the charger and keep playing. Or they are on a video call at 5% battery, plug in, and continue the call.
What happens in this scenario is brutal for your phone. The processor is working hard generating heat. The battery is trying to charge which generates more heat. The phone gets hotter and hotter.
Eventually the thermal protection system cannot keep up. The phone either stops charging completely or it starts throttling performance to reduce heat. Your game lags. Your video call freezes. The battery percentage might even drop while the charger is plugged in because the phone is using power faster than it can charge in this throttled state.
I have seen phones get so hot in this situation that they automatically shut down to protect themselves. When that happens, you cannot use the phone at all until it cools down enough to turn back on.
If your phone is at low battery and you need to charge it, stop using it. Let it charge. Doing both at the same time, especially with heavy apps, creates a heat problem that prevents effective charging.
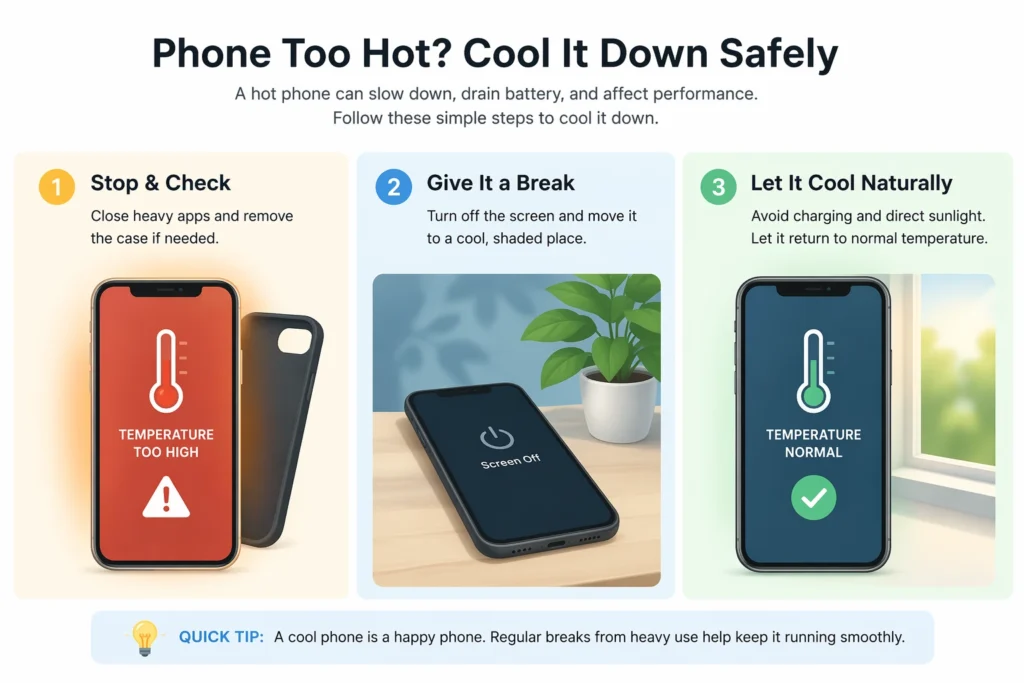
The 5-Minute Cool-Down Rule
Here is the simple protocol I follow whenever my phone feels warm and I need to charge it. This works every single time.
Step 1: Stop all activity immediately. Close whatever app you were using. Do not try to finish the level or send one more message. Just stop.
Step 2: Turn off mobile data and Wi-Fi. Swipe down to access your quick settings and tap the icons to disable both. These radios generate heat even when you are not actively using them.
Step 3: Enable Airplane Mode. This shuts down all wireless communications at once and significantly reduces background heat generation.
Step 4: Power off the phone completely. Do not just lock the screen. Actually turn the phone off using the power button menu. A powered off phone cools much faster than one that is just sleeping.
Step 5: Remove any phone case. Cases trap heat against the phone body. Taking the case off allows heat to escape faster.
Step 6: Place the phone in a cool location. Not in the refrigerator or freezer. Just somewhere room temperature away from direct sunlight. I usually set it on a table or desk in an air conditioned room.
Step 7: Wait 5 to 10 minutes. Set a timer. Do something else. Let the phone cool down completely.
After 5 to 10 minutes, pick up the phone and feel it. It should feel cool to the touch, or at least room temperature. If it still feels warm, wait another 5 minutes.
Once the phone is cool, turn it back on and plug in your charger. You will notice that charging starts immediately and proceeds at normal speed. The thermal protection is no longer blocking it.
I use this exact process anytime I notice my phone is not charging properly after heavy use. It has never failed to work.
How to Tell If Heat is Your Problem
Sometimes it is obvious that heat is the issue. The phone feels hot in your hand. But other times it is not as clear.
Here are the signs that heat is preventing your phone from charging:
The phone feels warm or hot to touch. This is the most obvious indicator. If the back of the phone is noticeably warmer than room temperature, heat is likely your problem.
Charging started but then stopped. The charging icon appeared briefly when you plugged in, but then disappeared or the percentage stopped climbing.
Charging is extremely slow. The phone is technically charging but gaining only 1% every 10 minutes when it should be much faster.
You just finished using intensive apps. If you were gaming, video calling, or using GPS in the last 15 minutes, heat is very likely the culprit.
The battery percentage drops while plugged in. This is a dead giveaway. If the phone is using power faster than it can charge, thermal throttling is active.
You see a temperature warning. Some phones display an explicit message saying the phone needs to cool down before charging can continue. If you see this, the diagnosis is confirmed.
If any of these signs match your situation, do not waste time trying different cables or cleaning your port. The issue is temperature. Follow the cool-down protocol.
Preventing Heat Related Charging Problems
Once you understand how heat affects charging, you can avoid the problem entirely with some simple habits.
Do not charge immediately after heavy use. If you just finished a gaming session or a long video call, give your phone 5 minutes to cool down before plugging in the charger.
Avoid using intensive apps while charging. If you need to charge your phone, let it charge. Watch videos or play games after it has some charge built up, not during the charging process.
Charge in cool environments. Do not charge your phone in direct sunlight, in a hot car, or anywhere the ambient temperature is high. Room temperature or cooler is ideal.
Remove thick cases while charging. If you have a bulky protective case, take it off during charging. The case traps heat and slows cooling.
Use a fan. If your room is warm and you need to charge quickly, point a small desk fan at your phone while it charges. The airflow helps dissipate heat.
Avoid fast charging when the phone is already warm. Fast charging generates more heat than regular charging. If your phone is already warm, use a standard charger instead of a fast charger.
I have gotten into the habit of always letting my phone rest for a few minutes after gaming before I plug it in. That simple pause prevents the overheating problem completely.
What About Charging in Hot Weather?
Summer heat amplifies this problem significantly. When the outside temperature is 90 or 95 degrees, your phone starts hot before you even use it.
If you live in a hot climate or you are going through a heat wave, be extra careful about phone charging.
Never leave your phone charging in a car on a hot day. The interior of a car can reach 130 to 160 degrees in summer sun. At those temperatures, your phone will not charge and you risk permanent battery damage.
If you must charge your phone during hot weather, do it indoors in air conditioning if possible. If you are outside, find shade and make sure air can circulate around the phone.
I spent a summer in Arizona and learned quickly that phones and desert heat do not mix well. I had to charge my phone in the morning before temperatures peaked and avoid any heavy phone use during midday hours. The phone would simply refuse to charge if I tried during the hottest part of the day.
How Hot is Too Hot?
Your phone should never feel uncomfortably hot to hold. If you pick up your phone and your first reaction is to pull your hand away because it is too hot, that is too hot.
As a general rule, if the phone body temperature is above 105 degrees Fahrenheit, charging will be affected. Above 115 degrees, charging will stop entirely on most phones.
You do not need a thermometer to measure this. Use your hand. If it feels hot, it is too hot. Let it cool down.
Your phone is designed to work in temperatures from about 32 to 95 degrees Fahrenheit. Outside that range, especially on the hot end, expect problems with charging and performance.
Take heat seriously. It is one of the most common causes of charging failure, and it is also one of the easiest to fix. Just give your phone a few minutes to breathe and cool down before you ask it to charge.
Your phone will thank you with faster charging and a longer lasting battery.
Why Your Phone is Charging Slowly (And How to Speed It Up)
Your phone is charging, but it feels like watching paint dry. You plugged it in an hour ago and it has only climbed from 20% to 35%. At this rate, it will take all night to reach 100%.
Slow charging is incredibly frustrating because everything appears to be working the phone is plugged in, not charging at full speed, but the icon shows nothing is wrong.
I have dealt with this problem countless times, both on my own phones and helping friends figure out why their charging suddenly became sluggish. The good news is that slow charging usually has a fixable cause, and there are several tricks you can use to speed things up dramatically.
Let me walk you through the common reasons for charging slowly and the solutions that actually work.
Common Causes of Slow Charging
Before we dive into solutions, you need to understand what slows down charging in the first place.
Low wattage charger. Not all chargers deliver the same power. A 5 watt charger will take twice as long as a 10 watt charger and three times as long as a 15 watt fast charger. If you grabbed the wrong adapter, that is your problem right there.
Old or damaged cable. Cables degrade internally over time. A cable that used to support fast charging might only deliver slow charging speeds after a year of heavy use.
Background apps consuming power. If your phone is running dozens of apps in the background while charging, it is using power at the same time it is trying to charge. This creates a tug of war that slows the net charging speed.
Disabled fast charging setting. Some phones let you turn fast charging on or off. If it got disabled accidentally, your phone will charge at standard slow speed even with a fast charger.
USB data transfer mode. When you plug your phone into a computer or certain chargers, it might default to data transfer mode instead of charging mode. Data mode delivers less power.
Battery saver mode. Some battery saver features actually limit charging speed to reduce heat and extend battery lifespan. This is helpful for long term battery health but annoying when you need a quick charge.
Hidden background processes. Your phone might be scanning for Wi-Fi networks, syncing cloud data, or running system updates in the background. All of this drains power while you are trying to charge.
I once spent an entire day wondering why my phone was charging slowly. Turns out I had accidentally enabled a battery protection feature that capped charging speed at 50% to reduce heat. One toggle switch fixed everything.
How to Check Your Charging Speed
Before you try to fix slow charging, it helps to know exactly how slow it is. Most people just have a vague feeling that charging is slower than it used to be.
Here is a simple test. Note your current battery percentage. Plug in your charger. Wait exactly 30 minutes without using the phone. Check the percentage again.
If your phone gained 20% to 30% or more in 30 minutes, your charging speed is normal. If it only gained 5% to 10%, you have a slow charging problem.
You can also use apps to measure charging speed more precisely. I mentioned these in an earlier section, but they work great here too:
AccuBattery on Android shows you the exact charging current in milliamps. Higher numbers mean faster charging.
Ampere is another Android app that measures charging speed in real time.
These apps take the guesswork out of troubleshooting. You can test different chargers, cables, and settings and see immediately which combination gives you the fastest charging speed.
Turn On Super Power Saving Mode (Android)
This is one of my favorite tricks for Android users who need to charge fast. Super Power Saving Mode is a feature built into many Android phones that dramatically speeds up charging by shutting down almost everything except essential functions.
When you activate this mode, your phone disables most background processes, limits app usage, turns the screen black and white, and reduces performance. It sounds extreme, but the charging speed improvement is incredible.
I have tested this multiple times and the results are consistent. Super Power Saving Mode can nearly double your charging speed compared to normal mode.
How to Enable It on Samsung Phones
Step 1: Swipe down from the top of your screen to open the quick settings panel.
Step 2: Swipe down again to see all quick setting toggles.
Step 3: Look for a toggle labeled Power Saving, Battery Saver, or Super Power Saving. The exact name varies by Samsung model.
Step 4: Tap and hold the toggle to open full battery settings.
Step 5: Select Maximum Power Saving Mode or Super Power Saving Mode.
Step 6: Confirm that you want to enable it.
Your screen will go black and white or change to a simplified interface. Do not worry, this is temporary. Your phone is now in ultra efficient mode and will charge much faster.
When your phone reaches the charge level you want, just turn off the mode and everything returns to normal.
How to Enable It on Other Android Phones
Google Pixel phones call it Battery Saver and you can find it in Settings under Battery.
OnePlus phones have Super Power Saving Mode in Settings under Battery.
Xiaomi phones call it Ultra Battery Saver.
The feature is available on almost all modern Android phones. Search your settings for “power saving” or “battery saver” and look for the most aggressive option available.
Why This Works
When your phone is in normal mode, the processor is running, apps are syncing in the background, the screen is bright, wireless radios are active, and all of this consumes power.
When you enable Super Power Saving Mode, the phone shuts down everything except the charging circuit. Almost 100% of the incoming power goes directly to charging the battery instead of being split between charging and running the system.
I use this mode anytime I need a quick charge and I am not actively using my phone. Plug it in, enable the mode, walk away for 30 minutes, and come back to a significantly charged battery.
Change USB Configuration to “Charging Only” (Android)
This is an advanced trick that most people do not know exists. Android phones have hidden developer options that include a setting to prioritize charging over data transfer when plugged in via USB.
By default, when you plug your Android phone into a computer or certain chargers, the phone asks whether you want to transfer files, charge only, or use USB tethering. Sometimes it defaults to file transfer mode, which delivers slower charging.
You can force your phone to always default to charging only mode, which maximizes charging speed.
How to Enable Developer Options
First you need to unlock the hidden developer menu. Here is how:
Step 1: Go to Settings on your Android phone.
Step 2: Scroll down and tap About Phone.
Step 3: Find the section that shows Build Number or Software Information.
Step 4: Tap Build Number seven times rapidly. You will see a message saying “You are now a developer.”
This unlocks a hidden Developer Options menu in your settings.
How to Change USB Configuration
Step 1: Go back to the main Settings menu.
Step 2: Scroll down and you will now see Developer Options listed. Tap it.
Step 3: Scroll down until you find Default USB Configuration.
Step 4: Tap it and select Charging or Charge Only from the options.
Now every time you plug in your phone via USB, it will default to charging mode instead of asking you or defaulting to file transfer. This ensures maximum power delivery every time.
I set this up on my Android phone years ago and forgot about it. Recently I realized my phone charges noticeably faster than my friend’s identical phone model. The difference was this one setting.
A Word of Caution
If you regularly transfer files between your phone and computer via USB cable, changing this setting adds one extra step. You will need to manually change the USB mode to file transfer when you want to move files.
For most people, this is a worthwhile tradeoff. Charging speed improves and you only need to change the mode occasionally when transferring files.
The Absolute Fastest Way to Charge: Turn It Off
If you need maximum charging speed and you do not need to use your phone right now, the single most effective thing you can do is turn it completely off.
Not sleep mode. Not just locking the screen. Actually power down the phone using the power menu.
When your phone is powered off, zero power is consumed by the operating system, apps, screen, or wireless radios. Every single watt of power coming through the charging cable goes directly into charging the battery.
I have tested this extensively. A phone charging while powered off can charge up to 50% faster than the same phone charging while turned on and sitting idle.
Power Off vs Restart
Make sure you choose Power Off, not Restart. Some phones have both options in the power menu.
Restart turns the phone off and then immediately turns it back on. This does not help with charging speed.
Power Off shuts the phone down completely and leaves it off until you manually press the power button to turn it back on.
When to Use This Method
I use this charging method in specific situations:
When I am sleeping. If I am charging overnight anyway, I turn the phone completely off. It charges faster and I am not using it while I sleep anyway.
Emergency fast charging. When I need to charge as much as possible in a short time, like a 20 minute window before leaving the house, I power off the phone for maximum speed.
When the battery is critically low. If my phone is at 2% or 3%, turning it off prevents it from dying while trying to charge and gives the battery the best chance to build up some power quickly.
During travel. If I am on a plane or train with limited outlet access, I turn the phone off while charging to maximize the charge I can get in the available time.
The only downside is that you cannot use the phone while it is off. But if speed is your priority and you can spare 30 to 60 minutes without phone access, this method is unbeatable.
Use Airplane Mode While Charging
If you need your phone to stay on so you can receive important calls or messages but you still want faster charging, Airplane Mode is your best compromise.
Airplane Mode disables all wireless radios including cellular, Wi-Fi, and Bluetooth. These radios consume significant power even when you are not actively using them. Your phone is constantly searching for signals, maintaining connections, and syncing data in the background.
When you enable Airplane Mode, all of that stops. The power draw drops dramatically and charging speeds up.
To enable Airplane Mode, swipe down from the top of your screen and tap the airplane icon. On iPhones, you can also go to Settings and toggle Airplane Mode on.
You can still use apps that do not require internet, you can still receive alarms, and you can still turn the phone on and off. You just cannot make calls, send messages, or use the internet until you turn Airplane Mode back off.
I use Airplane Mode charging whenever I am at my desk working and I have my phone plugged in nearby. I do not need it to be online every second, so I enable Airplane Mode to speed up charging. When I need to check something online, I just toggle it off for a minute.
Stop Background Wi-Fi and Bluetooth Scanning
Here is something most people do not realize. Even when Wi-Fi and Bluetooth are turned off in your quick settings, your phone might still be scanning for networks and devices in the background.
Android phones especially have hidden settings that enable Wi-Fi scanning and Bluetooth scanning to improve location accuracy. If you rely heavily on WiFi features like WiFi Calling on iPhone, be aware that disabling background scanning affects location but not calling quality
How to Disable This on Android
Step 1: Open Settings.
Step 2: Go to Location or Location Services.
Step 3: Look for an option called Location Services, Improve Accuracy, or Scanning.
Step 4: Tap it and you will see two toggles: Wi-Fi Scanning and Bluetooth Scanning.
Step 5: Turn both of these off.
Your location features will still work fine using GPS. The only difference is that location accuracy might be slightly slower in urban areas with lots of buildings. For most people, this is not noticeable.
But the battery savings are real. Disabling these background scans reduces power consumption and speeds up charging.
How to Disable Background App Refresh on iPhone
iPhones have a similar feature called Background App Refresh. Apps refresh their content in the background even when you are not using them, and this consumes power.
Step 1: Go to Settings.
Step 2: Tap General.
Step 3: Tap Background App Refresh.
Step 4: Either turn it off completely or go through the list and disable it for apps that do not need to update in the background.
Disabling this feature speeds up charging and also extends overall battery life throughout the day.
Check If Fast Charging is Actually Enabled
Some phones let you toggle fast charging on or off in settings. If your phone supports fast charging but it is disabled in settings, you will only get slow charging speeds no matter what charger you use.
On Samsung phones, go to Settings, Battery, Charging, and make sure Fast Charging is toggled on.
On other Android phones, check Settings under Battery or Charging for a similar toggle.
iPhones do not have a toggle for this. Fast charging is automatic when you use a compatible charger and cable.
I once helped someone whose Samsung phone was charging slowly. They had disabled fast charging months earlier to reduce heat during summer and forgot to turn it back on. One toggle flip and their charging speed doubled instantly.
Use the Right Charger
This seems obvious but it matters more than people realize. If you are using a 5 watt charger that came with an old phone, charging will be slow no matter what tricks you try.
Modern phones support 15 watt, 20 watt, or even 30 watt fast charging. But you need a charger and cable that can deliver that power.
Check the wattage printed on your power adapter. If it says 5W or 10W, you are using an old slow charger. Upgrade to a 20W or higher charger for noticeably faster charging.
Make sure your cable supports fast charging too. Not all USB cables can carry high power. Use the cable that came with your phone or buy a quality certified cable.
Charging speed is not magic. It is physics. More watts delivered to the battery means faster charging. Use the highest wattage charger your phone supports for maximum speed.
Slow charging is annoying but it is almost always fixable. Try these methods and you will see real improvements in how fast your phone powers back up.
Why Won’t My Phone Fast Charge Anymore? Causes and Fixes
Fast charging is one of those features you do not appreciate until it suddenly stops working. Your phone used to charge from 20% to 80% in under an hour. Now it takes three or four hours to reach full charge even though you are using the same charger.
I have experienced this frustrating situation multiple times. One day fast charging works perfectly. The next day it is gone and you have no idea what changed.
The truth is that fast charging depends on several factors working together perfectly. When any one piece breaks down, you lose the fast charging capability and fall back to slow standard charging.
Let me help you figure out why your phone won’t fast charge anymore and how to get that speed back.
How Fast Charging Actually Works
Before we troubleshoot, you need to understand what fast charging requires. It is not just about plugging in any charger and expecting magic.
Fast charging uses higher voltage and amperage to push more power into your battery in less time. Standard charging typically delivers 5 watts of power. Fast charging can deliver 18 watts, 20 watts, 25 watts, or even higher depending on your phone model.
But for this to work, you need three things working together:
A phone that supports fast charging. Most phones made in the last five years support some form of fast charging, but very old phones do not have this capability built in.
A charger that can deliver high wattage. The power adapter needs to output 18 watts or more. A standard 5 watt charger cannot fast charge no matter what.
A cable that can handle high power transfer. Not all USB cables are created equal. Some can only carry 5 watts. Others can handle 20 watts or more.
All three pieces must be compatible and working. If any one piece is wrong, fast charging fails and you get slow charging instead.
Think of it like a water hose. You need high water pressure from the source, a pump that can handle that pressure, and a hose that will not burst. If any piece is too weak, water flow slows to a trickle. Fast charging works the same way.
Check Your Cable Wattage and Adapter Rating
This is the first thing I check when fast charging suddenly stops working. Often someone grabbed the wrong charger or cable without realizing it.
How to Check Your Power Adapter
Pick up your power adapter and look closely at the fine print on it. You will see ratings printed on the adapter body. Look for the output specifications.
A standard slow charger will say something like “Output: 5V 1A” which equals 5 watts.
A fast charger will say “Output: 9V 2A” or “Output: 5V 3A” or similar higher numbers. These output 18 watts or more.
Some fast chargers list multiple output levels like “5V 3A / 9V 2A / 12V 1.5A” which means they can adapt to different charging protocols.
If your adapter only shows 5V 1A or 5V 2A, you are using a slow charger. That is why fast charging is not working. You need a higher wattage adapter.
I keep multiple chargers around the house and I have accidentally grabbed the wrong one more times than I care to admit. I plug it in, walk away, come back an hour later and wonder why my phone barely charged. Then I check the adapter and realize I grabbed an old 5 watt charger instead of my 20 watt fast charger.
Label your chargers or keep your fast charger in a specific spot so you do not mix them up.
Understanding Charging Protocols
Fast charging is not just about watts. Different phone manufacturers use different charging protocols and standards.
USB Power Delivery (USB PD): This is the universal standard used by iPhones, Google Pixel, and many other phones. It can deliver up to 100 watts but most phones use 18 to 30 watts.
Qualcomm Quick Charge: Used by many Android phones with Qualcomm processors. Versions range from Quick Charge 2.0 to 5.0 with increasing speeds.
Samsung Adaptive Fast Charging: Samsung’s proprietary fast charging technology for Galaxy phones.
OnePlus Warp Charge / SuperVOOC: Extremely fast charging systems used by OnePlus and some other brands.
Your charger and phone need to speak the same language. An iPhone needs a USB PD charger. A Samsung phone works best with a Samsung adaptive charger or USB PD.
Using a charger with the wrong protocol might still charge your phone, but it will default to slow standard charging instead of fast charging.
Check Your Cable
Cables are often the hidden culprit. A cable can look perfectly fine on the outside but be incapable of fast charging due to internal wiring.
There is no easy way to visually identify a fast charging cable versus a standard cable. They look identical. The difference is the internal wire gauge and build quality.
Here is what I do to test cables. If you have multiple USB-C or Lightning cables, try swapping them while using the same charger. If fast charging suddenly works with one cable but not another, you found your problem. The first cable cannot handle high power transfer.
Cheap cables from discount stores or online marketplaces often cannot support fast charging even if they physically fit your phone. They use thin internal wires that bottleneck power delivery.
Stick with cables from your phone manufacturer or certified third party cables. For iPhones, look for MFi certified cables which means Apple approved them. For Android, look for cables specifically labeled as supporting fast charging or high power delivery.
I learned this lesson when I bought a pack of five cheap USB-C cables online for 10 dollars. They all worked for data transfer and slow charging, but not a single one supported fast charging. I ended up replacing them with two quality cables that cost 15 dollars each, and fast charging came right back.
How to Re-Enable Fast Charging on iPhone
iPhones support fast charging starting with the iPhone 8 and all newer models. But there are some quirks with how iPhones handle fast charging.
You Need a 20W or Higher Adapter
Apple changed their charging standards with newer iPhone models. To get fast charging, you need a power adapter rated at 20 watts or higher.
The old 5 watt adapters that came with iPhones for years do not support fast charging at all. Even the 12 watt iPad adapters are too slow for proper iPhone fast charging.
If you are still using an old Apple power adapter, that is your problem. You need to buy a 20W USB-C power adapter from Apple or a certified third party manufacturer.
You Need a USB-C to Lightning Cable
Fast charging on iPhones requires a USB-C to Lightning cable, not the old USB-A to Lightning cables.
If your cable has a rectangular USB-A connector on one end, it cannot fast charge. You need the newer USB-C connector which is smaller and oval shaped.
Apple includes USB-C to Lightning cables with newer iPhones, but if you bought your iPhone a few years ago or if you are using an old cable, you might have the wrong type.
Check Optimized Battery Charging Settings
I covered this earlier, but it is worth mentioning again here. If Optimized Battery Charging is active and your phone thinks it has all night to charge, it might deliberately slow down charging.
Go to Settings, Battery, Battery Health & Charging, and check if Optimized Battery Charging is on. If you need fast charging right now, turn it off temporarily.
Software Updates Can Affect Fast Charging
Sometimes iOS updates change how charging works. If your iPhone stopped fast charging right after an update, check online to see if other users are reporting the same problem.
Apple occasionally releases follow up updates that fix charging bugs. Make sure you are on the latest iOS version by going to Settings, General, Software Update.
I had an iPhone that stopped fast charging after an iOS update. I was ready to blame my cable when I found forum posts from hundreds of other users with the same issue. Apple released a patch update two weeks later and fast charging resumed immediately.
How to Re-Enable Fast Charging on Android
Android phones have more variety in how fast charging is controlled because each manufacturer does it slightly differently.
Samsung Galaxy Fast Charging Toggle
Samsung phones have a setting that can turn fast charging on or off. If it is off, your phone will charge slowly no matter what charger you use.
Step 1: Open Settings on your Samsung phone.
Step 2: Tap Battery and Device Care or just Battery.
Step 3: Tap Battery again if needed.
Step 4: Tap Charging or More Battery Settings.
Step 5: Look for a toggle labeled Fast Charging, Fast Cable Charging, or Super Fast Charging depending on your model.
Step 6: Make sure it is toggled on.
If the toggle is already on but fast charging still is not working, try this trick I learned from experience. Turn the toggle off. Wait three to five hours. Then turn it back on.
Sometimes the fast charging feature gets stuck in a glitched state. Turning it off for several hours resets whatever internal flag was preventing it from working. When you turn it back on, fast charging often starts working again.
I have used this reset trick on three different Samsung phones over the years and it worked every time. I have no idea why it needs such a long wait period, but anything less than three hours does not seem to reset it properly.
Google Pixel and Stock Android
Google Pixel phones and phones running stock Android usually do not have a toggle to disable fast charging. Fast charging happens automatically when you use a compatible charger.
If your Pixel stopped fast charging, the problem is almost always the cable or charger, not a setting.
Make sure you are using a USB PD charger rated at 18 watts or higher. Use the cable that came with your Pixel or buy a high quality USB-C cable rated for high power delivery.
Check Settings, Battery, and look for any battery optimization features that might be limiting charging speed. Adaptive Battery and Battery Saver can sometimes slow charging to reduce heat.
OnePlus and Other Brands
OnePlus phones require the specific Warp Charge or SuperVOOC adapter to get maximum fast charging speeds. Using a generic USB PD charger will work but you will only get standard fast charging, not the ultra fast speeds OnePlus advertises.
If you have a OnePlus phone and fast charging stopped working, make sure you are using the original OnePlus charger. Third party chargers often do not support the proprietary fast charging protocol.
The same applies to Oppo, Realme, and Xiaomi phones. They each have proprietary fast charging technologies that work best with their original chargers.
You can still use generic chargers with these phones, but expect slower charging speeds compared to the manufacturer’s charger.
Third Party Charger Problems
Third party charger problems are one of the most common reasons fast charging stops working. A charger that claims to support fast charging but does not actually deliver the right wattage or protocol will silently fall back to slow charging
I see this constantly. Someone buys a cheap multi port charger on sale, uses it for a week, and wonders why their phone takes forever to charge. The charger packaging claimed it supports fast charging, but in reality it only delivers 10 watts per port when multiple devices are plugged in.
Not all third party chargers are bad. But you need to be careful about which ones you buy.
Look for chargers from reputable brands like Anker, Belkin, or Aukey. These companies actually test their products and deliver the advertised wattage.
Avoid ultra cheap chargers from unknown brands on online marketplaces. They often lie about specifications and can even damage your phone with unstable power delivery.
For iPhones, only use MFi certified chargers and cables. The MFi certification means Apple tested and approved the accessory. Non certified accessories might work for basic charging but often fail at fast charging and can cause software errors.
For Android, look for chargers explicitly labeled with the charging protocol your phone uses. If your phone supports USB Power Delivery, buy a charger that lists USB PD in the specifications.
Using Your OEM Charger
OEM means Original Equipment Manufacturer. That is just a fancy way of saying the charger that came with your phone or an official replacement from the phone manufacturer.
Your OEM charger is guaranteed to work correctly with your phone because it was designed specifically for it. Third party chargers have to guess at compatibility.
If fast charging stopped working and you switched to a different charger recently, go back to your original charger and cable. I bet fast charging starts working again immediately.
I always keep my OEM charger as my primary charger and only use third party chargers as backups or for travel. This ensures I always have reliable fast charging when I need it.
When Fast Charging Should Be Disabled
There are actually times when you should intentionally disable fast charging or avoid using it.
Fast charging generates more heat than slow charging. If you are in a very hot environment, fast charging can make your phone uncomfortably hot or even trigger thermal throttling.
If you are charging overnight, you do not need fast charging. Slow charging overnight is gentler on the battery and can extend its lifespan.
If your battery health is already degraded below 80%, fast charging accelerates degradation further. Switching to slow charging helps preserve what battery life you have left.
But for normal daily use when you need a quick charge boost, fast charging is perfectly safe and one of the best features modern phones offer.
If it stopped working on your phone, work through the checklist I provided. Check your adapter wattage. Check your cable. Check your phone settings. Try the toggle reset on Samsung phones.
Nine times out of ten, one of these steps will restore your fast charging and get you back to quick convenient charging speeds.
Why Your Phone Won’t Charge in the Car (Or on Wireless Chargers)
Most troubleshooting guides focus on home charging with standard cables and wall outlets. But real life is more complicated. You charge your phone in your car during commutes. You use wireless chargers at work. You have charging setups in multiple places.
When charging fails in these alternative scenarios, it is frustrating because you assumed it would work the same way everywhere. Your phone charges fine at home but refuses to charge in the car. Or your wireless charger suddenly stops recognizing your phone.
These situations have their own specific causes and solutions. Let me walk you through both scenarios so you understand what is going wrong and how to fix it.
Why Your Phone Won’t Charge in the Car
Car charging problems are surprisingly common and often baffling because the car charger is a completely different device from your home charger.
The Cigarette Lighter Port Problem
Many older car chargers plug into what is called the cigarette lighter socket or power outlet in your car. These ports deliver 12 volts of power, but the amount of current varies depending on your vehicle.
Older cars have weak power delivery through these ports. A car charger drawing too much power can blow the fuse or the car’s electrical system might not supply enough amperage to the charger in the first place.
I once rented a car and tried to use a fast charging car adapter I had bought. The charger would not deliver any power at all. I switched to a different charger and still nothing. I assumed the car had a dead outlet, but when I plugged in the car’s factory charger, it worked fine.
The problem was that my high wattage charger was demanding more power than that particular car’s outlet could provide. Older vehicles have weaker power systems than newer cars.
Car Charger Wattage is Too Low
Most car chargers deliver between 10 and 20 watts of power when the engine is running. That is decent, but nowhere near as good as a home fast charger.
If you buy a very cheap car charger, it might only deliver 5 watts. Your phone will charge, but extremely slowly, especially if you are using GPS or playing music while charging.
Check the wattage rating printed on your car charger. If it says 5W or 10W, you have a slow charger. Upgrade to a 15W or 20W car charger for noticeably faster charging in the car.
Quality matters with car chargers just like home chargers. Cheap multi port chargers that claim to charge multiple devices at once often deliver very low wattage to each port. You end up with slow charging even though the charger is technically working.
The Engine Off Problem
Here is something that surprises people. Car chargers do not work when the engine is off.
When your engine is not running, most cars severely limit power to the cigarette lighter outlets to preserve battery. The electrical system simply cannot deliver enough power through the outlet.
I have seen people park at work, plug in their phone charger, leave for the day, and come back to find the phone completely dead because it was not charging while parked.
If you need to charge your phone in a parked car, you need a different solution. Some cars have USB ports built into the dashboard or console that charge even when the engine is off. Check your car’s documentation.
Alternatively, leave the engine running while charging if you are only going to be parked for a short time. Or use a portable power bank to charge your phone instead of relying on the car’s charging port.
USB Port Compatibility
Many newer cars have USB ports built in instead of traditional cigarette lighter outlets. These are much better for charging phones.
But there is a catch. Some car USB ports are designed for data transfer only. They do not deliver much power for charging.
Other car USB ports are designed for charging and deliver better power. The problem is you cannot always tell which type you have just by looking.
If your car has a USB port and your phone barely charges or does not charge at all, try a different cable. Sometimes using a quality data and charging cable instead of a cheap data-only cable makes the difference.
If your car USB port still does not charge adequately, check your car’s manual to see if there is a setting you need to adjust. Some cars have a menu option to enable or disable charging through USB ports.
The Cable Quality Issue
Do not underestimate your car charger cable. I once had a car charger that would only work intermittently. Sometimes it charged, sometimes it did not.
I tried different cables and found that one specific cable always worked while the others failed. The charger was fine, but cheap cables could not handle the power delivery through the car outlet properly.
Use quality cables in your car. The cable that came with your car charger is usually the best option. If you need a second cable, buy a quality brand rather than the cheapest option available.
Troubleshooting Car Charging Step by Step
Step 1: Make sure the engine is running. If it is off, car charging will not work on most vehicles.
Step 2: Plug your phone into a wall charger at home to verify it charges normally. If it does not charge at home either, your phone has a problem, not the car charger.
Step 3: Try a different cable in the car charger. Sometimes the cable is the issue, not the charger itself.
Step 4: Check what wattage your car charger outputs. If it is less than 10 watts, that might be too slow for your phone.
Step 5: Try plugging the car charger into a different outlet in your car if you have multiple outlets available.
Step 6: Use your phone’s battery stats to see if charging is actually happening. Go to Settings and check battery information. If it shows your phone is charging but just slowly, the car charger is working but underpowered.
Step 7: Consider upgrading to a higher quality car charger with better wattage rating if your current one is not cutting it.
I keep two car chargers in my vehicle now. A basic one for normal driving and charging, and a high wattage one that I use when I really need maximum charging speed. This way I have options depending on the situation.
Why Wireless Charging Stopped Working
Wireless charging is incredibly convenient, but it is also more finicky than wired charging. Several things can cause it to stop working.
Your Phone Case is Too Thick
This is the most common culprit. Wireless charging transmits power through electromagnetic induction. The thicker the barrier between your phone’s charging coil and the wireless charger pad, the harder the charger has to work.
Some phone cases are just too thick for wireless charging to work. I learned this the hard way when I bought a rugged protective case for my iPhone. It looked good and protected the phone well, but when I put it on my wireless charger, absolutely nothing happened.
I removed the case and the wireless charger worked perfectly. I put the case back on and charging stopped. That was the problem.
Not all thick cases block wireless charging. Some are designed with wireless charging in mind and include special materials that allow signals to pass through.
If your wireless charging stopped working after you added a new phone case, that is almost certainly the cause. Try removing the case and placing your phone directly on the wireless charger.
If charging works without the case, you have two options. Either use a thinner case, or buy a wireless charger that has higher power output to penetrate the case better.
Misalignment With the Charger Pad
Wireless charging only works when your phone is positioned correctly on the charger pad. The charging coil in your phone needs to be directly over the coil in the charger.
If your phone is off to the side, shifted forward, or tilted at an angle, the coils might not be properly aligned and charging will fail.
Some people place their phone on a wireless charger and walk away assuming it is charging. They do not realize the phone shifted or was not positioned correctly in the first place.
Check the alignment. Most wireless chargers have a marked area where you should place your phone. Make sure your phone is positioned in that area with the screen facing up.
If your phone keeps sliding off the charger or shifting position, you might need a charger with a lip or guide that keeps the phone in place better.
Qi Compatibility Issues
Wireless charging uses a standard called Qi (pronounced “chee”). Most modern phones support Qi charging. But compatibility is not always guaranteed, especially between older chargers and newer phones.
Very old phones and very new phones sometimes do not work together. For example, an iPhone 8 wireless charger might not work optimally with an iPhone 15, or vice versa.
If your wireless charger is several years old and you recently got a new phone, check online to make sure the two are compatible. Usually they are, but occasionally there are compatibility issues.
Also check that your phone actually supports wireless charging. Not all phones do. Budget Android phones sometimes skip this feature to save costs.
If your phone should support wireless charging but does not work on any charger, take your phone in for professional diagnosis. There might be internal hardware damage affecting the charging coil.
Metal Objects Interfering
Metal interferes with wireless charging signals. If you have a metal phone case or a metal stand holding your phone, wireless charging will not work.
I once had a metal wallet case that looked beautiful but completely blocked wireless charging. I switched to a plastic case and everything worked fine.
Check if anything metal is between your phone and the charger pad. Remove any metal cases, metal stands, or metal phone rings that might be interfering.
Charger Needs to Be Reset
Sometimes a wireless charger just gets stuck. The charging circuit inside the charger becomes confused and stops working even though physically everything is fine.
Try unplugging the wireless charger from the wall outlet for about 30 seconds. Leave it unplugged while you count to 30. Then plug it back in.
This power cycle often resets whatever internal circuit was stuck and gets the charger working again.
I have done this multiple times with wireless chargers that stopped working for no obvious reason. Half the time a simple 30 second power cycle brings it right back to life.
Water or Moisture Inside the Charger
If your wireless charger got wet or was in a humid environment, moisture might have gotten inside the charging coil area.
Water does not conduct the wireless charging signal the same way the charger circuit expects. Your phone might sit on the charger but charging will not work.
Let the charger dry out completely in a warm, dry place for a few days. Once moisture is gone, it should work again.
If the charger was exposed to significant water damage, it might need replacement. Wireless chargers are not typically waterproof and internal corrosion can permanently damage the charging coil.
Check Your Phone’s Charging Coil
Finally, the problem might not be the charger but your phone’s wireless charging coil.
If multiple different wireless chargers do not work with your phone, but wired charging works fine, your phone’s wireless charging receiver might be broken.
This happened to a friend’s iPhone. He tested it on three different wireless chargers and none worked. But plugging in a lightning cable charged the phone fine. The wireless charging coil was damaged and needed phone repair or replacement.
Using Wireless Charging as a Diagnostic Tool
Here is a useful trick I learned. If your wired charging is acting up, try wireless charging if your phone supports it.
Wireless charging bypasses your USB port and cable entirely. If your phone charges fine wirelessly but not with a cable, you know the problem is your charging port, cable, or charger, not your phone’s battery or charging system.
This helps narrow down the troubleshooting significantly. Instead of wondering if the problem is your phone or your accessories, wireless charging gives you a quick answer.
I have used this diagnostic method multiple times when helping friends troubleshoot. It saves so much time and eliminates a lot of guesswork.
When to Replace a Car Charger or Wireless Charger
Car chargers and wireless chargers do not last forever. They can burn out, degrade, or simply stop working over time.
If your charger is more than three years old, stops working intermittently, or no longer charges reliably even with good cables and proper phone positioning, it is probably time for a replacement.
Quality chargers from reputable brands last longer than cheap ones. I have had car chargers and wireless chargers fail on me within months of purchase from no name brands. Meanwhile, chargers from Anker, Belkin, or the phone manufacturer itself last years without problems.
Invest in good chargers and they will serve you well. Buy cheap chargers and you will be replacing them constantly.
Your phone charges in many different places throughout your day. Home, car, work, friends houses. Making sure all those charging scenarios work reliably keeps you connected and your battery healthy.
Use These Apps to Test Your Charger and Diagnose Problems
At this point in the troubleshooting process, you might feel like you are guessing. Your phone charges slowly but you are not sure if the cable is bad, the charger is weak, or something else is the problem.
This is where most people either give up or buy a new charger hoping that fixes it. But there is a better way. You can objectively measure your charger’s performance using free apps that show you exactly how much power your charger is delivering.
These apps remove all the guesswork. Instead of wondering if your charger is the problem, you can see real numbers that tell you if your charger is performing correctly or failing.
I have used these apps countless times to diagnose charging problems. They have saved me from buying new chargers when the real problem was my cable, and they have confirmed when my charger really was dead.
Let me show you how to use them.
Understanding Charging Current Measurements
Before we dive into the apps, you need to understand what we are measuring.
Power delivery is measured in two ways. Voltage tells you the pressure of the electrical flow. Current tells you the amount of electricity flowing.
When troubleshooting chargers, we care about current. Current is measured in milliamps, abbreviated as mA.
A standard slow charger delivers about 500 to 1000 mA of current. That is 0.5 to 1 amp.
A fast charger delivers 2000 to 3000 mA or higher. That is 2 to 3 amps or more.
Think of it like a water hose. Voltage is the water pressure. Current is how much water is flowing. You want high flow, which means high current.
If your charger shows very low current when it should show high current, something is wrong with your charger, cable, or port.
How to Use the Ampere App (Android)
Ampere is an Android app that shows you real time charging current. I have used it on dozens of phones and it is incredibly accurate.
Installing Ampere
Step 1: Open Google Play Store on your Android phone.
Step 2: Search for “Ampere.”
Step 3: Find the app by Ampere Lab and tap Install.
Step 4: Once installed, open the app and grant it the permissions it requests.
The app is free and does not have annoying ads that interfere with the main function. It is one of the best free diagnostic tools available.
Using Ampere to Test Your Charger
Step 1: Unplug your phone from any chargers. Let it sit for a minute with no power connected.
Step 2: Open the Ampere app and let it sit on the home screen for about 30 seconds. This lets it calibrate and establish a baseline.
Step 3: Plug your charger into your phone while the Ampere app is open and running.
Step 4: Watch the app as your phone charges. The main number shown is the charging current in milliamps.
A good charger will show current increasing and stabilizing within 10 to 20 seconds of plugging in.
Interpreting Ampere Results
Here is how to interpret what you see in the Ampere app:
1000 mA or higher: Your charger is delivering strong current and charging at a good speed. This is normal for a decent charger.
500 to 1000 mA: Your charger is working but delivering weaker current. Charging will be slow. This usually indicates an older charger, a damaged cable, or a port with partial blockage.
Less than 500 mA: Your charger is delivering very weak current. Either the charger is failing, the cable is severely damaged, or your charging port has significant buildup. This is not acceptable charging.
Zero or near zero mA: Your charger is not delivering power at all. Either your charger is completely dead, your cable is broken, or your phone is not recognizing the charger. This definitely needs repair.
Fluctuating wildly between high and low: This indicates an intermittent connection, usually caused by a loose cable or damaged port. Wiggle the cable gently while watching the app. If the current jumps around when you wiggle it, you found your problem.
Testing Different Chargers With Ampere
The real power of Ampere is that you can test different chargers and immediately see which ones work and which ones do not.
I have three different chargers around my desk. I tested each one with Ampere and discovered that one of them only delivers 300 mA, which explains why charging is painfully slow when I use it.
The other two chargers deliver over 2000 mA, so I prefer using those.
Now when my phone charges slowly, I know exactly which charger caused the problem and I do not use it anymore.
You can use Ampere to test your home charger, your car charger, your office charger, and any other charger you use. Build a profile of which chargers are strong and which ones are weak.
Temperature Readings
Ampere also shows your phone’s internal temperature. This is helpful if you suspect your phone is overheating while charging.
A phone charging at room temperature typically shows between 75 and 90 degrees Fahrenheit. If Ampere shows your phone is over 110 degrees while charging, heat is definitely affecting your charging.
I have used this feature to identify chargers that make my phone run hot. Some cheap chargers deliver unstable power that causes the phone’s charging circuit to work harder and generate more heat.
Switching to a quality charger reduced my phone’s temperature by 15 to 20 degrees while charging. That is a massive difference.
How to Use the Charger Tester App (Android)
Charger Tester is another Android app that measures charging quality, but it uses a different rating system than Ampere.
Instead of showing raw milliamps, Charger Tester rates your charger on a scale and gives it a quality score.
Installing Charger Tester
Step 1: Open Google Play Store.
Step 2: Search for “Charger Tester.”
Step 3: Install the app from the developer that has the most downloads and highest ratings.
Step 4: Open the app and allow permissions.
Using Charger Tester to Rate Your Charger
Step 1: Plug your charger into your phone with the Charger Tester app open.
Step 2: Wait 5 to 10 seconds for the app to take a reading.
Step 3: The app will display a score and rating for your charger.
Understanding Charger Tester Results
The scoring system is simple:
1000 or higher: Your charger is excellent. It is delivering strong power and working correctly.
800 to 1000: Your charger is good. Not perfect, but acceptable. Charging speed will be decent.
500 to 800: Your charger is average. It works but is not very fast. Charging will be slow.
Less than 500: Your charger is poor. It is barely functional. You should replace it.
Below 100: Your charger is basically dead. It is not delivering meaningful power at all.
I prefer Ampere for detailed diagnostic information, but Charger Tester is great if you just want a quick pass fail rating for multiple chargers.
Quick Charger Comparison
You can test several different chargers quickly with Charger Tester to find out which one is best.
I tested four different chargers I had around the house and got scores of 950, 1200, 450, and 200.
The 1200 rated charger is my fast charger that I use for work and travel.
The 950 rated charger is my backup charger that works well for normal charging.
The 450 rated charger is too slow for daily use. I now only use it in emergencies.
The 200 rated charger is basically garbage. I threw it away.
This simple test immediately told me which chargers to trust and which ones to replace.
When to Test Your Charger
You do not need to test your charger constantly. But there are specific situations where testing is incredibly helpful.
Test when you suspect your charger is failing. If your phone charges slowly with one charger but normally with another charger, test both to confirm which one is bad.
Test when you buy a new charger. Before relying on a new charger for daily use, test it to make sure it actually delivers the advertised power.
Test when troubleshooting slow charging. Instead of guessing, get real data. If the app shows your charger is delivering good current, the slow charging is probably caused by something else like heat or background apps.
Test car chargers and portable chargers. These alternative chargers often deliver weaker power than home chargers. Testing tells you if they are actually capable of good charging speed.
Test before buying a replacement charger. If you are considering upgrading, test your current charger first to know what you are dealing with.
Apps for iPhone Users
Unfortunately, Ampere and Charger Tester are Android only. Apple does not allow iPhone apps to access the detailed charging information that these Android apps can retrieve.
iPhone users can still check basic charging information through the Battery Health menu in Settings, which I covered earlier. But you cannot get the detailed real time current measurements that the Android apps provide.
If you have an iPhone and you suspect your charger is the problem, your best approach is to test multiple chargers and see which ones work well and which ones do not. You cannot get app based measurements, but trial and error with different chargers will reveal which ones are strong.
Alternatively, take your iPhone to an Apple Store or authorized repair center. They have diagnostic tools that can measure charging performance.
Why These Apps Matter
These apps eliminate guesswork from charger troubleshooting. Instead of buying a new charger and hoping it fixes your problem, you can test your current charger and know for certain whether it is working correctly.
I have saved money countless times by using these apps. They showed me that my problem was not the charger at all, but my cable or port. Or they confirmed that my charger really was failing and needed replacement.
These apps are free. There is no excuse not to use them if you have an Android phone and you are trying to figure out why your charging is not working properly.
Download one or both of these apps today. Test your chargers. Build a profile of which chargers are reliable and which ones are weak.
You will never wonder again if your charger is the problem. You will have real data that tells you exactly what is going on.
When to Stop Trying and Get Professional Help
I want to be honest with you. Not every charging problem can be fixed at home.
You have tried cleaning your port. You have tried different cables and chargers. You have force restarted your phone multiple times. Nothing worked.
At some point you need to accept that your phone has a hardware problem that requires professional repair. Knowing when to stop troubleshooting and get professional help saves you time and frustration.
Let me walk you through the signs that your phone needs professional repair and how to choose a repair shop that will not rip you off.
Signs Your Charging Port is Physically Damaged
Some charging problems are caused by physical damage that cleaning and software fixes cannot repair.
If you see any of these signs, your charging port is likely damaged beyond DIY repair.
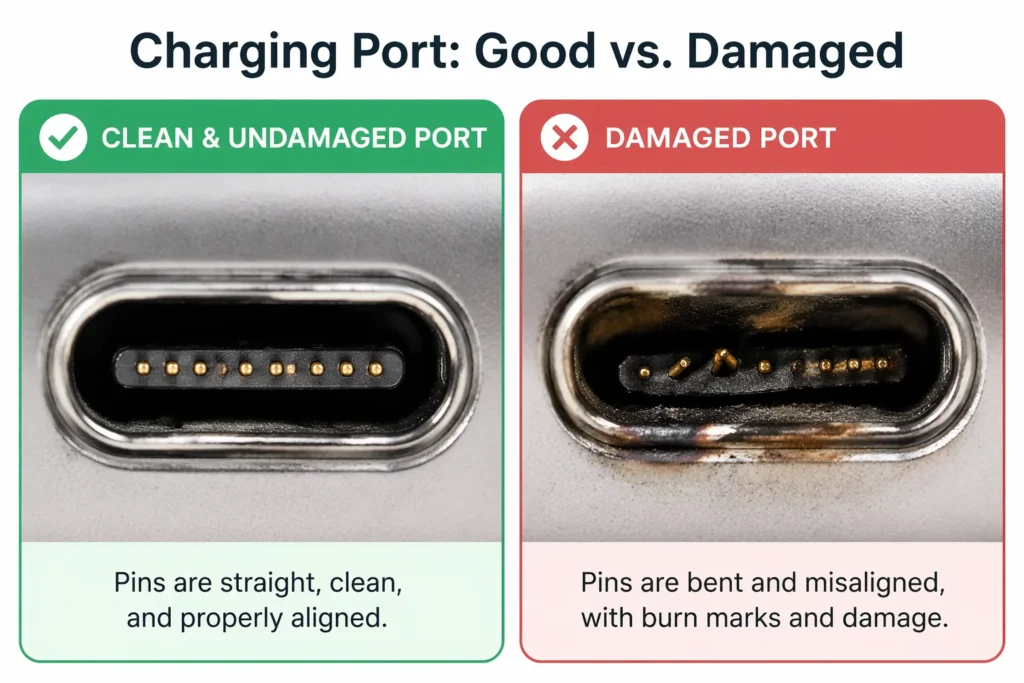
The Port Feels Loose or Wiggly
When you plug in your cable, does it feel loose inside the port? Does the cable fall out with the slightest bump? Does the connection feel like it is barely holding on?
A loose port means the internal connector pins have worn out or the port frame has been damaged. This typically happens after years of repeated plugging and unplugging, or from the damage caused by holding the cable at angles to maintain a connection.
I had an iPhone where the charging port felt like the cable could fall out at any moment. I took it to Apple and they told me the port needed replacement. No amount of cleaning would have fixed that because the problem was internal wear, not debris.
You Can See Bent or Damaged Pins
Look directly into your charging port with good lighting. You should see shiny metal pins at the back of the port.
If those pins look bent, broken, misaligned, or discolored, you have internal damage. Bent pins especially are a sign that the port has been stressed by angled charging or physical pressure.
Metal pins that look blackened or burned indicate heat damage from electrical arcing. This happens when poor connections cause sparks inside the port.
These are problems that require professional replacement. You cannot straighten internal pins yourself without destroying them, and burned pins are a fire safety hazard.
There Are Burn Marks Around the Port
Look around the outside opening of your charging port. Do you see black marks, scorch marks, or burn damage around the port opening?
These marks indicate that electrical arcing or heat damage has occurred inside the port. This is serious because it suggests the port has experienced electrical problems that could damage your phone’s motherboard.
I saw a phone once where there were visible burn marks inside the charging port. The repair technician explained that using a damaged charger with the wrong voltage had caused internal arcing. The port needed replacement and the motherboard needed testing to make sure it was not damaged.
The Port Has Visible Cracks or Breaks
If the plastic or metal frame around your charging port has cracked, broken, or separated, professional repair is the only option.
Sometimes the port connector itself can break if the phone has been dropped or physically impacted. Or the port frame inside the phone can separate from the motherboard due to stress or heat.
These are not things you can glue back together yourself. The port needs to be desoldered from the motherboard and a new one soldered on. This requires professional equipment and expertise.
Physical Signs of Battery Problems
Sometimes the issue is not your charging port but your battery itself.
Your Battery is Swollen
This is the most serious sign. If the back of your phone is bulging, if the screen is lifting at the edges, or if the phone no longer sits flat on a table, your battery is swollen.
A swollen battery is dangerous. It can rupture and expose corrosive chemicals. In extreme cases, it can catch fire.
Stop using the phone immediately. Do not try to charge it. Do not try to continue using it. Take it to a professional for battery replacement right away.
I cannot stress this enough. A swollen battery is not something to ignore or hope will go away on its own. It will only get worse.
Your Phone Gets Extremely Hot While Charging
Some warmth during charging is normal. But if your phone gets uncomfortably hot to touch, hot enough that you cannot hold it for more than a few seconds, something is wrong.
This could indicate a battery that is failing and generating excessive heat. It could also indicate damage to the charging circuit on the motherboard.
Either way, if your phone gets dangerously hot, stop using it and get professional help. Excessive heat can damage internal components and even cause safety issues.
Water Damage Indicators
If your phone has been exposed to water or liquid, charging problems are common. But these are usually not fixable at home.
Most phones have a liquid damage indicator inside the charging port. This is a tiny colored sticker that changes color if it gets wet.
If you look inside your charging port and see a white or light colored area, the sticker is normal and your port has not been water damaged.
If you see a red, pink, or dark colored sticker, that indicates your phone has been exposed to liquid at some point.
Water damage can cause internal corrosion of the charging pins and damage to the charging circuit on the motherboard. Even if the phone seems to work, internal corrosion will eventually cause charging failure.
If your phone has water damage indicator showing liquid exposure, professional diagnosis is important. A repair technician can determine if internal corrosion requires component replacement.
Signs Your Phone Needs a New Battery
I covered battery health earlier, but there are physical signs that tell you the battery itself is failing.
If your phone battery health shows 60% or lower, the battery needs replacement.
If your phone randomly shuts down at 40% or 30% battery, the battery cannot deliver stable power and needs replacement.
If your phone shows battery health below 50%, it is time for a replacement. The battery is too degraded for reliable use.
Battery replacement is straightforward and relatively affordable. Most repair shops charge between 50 and 100 dollars for battery replacement depending on the phone model.
A new battery transforms an old phone. Suddenly it lasts all day again. The improvement is dramatic.
I got my iPhone battery replaced at 2.5 years old when it hit 78% health. The cost was 70 dollars. That single repair extended my phone’s usefulness by another 18 months before I upgraded. Absolutely worth it.
How to Choose a Repair Shop
Once you accept that your phone needs professional repair, choosing the right shop is critical. A bad repair shop will use cheap parts and cause more problems than it solves.
Official Manufacturer Repair Centers
The safest option is always the official repair center for your phone’s manufacturer.
Apple has Apple Stores and authorized service providers. Samsung has Samsung service centers. Google has certified Pixel repair locations.
These official channels charge more money, but they use genuine parts and their work is warrantied by the manufacturer.
I have always had good experiences with Apple Stores. Yes, repairs cost more, but I know they are using original parts and the repair is done correctly.
Authorized Third Party Repair Shops
There are quality independent repair shops that are authorized by the phone manufacturer. They have permission to use genuine parts and their work carries manufacturer backing.
Look for the authorized certification in the shop’s name or on their website. These shops are trustworthy because they have been vetted and certified.
Questions to Ask Any Repair Shop
Before you hand over your phone and your money, ask these critical questions.
Will you use original manufacturer parts or aftermarket replacement parts?
This is the most important question. Original parts are manufactured to exact specifications. Aftermarket parts are cheap copies made by third parties.
The difference matters. I have heard horror stories from people who got cheap aftermarket charging ports installed. After the repair, their microphone did not work properly, their network signal was weak, and the charging failed again within weeks.
This happens because cheap aftermarket parts lack the protection circuits and precision that original parts have. They are literally built with inferior components to save money.
Insist on original parts. If a repair shop refuses or wants to charge extra for original parts, go somewhere else.
What is your warranty on the repair?
A quality repair should come with a warranty. Ask how long the warranty is and what it covers.
Apple typically warranties repairs for 90 days. Quality independent shops often offer 30 to 90 day warranties.
If a shop offers no warranty or a very short warranty like 7 days, be suspicious. A good repair shop stands behind their work.
Can you show me the damaged part after you remove it?
A reputable repair shop will show you the damaged component they removed from your phone. This confirms what the problem actually was.
If they refuse to show you the damaged part, that is a red flag. They might be lying about what was wrong.
I always ask to see the old part. Once I had a repair shop claim my charging port was damaged beyond repair. But when I asked to see the port they removed, it looked barely worn at all. I took my phone somewhere else and got a second opinion.
What parts are you using and where do they come from?
Ask specifically if they are using original manufacturer parts or third party parts. Ask where they source their parts.
A shop that sources parts directly from the manufacturer or from authorized distributors is trustworthy. A shop that gets parts from unknown online sellers is risky.
How much does the repair cost?
Get a written estimate before any work is done. Make sure you understand what is included in the price.
Reasonable repair costs:
Charging port replacement: 80 to 150 dollars depending on phone model and shop
Battery replacement: 50 to 120 dollars
Screen replacement: 150 to 400 dollars depending on phone model
Water damage repair: 100 to 300 dollars
If a shop quotes significantly higher than these ranges, get a second opinion.
If a shop quotes significantly lower, be suspicious. They might be using cheap parts.
The Repair Tech Perspective
Here is something I learned from repair professionals that changed how I view phone repairs.
A quality repair shop will use original parts even if they have to order them specially. They know that cheap parts will cause problems down the road and they want their repairs to last.
A shop trying to maximize profit will use the cheapest parts available. They will fix your phone for next month, but the repair might fail in a few months.
The difference in cost is often minimal. Original parts might cost 20 to 30 dollars more than cheap copies. But that small investment makes a huge difference in repair quality.
Find a repair shop that cares about doing it right instead of just doing it cheap. You will be happier with the results.
Before You Decide on Repair
One more thing. Before you commit to repair, consider whether repair makes financial sense.
If your phone is very old and repair costs more than 40% of a used replacement phone’s cost, buying a used phone might make more sense than repairing.
If your phone is relatively new and the repair is straightforward like a battery or charging port, repair is almost always the right choice.
If repair costs more than 300 dollars on a phone that is not a flagship model, I seriously consider switching devices instead. If that means moving to a new platform, I have a complete guide on how to transfer everything from iPhone to Android without losing any data
But if repair is under 150 dollars, I always repair.
Your situation might be different. Think about your phone’s age, the repair cost, and the cost of replacement. Make the decision that makes financial sense for you.
Get Multiple Opinions
If you are unsure about a repair diagnosis, get a second opinion.
Take your phone to another repair shop and let them diagnose the problem independently. Sometimes different shops will identify different problems.
If two different shops agree on the diagnosis, you can be confident that is the actual problem.
If they disagree, that tells you something. One of them might be trying to overcharge you or recommend unnecessary repairs.
Multiple opinions give you confidence that the repair recommended is legitimate and necessary.
You have done all the troubleshooting you can at home. You have cleaned your port, tried different chargers, restarted your phone, and checked your battery health.
If your phone still will not charge and you see any of the signs I described, it is time to get professional help. A skilled repair technician can fix what DIY methods cannot.
If you have cleaned your charging port, tried different cables, and checked your battery health but your phone still refuses to charge, the problem may be deeper than a simple DIY fix. Apple’s official battery service page provides manufacturer-verified guidance on when your iPhone battery needs professional replacement and what your repair options are depending on your model and warranty status.
Choose your repair shop carefully. Ask the right questions. Insist on original parts. And do not be afraid to get a second opinion if something does not feel right.
Your phone can be repaired. It just needs professional hands to do it correctly.
How to Prevent Charging Problems (6 Long-Term Habits)
Prevention is always better than repair. I have learned this lesson many times. An hour of preventative maintenance now saves days of troubleshooting and hundreds of dollars in repair costs later.
Most charging problems are not sudden surprises. They develop gradually because of habits and neglect. A little attention to the right practices keeps your phone charging reliably for years.
Let me share the six habits that have kept my phones charging perfectly and will do the same for you.
Clean Your Port Every 6 Months (Preventative Maintenance)
I cannot stress this enough. Regular port cleaning is the single most important habit for preventing charging problems.
You do not need to wait until your phone stops charging. By then, lint buildup has already reached the point where charging is compromised.
Instead, clean your port every six months before problems develop. This keeps buildup from ever accumulating to dangerous levels.
How Often Should You Actually Clean?
The honest answer depends on your lifestyle.
If you keep your phone in your pocket all day, you accumulate lint faster. I would say clean every three to four months.
If you mostly keep your phone on a desk or table, every six months is plenty.
If you live in a dusty environment like a construction site or a workshop, clean more frequently. Even monthly if you are in very dirty conditions.
I set a phone reminder on my calendar. Every six months I get a notification that says “Clean charging port.” I spend two minutes with a toothpick and I am done.
This one simple habit has prevented charging problems for years. I have never had to deal with the frustration of a phone that will not charge because I caught the lint buildup early.
The Two-Minute Monthly Check
Between my scheduled six-month cleanings, I do a quick visual inspection once a month.
I shine a flashlight into my charging port and look inside. If I see any obvious lint accumulating, I do a quick one or two minute cleaning right then.
This catches heavy lint buildup before it becomes a problem. Most months I see nothing and the port is fine. But occasionally I catch buildup early and clean it before it gets bad.
This monthly check takes literally 30 seconds and it has saved me multiple times from developing charging problems.
Make It a Habit
The key is making port cleaning a habit, not something you do only when you remember or when you have a problem.
Put it on your calendar. Set a phone reminder. Link it to another habit like changing your toothbrush or paying your phone bill.
Whatever reminder system works for you, use it. Regular maintenance prevents problems. Ignoring your port until charging fails means you have waited too long.
Never “Wiggle” Your Cable to Make It Charge
This is a habit I see constantly and I have done it myself. Your phone will not charge properly so you hold the cable at a specific angle and suddenly it works.
Stop doing this immediately. This habit is destroying your charging port one day at a time.
When you force the cable to sit at an angle to maintain connection, you are bending the internal pins inside your port. Each time you do this, you bend them a little more.
Eventually those pins become permanently bent. The port no longer works at any angle. Now you have a serious problem that requires professional repair.
I had a friend who did this for months. His charger would only work if he held the cable at a very specific angle. He thought this was just how it was. Then one day even that angle stopped working and his phone would not charge at all.
When he took it to a repair shop, they showed him that the internal pins were severely bent and the port needed complete replacement. The repair cost 120 dollars when it could have been prevented by not wiggling the cable in the first place.
What to Do Instead
If your charger only works at certain angles, that is a sign something is wrong. Do not just accept it and keep wiggling the cable.
Clean your charging port. It probably has lint buildup blocking proper connection.
Try a different cable. Yours might be damaged.
Test with a different charger. Your current charger might be weak.
Address the root cause instead of developing a workaround habit. Wiggling the cable is a temporary fix that causes long term damage.
The Permanent Damage
Once the internal pins are bent, they cannot be straightened without destroying them. The port needs replacement by a professional.
Every time you wiggle that cable, you are contributing to permanent damage. It is not worth the temporary convenience.
I learned to be very gentle with my charging cable after seeing what happens when people develop this habit. The cable goes straight in. No forcing. No angling. If it does not go in smoothly, something is wrong and I investigate the cause.
Always Use Original or Certified Chargers
This is where I see people make expensive mistakes.
You are at an airport and realize you forgot your charger. You see a cheap charger for 10 dollars from a brand you have never heard of. You buy it thinking it is fine.
Or you find a charger online that costs half as much as the original. You order it thinking you are saving money.
Six months later your phone starts acting weird. Apps crash. The screen freezes. Charging stops working. You blame the phone when really the cheap charger caused a system crash months ago.
The relationship between cheap chargers and phone problems is direct. Bad chargers deliver unstable power that causes the phone’s charging system to malfunction.
MFi Certified Chargers for iPhone
If you have an iPhone, only use chargers that are MFi certified. MFi stands for Made for iPhone and it means Apple has tested and approved the charger.
MFi certified chargers cost a bit more than cheap no name chargers, but they are guaranteed to work correctly and safely.
Look for the MFi certification logo on the charger or its packaging. If it does not say MFi certified, do not buy it.
I have an MFi certified charger from Belkin and an MFi certified charger from Anker alongside my Apple branded charger. All three work perfectly because they all meet Apple’s quality standards.
OEM Chargers for Android
OEM stands for Original Equipment Manufacturer. That means the charger made by Samsung, Google, OnePlus, or whatever brand your phone is.
OEM chargers are designed specifically for your phone and they are guaranteed compatible and safe.
If you cannot get an OEM charger, look for chargers from reputable brands like Anker, Belkin, or Aukey that clearly state they are compatible with your phone model.
Avoid no name brands and chargers sold at gas stations or convenience stores. These are almost always low quality and prone to failure.
Chargers to Avoid Completely
I have learned which chargers to avoid completely.
Ultra cheap multi port chargers that cost under 15 dollars. If it seems too cheap to be true, it is. These chargers often overheat and fail quickly.
Chargers from online marketplaces with unverifiable brands. If you cannot find any information about the manufacturer online, it is a red flag.
Chargers sold at gas stations and convenience stores. These are always the cheapest options and always low quality.
Used chargers from unknown sources. You do not know the history or if they have been damaged.
Chargers with damaged cords or plugs. Even if they still work, they are fire hazards.
The Math on Charger Cost
A quality original charger costs 20 to 40 dollars depending on the phone type.
A cheap no name charger costs 5 to 15 dollars.
The difference is 15 to 25 dollars.
But a cheap charger that fails and causes phone problems might cost you 100 to 200 dollars in repairs or even the cost of a new phone.
That 15 dollar savings is not worth the risk. I always buy quality chargers and I have never regretted spending the extra money.
Avoid Charging While Gaming or Using Heavy Apps
I covered this earlier but it is worth repeating because it is such an important prevention habit.
Never charge your phone while playing games, recording video, or using any app that makes the processor work hard.
When you do this, your phone is generating heat from two sources at once. The processor is hot from running the heavy app. The charging circuit is hot from charging the battery.
The temperature climbs rapidly. The phone’s thermal protection kicks in and charging slows or stops. You end up with slow charging and a hot phone.
But more importantly, you are accelerating battery degradation. The battery hates being charged while the phone is hot. Every time you do this, you are shortening your battery’s lifespan.
The Right Way
If your battery is low and you need to use your phone, do this instead:
Charge to 30% or 40% with the phone powered off or in Airplane Mode. This is fast and lets the phone stay cool.
Once you have some battery built up, turn the phone back on and use it normally.
If your battery is very low and you need to charge and use the phone immediately, at least avoid heavy apps. Use light apps that do not stress the processor.
Play games and use heavy apps when your phone is not charging. Charging and heavy use do not mix.
Gaming and Battery Damage
Gaming is the worst offender. Mobile games push your processor to maximum and generate significant heat.
Add charging on top of that and your phone becomes a heat factory. The battery suffers. The internal components suffer.
I made a personal rule. I never game while my phone is charging. Full stop.
If my battery is low, I charge until it has enough power. Then I use my phone normally. If I want to game, I do it when the phone is not charging.
This one habit has kept my phone batteries healthy and my charging working perfectly.
Keep Your Phone Away From Moisture
Moisture is your phone’s enemy when it comes to charging.
If your phone has been in a humid bathroom, left in a rainy car, or even just exposed to high humidity, moisture can get inside the charging port.
Water inside the port causes oxidation of the metal pins. This buildup blocks electrical contact and prevents charging.
Prevention Habits
Do not leave your phone in the bathroom during a hot shower. The steam is terrible for your phone.
Do not use your phone in heavy rain. Keep it in a pocket or bag where it is dry.
Do not charge your phone in a humid environment if you can avoid it. If you must charge in humidity, make sure the charger and cable are completely dry before plugging in.
If your phone gets wet, do not immediately try to charge it. Let it dry out completely for at least 24 hours before attempting to charge.
I once got my phone wet at the beach. I immediately charged it anyway because I thought I needed it right away. Big mistake. The moisture inside the port caused charging problems for months. I should have let it dry first.
Update Your Software Regularly
Software bugs can cause charging issues. When you get a software update notification, install it instead of ignoring it.
Some updates specifically fix charging related bugs. Installing updates keeps you protected from known charging problems.
I have had situations where an iOS or Android update fixed a charging issue I did not even know I had. The update improved something in the charging system and suddenly my phone charged faster and more reliably.
Check for updates at least once a month. While you are in your settings reviewing things, it is also a good time to check your home network security here is a quick guide on how to change your WiFi password if you have not done it recently.
Go to Settings, System Update, or Software Update and see if anything is available.
Enable automatic updates if your phone offers that option. This ensures you get bug fixes and improvements without having to remember to check.
One More Habit: Use a Phone Case That Does Not Trap Heat
This is a bonus prevention habit. The case you choose affects your phone’s temperature during charging.
Thick rubber or plastic cases trap heat against your phone. If you charge while wearing a thick case, your phone stays hotter longer.
Use a case that is protective but not overly thick. Or remove your case when charging if you have a thick protective case.
A case that lets air circulate around your phone helps keep it cool during charging.
Prevention Saves Money and Frustration
These six habits cost you nothing. They require minimal effort and time.
A little port cleaning every six months takes two minutes.
Never wiggling your cable costs you zero dollars and zero effort.
Buying a quality charger costs maybe 20 extra dollars but saves you hundreds in repair costs.
Avoiding gaming while charging costs nothing.
Keeping moisture away is just common sense.
Installing software updates is free and automatic.
Following these habits means you might never deal with charging problems again. Your phone charges reliably. Your battery stays healthy. Your charging port never gets damaged.
Prevention is the best solution. Start these habits today and you will thank yourself years from now when your phone is still charging perfectly while other people’s phones are having constant problems.
Your phone is an important part of your life. Treat it well and it will work well. Neglect it and problems will follow.
The choice is yours. But the prevention path is always easier than the troubleshooting path.
Why does my phone only charge when I hold the cable at a certain angle?
Compressed lint or carbon buildup inside your port is blocking proper contact between the cable and the internal pins. When you hold the cable at an angle, you are forcing temporary pressure contact. But this habit bends the pins further over time and causes permanent damage.
Clean your port using the toothpick or alcohol method described in Section 4. Then stop holding the cable at angles immediately. If you keep doing this, you will eventually destroy your port completely and need professional repair.
My phone shows it is charging but the battery percentage stays the same or goes down. Why?
This is called fake charging. Your phone recognizes something is plugged in, but no actual power is flowing to the battery.
Three things cause this. First, your cable or adapter is too low quality to deliver real current. Second, your port is 90% blocked by debris so the connection is too weak. Third, your phone is in thermal protection mode after overheating.
Test with a different cable and adapter first. If that does not work, clean your port thoroughly. If your phone feels hot, power it off and let it cool for 10 minutes before trying again.
How long should I wait after plugging in a completely dead phone before trying to turn it on?
Wait at least 30 minutes. Your phone needs approximately 3% battery charge before it has enough power to boot the operating system.
If you swap cables or outlets, wait an additional 10 minutes after each change before attempting a force restart. Trying to restart too soon wastes time. Give it the full time it needs.
Can I use nail polish remover to clean my charging port safely?
Yes. Acetone and similar solvents like isopropyl alcohol evaporate very quickly, which makes them safer for electronics than water. But you must use them correctly.
Apply a small amount to a toothbrush or tissue-wrapped toothpick. Gently scrub the port for 5 to 10 minutes. Then use a hair dryer on a gentle, cool setting to ensure all liquid evaporates before plugging in your charger. Never pour liquid directly into the port.
Why did my phone stop charging after I played a game?
Gaming heats up your phone’s processor and battery. Modern smartphones automatically stop charging when internal temperatures get too high. This protects the battery and prevents damage.
If your phone feels warm, power it off completely and remove the case. Let it sit for 5 to 10 minutes to cool down before charging. Avoid gaming while charging or charging immediately after heavy use.


