
Method 1: The Fastest Auto-Save Way (Windows + Print Screen No Extra Steps)
If you want the absolute fastest way to take a screenshot on your HP EliteBook, this is it. I prefer this method over the first one because it saves your screenshot automatically as a file. You don’t have to mess around with pasting into Paint or hunting through folders. Press two keys, and you’re done.
The beauty of this approach is that Windows 10 handles everything for you in the background. Your screenshot gets saved to a specific folder immediately, ready to use whenever you need it. This is the method I use every single day because it’s genuinely the quickest option available.
Quick 3-Step Method
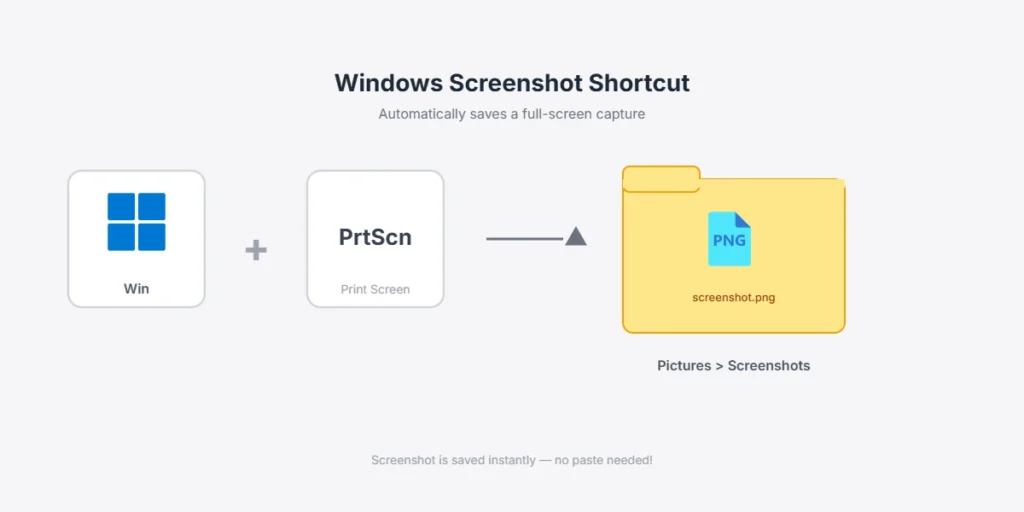
Here’s how simple this is. Press the Windows key and the Print Screen key at the same time. That’s it for the capture part.
Your screen will dim briefly, just like I mentioned in the previous method. This dim is your confirmation that the screenshot worked and is being saved.
Your screenshot now sits in your Pictures folder, ready to find whenever you want it. That’s the entire process press two keys, and you’re done
No pasting. No opening Paint. No saving dialog boxes asking you where to put the file. Windows handles the entire process automatically. I’ve timed this method, and from pressing the keys to having a saved file takes just a couple of seconds from start to finish.
Finding Your Screenshot in Windows 10
Now that your screenshot is captured, you probably want to know exactly where it went. I used to search around my computer trying to find my screenshots before I learned the exact location.
Your screenshot lives at this path: C:\Users\[YourUsername]\Pictures\Screenshots
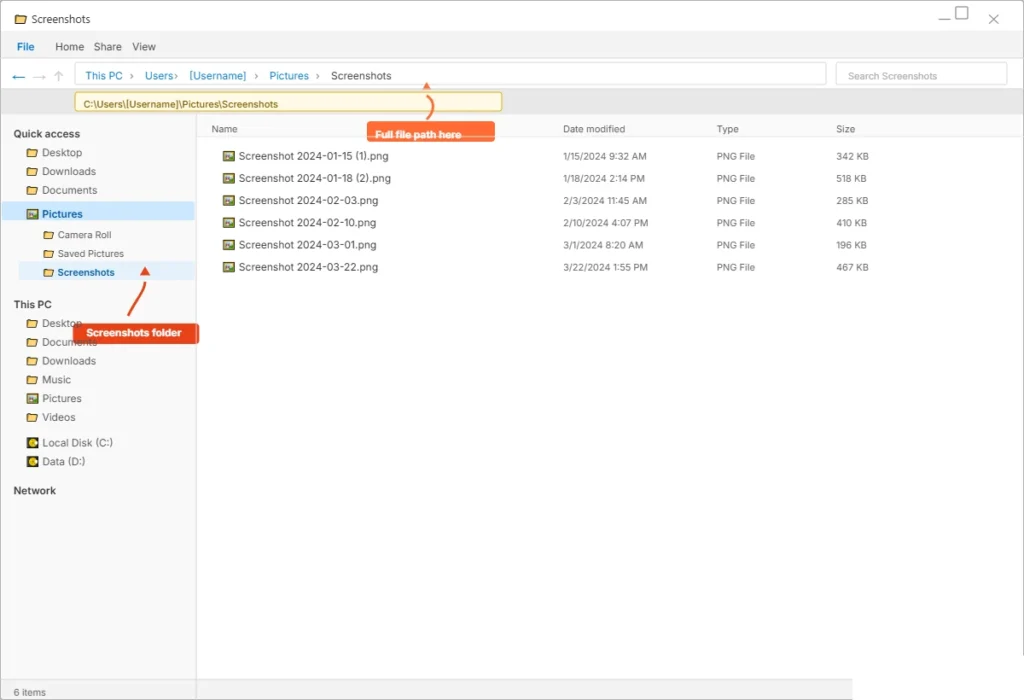
Replace [YourUsername] with your actual Windows username, and that’s where your file is stored. Windows always saves auto-captured screenshots here in PNG format, which is a high-quality image format perfect for sharing. For more details on managing your Windows 10 files and folders Microsoft provides an official guide on file organization and screenshot storage in Windows 10
Let me show you the easiest way to find it. Open File Explorer by pressing Windows key and E together. You’ll see your computer files open in a window.
Look at the left sidebar. You’ll see a section labeled Favorites or Quick Access. Click on Pictures folder from this sidebar. This takes you directly to your Pictures folder without digging through multiple directories.
Inside the Pictures folder, look for a subfolder called Screenshots. Double click it to open it. Every screenshot you’ve taken using the Windows plus Print Screen method appears here automatically.
You’ll see all your files listed by date and time. The newest one is usually at the top. Right click any screenshot to rename it, move it, delete it, or open it with an image viewer. It’s that straightforward.
Note for HP EliteBook Users: You Might Need the Fn Key
Here’s the thing I discovered with some EliteBook models. While this Windows plus Print Screen method works on standard Windows 10 laptops, certain EliteBook versions require you to add the Function key to the mix.
Try the standard Windows plus Print Screen combination first. If your screen dims, you’re good to go. Your screenshot saved successfully. If nothing happens, don’t panic. Your EliteBook might be one of the models that needs the Fn key included. In that case, hold down Fn, then press Windows and Print Screen together. So it becomes Fn plus Windows plus Print Screen all at once
I recommend testing the standard method first because most modern EliteBooks support it. If that doesn’t work for you, adding Fn usually solves the problem immediately. You’ll get that screen dim confirmation, and your file saves to the same Pictures Screenshots folder I mentioned above.
The good news is that once you figure out which method works for your specific EliteBook model, you’ll use the same shortcut every time. It becomes automatic, and you’ll be taking screenshots faster than you ever imagined possible.
Method 2: Capture Just One Window (Alt + PrtScn Active Window Only)
Sometimes you don’t need to capture your entire screen. You just need a screenshot of one specific window, like an email you received, a document you’re working on, or a single application. This method lets you do exactly that without all the extra clutter from your desktop and other open programs.
I use this method constantly because it’s cleaner and more professional. When I’m taking screenshots for work or documentation, I rarely want to show everything on my screen. I just want that one window. Alt plus Print Screen is my go-to shortcut for this situation, and it saves me time compared to manually selecting and cropping later.
When to Use Alt + PrtScn (vs Full Screen)
Let me give you some real scenarios where this method makes sense. Imagine you’re working with multiple applications open at once. Your email is open, you have a Word document running, maybe a spreadsheet too. You need to send your boss a screenshot of just the email, not your entire desktop with all those other windows visible.
That’s when Alt plus Print Screen shines. You click on the email window to make it active, press Alt and Print Screen together, and only that email window gets captured. Everything else stays hidden from the screenshot.
This method is perfect for taking screenshots of individual applications without showing the background. It’s also useful when you want to focus your screenshot on one specific thing. Maybe you’re troubleshooting a problem and only need to capture the error message window, not your whole screen. Another common use case is privacy.
When you’re taking a screenshot for someone else to review, you might have sensitive information or personal stuff on other parts of your screen. Using this active window method ensures you only share what you actually want them to see.
I also prefer this method when I’m creating documentation or tutorials. A clean screenshot of just one window looks more professional than a full screen cluttered with multiple programs and taskbar icons
How to Use window+ Alt + PrtScn (Step-by-Step)
Here’s how to do this. First, click on the window you want to capture. This makes it your active window. You’ll notice the title bar becomes highlighted or changes color, indicating this window is now in focus.
Once the window is selected and active, press Alt and Print Screen together. Just like with the other methods, your screen might dim slightly to show the screenshot was captured.
The important thing to understand is that this method captures only to your clipboard, not to a file. The image doesn’t automatically save to your Pictures folder like the Windows plus Print Screen method does.
So after you press Alt plus Print Screen, you need to paste the image somewhere. This is where Ctrl and V come in. Open whatever application you want to put the screenshot in. This could be an email, a Word document, a Google Doc, or even Paint if you just want to save it as a file.
Click where you want the image to appear, then press Ctrl and V together to paste. The screenshot appears instantly right where you clicked.
If you want to save it as a file rather than paste it into something, open Paint first. Press Ctrl and V to paste the screenshot, then go to File and Save As. Choose your location and filename, and you’re done.
The workflow is simple: click your target window, press Alt plus Print Screen, open your destination, press Ctrl plus V to paste, and save if needed. Once you do this a few times, it becomes second nature and incredibly quick.
Method 3: Select Any Area You Want (Windows + Shift + S Modern Snipping)
If you want complete control over exactly what gets captured in your screenshot, this is the method for you. Windows plus Shift plus S opens a modern selection tool that lets you choose any area of your screen, no matter how oddly shaped or sized. I love this method because it’s fast, intuitive, and you get instant editing options right after you capture.
This is the modern replacement for the old Snipping Tool app that Windows used to have. Microsoft created this newer version called Snip and Sketch, and it’s built directly into Windows 10. You don’t need to install anything or launch a separate application. Just press three keys and you’re ready to select your screenshot area.
The Shortcut (Fastest Method for Partial Captures)
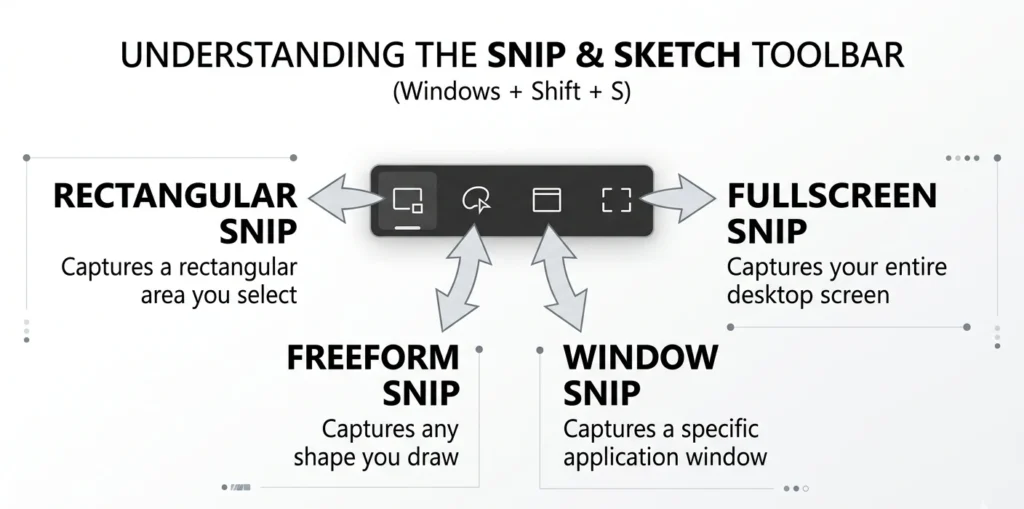
Press Windows, Shift, and S all at the same time. That’s it. Your screen will dim slightly, which is the signal that the selection tool is now active and waiting for you to choose what to capture.
Unlike the Snipping Tool app that takes several seconds to load, this keyboard shortcut happens instantly. The dimmed screen and selection interface appear within a millisecond of pressing the keys. This speed difference is why I prefer this method over launching an app every time I need a partial screenshot.
Your screen remains dimmed while you make your selection, which actually helps you focus on the exact area you want to capture. The dimming creates a slight visual separation between what you’re selecting and everything else on your screen.
The Four Capture Modes Explained
When your screen dims and the selection tool activates, you’ll notice a small toolbar appears at the top of your screen. This toolbar gives you four different capture mode options, and choosing the right one depends on what you’re trying to capture.
The rectangular snip is the most common option. You click and drag to create a rectangular box around the area you want to capture. This works perfectly for most screenshots because screens and windows are typically rectangular anyway. I use this mode about ninety percent of the time.
The freeform snip option lets you draw any shape you want with your mouse. This is useful when you need to capture something with irregular edges or when you want to highlight a specific non-rectangular area. Drawing freeform takes a bit longer, but it gives you complete flexibility.
The window snip is incredibly handy when you want to capture an entire window without having to draw around it manually. Just click on the window you want to capture, and the entire window gets selected automatically. This saves you from trying to perfectly trace the window edges with your mouse.
Finally, the fullscreen snip captures your entire screen at once. This is basically the same as pressing Windows and Print Screen, but you access it through this tool instead. Honestly, you’d probably just use the Windows plus Print Screen method if you wanted a fullscreen capture, so this option is less commonly needed.
Edit Your Screenshot Immediately
After you complete your selection, something great happens. Your screenshot gets captured, and a notification pops up in the bottom right corner of your screen. This notification is actually a clickable button that opens your screenshot in the built-in editor.
I really appreciate this feature because you can make quick edits right away without opening a separate program. Click that notification, and the editor opens with your screenshot loaded and ready to go.
Inside the editor, you have several annotation tools at your disposal. You can draw arrows and lines to point out specific details. You can add text boxes with explanations. You can highlight areas with boxes or circles. You can even blur or pixelate portions of the image if you need to hide sensitive information.
The toolbar is simple and intuitive. Even if you’ve never used this tool before, you’ll figure out how to add annotations within seconds. All the buttons are clearly labeled, and hovering over them shows you what each one does.
Once you’re happy with your edits, you can save the screenshot directly from the editor. Click the save button, choose where you want it saved, give it a filename, and you’re done. The entire process from pressing Windows plus Shift plus S to having a saved, edited screenshot takes less than a minute.
This method combines the speed of a keyboard shortcut with the editing power of a dedicated tool. You get precision, flexibility, and built-in editing all in one streamlined workflow. It’s why this is often my first choice when I need a custom screenshot on my HP EliteBook.
Method 4: The Traditional Snipping Tool (For Older Windows 10 Builds)
If you’ve tried the Windows plus Shift plus S method and it didn’t work on your system, don’t worry. You have a backup option that’s been around for years. The Snipping Tool app is the older version of the screenshot selection tool, and it still works perfectly fine on Windows 10. I include this method for completeness because some older Windows 10 builds don’t have the newer Snip and Sketch feature yet.
The Snipping Tool is what many people used before Microsoft updated it to the modern version. It requires a few more steps than the keyboard shortcut method, but it accomplishes the same goal. You select a portion of your screen and capture just that area. For users whose systems don’t support the newer method, this is a reliable workaround that gets the job done.
How to Open Snipping Tool (3 Steps)
Opening the Snipping Tool is straightforward. Click the Windows Start button in the bottom left corner of your screen. A menu will pop up showing your installed applications and a search box at the top.
Type “Snipping Tool” into the search box. You don’t need to type the whole thing. Just start typing and Windows will begin searching your computer for the application. Within a second or two, you’ll see the Snipping Tool app appear in the search results at the top of the menu.
Click on the Snipping Tool app from the search results. The application window opens immediately. You’ll see a simple interface with a few buttons and options. The main button you need is labeled “New,” which is usually near the top left of the window.
That’s all there is to launching it. Three simple steps and you’re ready to start capturing. Some people find it annoying to have to launch an app when a keyboard shortcut would be faster, which is why the Windows plus Shift plus S method is preferred if your system supports it.
How to Snip (3 Steps)
Now that the Snipping Tool window is open, click the “New” button. This tells the application that you’re ready to capture something.
Your screen will dim or change slightly, indicating that the tool is waiting for you to make a selection. Your cursor will turn into a crosshair, which is your signal to start drawing your selection box.
Click and drag your mouse across the area you want to capture. Start at one corner and drag to the opposite corner to create a rectangular selection. As you drag, you’ll see a colored outline showing the exact area you’re selecting. Release the mouse button when you’ve highlighted everything you want in your screenshot.
The captured area appears in the Snipping Tool window immediately after you release. You can see exactly what you captured and verify it includes everything you needed before saving.
Save Your Snip
Once your snip appears in the Snipping Tool window, you can save it. Look for a “Save” button or go to the File menu and select Save As. This opens a save dialog where you choose where to store your file and what to name it.
You can save your snip in different formats. PNG is the most common choice because it maintains high quality without taking up too much storage space. Some people prefer JPG if they want a smaller file size. Both formats work great for sharing screenshots.
Choose your desired filename and location, then click Save. Your screenshot is now stored as a file on your computer.
The Snipping Tool also allows you to make quick edits before saving. You can draw on your snip using the markup tools, though these options are more limited compared to the newer Snip and Sketch editor. If you need extensive editing capabilities, you might want to save first and then open the file in Paint or another image editor.
I’ll be honest though. If your Windows 10 system supports the newer Windows plus Shift plus S method, use that instead. It’s faster, has better editing options, and gives you a more modern experience. But if you’re on an older Windows 10 build that doesn’t have that feature yet, the Snipping Tool is a perfectly reliable alternative that works just as well for capturing exactly what you need from your HP EliteBook screen.
Understanding Your Screenshot Shortcuts: Which Method Should You Use?
By now you’ve learned five different ways to take a screenshot on your HP EliteBook. You might be wondering which one to actually use. The honest answer is that it depends on your situation. Different scenarios call for different methods, and knowing when to use each one will save you time and frustration.
I’ve tested all these methods extensively, and I’ve developed a clear sense of when each one makes the most sense. Let me break this down so you can quickly figure out the best approach for whatever you’re trying to do.
Master three quick screenshot methods for Windows 10 laptops: Windows + Print Screen (auto-save), Windows + Shift + S (selection tool) and Snipping Tool (traditional method). Perfect visual guide for anyone learning to capture screens efficiently on HP laptop systemsQuick Decision Table
Here’s a simple reference chart showing each method, what it does, and how fast it is.
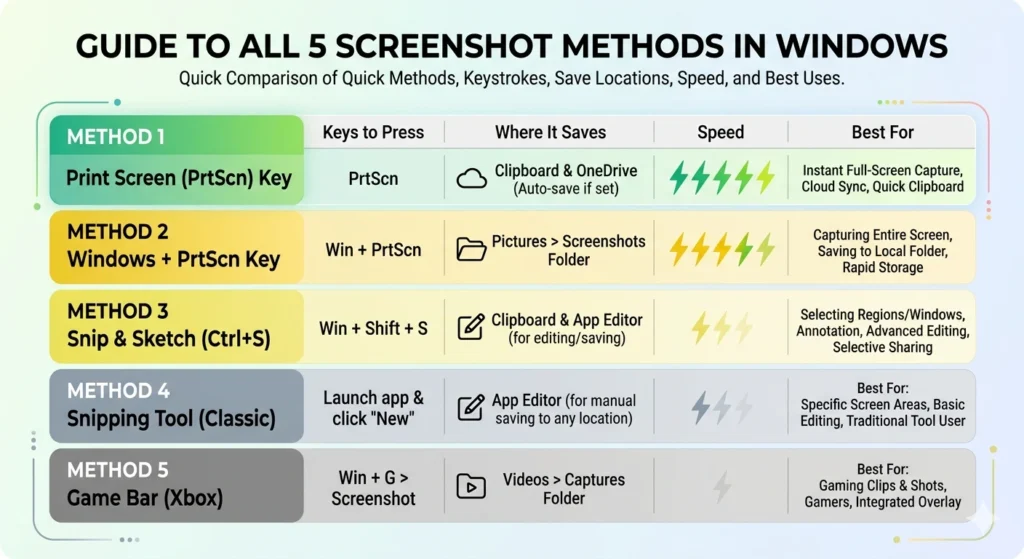
| What You Want | Method | Keys | Speed |
|---|---|---|---|
| Entire screen, auto-saved to file | Method 2 | Windows + Print Screen | ⚡ Fastest |
| Entire screen, save manually | Method 1 | Windows + Fn + Shift + Print Screen | Fast |
| One window only | Method 3 | Alt + Print Screen | Fast |
| Specific area, edit it | Method 4 | Windows + Shift + S | Fast + flexible |
| Specific area, old method | Method 5 | Start → Snipping Tool | Slowest |
If I had to rank them purely by speed, Method 2 wins every single time. Press two keys, your file saves automatically, done. You can’t get faster than that. Method 1 is nearly as fast on EliteBooks. Methods 3 and 4 are equally quick, though Method 4 gives you editing features built in.
Method 5 is the slowest because you have to launch an app, click New, make your selection, and then save. It takes more steps and more time. I only recommend using Method 5 if your system doesn’t support the newer shortcuts.
The Real-World Scenario Guide
Now let me give you actual situations where each method shines. Understanding these scenarios will help you naturally gravitate toward the right method without overthinking it.
I need a screenshot right now — Use Method 2 (Windows + Print Screen). This is my default choice when I’m in a hurry or just need a quick full-screen capture. Press, done, file saved. I use this probably seventy percent of the time because it’s the fastest and most automatic.
I need to capture just the email I’m reading — Use Method 3 (Alt + Print Screen). This method is perfect when you have multiple windows open and only care about one of them. I frequently use this when taking screenshots of emails for documentation or sharing with colleagues. It keeps everything clean by excluding the clutter of other windows.
I need to draw arrows and annotate — Use Method 4 (Windows + Shift + S). When I’m creating tutorials or trying to point out specific details in a screenshot, this is my go-to. The built-in editor lets me add arrows, text boxes, and highlights without opening another program. It’s convenient and professional looking.
I have an old Windows 10 computer — Use Method 5 (Snipping Tool app). If the newer keyboard shortcuts aren’t available on your system, the traditional Snipping Tool still works perfectly. It’s not as fast, but it’s reliable and gets the job done.
I’m on HP EliteBook and standard shortcuts don’t work — Use Method 1 (Windows + Fn + Shift + Print Screen). If you tried Method 2 and nothing happened, your EliteBook model likely requires the Fn key. This method is specific to business laptops like yours and should work when the standard Windows shortcuts fail.
The key insight here is that you don’t need to master all five methods. Most days I just use Method 2 because it’s fastest and most automated. When I need something specific, I reach for Method 4 because of the editing features. Method 3 gets used when I want to avoid showing other windows on my screen.
Pick the method that matches your immediate need, and you’ll develop a natural rhythm of using the right tool for the right situation. Over time, you won’t even think about which method to use. Your fingers will just know which keys to press based on what you’re trying to accomplish.
The beauty of having five options is that you’re never stuck. If one method doesn’t work on your system, you have backup options. If one method doesn’t fit your current need, you switch to another. This flexibility is what makes screenshot capturing on Windows 10 so powerful once you understand all the available options
Where Are Your Screenshots Saved? (Finding Your Files on Windows 10)
One of the most common questions I hear is simple but important: where did my screenshot go? You press the keys, your screen dims, and then what? If you used the auto-save method, your file is somewhere on your computer waiting for you. The problem is knowing exactly where to look. Let me show you the exact locations and how to find them quickly.
Auto-Saved Screenshots (Windows + PrtScn Method)
When you use the Windows plus Print Screen method, your screenshot automatically saves to a specific folder on your computer. You don’t have to do anything extra. Windows handles the entire process silently in the background.
Your file path is: C:\Users[YourUsername]\Pictures\Screenshots
Replace [YourUsername] with your actual Windows username. That’s the complete address where your auto-saved screenshots live. Every screenshot you capture using Windows plus Print Screen goes directly to this folder as a PNG file.
The beauty of this location is that it’s consistent. You always know exactly where to find your files. I never have to search or wonder. I just navigate to this folder and there they are, organized by date and time.
Windows creates the Screenshots folder automatically the first time you use the Windows plus Print Screen method. If you haven’t used this method before, the folder might not exist yet. Don’t worry. Windows will create it as soon as you take your first auto-saved screenshot.
Manually Pasted Screenshots (PrtScn + Ctrl+V)
This is where things get different. When you press just Print Screen without the Windows key, the screenshot goes to your clipboard. It doesn’t create a file automatically. It just sits in memory waiting for you to paste it somewhere.
If you paste it into Paint, Word, an email, or any other application, you now have control over where that file gets saved. You choose the folder, the filename, and the format. This is the manual workflow where you’re actively deciding where everything goes.
I use this method when I want my screenshots organized in specific folders. Maybe I’m working on a project and want screenshots saved in a project folder rather than the default Pictures location. With manual pasting, I have complete control.
The key thing to remember is that manually pasted screenshots don’t auto-save anywhere. You have to consciously save them yourself. If you paste into an application and then close it without saving, your screenshot disappears.
How to Open File Explorer and Find Your Screenshots
Finding your auto-saved screenshots is straightforward. Press the Windows key on your keyboard and type File Explorer. Click the File Explorer app when it appears in your search results.
File Explorer opens showing your computer’s file system. Look at the left sidebar, and you’ll see a section called Quick Access or Favorites. In this section, click Pictures. This takes you directly to your Pictures folder without navigating through multiple directories.
Once you’re in the Pictures folder, look for a subfolder called Screenshots. Double click it to open it. This folder contains every screenshot you’ve taken using the auto-save method. They’re listed by date and time, with the newest ones typically appearing at the top.
You can do several things with your screenshots from here. Right click any file to rename it, move it, delete it, or open it with an image viewer. You can also create subfolders within Screenshots to organize files by project or date if you want extra organization.
Why PNG Format? Can I Change It?
Windows 10 saves your auto-screenshots as PNG files. PNG stands for Portable Network Graphics, and it’s a format that preserves the highest quality image without losing any detail. This is why Windows chooses it for automatic screenshots.
If you need a different format like JPG for email or web use, you can convert it easily. Open the PNG file with Paint, go to File and Save As, and choose JPG as your format. JPG creates smaller file sizes if you need to email or upload quickly, though the image quality isn’t quite as sharp as PNG.
For most purposes, PNG is perfect. It’s high quality, shares easily, and works on any device or website. I keep my screenshots in PNG format unless I have a specific reason to convert them.
Complete Workflow: From Screenshot to Email or Document (The Manual Method)
Taking a screenshot on your HP EliteBook is only half the battle. The real question is what you do with it next. Many people want to immediately email a screenshot to a colleague, paste it into a document, or share it right away. This section walks you through three common workflows so you can go from screenshot to sharing in just a few clicks.
I use these workflows constantly. Whether I’m documenting an issue, sending a quick visual reference, or embedding screenshots in a report, knowing the fastest path from capture to destination saves me minutes every day. Let me show you exactly how to do this on your HP EliteBook running Windows 10.
Method A: Email Your Screenshot Directly
This is the fastest way to share a screenshot if you just need to send it immediately. Take your screenshot using any method. Press Print Screen, Windows plus Print Screen, or Alt plus Print Screen. It doesn’t matter which one you choose because all three methods put the image in your clipboard.
Open your email. This could be Gmail, Outlook, Yahoo Mail, or whatever email service you use. Create a new message or reply to an existing one.
Click in the message body where you want the screenshot to appear. Position your cursor at the spot where you’d like the image to show up in your email.
Press Ctrl and V together to paste. Your screenshot appears instantly in the email body. I love this method because it’s so fast. The entire process from pressing Print Screen to having the image in your email takes about five seconds.
You can resize the image by clicking and dragging the corners if it’s too large or too small. Then just type your message, add a subject line, and send. Your screenshot goes directly to the recipient without any extra steps or file management.
Method B: Edit in Paint, Then Save
Sometimes you want to edit your screenshot before sharing. Maybe you need to crop it, add annotations, or highlight something specific. This is where Paint comes in handy.
Take your screenshot using Print Screen or any other method. Open Paint by pressing the Windows key and typing Paint. Click the Paint app to launch it.
Press Ctrl and V to paste your screenshot into Paint. The image appears in the canvas immediately. Now you have the full Paint toolbar available for editing.
You can crop the image by selecting the crop tool and drawing a rectangle around the area you want to keep. You can draw shapes or lines to highlight things. You can add text boxes to explain what you’re showing. Paint gives you basic editing tools right in the application.
When you’re happy with your edits, click File and then Save As. A dialog box opens asking where you want to save the file and what to name it. I recommend PNG format for best quality, though JPG works too if you need a smaller file size.
Type your filename, choose your location, select PNG format, and click Save. Your edited screenshot is now saved as a file that you can email, upload, or share however you want.
Method C: Paste into a Document (Word, Google Docs, etc.)
If you’re working on a Word document or Google Doc and need to include a screenshot, the workflow is even simpler. Take your screenshot using any method on your HP EliteBook Windows 10 system.
Open your document in Word, Google Docs, or whatever application you’re using. Click exactly where you want the image to appear in the document. This might be after a paragraph, in the middle of a sentence, or anywhere else you need it.
Press Ctrl and V to paste. The screenshot appears right where your cursor was positioned. The application automatically formats it to fit nicely within your document margins.
You can click the image and drag the corners to resize it if needed. Make it larger to emphasize it or smaller to keep it compact. You can also right click the image to access options for cropping or adjusting how text wraps around it.
Save your document like you normally would. Your screenshot is now embedded in your document and will be there whenever you open it again. This method is perfect for reports, instructions, or any document where you need visual examples alongside your text.
These three workflows cover ninety percent of what people need to do with screenshots. Master these approaches and you’ll handle any situation that comes up on your HP EliteBook.
Print Screen Not Working on Your HP EliteBook? Here’s How to Fix It
If you’ve tried to take a screenshot on your HP EliteBook and nothing happened, you’re not alone. I’ve been there. You press the keys, expect your screen to dim, and instead you get silence. It’s frustrating when the methods I’ve shown you don’t seem to work. The good news is that print screen not working on your HP EliteBook usually has a simple fix. Let me walk you through the most common solutions.
Before you assume your laptop is broken, understand that most screenshot issues come from settings or conflicts, not hardware failure. I’ve troubleshot dozens of these problems and I’ve found solutions for nearly all of them.
If you notice display problems like strange lines or visual glitches alongside screenshot issues, those might be separate hardware problems check out my guide on How to Fix Black Lines on HP Laptop Screens fixing common HP laptop display issues. Start with the easiest fixes first and work your way down the list
Solution 1: Check If Fn Lock Is Enabled
Many HP EliteBook users don’t realize their laptop has a Fn Lock feature. This lock can disable your Function key, which prevents the Fn key combinations from working. This is probably the most common culprit when people can’t take screenshots on their EliteBook.
Look at your keyboard and find the Fn key, usually in the bottom left corner. Look for a small lock icon printed on one of the keys nearby. This is typically the Escape key or another key in that area.
Try pressing Fn and that lock key together. This toggles your Fn Lock on or off. If Fn Lock was enabled, this disables it. Once it’s disabled, try your screenshot shortcuts again. Most people find this single step solves their problem immediately.
You can test if Fn Lock is on by looking for an indicator light on your keyboard. Some EliteBooks show a light when Fn Lock is active. If you see a lock icon lit up on your keyboard, that’s your signal that Fn Lock is enabled and needs to be turned off.

Solution 2: Try Alternative Key Combinations
If the standard shortcuts still don’t work, your HP EliteBook model might respond to different key combinations. This is where alternative options come in handy. Don’t give up yet because these workarounds often succeed where standard shortcuts fail.
Try pressing Ctrl plus Windows plus Print Screen all together. This combination works on some EliteBook models where the standard Windows plus Print Screen doesn’t register.
If that doesn’t work, try Windows plus Alt plus Print Screen. This is another alternative that sometimes triggers the screenshot function on specific hardware configurations.
You might also try just Fn plus Print Screen by itself. On some EliteBooks, this alone captures the screen without needing the Windows key at all.
The reason different models require different combinations relates to how HP designed the keyboard firmware. Each EliteBook generation or model sometimes has slightly different keyboard layouts and function mappings. One of these alternatives should work for your specific device.
Solution 3: Update Keyboard Drivers
Outdated or corrupted keyboard drivers can prevent shortcuts from functioning properly. Your keyboard hardware works fine, but the software that tells Windows how to interpret keyboard presses might be out of date.
Right click on your Start menu button and select Device Manager. A window opens showing all your hardware devices. Look for Keyboards in the list and click the arrow next to it to expand that section.
Right click on your keyboard entry and select Update driver. Windows will search for the latest keyboard driver from your system. Let it complete the search and installation. If an update is available, Windows installs it automatically.
After the update completes, restart your computer. Sometimes the driver update doesn’t take effect until you reboot. After restarting, try your screenshot shortcuts again.
Solution 4: Check for Conflicting Software
Screen recording software, gaming applications, or certain accessibility programs sometimes hijack keyboard shortcuts. These apps intercept the shortcuts before Windows can process them, which makes screenshot functions appear broken.
Think about any software you’ve recently installed. Gaming programs, video capture tools, or assistive technology applications are common culprits. Try temporarily disabling or uninstalling these programs.
Close any screen recording software running in the background. Check your system tray for apps you might have forgotten about. Right click icons there to see what’s running and close what you don’t need active right now.
Try your screenshot shortcuts again with fewer programs running. If they work now, you’ve identified a conflict. You can then decide whether to uninstall the conflicting software or adjust its settings to stop intercepting screenshot shortcuts.
Solution 5: Restart Your Computer
This sounds too simple, but I’m serious. A simple restart fixes more problems than you’d think. Save all your work, shut down your computer, wait a few seconds, and turn it back on.
After your HP EliteBook restarts, try the screenshot shortcuts again. Sometimes Windows gets confused about keyboard input, and a fresh start clears everything up.
When to Contact HP Support
If you’ve tried all five solutions and print screen still isn’t working on your HP EliteBook, contact HP Support. You likely have a hardware issue or a model-specific configuration that needs professional attention.
Find your laptop model number, usually printed on the bottom of your device or in System Settings under About. Contact HP Support with this information and describe what you’ve already tried. They can provide model-specific guidance or arrange repairs if needed.
Bonus: Advanced Tools for Power Users (Snagit, ShareX, and More)
Once you’ve mastered the built-in screenshot methods on your HP EliteBook, you might want to explore more powerful options. If you’re creating tutorials, writing documentation, or managing large amounts of visual content, professional third-party tools can save you significant time. These advanced screenshot tools go far beyond what Windows 10 offers natively.
I’ve tested several professional tools, and I can tell you they’re worth considering if you find yourself taking screenshots constantly. They handle complex tasks that would take forever using Windows built-in methods. Let me show you the two best options I’ve found.
Snagit (Best for Editing & Annotations)
Snagit is a professional screenshot and screen recording tool that I recommend to anyone who needs serious editing capabilities. It’s a paid tool, but the investment pays for itself quickly if you use it regularly. The good news is you can try it free before committing.
The workflow is simple. Launch Snagit and click the big red Capture button. Your screen dims, and crosshairs appear, ready for you to select your capture area. Unlike Windows tools, Snagit gives you complete flexibility in selecting windows, custom regions, or specific areas you want to capture.
Once you’ve captured something, it opens immediately in the Snagit Editor. This is where the real power shows. You get professional-grade annotation tools at your fingertips. Add arrows to point out important details. Insert text boxes with explanations. Draw shapes to highlight areas. Add callouts that explain what you’re showing.
The editor includes stamps, effects, and preset shapes. You can blur sensitive information, add branding elements, or apply effects before saving. Everything is intuitive and doesn’t require learning a complex interface.
One feature I love is automatic file organization. Snagit organizes your captures by date and project automatically. You never have to manually sort screenshots or search for files. Everything stays organized without you lifting a finger.
Snagit also handles screen recording if you ever need video instead of still images. The entire application is designed around visual content creation, making it perfect for content creators, technical writers, and anyone who communicates visually.
ShareX (Best for Power Users & Automation)
If you want advanced features without paying, ShareX is your answer. This free, open-source tool is incredibly powerful and loved by technical users everywhere. I was amazed at what you can do without spending any money.
ShareX handles scrolling screenshots, which is invaluable when you need to capture entire web pages or long documents. Windows tools can only capture what’s currently visible. ShareX scrolls automatically and stitches screenshots together, capturing everything from top to bottom.
The OCR feature is extraordinary. It extracts text from images and converts it to editable text. If you need to copy text from a screenshot, instead of retyping it, OCR handles it for you. This saves hours of work if you process many images.
Annotation tools in ShareX rival professional software. Add shapes, callouts, text, arrows, and even apply effects like blurring or pixelating. The tools are advanced but remain user friendly.
The automation features are where ShareX really shines. Set it to automatically save files to specific folders, upload to cloud storage like Google Photos, apply borders, rename files based on templates, and execute actions you define. You can create entire workflows that run automatically.
When to Use Third-Party Tools vs Windows Built-In
Use Windows built-in methods for everyday screenshots. They’re fast, require no installation, and work everywhere. For quick captures and immediate sharing, Methods 1 through 5 are perfect.
Use Snagit when professional presentation matters. If you’re creating training materials, documentation, or content where annotation quality reflects on your work, Snagit is worth the investment.
Use ShareX when you need automation and advanced features. If you process screenshots constantly or need OCR and scrolling capture, ShareX’s free, open-source solution saves money while delivering professional results.
For most people using an HP EliteBook, Windows built-in tools handle everything you need. These third-party options are for when you outgrow those basics and want professional capabilities.
Key Takeaways: Quick Reference for HP EliteBook Screenshot Shortcuts
You’ve now learned everything about taking screenshots on your HP EliteBook running Windows 10. Whether you’re a beginner just figuring out your laptop or someone looking to master every available method, this final section brings everything together in one place. Bookmark this page so you can come back whenever you need a quick reminder about the right HP EliteBook screenshot keyboard shortcut to use.
The Shortcuts at a Glance
Here’s your complete reference table showing every method, the exact keys to press, and where your screenshot ends up.
| What You Want | Shortcut | Saves To |
| Fast auto-save (entire screen) | Windows + Print Screen | Pictures > Screenshots (file) |
| HP EliteBook specific | Windows + Fn + Shift + Print Screen | Clipboard (must paste & save) |
| One window only | Alt + Print Screen | Clipboard (must paste & save) |
| Select specific area | Windows + Shift + S | Clipboard & notification panel |
| Manual selection tool | Start menu → Snipping Tool | Clipboard (must save manually) |
I keep this table bookmarked in my browser for quick reference. When I’m in a hurry and need to remember which shortcut does what, this gives me the answer in seconds without scrolling through the entire article.
The first two methods are your workhorses. Windows plus Print Screen is fastest for full-screen captures that auto-save immediately. Windows plus Fn plus Shift plus Print Screen is your backup for EliteBooks when the standard Windows shortcut doesn’t respond.
The Windows plus Shift plus S method is perfect when you want to select a specific area without launching an app. Alt plus Print Screen handles single-window captures when you have multiple programs open. The Snipping Tool is your legacy backup for older Windows 10 builds.
Remember These Tips
I’ve learned a few key points through testing different scenarios on HP EliteBooks. Keep these in mind and you’ll avoid the common frustrations that trip up most people.
Screen dimming means success. Don’t panic when your screen dims briefly after pressing the keys. This is normal and expected. The dimming is Windows telling you the screenshot was captured. It’s your visual confirmation that everything worked.
Key sequence matters on your EliteBook. Don’t press all keys at once. On HP EliteBooks, you must press keys in order. Fn first, then Windows, then Shift and Print Screen. This sequence is critical because your keyboard firmware processes them in this order. Pressing them simultaneously won’t work on most EliteBook models.
Clipboard and files are different. Press Print Screen alone and it goes to clipboard only. You must paste it somewhere with Ctrl plus V. Press Windows plus Print Screen and it auto-saves as a file to your Pictures folder. This distinction matters because you can’t find a clipboard screenshot in your file system. It only exists in memory until you paste it.
Paste with Ctrl plus V to move screenshots into emails or documents. Once you’ve captured something to clipboard, open your email, document, or application and position your cursor where you want the image. Press Ctrl plus V and it appears instantly. This workflow is faster than saving files and attaching them.
Try alternative combinations if standard shortcuts fail. Don’t assume your laptop is broken. Try Ctrl plus Windows plus Print Screen or Windows plus Alt plus Print Screen instead. One of these alternatives usually works when the standard Windows plus Print Screen doesn’t respond on your specific EliteBook model.
Still Having Trouble?
If you’ve tried the methods in this article and screenshots still aren’t working on your HP EliteBook, head back to Section 9 where I cover troubleshooting in detail. That section walks through Fn Lock issues, driver updates, conflicting software, and when to contact HP Support.
Most problems are solved by using the correct key sequence or identifying that your EliteBook model uses the Fn plus Shift method instead of the standard Windows shortcut. If none of those solutions work, check your specific EliteBook model number against HP’s official documentation. Different EliteBook generations sometimes have unique keyboard configurations.
You now have complete knowledge of how to screenshot on your HP EliteBook Windows 10 system. You understand five different methods, know where files are saved, can troubleshoot when things go wrong, and have advanced options if you want professional editing capabilities. That’s more than enough to handle any screenshot situation you encounter.
Take this knowledge and use it confidently. The methods work. If something doesn’t work the first time, you have backup options and troubleshooting steps. You’ve got this.
What’s the difference between pressing Print Screen alone vs Windows + Print Screen?
Print Screen copies to clipboard only (you must paste it somewhere). Windows + Print Screen auto-saves to Pictures > Screenshots as a PNG file instantly. Print Screen requires extra steps; Windows + Print Screen is automatic
Why do I have to press keys in a specific order on my HP EliteBook? Why can’t I press them all at once?
HP EliteBook keyboard firmware processes the Fn key first, then Windows, then Shift/Print Screen. Pressing them simultaneously doesn’t establish this order, so your laptop doesn’t recognize the command. The sequence is essential for the shortcut to work
I took a screenshot but I can’t find where it went. Is it saved?
It depends on your method. Windows + Print Screen auto-saves to Pictures > Screenshots folder. Print Screen alone copies to clipboard only (not a file). Check which method you used and review Section 7 for exact file locations.
My Print Screen key doesn’t exist or is combined with another key on my HP EliteBook. What do I do?
Use Fn + Shift as the alternative. On some EliteBook models, Print Screen function is built into the Shift key with “prt sc” printed on it. This workaround solves the missing key problem for most users immediately
Can I take a screenshot on HP EliteBook the same way as a regular Windows 10 laptop?
Mostly yes. Windows + Print Screen works on most devices. However, HP EliteBook may need Fn key modifications (Windows + Fn + Print Screen). Try standard Windows methods first; if they fail, add the Fn key or try the EliteBook-specific combinations in Section 1.

