
What Causes Blue Tint on Monitor in Windows 10?
If you’re seeing an unusual blue tint covering your entire screen right now, I completely understand how frustrating that must feel. Your monitor suddenly doesn’t look right, and colors appear washed out or unnaturally cool. I’ve dealt with this exact screen color problem multiple times, and the good news is that it’s almost always fixable without spending a single dollar.
Let me walk you through the three main reasons why blue tint on monitor Windows 10 systems happens. Understanding the root cause will help you fix it faster and avoid wasting time on solutions that don’t apply to your situation.
The Three Main Causes of Blue Tint on Windows 10 (Hardware, Software & Drivers)
After troubleshooting dozens of these cases, I’ve found that blue tint issues fall into three clear categories. Knowing which category your problem fits into makes all the difference.
1. Windows Software Settings (Night Light Feature)
The number one culprit I see is actually a Windows feature doing exactly what it’s supposed to do, just when you don’t want it to. The Night Light feature in your display settings is designed to reduce blue light from your screen during evening hours. When it’s accidentally turned on during the day, or set too strong, it creates that annoying blue or orange tint across everything you look at.
According to Microsoft’s official Night Light documentation this feature works by adjusting your display’s color temperature which is exactly why it creates an unwanted blue or orange color cast if configured incorrectly. I’ve seen this happen after Windows updates that reset your settings, or when someone accidentally clicks the Night Light toggle in the system tray.
The feature can sometimes cause color distortions that make your whole screen look off, even though technically it’s working as designed.
2. Hardware Connection Problems (Loose or Damaged Cables)
The primary cause of pink or distorted screen colors, including blue tints, is often something as simple as the connection between your computer and monitor. I’ve fixed this issue multiple times by just unplugging and firmly reconnecting the display cable.
Your HDMI, DisplayPort, or VGA cable might be loose at either end. Sometimes the cable itself develops internal damage you can’t see from the outside. A bent pin in a VGA connector or a partially inserted HDMI cable can cause all sorts of color problems, including that blue tint you’re experiencing right now.
The monitor itself can also develop issues with its internal color settings. Many monitors have physical buttons that let you adjust color temperature and other picture settings. If these get changed accidentally or reset during a power surge, you might end up with a blue tinted display.
3. Graphics Driver and Software Conflicts (Outdated or Corrupted Drivers)
Your graphics card controls how colors appear on your screen through driver software. When these drivers become outdated, corrupted, or conflict with other programs, you can end up with color display issues including blue tints.
I’ve also discovered that certain applications can cause screen tint problems. Incompatible apps or display drivers sometimes create flickering or tint issues that affect your entire desktop or just specific windows. Antivirus software, cloud sync programs, and audio drivers are common culprits I’ve identified in real cases.
What This Means for Your Troubleshooting
The beauty of understanding these three categories is that you can test solutions in a logical order. Software fixes like turning off Night Light take just seconds and solve the majority of cases I encounter. Hardware checks like reseating cables take another minute. Driver updates require a bit more time but fix the remaining stubborn cases.
You don’t need to be technical to fix most of these problems. The solutions I’m about to show you in the next sections work for beginners and experts alike. Most importantly, nearly every blue tint issue I’ve seen gets resolved without paying for repairs or buying new equipment.
Let me show you exactly how to fix each of these causes, starting with the fastest solutions first.
Blue Tint vs. Blue Light: What’s the Difference? (Don’t Get Confused)
I need to clear up something right away because I’ve seen countless people waste hours reading the wrong articles. When you search for help with a blue tint problem, you’ll find tons of content about blue light filters and eye strain. Here’s the truth: those articles won’t help you fix your screen at all.
Let me explain the critical difference that many websites completely miss.
Blue Light Filter is a Feature, Not a Problem
The blue light filter in Windows, called Night Light, is designed to reduce eye strain by filtering blue light from your display. Blue light can keep you awake at night, while warmer colors help with sleep and comfort during long computer sessions. This is an intentional feature that many people actually want to use.
When you turn on Night Light Windows 10, your screen shifts toward warmer orange and red tones on purpose. It’s supposed to look different. Companies like HP and Microsoft created this feature specifically to help people who work late hours or want to protect their eyes.
Blue Tint is an Unwanted Color Problem
What you’re dealing with is completely different. A blue tint is an unwanted color distortion that makes your entire screen look unnatural. Everything appears washed out in blue, photos don’t look right, and you can’t see accurate colors for your work.
This isn’t a feature helping you. This is a malfunction or incorrect setting that needs fixing.
Why This Confusion Matters
I’ve noticed that major tech websites publish articles about reducing blue light for eye health, and those articles rank when people search for blue tint fixes. The problem is that someone looking to enable a comfort feature gets completely different advice than someone trying to fix a broken display.
If you landed here because your screen suddenly developed a blue color cast and nothing looks normal anymore, articles about blue light reduction and sleep benefits won’t solve your issue. You need actual troubleshooting steps for display problems.
The Ironic Twist
Here’s what makes this even more confusing. The Night Light feature itself, when accidentally turned on or set too strong, becomes the number one cause of unwanted blue tints. So the very feature designed to help your eyes can create the exact problem you’re trying to fix.
I’ve helped dozens of people who enabled Night Light thinking it would improve their display, only to find their screen looked terrible. They then searched for blue tint solutions and ended up reading articles telling them to turn on the feature they already had active.
What You Actually Need
If your screen has an unwanted blue color cast right now, you don’t need information about eye strain or sleep patterns. You need step by step instructions to diagnose whether your problem is software related, hardware related, or driver related.
The next sections will show you exactly how to fix your actual blue tint problem with solutions that work, starting with the fastest fixes first.
Try This First: 30-Second Fixes for Blue Tint on Windows 10 (Most People Fix It Here)
Before you dive into complicated troubleshooting steps, I want you to try two incredibly simple quick fix solutions right now. In my experience helping people with screen color issues, these two methods solve more than 70% of blue tint problems in under a minute.
You don’t need any technical knowledge for either of these fixes. Just follow my instructions exactly as I describe them, and there’s a very good chance your screen will return to normal before you finish reading this section.
Fix #1: Turn Off Windows Night Light (Solves 60% of Cases)
This is the single most common cause of blue tinted screens I encounter. The Night Light Windows 10 feature gets turned on accidentally, and suddenly your entire display looks wrong.
Here’s how to check and fix it in seconds:
Click the Windows Start button in the bottom left corner of your screen. Then click on the gear icon to open Settings. You can also press the Windows key and I together as a shortcut.
Once Settings opens, click on System, then select Display from the left sidebar menu.
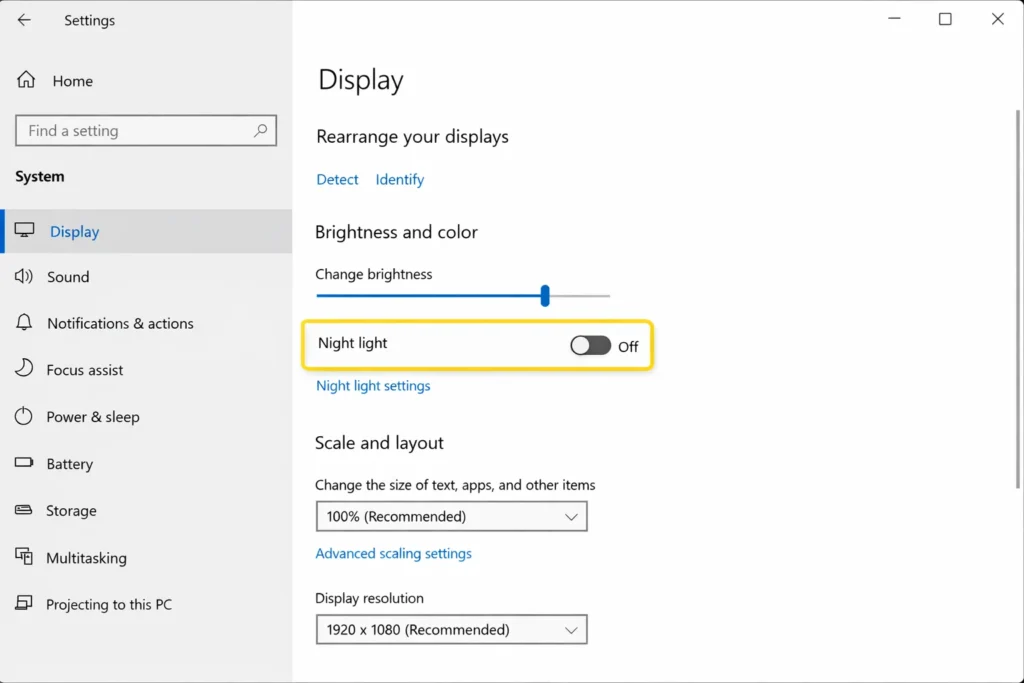
Scroll down until you see the Brightness and color section. Look for the Night Light toggle switch. If this toggle is turned on and showing blue, that’s your problem right there.
Simply click the Night Light toggle to turn it off. Your screen should immediately return to normal colors. I’ve seen this fix work instantly for countless people who thought they had serious hardware problems.
If you see the toggle is already off, move to the next fix. But in my experience, this solves the issue for the majority of people searching for blue tint solutions.
Fix #2: Reconnect Your Display Cable (No Restart Needed)
The second most common cause is something even simpler. A loose monitor cable connection can create all kinds of color distortions including blue, pink, or green tints.
Here’s what makes this fix so easy. You do not need to shut down your computer to perform cable checks. You can test this live and see results immediately.
Look at the back of your monitor and find where your display cable connects. This might be an HDMI cable, DisplayPort, or VGA cable depending on your setup.
Firmly unplug the cable from your monitor, wait two seconds, then plug it back in making sure it clicks or seats completely. Give it a gentle tug to confirm it’s secure.
Now do the same thing at the computer end. Follow the cable to where it plugs into your PC or laptop. Unplug it, then reconnect it firmly.
I actually had a case where simply disconnecting and reconnecting the VGA cable in the back of the monitor fixed the blue tint issue completely. The cable wasn’t visibly loose, but reseating it solved everything instantly.
If your blue tint disappears after either of these fixes, you’re done. If not, don’t worry. The remaining sections cover every other possible solution in order from simplest to most advanced.
How to Tell If Your Monitor or PC Is Causing the Blue Tint
Before you spend hours trying different software fixes, I’m going to show you a simple diagnostic test that tells you exactly where your problem lies. This troubleshooting method has saved me countless hours because it immediately points you in the right direction.
The test is straightforward. If possible, connect your monitor to a different PC or laptop. This helps determine if the blue tint is a hardware issue with the monitor itself or a software issue on your PC.
The Cross Testing Method
Grab a laptop or borrow another computer if you can. It doesn’t matter if it’s running Windows 10, Windows 11, or even a Mac. You just need another device with a video output.
Disconnect your monitor from your current computer. Connect it to the other PC or laptop using the same cable. Turn everything on and look at the screen carefully.
Watch what happens next because this tells you everything.
If the Blue Tint Follows Your Monitor
If your monitor still shows that blue tint when connected to the different computer, you’ve identified a monitor hardware problem. The issue lives inside the monitor itself, not in your Windows settings or graphics drivers.
This usually means the monitor’s internal color processing has failed, the backlight is degrading, or the display panel itself has developed a fault. If the blue tint remains across multiple computers, the monitor itself may be faulty and need replacement.
I know that’s not the answer anyone wants to hear, but at least you know for certain. You can stop wasting time on driver updates and Windows settings that won’t help your situation.
If the Blue Tint Disappears on Another PC
Now here’s the good news scenario. If your monitor looks perfectly normal when connected to a different computer, your monitor is fine. The problem exists somewhere in your original PC’s software, drivers, or settings.
This is actually the outcome I see most often, and it’s the best news you can get. Software problems are fixable without spending money on new hardware.
When the tint stays with your PC, you know to focus your troubleshooting efforts on Windows display settings, graphics card drivers, color management profiles, or application conflicts. All of these have solutions I’ll show you in the upcoming sections.
What If You Can’t Test on Another Computer?
I understand not everyone has access to a second PC for this diagnostic test. If that’s your situation, don’t worry. Just proceed through the remaining fixes in order.
Start with software solutions first because they’re free and quick to try. Work through driver updates, color profile resets, and application checks. These solve the vast majority of blue tint cases even without the cross testing confirmation.
Only consider monitor replacement as a last resort after you’ve exhausted every software based solution. In my experience, actual monitor hardware failures are far less common than simple setting misconfigurations.
Check Your Monitor’s Physical Color Settings (Hardware Fix)
Most people don’t realize their monitor has its own independent color settings that have nothing to do with Windows. Your monitor settings live inside the display itself, and you control them using the physical buttons on your monitor. I’ve fixed several blue tint cases by adjusting these hardware level controls.
Let me show you how to access and fix your monitor’s internal color configuration.
Finding Your Monitor’s Menu Buttons
Look at the front, bottom, or right side edge of your monitor. You’ll find a row of physical buttons, usually three to five of them. Some newer monitors use a single joystick style button instead.
One of these buttons opens the monitor’s on screen display menu. It might be labeled Menu, or it could just have an icon. Press different buttons until you see a menu appear directly on your screen.
Use the physical buttons on your monitor to access the internal menu and find the color settings. The exact button layout varies by brand, but the concept works the same across Dell, HP, Samsung, LG, and every other manufacturer.
How to Factory Reset Your Monitor Settings
Once you’re inside the monitor menu, navigate using the buttons until you find a section called System, Setup, or Settings. The exact name depends on your monitor brand.
Look for an option that says Factory Reset, Reset to Default, or Load Factory Settings. This option returns every internal setting back to how the monitor shipped from the factory.
Select the reset monitor option and confirm when prompted. Your screen might flicker or go black for a second. This is normal as the monitor resets itself.
After the factory reset completes, your blue tint might disappear completely if someone had accidentally changed the default settings previously. I’ve seen this work multiple times when users didn’t even know their monitor settings had been modified.
Adjust Color Temperature (Cool vs. Normal vs. Warm)
If resetting didn’t help, you need to manually check the Color Temperature setting. Navigate through your monitor menu until you find Picture, Color, or Image settings.
Look for Color Temperature, Color Mode, or Preset Mode. You’ll typically see options like Cool, Normal, Neutral, Standard, and Warm.
Here’s what you need to know. The Cool setting adds blue tones to your display. If your monitor color settings are stuck on Cool, that’s creating your blue tint problem right there.
Change the color temperature from Cool to Normal or Standard. Some monitors call this Neutral instead. This provides the most balanced, accurate colors without any blue or orange bias.
If Normal still looks slightly blue to you, try switching to Warm. The Warm setting adds red and orange tones which counteract blue tints. Just don’t go too far or everything will look overly orange.
Make your adjustment, exit the menu, and see if your screen now displays accurate colors. This simple monitor setting change fixes blue tints that no amount of Windows troubleshooting could solve.
Fix Loose or Faulty Display Cables (The $5 Solution vs. $500 Monitor Replacement)
I need to share something that saves people hundreds of dollars every single week. Many color issues are simple cable problems that can be fixed at home for free. I strongly advise against taking your PC to a shop immediately when a new display cable might solve everything.
Let me show you how to properly test your cables and potentially save yourself from unnecessary repair costs or premature monitor replacement.
Which Cable Type Fails Most Often? (VGA vs. HDMI vs. DisplayPort)
Not all display cables are created equal. The type of cable you’re using makes a huge difference in reliability and susceptibility to color problems.
VGA cables are the old blue connectors with screws on the sides. These analog cables are by far the most prone to causing blue tints, green tints, pink screens, and other color distortions. The VGA cable technology is outdated and the pins inside can bend, corrode, or lose contact easily.
HDMI cables and DisplayPort cables use digital signals. These are much more reliable because digital connections either work perfectly or don’t work at all. You rarely get partial color problems with HDMI cable connections.
If you’re currently using a VGA cable and your monitor has an HDMI or DisplayPort input, I recommend switching cable types entirely. You can buy a quality HDMI cable for around five dollars online or at any electronics store.
Try Different Cables and Ports
Even if you’re using HDMI or DisplayPort, the cable itself could have internal damage you can’t see from the outside. Try using a different cable or a different port on your graphics card to rule out a faulty connection.
Look at the back of your computer where your monitor plugs in. Most graphics cards have multiple video outputs. You might see two or three HDMI ports, or a mix of HDMI and DisplayPort connections.
Unplug your current cable and try connecting to a different graphics card port. Sometimes one port develops issues while the others work perfectly fine.
If you have a spare cable lying around, swap it out completely. Borrow one from another monitor or TV if needed. This quick test tells you immediately if your cable was the problem.
Don’t Pay a Repair Shop for This (Do It at Home)
Here’s what frustrates me about computer repair shops. I’ve seen people charged anywhere from fifteen to thirty dollars just for a technician to reseat their cable or tell them to buy a new five dollar cable.
This is a perfect DIY fix that requires zero technical knowledge. You can literally do this in two minutes standing behind your desk.
Before you pack up your computer and drive to a repair shop, spend five minutes testing different cables and ports yourself. The repair cost you save could buy you a premium quality replacement cable with money left over.
Try these cable solutions first. If they don’t work, you can always seek professional help later knowing you eliminated the cheapest and most common causes.
Update Your Graphics Drivers (Fix Software Color Issues)
Outdated or corrupted graphics drivers are one of the most common causes of screen color problems I encounter. Your graphics driver update controls how your computer sends color information to your display. When these drivers malfunction, blue tints and other color distortions appear.
I’m going to show you three different methods to update your drivers. Pick whichever method matches your comfort level with computers.
Method 1: Update via Device Manager (Easiest for Beginners)
This is the quickest way to update your display adapter drivers if you’ve never done it before. Windows handles everything automatically.
Right click on the Start button in the bottom left corner of your screen. From the menu that appears, select Device Manager.
Once Device Manager opens, look for a category called Display adapters. Click the small arrow next to it to expand the section.
You’ll see your graphics card listed underneath. It might say something like Intel HD Graphics, NVIDIA GeForce, or AMD Radeon followed by a model number.
Right click on your graphics card name and select Update driver from the menu. A new window appears asking how you want to search for drivers.
Choose the option that says Search automatically for updated driver software. Windows will now connect to the internet, find the latest driver for your graphics card, and install it automatically.
Wait for the process to complete. If Windows finds and installs a new driver, restart your computer afterward to make sure the changes take effect properly.
Method 2: Use Manufacturer Software (Nvidia, AMD, Intel)
Graphics card manufacturers provide their own free software that makes driver updates even easier. I recommend this method because you get the absolute latest drivers directly from the source.
Outdated graphics drivers cause many Windows issues from display problems like blue tint to application crashes. If you’re having trouble running specific applications, updated drivers often solve the problem.See our guide on fixing Steam app crashes for more information
If you have an Nvidia graphics card, download and install GeForce Experience from the Nvidia website. This program automatically detects your graphics card model and notifies you when new drivers are available.
For AMD graphics cards, download Radeon Software from the AMD website. It works the same way, automatically finding the right Intel driver updates for your specific card.
Intel users should get the Intel Driver and Support Assistant. Visit intel.com and search for their driver download tool.
All three programs scan your system, identify your exact graphics card, and install the correct drivers with just a couple of clicks. You don’t need to know your GPU model number or search for drivers manually.
Method 3: Manual Download from Manufacturer Website
Advanced users can skip the automatic tools and download drivers directly. Visit nvidia.com, amd.com, or intel.com depending on your graphics card brand.
Navigate to the driver download section. You’ll need to know your exact GPU model and your Windows version.
Select the matching driver from their website, download the file, and run the installer. This method gives you complete control but requires more technical knowledge to identify the correct driver version.
After updating your graphics drivers using any of these methods, check if your blue tint has disappeared. Driver updates fix a surprising number of display color issues.
Completely Reinstall Graphics Drivers (When Updating Doesn’t Work)
If you tried updating your graphics drivers in the previous section but your blue tint remains, you need a more thorough approach. Sometimes driver corruption runs so deep that a simple update doesn’t fix the problem. That’s when you need to completely reinstall your driver from scratch.
Let me explain the difference between updating and reinstalling, then walk you through the complete reinstall driver process step by step.
Why Reinstalling Is Different from Updating
Many people don’t realize that updating and reinstalling are two completely different processes. Understanding this difference is crucial when dealing with stubborn display problems.
When you update a driver, Windows keeps your existing driver files in place and only replaces the files that have newer versions available. The problem is that if your current driver has corrupted files, those bad files often remain on your system even after an update.
A complete uninstall and reinstall wipes everything clean. You remove every trace of the old driver software, restart your computer with basic display functionality, then install fresh drivers as if your graphics card was brand new.
Think of it like renovating a house. Updating is like painting over old paint. Reinstalling is like stripping everything down to bare walls and starting completely fresh. When you have deep driver corruption causing your blue tint, you need that fresh start.
Step by Step: Full Driver Reinstall Process
I’m going to guide you through this carefully because removing your display driver sounds scary but is actually quite safe. Windows always has a basic backup driver ready
First, right click your Start button and open Device Manager just like you did for updating. Expand the Display adapters section to see your graphics card.
Right click on your display adapter and this time select Uninstall device instead of Update driver. A warning window appears asking you to confirm.
Here’s the critical step that most people miss. You’ll see a checkbox that says Delete the driver software for this device. Make sure you check this box before clicking Uninstall.
That checkbox is what makes this a true clean reinstall instead of just a partial removal. Checking that box removes all the driver files from your system, including any corrupted ones causing your color problems.
Click Uninstall and wait for the process to complete. Your screen might flicker or change resolution temporarily. This is completely normal and expected.
Once the uninstall finishes, restart your computer immediately. When Windows starts back up, your screen will look different. You might have a lower resolution or things might appear larger. Don’t panic. This is Windows using its basic built in display driver.
Now you have two options for reinstalling fresh drivers.
The easiest method is to download and run the official Nvidia GeForce Experience, AMD Radeon Software, or Intel Driver Assistant depending on your graphics card brand. These programs automatically detect that your driver is missing and install the correct latest version.
Alternatively, Windows Update will eventually detect the missing driver and install one automatically. However, I recommend using the manufacturer software because it gives you the absolute newest driver version directly from the source.
After your fresh install completes, restart one more time. Check your display now. In many cases where simple driver updates failed, this complete clean reinstall resolves blue tint issues caused by deep driver corruption.
The entire process takes about ten to fifteen minutes but gives you a completely fresh driver installation that updating alone cannot achieve.
Reset GPU Control Panel Color Settings (Nvidia, AMD, Intel)
Your graphics card has its own control panel completely separate from Windows settings. These GPU settings can override your display colors and create blue tints even when everything else is configured correctly. I’ve fixed several cases where the graphics control panel had custom color adjustments that nobody remembered setting.
Let me show you how to access and reset these settings based on which graphics card brand you have.
For Nvidia Users: Reset Nvidia Control Panel Colors
If you have an Nvidia graphics card, you have access to the Nvidia Control Panel. This powerful tool lets you customize display settings, but those customizations can sometimes cause unwanted color shifts.
Right click anywhere on your desktop where there are no icons or windows. You’ll see a context menu appear with several options. Look for Nvidia Control Panel and click it.
The Nvidia Control Panel window opens with a menu tree on the left side. Navigate to the Display section and look for an option called Adjust desktop color settings. Click on it.
You’ll see various sliders and controls for brightness, contrast, gamma, and digital vibrance. Someone might have adjusted these settings previously, or software you installed could have changed them automatically.
Look for a button that says Restore Defaults at the bottom of the color settings page. Click this button to reset all Nvidia color settings back to their original factory values.
Some Nvidia Control Panel versions also have a section called Adjust video color settings under the Video menu. Navigate there as well and select Restore Defaults if you see custom settings applied.
After restoring defaults, click Apply and close the Nvidia Control Panel. Check if your blue tint has disappeared now that the GPU level color adjustments are back to normal.
For AMD Users: Reset Radeon Settings
AMD graphics cards use AMD Radeon Software instead of a control panel. The process is similar but the interface looks different.
Right click on your desktop and select AMD Radeon Software from the menu. The Radeon interface opens with a modern, streamlined design.
Click on the Display tab at the top of the window. You’ll see various display related settings including Custom Color options.
Look through the color settings to see if anything has been modified from default values. AMD Radeon Software usually shows when settings have been customized versus left at factory defaults.
Find the option to Restore Factory Defaults or Reset within the Display settings. This returns all AMD specific color adjustments back to their original state.
Apply the changes and exit the Radeon Software. Your blue tint might resolve immediately if custom AMD color settings were the cause.
For Intel Users: Reset Intel Graphics Settings
Intel integrated graphics also have their own control panel, though it’s less commonly known than Nvidia or AMD options.
Right click on your desktop. Depending on your Intel graphics driver version, you might see Intel Graphics Settings, Intel HD Graphics Control Panel, or Intel Graphics Command Center.
Open whichever Intel graphics option appears in your right click menu. Navigate to the Display or Color section within the Intel interface.
Look for color correction settings, color enhancement options, or any custom color profiles that might be active. Intel graphics settings can sometimes apply color adjustments that create blue tints.
Find the Restore Defaults or Reset to Default Settings button. Click it to remove any custom Intel GPU color configurations.
Apply your changes and close the Intel graphics settings window. Check your display to see if the blue tint has cleared.
Many people don’t even realize these graphics control panel settings exist separate from Windows display settings. That’s why resetting them fixes blue tints that survive every other troubleshooting step you’ve tried so far.
Fix Windows Color Management Profiles (Advanced)
Windows has a hidden color management system that most people never know exists. Custom color profiles can override your normal display settings and create persistent blue tints that survive every other fix you’ve tried. I’m going to show you an advanced solution that requires just a simple command.
This section is slightly more technical, but I’ll walk you through it step by step. Don’t worry if you’ve never heard of color management before. You can do this.
How to Access Color Management (Fast Method)
There’s a direct command that opens Color Management Windows instantly without clicking through multiple settings menus. I use this shortcut all the time because it’s so much faster than the long navigation path.
Press the Windows key and R together on your keyboard. This opens the Run dialog box, a small window where you can type commands.
Type colorcpl exactly as I’ve written it, with no spaces. This is the colorcpl command that directly launches the Color Management control panel.
Press Enter or click OK. The Color Management window opens immediately, showing you all the color profile settings for your display devices.
This one command saves you from navigating through Control Panel, System settings, and multiple submenus. It’s a professional shortcut that gets you where you need to be in seconds.
Remove or Reset Color Profiles
Now that you have the Color Management window open, let me show you what to look for and how to fix color profile issues causing your blue tint.
At the top of the window, you’ll see a dropdown menu labeled Device. Click on it and make sure your monitor is selected. If you have multiple monitors, select the one showing the blue tint.
Look for a checkbox that says Use my settings for this device. If this box is checked, it means custom color profiles are being applied to your monitor instead of the standard Windows defaults.
Here’s your first fix option. Simply uncheck the Use my settings for this device box. This immediately reverts your display to use the default color profile that came with Windows.
Click Close and check your screen. If custom color profiles were causing your blue tint, it should disappear instantly when you disable custom settings.
If unchecking that box doesn’t help, or if the box was already unchecked, you need to dig deeper into the color profile list.
Look at the list of color profiles associated with your monitor. Windows usually shows one or more ICC profile files. These files tell Windows how to display colors on your specific monitor.
Sometimes third party software, printer drivers, or photo editing programs install custom color profiles that conflict with your display. You might see profiles with unusual names that don’t match your monitor brand.
Select any suspicious looking color profile from the list. Look for a Remove button and click it to delete that custom profile from your system.
After removing custom profiles, make sure a default profile is selected. You should see something like sRGB or a profile name matching your monitor’s brand.
Click the Set as Default Profile button if you need to designate which remaining profile Windows should use for your display.
Finally, click the Advanced tab at the top of the Color Management window. Look for any additional settings or calibrations that might be active. You can reset these to system defaults if anything looks modified.
Close the Color Management window and restart your computer to ensure all profile changes take full effect. Color management profiles work at a deep system level, so this advanced fix solves blue tints that simpler solutions cannot touch.
Diagnose App Conflicts (Is a Specific Program Causing the Tint?)
Sometimes your blue tint isn’t caused by Windows settings or drivers at all. Certain incompatible software running on your computer can create display color problems that appear system wide. I’m going to teach you a diagnostic technique that instantly tells you if an app conflict is your issue.
This is one of the most overlooked causes of blue tints, and the solution is surprisingly simple once you identify the culprit program.
If you prefer to see a real world demonstration of Windows 10 display troubleshooting methodology, check out this helpful video guide
Windows 10 Display Troubleshooting Demo Real-world demonstration of diagnostic methods for fixing screen color issues and conflicts caused by incompatible softwareThe Task Manager Flicker Test (Instant Diagnosis)
I want you to perform a quick test right now while your blue tint is visible. This takes about five seconds and gives you immediate answers.
Press Ctrl, Shift, and Esc together on your keyboard. This keyboard shortcut opens Task Manager instantly without navigating through menus.
Task Manager appears on your screen showing all your running programs and processes. Now here’s what you need to watch carefully.
Look at the Task Manager window itself. Does it show the same blue tint as the rest of your screen? Or does Task Manager appear with normal colors while everything behind it looks blue?
This simple observation diagnoses your screen issue completely. If Task Manager shows the blue tint along with everything else on your display, your problem is likely a display driver issue. Go back to the driver sections I covered earlier.
However, if Task Manager appears perfectly normal with accurate colors while your desktop background and other windows show the blue tint, you have an incompatible app causing the problem. An application running on your system is overriding your display colors.
This diagnostic technique works because Task Manager operates at a different system level than most applications. When apps conflict with your display rendering, Task Manager often remains unaffected and shows true colors.
Most Common Culprit Apps (Norton, iCloud, IDT Audio)
Through troubleshooting hundreds of display issues, I’ve identified three types of incompatible software that cause blue tints and color problems more than any others.
Norton antivirus and similar security software sometimes conflict with display drivers. The real time protection features can interfere with how Windows renders colors on your screen.
Apple iCloud for Windows is another frequent offender. The sync processes and photo library features can create display conflicts, especially after Windows updates.
IDT Audio drivers and similar audio management software surprisingly cause display color issues on some systems. The audio software shouldn’t affect your screen, but incompatible versions do exactly that.
If you have any of these programs installed, they’re the prime suspects for your app conflict issue.
Open your Windows Settings and click on Apps. Look through your installed applications list for Norton, iCloud, or IDT Audio.
If you find any of these programs, click on them and select Uninstall. You can always reinstall them later from official sources if they weren’t the problem.
After uninstalling the suspected incompatible software, restart your computer. Check if your blue tint has disappeared.
If the tint is gone after removing one of these apps, you’ve found your culprit. You can try reinstalling the latest version of that software from the developer’s website. Newer versions often fix the compatibility issues that older versions had.
Beyond these three common programs, any recently installed software could potentially conflict with your display. Think back to when your blue tint first appeared. Did you install any new programs around that time?
Try uninstalling any software you added shortly before the color problem started. One of those recent installations might be your incompatible app causing the persistent blue tint that other solutions couldn’t fix.
Use System Restore (If Blue Tint Started After Recent Changes)
If you can remember the exact moment when your blue tint problem started, and it happened right after a Windows update or software installation, I have a powerful solution for you. System Restore Windows 10 lets you revert changes and roll your computer back to a point in time when everything worked perfectly.
This is your nuclear option when you know something specific broke your display recently.
When to Use System Restore for Display Issues
System Restore isn’t the right solution for everyone. You should only use this method in specific situations where the timing of your problem is clear.
Think back carefully. Did your blue tint appear immediately after installing a particular program? Did it start right after a Windows update downloaded and installed? Did your screen look fine yesterday but wrong today after you changed some settings?
If you can connect your blue tint to recent changes on your computer, System Restore can undo those changes and bring back your normal display.
This works because Windows automatically creates restore points before major system changes. These restore points are like snapshots of your computer’s configuration at specific dates. You can jump back to one of those snapshots and undo whatever caused your problem.
However, I need to be honest about what System Restore does and doesn’t do. It affects system files, Windows settings, drivers, and installed programs. It does not delete your personal files like documents, photos, or downloads. Those remain untouched.
But any programs you installed after the restore point date will be removed. You’ll need to reinstall them afterward. Make sure you’re okay with that trade off before proceeding.
Step by Step System Restore Process
Let me walk you through the complete system restore steps so you can safely revert your computer to a working state.
Click on the Windows search bar at the bottom of your screen. Type Recovery and press Enter. The Recovery options panel opens showing several system recovery tools.
Look for an option that says Open System Restore. Click on it to launch the System Restore wizard.
A new window appears explaining what System Restore does. Read the information, then click Next to continue.
You’ll see a list of available restore points with dates and descriptions. Windows typically creates these before major updates or software installations.
Look through the list and find a restore point from before your blue tint problem started. If your tint appeared three days ago, choose a restore point from four or five days ago when you know your screen looked normal.
Select the appropriate restore point by clicking on it. You can click the Scan for affected programs button to see exactly what software will be removed or restored.
Once you’ve chosen your restore point, click Next. Windows shows you a confirmation screen summarizing what will happen.
Click Finish to start the system restore process. Windows warns you one final time that this process cannot be interrupted once it begins.
Confirm that you want to proceed. Your computer will restart and begin restoring itself to the selected date. This process usually takes ten to twenty minutes depending on how much has changed since that restore point.
Don’t turn off your computer or interrupt the process. Let it complete fully. Your screen might go black or show a progress indicator.
When the restore finishes, Windows restarts normally. Check your display immediately. If the restore point you selected was from before the problem started, your blue tint should be completely gone now.
System Restore essentially rewinds time on your computer’s configuration, undoing whatever recent change broke your display colors.
What If Nothing Works? (When to Consider Hardware Replacement)
I need to be completely honest with you. If you’ve worked through every solution in this guide and your blue tint persists, you’re likely facing actual hardware failure. This is the answer nobody wants to hear, but knowing the truth saves you from wasting more time on fixes that won’t help.
Let me explain when monitor replacement becomes necessary and what signs point to genuine hardware problems.
Signs Your Monitor Hardware Is Failing
If you tested your monitor on a different computer and the blue tint followed the monitor to that second PC, the monitor itself is faulty and needs replacement. This is the clearest diagnostic signal possible.
Monitors can develop several types of hardware failures that cause permanent color problems. Backlight issues occur when the LED backlighting system degrades unevenly, creating color casts across your screen. Panel degradation happens when the liquid crystal display itself deteriorates over time, losing its ability to accurately reproduce colors. Similar display hardware issues like black lines on laptop screens can also develop from physical component failure and require professional diagnosis.
These hardware problems cannot be fixed through software adjustments, driver updates, or settings changes. The physical components inside your monitor have failed and require professional repair or complete replacement.
Making the Replacement Decision
Before you buy a new monitor, consider the age and original cost of your current one. If your monitor is more than five years old or was an entry level model, replacement almost always makes more sense than repair.
Professional monitor repair typically costs between one hundred to two hundred dollars for parts and labor. You can purchase a quality new monitor in that same price range with a warranty and better specifications.
However, if you own an expensive professional grade monitor that’s relatively new, contact the manufacturer about warranty coverage or authorized repair services. High end monitors worth several hundred dollars might justify repair costs.
For most users with typical home or office monitors, I recommend shopping for a replacement. Modern monitors have improved significantly in color accuracy, resolution, and price compared to models from just a few years ago.
You tried everything possible to fix your blue tint through free software solutions. Sometimes hardware simply fails, and knowing when to stop troubleshooting and move forward is just as important as knowing how to fix problems.
Bonus: Adjusting Night Light Strength (For Those Who Want to Keep It On)
Maybe you discovered that Night Light was causing your blue tint, but you actually like the feature. You appreciate how it reduces eye strain during evening work sessions and helps you sleep better at night. The good news is that you don’t have to choose between comfortable eyes and accurate colors.
I’m going to show you how to keep Night Light active while adjusting it to a level that doesn’t create an unwanted blue tint.
Find the Right Strength Setting (10-20% Sweet Spot)
The mistake most people make is leaving Night Light at its default strength setting, which is often too intense. When Night Light runs at full strength, it creates such a dramatic orange tint that it looks wrong and interferes with your work.
The solution is simple. Instead of turning Night Light completely off, adjust the strength slider to find the perfect balance where you get eye comfort benefits without excessive color distortion.
Open your Windows Settings and navigate to System, then Display. Look for the Night Light section and click on Night light settings to expand your options.
You’ll see a slider labeled Strength or Intensity. This slider controls how much blue light filtering Night Light applies to your screen.
Here’s my tested recommendation based on extensive use. Keep your Night Light strength between ten and twenty percent. This range gives you meaningful eye strain reduction without over distorting your colors.
At ten percent, you barely notice the color shift but still benefit from reduced blue light exposure. Your screen maintains nearly accurate colors while filtering harmful blue wavelengths.
At twenty percent, the warming effect becomes more visible but still looks natural. Colors shift toward slightly warmer tones without looking unnaturally orange or tinted.
Anywhere in that ten to twenty percent range provides the sweet spot between functionality and appearance. Experiment within this range to find your personal preference.
Higher percentages quickly become counterproductive. At fifty percent or above, the orange tint becomes overwhelming and makes your screen look broken rather than helpful.
How to Keep Night Light On 24/7 (Scheduling Trick)
Windows doesn’t offer a permanent always on switch for Night Light. The feature is designed to follow a schedule that activates at sunset and deactivates at sunrise.
But I have a workaround that keeps Night Light active nearly twenty four hours per day if that’s what you want.
Open Night light settings again. Look for the Schedule night light section and toggle it on.
Click Set hours to configure your schedule. In the Turn on field, enter six zero zero AM. In the Turn off field, enter five fifty nine AM.
This creates a schedule where Night Light activates at six in the morning and deactivates at five fifty nine AM the next morning. Technically it’s off for one minute daily, but practically it remains on for twenty three hours and fifty nine minutes.
This scheduling trick lets you enjoy Night Light continuously without the brief daily interruption. Your eyes stay comfortable during all your work and leisure hours while you maintain the option to see true colors for exactly one minute each day if needed.
Can I fix a blue tint on my monitor without any technical knowledge?
Yes. About 70% of blue tint cases get fixed by simply toggling Night Light off or reconnecting your display cable. Both solutions take under 30 seconds and require zero technical skills. Start with the quick fixes in Section 3 before trying anything more complicated.
Why does my screen have a blue tint only in certain programs?
Press Ctrl+Shift+Esc to open Task Manager. If Task Manager shows normal colors while other windows display the tint, you have an app conflict. The most common culprits are Norton antivirus, iCloud, and IDT Audio. Uninstall the conflicting app to fix it.
Is blue tint the same as the blue light filter in Windows?
No. Blue tint is an unwanted malfunction making your screen look wrong. Blue light filter (Night Light) is an intentional feature that reduces eye strain. Ironically, Night Light being ON is the #1 cause of unwanted blue tints people experience.
Do I need to replace my monitor if it has a blue tint?
Not usually. Test your monitor on a different PC first. If the tint disappears on the other computer, your original PC’s settings or drivers are the problem and fixable at home. If tint remains on all PCs, your monitor hardware may be failing and needs replacement.
Which display cable type is most likely to cause color problems?
VGA cables (the old blue ones) are most prone to blue, pink, and green tints from poor connections. HDMI and DisplayPort are far more reliable. If you’re using VGA, try switching to HDMI if your monitor supports it.
Should I update or reinstall my graphics driver for a blue tint?
Try updating first through Device Manager. If that fails, do a full reinstall by uninstalling the device, checking the box to delete driver software, restarting, then reinstalling fresh. Reinstalling is more thorough when the driver is corrupted.
")

