
Not All Laptop Green Screens Are the Same Find Yours First
I’ve fixed dozens of laptop green screen issues over the years, and the first thing I learned is this: not all green screens are created equal. When your laptop screen turned green, it didn’t happen for just one universal reason. There are actually four completely different types of green screen problems, and each one has its own causes and fixes.
This is a common laptop display issue seen across various brands like Dell, Lenovo and HP. I’ve seen users waste hours following the wrong tutorials simply because they didn’t identify which type of green screen they actually had. So before you try any fix, let me help you figure out exactly what you’re dealing with
Type 1 Full Green Screen or Crash (GSOD)
The Green Screen of Death, or GSOD, is when your entire screen goes solid green, usually during startup or after a Windows update. If you’re part of the Windows Insider Preview program, you’ve probably seen this before. Your laptop essentially crashes, and you might see an error code or a sad face emoji on a completely green background.
This is different from the other types because your laptop isn’t working at all when this happens. It’s a full system crash, not just a display color problem. I’ll explain what causes the green screen of death and how to fix it later in this guide.
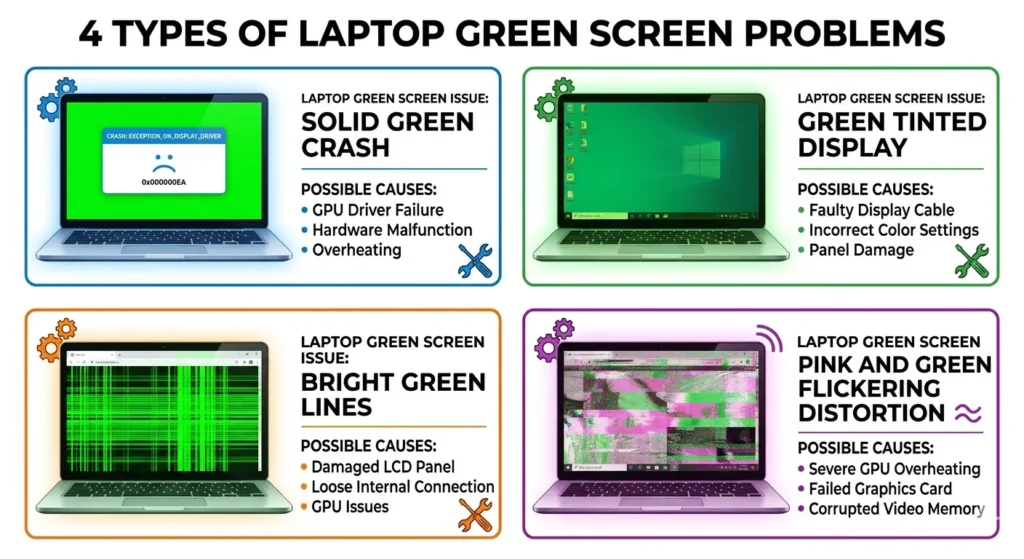
Type 2 Green Tint Over the Whole Display
This is the type I see most often. Your screen still works perfectly fine, you can click, type, and use your laptop normally, but everything looks like you’re wearing green-tinted sunglasses. Images, text, videos, everything has a greenish color cast over it.
I dealt with this exact screen color distortion on an Acer laptop last year, and it turned out to be a simple driver issue. The green tint on laptop screen is usually caused by software problems like corrupted color profiles, stuck display settings, or a loose cable connection inside the laptop. The good news? This type is often the easiest to fix
Type 3 Green Lines on Screen (Horizontal or Vertical)
If you see one or more bright green lines running across or down your display, that’s a different beast entirely. These lines can be thin or thick, permanent or flickering. Sometimes it’s just one vertical green line on laptop screen, other times it’s multiple horizontal ones.
I’ve learned that green lines can be caused by either hardware or software. A cracked LCD panel, a loose display cable, or even a graphics driver glitch can all create lines. The trick is figuring out which one you’re dealing with before you start trying fixes.
Important note: If you’re experiencing black lines instead of green lines, the diagnostic process and many solutions are identical. I’ve written a complete guide on how to fix black lines on laptop screens that covers the same hardware and software troubleshooting methods. The root causes (loose display cable, corrupted drivers, LCD panel damage) are often the same regardless of the line color.
Type 4 Pink and Green Flickering or Artifacting
This is the most dramatic type, and honestly, the most worrying. If your screen shows heavy flickering with bands of both pink and green colors flashing across it, that’s usually a sign of serious hardware trouble. I saw this on a Lenovo Legion gaming laptop once the entire display looked like a glitchy TV with pink and green stripes everywhere, and the owner was understandably panicking.
This laptop screen flickering green and pink together almost always points to GPU failure or severe display cable damage. It’s not something you can usually fix with a simple driver update
Is Your Laptop Green Screen Hardware or Software? (Do This Test First)
Before you start randomly trying fixes, you need to know whether your laptop green screen is a hardware vs software diagnosis situation. I learned this the hard way after spending two hours reinstalling drivers on a laptop that actually had a loose cable inside. One simple test would have saved me all that time.
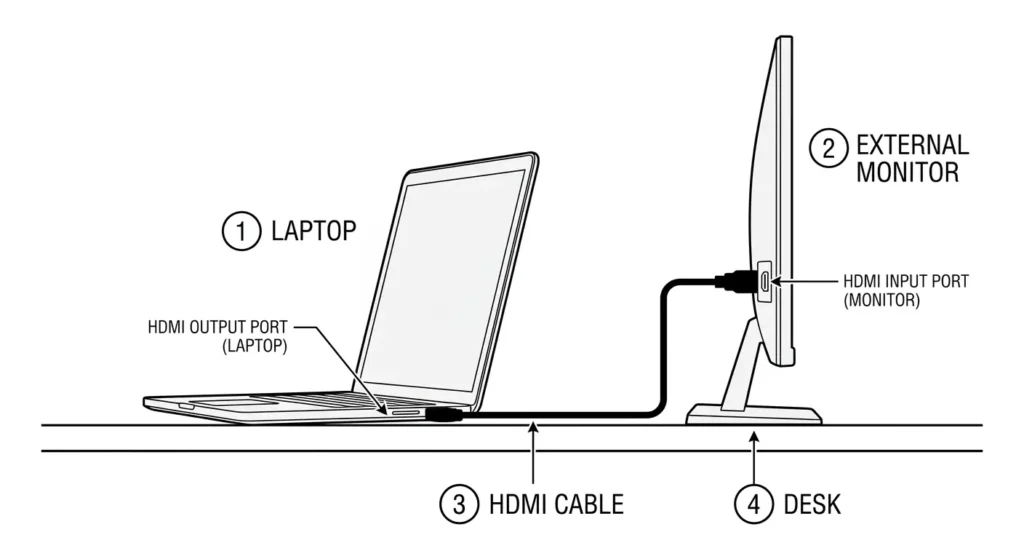
The external monitor test is the fastest way to diagnose what’s actually broken. If the green issue appears on an external monitor too, the problem is likely related to the graphics card or its drivers. If the external monitor looks completely normal, the issue is likely a physical hardware fault with the laptop’s built-in screen.
This single test tells you exactly where to focus your troubleshooting efforts, and I can’t believe how many people skip it
How to Run the External Monitor Test (Step by Step)
Here’s exactly how I run the external monitor test every time I diagnose a laptop screen hardware problem:
Step 1: Find an HDMI cable and any external monitor or TV. Most modern TVs work perfectly for this test.
Step 2: Plug one end of the HDMI cable into your laptop’s HDMI port and the other end into the monitor or TV.
Step 3: Turn on the external display. Your laptop should automatically detect the monitor. If it doesn’t, press Windows + P on your keyboard and select “Duplicate” or “Extend.”
Step 4: Look closely at the external screen. Does the green tint, green lines, or green crash appear there too? Take your time with this step because the answer determines everything that comes next.
That’s the entire test. Simple, quick, and incredibly revealing
What Your Result Means (And Where to Go Next)
So what does your external monitor test actually tell you?
If the green problem shows up on the external monitor: You’re dealing with a graphics card issue or a GPU driver problem. The laptop’s internal graphics processor is sending out bad video signals, which means this is a software or internal hardware issue. Jump straight to Section 5 where I’ll show you how to fix driver and GPU related green screens.
If the external monitor looks totally normal: The problem is isolated to your laptop’s physical screen, display cable, or screen connectors. Your graphics card is working fine, which means the issue is somewhere between the motherboard and the LCD panel itself. Head to Section 7 where I cover hardware fixes like cleaning display cable connections.
I can’t stress enough how much time this external monitor test saves. It’s the difference between fixing your laptop in 10 minutes with a driver update versus spending money on a screen replacement you didn’t actually need
Why Is My Laptop Screen Green? The Real Causes Explained
Your laptop screen didn’t just randomly decide to turn green one day. There’s always a specific reason behind it, and understanding why your laptop screen turned green helps you pick the right fix instead of guessing blindly.
The problem typically stems from one of two sources: the screen itself or the data cable connecting the motherboard to the screen. But within those two categories, there are actually six distinct causes I’ve seen over the years. Some are pure software issues you can fix in minutes, while others are hardware problems that need a bit more attention.
Let me break down what’s really happening inside your laptop when screen color distortion appears.
Software Causes (Drivers, Windows, System Files)
GPU driver corruption is hands down the most common software reason for a green screen. Your graphics card relies on driver software to communicate properly with Windows and your display.
When that driver gets corrupted, outdated, or conflicts with a Windows update, the GPU driver problem can cause all sorts of visual glitches including green tints and green screens.
The Green Screen of Death is a specific type of crash that happens mostly to people using Windows Insider Preview builds. If you’re enrolled in the GSOD Windows Insider program to test early Windows features, you’ve probably seen this before.
Your screen goes completely green, usually with an error code, and the system freezes. This happens because preview builds of Windows are inherently unstable and sometimes crash in ways the public releases don’t.
Corrupt system files can also mess with your display output. Windows relies on thousands of system files to run properly and if the ones responsible for graphics rendering get damaged, you might see green screens or laptop screen flickering green.
This usually happens after a failed Windows update or sudden shutdown.
These software causes are actually the good news because you can fix them without opening your laptop or spending any money.
Hardware Causes (Cable, Panel, GPU Overheating)
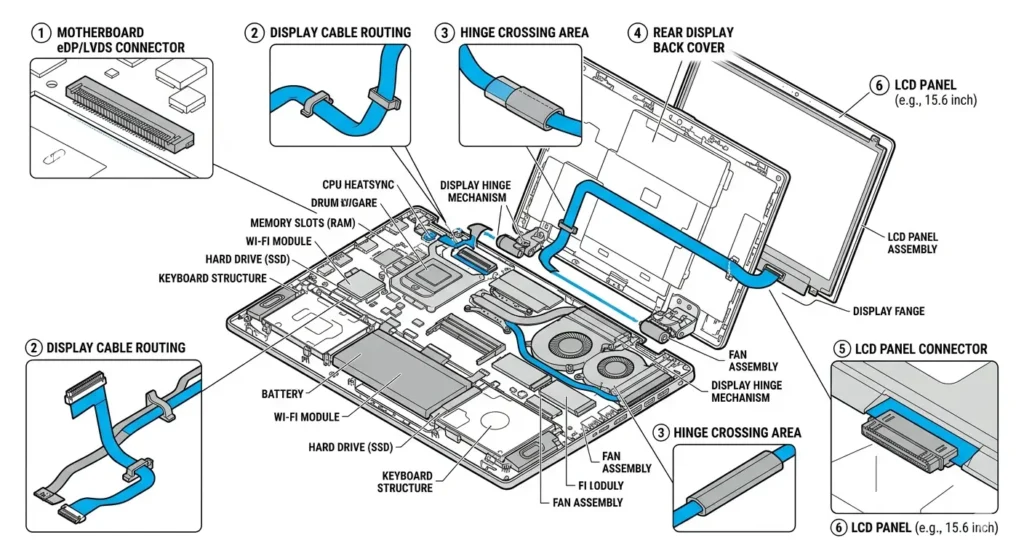
Now for the physical stuff. A loose display cable is the most overlooked hardware cause I’ve encountered. Inside your laptop, there’s a thin ribbon cable called an eDP or LVDS cable that carries the video signal from your motherboard to the LCD panel.
The display cable may have become partially detached from the motherboard or the back of the LCD panel over time, especially if you open and close your laptop lid frequently or carry it around a lot.
Here’s the part most people don’t know: dirty connectors on that same cable can cause the exact same green screen symptoms.
Dust or oxidation builds up on the tiny metal pins where the cable connects, and that breaks the signal just enough to create green color errors. I’ve fixed laptops that people were ready to throw away just by cleaning those connector pins with a pencil eraser.
An overheating GPU is a big deal, especially on gaming laptops. I saw this firsthand on a Lenovo Legion where the graphics card was running so hot under heavy gaming loads that it started producing pink and green artifacting across the screen.
When your GPU overheats, the electronic components literally start malfunctioning, and one of the first visual signs is usually weird color banding or a green tint.
Finally, a faulty or degraded LCD panel means the screen itself is physically broken. Pixel damage, internal LCD layer separation, or manufacturing defects can all cause persistent green screens that no amount of driver updates will fix.
This is the worst case scenario because it usually means you need a screen replacement.
The key difference? Software causes affect the external monitor test. Hardware causes like a loose display cable or broken LCD panel only affect your laptop’s built-in screen.
Try These Two Quick Fixes Before Anything Else
Before you dive into complicated troubleshooting steps, let me share three incredibly simple tricks that can fix your laptop green screen issues in under a minute. I’m talking about zero cost, zero technical skill required, and zero risk to your laptop.
I’ve seen these quick fixes work so many times that I now tell everyone to try them first before doing anything else.
Resetting the graphics driver can resolve temporary display glitches, flickering, or black screen issues without needing to restart your entire computer. And the best part? Most people have never even heard of these shortcuts.
If any of these work for you, you’ll save yourself hours of frustration. If they don’t, you’ve only lost 60 seconds and you can move on to the deeper fixes with nothing lost
Quick Fix 1: Reset Your Graphics Driver in 3 Seconds (No Restart)
This is my absolute favorite quick fix because it’s so ridiculously fast and it actually works for temporary GPU driver problems.
Here’s exactly what you do: Press and hold the Windows key + Ctrl + Shift, then tap the B key once. Your screen will go completely black for about two seconds. Don’t panic when that happens, the laptop is resetting your graphics driver in real time.
When your screen comes back on, look closely. Is the green tint gone? Are the colors back to normal? If yes, congratulations, you just fixed a driver glitch without restarting, reinstalling, or touching Device Manager at all.
If the green screen comes right back, that’s okay too. Move to the next fix. This keyboard shortcut only fixes temporary graphics glitches, not permanent hardware issues, but it’s worth trying because when it works, you’re done in three seconds flat
Quick Fix 2: The Switch User Trick That Works on Acer (and Others)
I learned this one from someone who tried various tutorials and websites without success before accidentally discovering this fix on their Acer laptop.
It sounds too simple to work, but I’ve personally used it to fix session-based green tints on multiple laptops.
Here’s the process: Press Ctrl + Alt + Delete on your keyboard. You’ll see a blue screen with several options. Click Switch User at the bottom. Wait a few seconds while Windows switches to the login screen, then log back into your account.
When your desktop reloads, check if the green tint is gone. This works because sometimes Windows gets stuck with corrupted color profile settings in your current session and forcing a session reload clears that temporary corruption.
This trick works particularly well on Acer laptops for reasons I honestly don’t fully understand, but I’ve also seen it fix green screens on HP and Dell models.
It takes maybe 15 seconds total, so even if you’re not using an Acer, try it anyway
Quick Fix 3: Disconnect All External Devices
This one is less glamorous but surprisingly effective. Unplug every single external device connected to your laptop. I mean everything: USB drives, external hard drives, wireless mouse dongles, webcams, external monitors, docking stations, even your phone charger cable if it’s plugged into a USB port.
Once everything is disconnected, restart your laptop. If the green screen was triggered by a peripheral conflict, especially an external monitor that was forcing your GPU into a weird display mode, removing all those devices lets Windows reset to default display settings.
I’ve fixed green screens caused by faulty USB hubs and malfunctioning external monitors this way more times than I can count. The laptop’s display suddenly goes back to normal the moment the conflicting device is unplugged.
If your screen looks perfect after the restart, plug your devices back in one at a time to figure out which one was causing the problem. If the green screen persists, you’ve at least ruled out peripheral conflicts and you know the issue is internal.
Still seeing green? Don’t worry. The next section covers a full display driver update process that handles deeper GPU driver problems these quick fixes can’t touch
How to Fix Laptop Green Screen With a Driver Update (Step by Step)
If your external monitor test showed the green screen also appears on the external display, then you’re dealing with a GPU driver problem. Updating your display driver is usually the fix that solves it. I’ve resolved countless green screen cases just by getting Windows to install the latest graphics driver.
A display driver update tells your graphics card how to communicate with your monitor and Windows properly. When that driver gets outdated or corrupted, your GPU can’t send the right color signals, which is why you end up with a green tint or green crash screen.
The good news is that updating your graphics driver through Device Manager takes maybe five minutes and requires no technical knowledge at all. I’ll walk you through both updating and rolling back, because sometimes a recent driver update is what caused the green screen in the first place
How to Update Your Display Driver (Windows 10 and 11)
This process is identical for both Windows 10 and Windows 11, so follow along whether you’re on one or the other.
Step 1: Right click on the Windows Start button in the bottom left corner of your screen. A menu will pop up with several options.
Step 2: Click on Device Manager. This opens a window showing all the hardware devices connected to your laptop.

Step 3: Look for a category called Display adapters and click the arrow next to it to expand the list. You’ll see your graphics card name listed there. It might say NVIDIA, Intel, AMD, or something similar depending on what your laptop has.
Step 4: Right click on your graphics card name. A context menu appears with several options.
Step 5: Click Update driver. Windows will ask how you want to search for drivers.
Step 6: Select Search automatically for updated driver software. Windows will now connect to the internet and look for the latest driver version for your graphics card.
This usually takes a minute or two. Let Windows finish the search completely. If Windows finds an update, it will download and install it automatically. If it says your driver is already up to date, that means you have the latest version from Microsoft’s servers, which is fine.
Step 7: When the update finishes, restart your laptop. This is important because the new driver won’t fully activate until you restart.
After your laptop turns back on, check your screen carefully. Is the green color gone? Are the colors back to normal? Most people see their green screen problem completely vanish after this update
How to Roll Back Your Driver (If an Update Caused the Green Screen)
Here’s the scenario: your laptop was working fine, then you got a Windows Update notification, installed updates, and suddenly your screen turned green. If this sounds like you, the problem might be that a bad graphics driver update is what caused the green screen in the first place.
Rolling back your driver means going back to the previous version before the update that broke things. I’ve fixed green screens this way when someone installed a driver that didn’t play nicely with their specific hardware.
Step 1: Open Device Manager again using the same method above. Right click the Windows Start button and click Device Manager.
Step 2: Expand Display adapters and right click your graphics card.
Step 3: Click Properties. A new window opens showing detailed information about your graphics card.
Step 4: Click the Driver tab at the top of that Properties window.
Step 5: Look for a button that says Roll Back Driver. If this button is grayed out, it means there’s no previous driver version to go back to, so a rollback driver won’t help your situation.
Step 6: If the button is available, click it. Windows will uninstall the current driver and restore the previous version.
Step 7: Restart your laptop when the rollback finishes.
The driver rollback process is usually faster than updating because you’re going back to an older version that’s already on your computer. After the restart, check if your screen looks normal again.
If rolling back fixes the green screen, I’d recommend waiting a few days before updating again. Sometimes driver updates have bugs that get fixed in the next version, so waiting a week or two can help you avoid getting the same bad driver twice.
Still green after both updating and rolling back? That means the GPU driver problem isn’t the issue. Move on to Section 6 if it’s just a green tint, or Section 7 if the external monitor test showed this is a hardware problem
How to Fix Green Tint on Laptop Screen in Windows 10 and 11
If your screen has a persistent green color cast over everything but it’s not crashing or showing lines, you’re dealing with a green tint issue specifically. This is different from a full green screen crash, and it requires a different approach to fix.
A green tint on laptop screen usually means Windows has the wrong color settings applied, or a feature like Night Light is stuck in the wrong position. The good news is that these are pure software fixes that take just a few minutes. I’ve seen this happen on both Windows 10 and Windows 11, and the solutions work for both versions.
Let me show you how to get your colors back to normal without touching any hardware
Check and Reset Windows Night Light Settings
Windows Night Light is a built-in feature that reduces blue light on your screen during evening hours. It’s supposed to be nice on your eyes, but sometimes it gets stuck at maximum warmth, which makes everything look greenish or orange tinted.
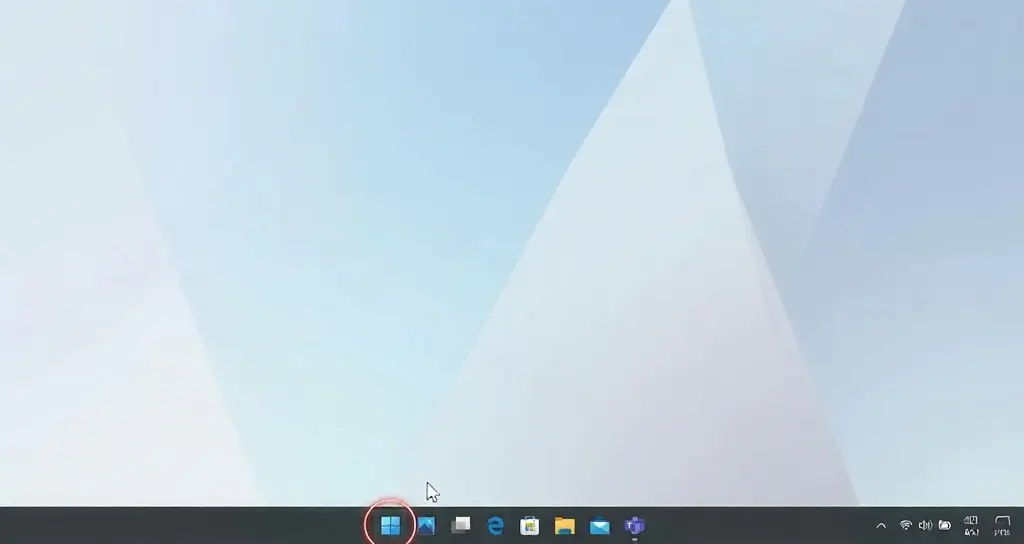
Step 1: Click the Windows Start button and type Settings into the search box. Open the Settings app.
Step 2: Click on System in the left sidebar menu.
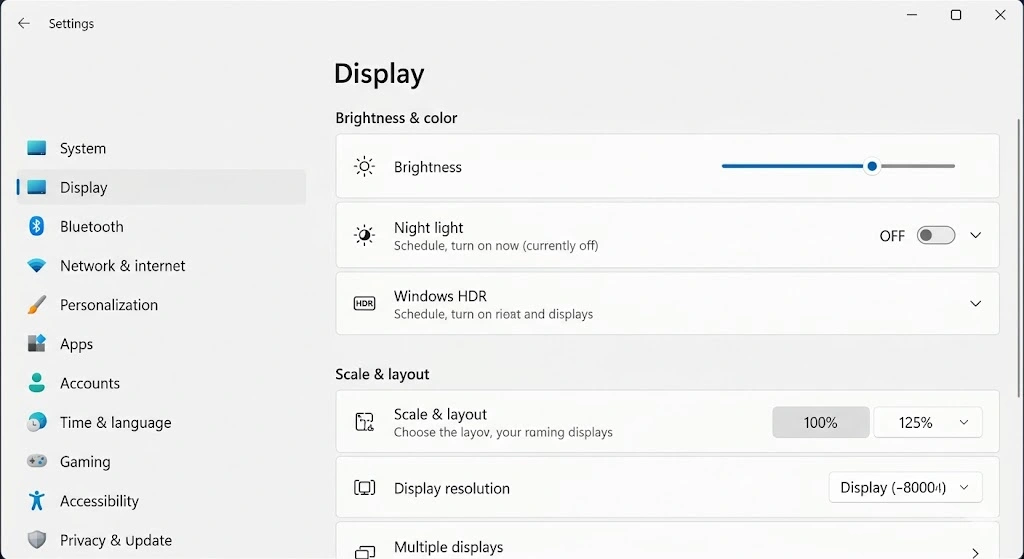
Step 3: Click on Display from the options that appear.
Step 4: Scroll down until you find Night Light. You’ll see a toggle switch next to it.
Step 5: If the Night Light toggle is turned on, click it to turn it off. This immediately removes any warm color filter that Night Light was applying.
Step 6: Restart your laptop to make sure the change takes full effect.
Check your screen now. Does the green tint look better or completely gone? If Night Light was the culprit, your display settings should be back to normal immediately.
If the green tint is still there, Night Light wasn’t the problem. Move to the next fix. But if you liked the Night Light feature and want to use it again, you can turn it back on. Just make sure to adjust the slider to a lower warmth level so it doesn’t create that greenish color cast.
Reset Your Display Color Profile
Your display color profile is basically a set of instructions that tells Windows how to display colors accurately on your specific laptop screen. When that color profile gets corrupted, Windows displays colors incorrectly, and a green tint is one common result.
Resetting your display color profile back to the default clears out any corruption and gives your screen a fresh start with Windows’ standard color settings.
For Windows 11:
Step 1: Click the Start button and type Color Management in the search box. Click the result that says “Color Management.”
Step 2: In the Color Management window that opens, click the Advanced tab at the top.
Step 3: Look for a button labeled Reset My Display or Restore Defaults. Click it.
Step 4: Windows will ask for confirmation. Click yes to confirm the reset.
Step 5: Restart your laptop.
For Windows 10:
Step 1: Click the Start button and open the Control Panel. You can search for it if you don’t see it immediately.
Step 2: Look for Color Management in the Control Panel. Click it.
Step 3: Click the Advanced tab.
Step 4: Click Restore Defaults or Reset to restore the original color profile.
Step 5: Restart your laptop.
After your laptop restarts, look at your display carefully. The green tint should be significantly reduced or completely gone. Your colors should look normal and balanced again.
If resetting the color profile didn’t work, and you’re still seeing that green and faded display appearance, then the issue might not be software related. In that case, the green tint could be caused by a loose display cable or hardware issue. Check Section 7 to learn about hardware fixes, or go back to Section 2 to run the external monitor test again to confirm whether this is truly a hardware problem
The Hardware Fix Most People Never Try (And It’s Free)
Here’s what I’ve learned after fixing dozens of green screen laptops: most people assume the screen itself is broken and needs an expensive replacement. However, in many cases, the issue is simply a dirty or loose connection in the display cable. I’ve seen the exact same green screen disappear completely just by cleaning a connector with a pencil eraser.
This is the hardware fix that could save you hundreds of dollars, but almost nobody tries it because they don’t know about it. Before you spend money on a new screen, let me show you what’s actually happening inside your laptop and how to fix it yourself if you’re comfortable with basic disassembly
What Is the Display Cable and Why Does It Cause Green Screens?
Inside your laptop, there’s a thin ribbon cable called an eDP or LVDS cable that does one critical job: it carries the video signal from your motherboard to your LCD screen. Think of it like a tiny highway that transmits all the color information from your graphics card to your display.
For a deeper understanding of how Low-Voltage Differential Signaling technology works at the engineering level,provides detailed technical documentation on why these signals are so sensitive to interference and connection problems
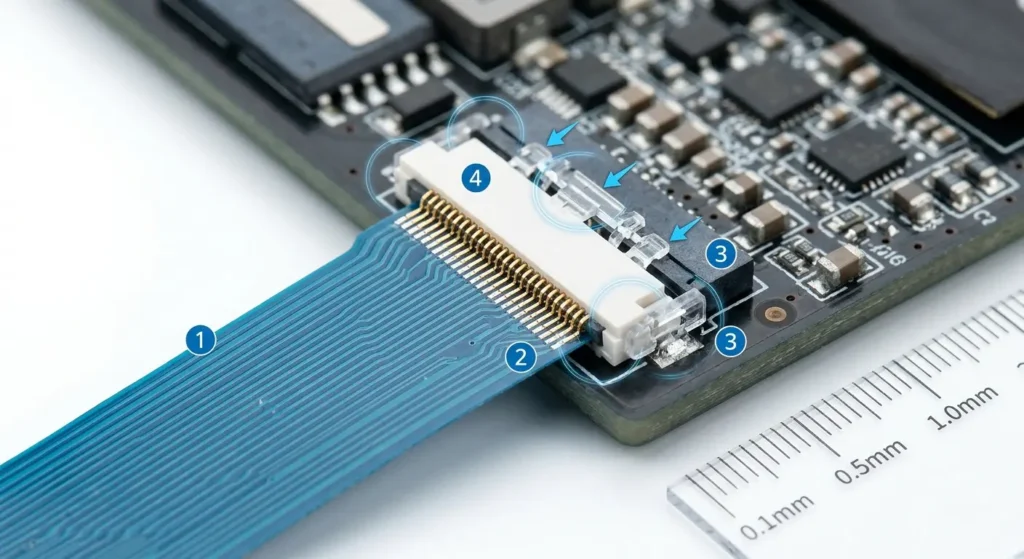
These connector pins are incredibly small and incredibly fragile. Over time, dust accumulates on those pins, or oxidation builds up from moisture and humidity. When the connection gets dirty or even slightly loose, the video signal gets interrupted.
Your laptop screen hardware problem then appears as color distortion, green tints, or even complete green screens because the color information isn’t reaching the display properly
The loose display cable connector is probably the number one overlooked cause of green screen issues I’ve encountered. Most repair shops check it immediately, but home users rarely think to look there
How to Clean and Re-seat the Display Cable Connector
This process requires you to open your laptop and work with small delicate components. If you’re not comfortable doing this, take your laptop to a technician and show them this section so they know exactly what to check first. A professional repair usually costs fifty to one hundred dollars, which is still way cheaper than a new screen.
Important: Before you start, shut down your laptop completely and unplug the power cable. Remove the battery if your laptop has a removable battery. This prevents any electrical damage while you’re working inside.
Step 1: Remove the back panel of your laptop. Most laptops have a few screws holding a plastic or metal cover on the bottom. Remove those screws carefully and set them aside in a small container so you don’t lose them.
Step 2: Look for the display cable running from the motherboard toward the screen. It’s usually a flat ribbon cable that’s maybe half an inch wide with a connector at the end.
Step 3: Gently unplug the display cable connector. There’s usually a small latch or clip that you need to lift or slide to release it. Don’t force it. If it feels stuck, look for a tiny lever or tab.
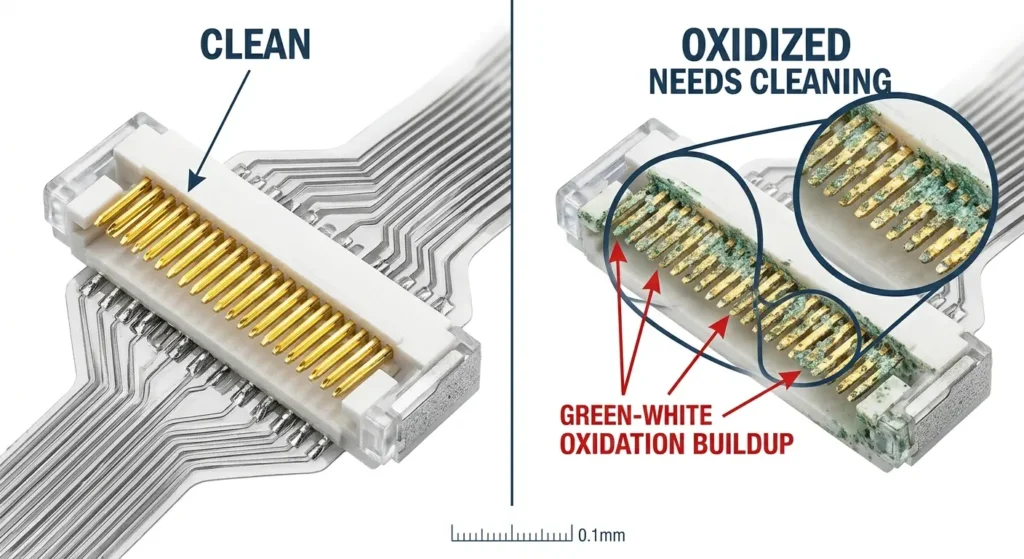
Step 4: Examine the connector pins closely. Do you see any green or white oxidation on the metal pins? That’s corrosion. Even light corrosion breaks the electrical connection.
connection.
Step 5: Take a regular pencil eraser and gently rub the metal pins on the display cable connector. Use light pressure and rub back and forth about twenty times. This removes oxidation without damaging the pins.
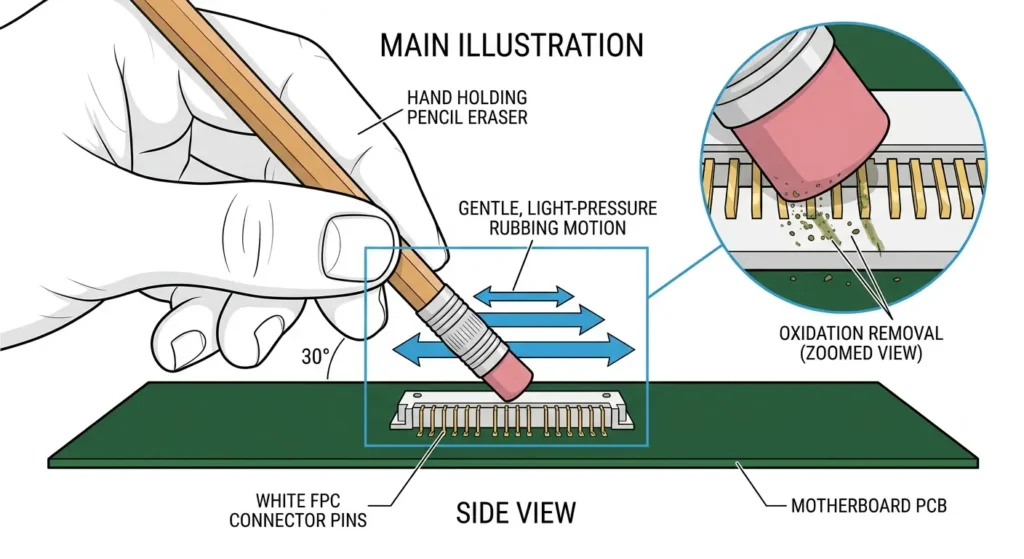
Step 6: Wipe away any eraser residue with a clean dry cloth. Make sure no rubber bits are left on the connector.
Step 7: Firmly plug the cable back into the connector. You should hear or feel a small click when it seats properly. Make sure it’s fully inserted.
Step 8: Put the back panel back on and screw it closed. Replace the battery if you removed it.
Step 9: Power on your laptop and check your screen. Is the green color gone? If yes, congratulations. You just fixed a laptop screen hardware problem without spending a dime.
If the green screen is still there after cleaning and re-seating, the cable itself might be damaged, or the problem could be something else entirely. In that case, a screen replacement might actually be necessary
Also Check: RAM Contacts (Quick 5-Minute Test)
Before you commit to opening up the screen assembly, there’s a quick five-minute test that eliminates RAM as a potential cause. I’ve seen laptops where bad RAM contact was somehow triggering display issues, which sounds weird but I’ve witnessed it happen.
Step 1: Power down your laptop and unplug everything.
Step 2: Remove the back panel as described above.
Step 3: Locate your RAM modules. They’re usually two rectangular sticks of memory sticking up from the motherboard at a slight angle.
Step 4: Gently push down on the clips at each end of the RAM module. The module should pop out at an angle.
Step 5: Look at the gold connector pins on the bottom of the RAM stick. Use a pencil eraser to gently rub those pins clean, just like you did with the display cable.
Step 6: Push the RAM back in firmly until the clips snap shut on both sides.
Step 7: Put the back panel on, power up your laptop, and see if anything changed.
Cleaning RAM contacts probably won’t fix your green screen, but it’s such a quick test that it’s worth doing while you have the laptop open anyway. If your screen looks normal after this, great. If not, you can move forward with the display cable fix knowing you eliminated one possible cause.
Remember: if opening your laptop makes you nervous, that’s completely okay. Laptop screen cable connection work is best left to professionals if you’re not experienced with electronics. Just show your technician this article and they’ll know exactly what to check first before quoting you for an expensive screen replacement
Green Lines, Green Pixels, or Pink and Green Screen? Fix These Specific Issues
Not everyone sees a solid green screen. Some people have bright green lines running across their display, others have tiny green pixels that won’t go away, and some unlucky folks see both pink and green colors flickering together. Each of these specific symptoms points to a different underlying problem, and they each need their own approach.
Let me walk you through how to diagnose and fix these more specific green screen issues. The good news is that many of them respond well to simple fixes. The bad news is that some indicate hardware damage that’s harder to reverse
How to Fix Green Lines on Laptop Screen
If you see one or more bright green lines running horizontally across your screen or vertically down the sides, the first step is the same diagnostic you ran before: the external monitor test.
Connect your laptop to an external monitor via HDMI and look closely. Do those green lines appear on the external monitor too? If yes, the problem is your graphics card or GPU driver, and you need to go back to Section 5 to update or roll back your display driver. The green lines on laptop screen are being generated by your GPU sending bad video signals.
If the external monitor looks perfectly clean with no green lines, then the problem is isolated to your laptop’s physical screen. A vertical green line on laptop screen that only appears on the built in display usually means either a cracked LCD panel or a loose display cable.
The cable is the more hopeful diagnosis because you can fix that with the method in Section 7. A cracked LCD panel means you need a screen replacement.
Press gently on different parts of your screen bezel. If the green line disappears or changes when you apply pressure, that strongly suggests a loose display cable connection inside.
The pressure temporarily reseats the connector. If pressing on the screen makes no difference at all, the LCD panel itself is probably cracked
How to Fix Green Pixels or Stuck Pixels on Screen
Sometimes instead of full lines or color casts, you see individual green pixels or small clusters of green dots that stay stuck on your screen.
These are called stuck or dead pixels, and they’re different from the other problems because they represent physical damage to the LCD panel itself.
A stuck pixel is a pixel that’s locked on one color and won’t change. You might see it in games, videos, or when scrolling through different colored backgrounds. Dead pixels are similar but completely black instead of green.
Try a pixel fixing software first before assuming the worst. Free tools like JScreenFix or UndeadPixel run animated patterns designed to unstick stuck pixels.
You run the software, let it flash colors at the stuck pixel location for ten to fifteen minutes, and sometimes the pixel starts responding again. It doesn’t always work, but it costs nothing and takes just a few minutes to try.
If the pixel is still green after running the fixing software, then you’re dealing with permanent pixel damage in the LCD panel. Unfortunately,
there’s no way to fix dead or stuck pixels once they’re physically damaged. You’ll need a screen replacement, or you can simply accept the single pixel as a minor cosmetic issue if it doesn’t bother you too much
Pink and Green Screen Together What It Usually Means
When you see bands of pink and green colors flickering together across your screen, especially if it’s accompanied by heavy flickering or distorted lines, that’s almost always a sign of serious hardware failure.
This symptom combination usually indicates one of two problems: a severely failing display cable or a GPU that’s overheating or suffering internal damage. I’ve seen this on gaming laptops pushed to their limits, and it’s never good news.
Run the external monitor test immediately. If the pink and green artifacting appears on the external monitor too, your GPU is having problems. If only your laptop screen shows the pink and green colors while the external monitor looks normal, your display cable or screen connector is failing.
If it’s the GPU, your laptop needs professional repair or replacement. A failing graphics chip can’t really be fixed at home. If it’s the display cable, you can attempt the cleaning fix in Section 7, but severe cable damage might also require professional replacement.
Either way, a pink and green screen together is your laptop telling you that something inside is seriously wrong. Don’t ignore it. The longer you use the laptop with this symptom, the more likely permanent damage becomes. Back up your data immediately and plan to take your laptop to a repair technician within the next day or two
Advanced Fixes If Nothing Has Worked Yet
If you’ve tried the quick fixes, updated your drivers, cleaned your display cable, and your screen is still green, it’s time to pull out the heavy artillery. These are the advanced troubleshooting steps that dig deeper into Windows itself to find and fix problems that simpler solutions can’t touch.
I’m going to walk you through four powerful fixes that work on corrupt system files, driver conflicts, and system wide problems. These fixes are organized from least disruptive to most disruptive, so start with the first one and only move to the next if the previous one didn’t work.
Watch this complete visual walkthrough of laptop green screen diagnosis and repair techniques. This video demonstrates both software fixes and hardware troubleshooting steps in real-time, showing you exactly how to identify and resolve your specific green screen problem type.Run an SFC Scan to Repair Corrupt System Files
Windows relies on thousands of system files to run properly, and if the ones responsible for graphics rendering get corrupted, you might get a green screen that won’t go away. An SFC scan automatically finds and repairs these corrupt system files without you having to manually identify them.
Step 1: Click the Windows Start button and type Command Prompt in the search box.
Step 2: Right click on Command Prompt and select Run as administrator. Windows will ask for permission. Click yes to allow the Command Prompt to run with administrator privileges.
Step 3: In the Command Prompt window, type exactly this: sfc /scannow
Step 4: Press Enter. Windows will now scan your entire system for corrupt files. This process can take anywhere from five to thirty minutes depending on how many files Windows needs to check. Don’t interrupt it or shut down your laptop while the scan is running.
Step 5: When the scan finishes, you’ll see a message telling you whether any corrupt files were found. If Windows found issues, it will automatically fix them.
Step 6: Restart your laptop. The repairs won’t take full effect until after you restart.
After your laptop comes back on, check your display. If corrupt system files were causing the green screen, your screen should look normal now. If the green screen persists, move to the next fix.
Boot Into Safe Mode to Diagnose Driver Conflicts
Safe Mode is a special Windows startup mode that loads only essential drivers and skips all third party software and drivers. If your green screen disappears when you boot into Safe Mode, that tells you the problem is a bad third party driver or software conflict, not a fundamental Windows issue.
Step 1: Click the Windows Start button and then click the Power button.
Step 2: Hold down the Shift key on your keyboard and click Restart. Your laptop will restart into a special menu.
Step 3: Click Troubleshoot.
Step 4: Click Advanced options.
Step 5: Click Startup Settings.
Step 6: Click Restart. Your laptop will restart again and show you a list of startup options.
Step 7: Press the number key for Safe Mode (usually 4). Your laptop will boot into Safe Mode with minimal drivers loaded.
Step 8: Look at your screen carefully. Is the green screen gone? Are the colors normal?
If the green screen disappears in Safe Mode, that means a third party driver or program is causing the problem. When you restart normally, Windows will load all those drivers again and the green screen will return. In this case, you need to identify which driver or program is the culprit. Try reinstalling your graphics driver, or uninstall any recent software you added before the green screen started.
If the green screen is still there even in Safe Mode, the problem is deeper in Windows itself and not a third party driver issue.
Use System Restore to Go Back to Before the Green Screen
If you remember approximately when your green screen started appearing, System Restore can roll back your entire Windows installation to a point before the problem began. This undoes any Windows Updates, driver updates, or software installations that happened after the restore point date.
Step 1: Click the Windows Start button and type System Restore in the search box. Click Create a restore point from the results.
Step 2: A window opens showing system properties. Click the System Protection tab.
Step 3: Click System Restore.
Step 4: Click Next to see the list of available restore points.
Step 5: Look for a restore point from before your green screen problem started. Restore points show the date and time they were created, plus a description of what triggered the restore point (usually Windows Updates or software installations).
Step 6: Select a restore point from before the green screen appeared. Click Next.
Step 7: Click Finish to begin the restore process. Windows will restart your laptop and roll back to that earlier date.
Step 8: When your laptop restarts, check if the green screen is gone.
System Restore is powerful but remember that it also undoes everything you installed or changed since that restore point date. You might lose recent files or reinstall older versions of software. That’s why you should only use it if other fixes haven’t worked.
Windows Recovery Environment (When the Laptop Won’t Boot Normally)
If your green screen is so severe that you can’t even get to the Windows login screen or your desktop, you need to boot into the Windows Recovery Environment. This is a special mode where you can run repair tools without loading the normal Windows system.
Step 1: Shut down your laptop completely.
Step 2: Power it back on and immediately hold down the Shift key while clicking Restart from the Windows login screen. If you can’t reach the login screen, hold Shift while restarting from the power button menu.
Step 3: Windows will boot into the Recovery Environment. You’ll see a blue screen with repair options.
Step 4: Click Troubleshoot and then Advanced options.
Step 5: You’ll see several options including Startup Repair and Reset This PC. Try Startup Repair first. This runs automated diagnostics and fixes common Windows problems.
Step 6: If Startup Repair doesn’t work, you can try Reset This PC, which reinstalls Windows while keeping your personal files (if you choose that option). This is more drastic but fixes almost any software related green screen.
The Windows Recovery Environment is your last software based option before considering hardware issues or professional repair. If even the Recovery Environment can’t fix your green screen, the problem is almost certainly hardware related, and you should move on to Section 10 about screen replacement
If your green screen is so severe that you can’t even get to the Windows login screen or your desktop, you need to boot into the Windows Recovery Environment. This is a special mode where you can run repair tools without loading the normal Windows system.
Step 1: Shut down your laptop completely.
Step 2: Power it back on and immediately hold down the Shift key while clicking Restart from the Windows login screen. If you can’t reach the login screen, hold Shift while restarting from the power button menu.
Step 3: Windows will boot into the Recovery Environment. You’ll see a blue screen with repair options.
Step 4: Click Troubleshoot and then Advanced options.
Step 5: You’ll see several options including Startup Repair and Reset This PC. Try Startup Repair first. This runs automated diagnostics and fixes common Windows problems.
Step 6: If Startup Repair doesn’t work, you can try Reset This PC, which reinstalls Windows while keeping your personal files (if you choose that option). This is more drastic but fixes almost any software-related green screen.
The Windows Recovery Environment is your last software-based option before considering hardware issues or professional repair. If even the Recovery Environment can’t fix your green screen, the problem is almost certainly hardware-related, and you should move on to Section 10 about screen replacement
When to Stop Fixing and Replace the Screen (And What to Check Before You Do)
At some point, you might reach a decision: is my laptop screen genuinely broken and beyond repair, or am I giving up too early? I’ve seen people spend hundreds of dollars on screen replacements when the real problem was just a dirty cable connector. I’ve also seen people refuse to replace a truly dead screen and suffer with a broken display for months.
Let me be honest with you about when replacement is actually necessary, and more importantly, how to avoid wasting money on a new screen you didn’t really need.
Signs Your Screen Actually Needs Replacement
Not every green screen means your LCD panel is dead. But some symptoms do point to genuine panel failure that no amount of cleaning or driver updates will fix.
You genuinely need a screen replacement if you have permanent pixel damage that won’t change no matter what you do. Stuck pixels that stay one color, dead pixels that stay black, or physical cracks in the LCD panel are all permanent hardware failures. These damage the physical glass and electronics inside the panel itself, and there’s no software fix for physical damage.
You also need replacement if you’ve tried every fix in this guide, run the external monitor test to confirm it’s not your GPU, cleaned the display cable connector, and the green screen still persists exactly the same way. At that point, the LCD panel itself is probably defective.
One more sign: if pressing gently on different parts of your screen makes no difference to the green color, and you’ve ruled out software causes, the panel is likely the problem rather than a loose cable.
The Critical Test Before Buying a New Screen
Here’s something most people don’t know: replacement screens sometimes arrive defective out of the box. I’ve seen someone buy a brand new replacement panel, install it carefully, and still see a green tint because the replacement screen itself was faulty from the factory.
Before you order an expensive replacement screen, talk to your repair shop about this possibility. If you’re installing it yourself, do this carefully: after installing the new screen and seeing it still has the green issue, reconnect your original old screen temporarily. Does the old screen look normal again?
If yes, the original screen was actually fine and the new replacement is defective. Contact the seller and request a refund or exchange. If the old screen also shows green when you reconnect it, then the problem is your display cable or motherboard, not the screen at all.
This diagnostic step saves you from buying a second replacement screen when the real problem was elsewhere.
Screens in Storage Can Develop Issues
Here’s an insider fact that surprised me the first time I heard it: screens that have been sitting in storage without use for years can sometimes exhibit display issues when first installed. This is especially true for replacement screens from older laptop models.
If your replacement screen came from a warehouse that’s been stored for a long time, give it a few days of use before assuming it’s defective. Sometimes a screen needs to be powered up and used for a while before it settles in properly. However, if the problem persists after a week of normal use, it’s probably actually defective.
What Screen Replacement Actually Costs
Laptop screen replacement typically ranges from eighty to three hundred dollars depending on your laptop model and screen quality. Budget laptops are cheaper to replace. High resolution or gaming laptop screens cost more.
If a repair technician quotes you more than three hundred dollars for just the screen replacement itself, get a second opinion. That price seems high for most standard panels.
One Final Piece of Advice
Before you commit to a screen replacement, show your repair technician this article. Specifically, show them Section 7 about the display cable cleaning method. I’ve seen repair shops skip this step and jump straight to screen replacement as their default solution because replacement is more profitable for them.
A good technician will check the display cable first, clean it thoroughly, and only recommend screen replacement if that doesn’t work. If a technician dismisses the cable cleaning method without even trying it, consider finding a different shop.
You’ve done a lot of troubleshooting by this point. You’ve tested for hardware versus software problems, updated drivers, tried quick fixes, cleaned hardware, and run advanced Windows repairs. If you’ve exhausted all these options and your laptop screen hardware problem persists exactly the same way, screen replacement is probably your answer.
But make absolutely sure before you spend that money. Carefully diagnose whether it is the cable or the panel before making a commitment to replacement. That one question could save you hundreds of dollars.
Frequently Asked Questions
Why did my laptop screen suddenly turn green for no reason?
A sudden green screen is usually a GPU driver glitch or a loose display cable connector. Try pressing Windows + Ctrl + Shift + B to reset your graphics driver first. If that doesn’t work, run the external monitor test from Section 2 to determine if it’s a software or hardware problem.
Can I fix a laptop green screen without opening the laptop?
Yes, most green screens can be fixed with software only: driver resets, driver updates, color profile resets, and SFC scans all work without disassembly. If you need the hardware cable fix but aren’t comfortable opening your laptop, take it to a technician and show them Section 7.
My laptop screen is green after I replaced it why?
The replacement screen itself might be defective out of the box. Reconnect your original old screen temporarily and see if it looks normal. If yes, the new screen is faulty. If the old screen is also green, the problem is your display cable or motherboard.
What does it mean when a laptop screen shows both pink and green?
Pink and green together indicates serious hardware failure, either a damaged display cable or failing GPU. Run the external monitor test immediately to determine which one. Back up your files and take your laptop to a repair technician within a day or two.
Will updating drivers fix a green screen?
Only if the external monitor test shows the green appears on external monitors too. If yes, a driver update usually fixes it. If the external monitor looks perfect and only your laptop screen is green, it’s a hardware issue and drivers won’t help

