
Hardware or Software? The 2-Step Test That Tells You Instantly
When you see black lines on laptop screen Lenovo the first question that probably runs through your head is simple: “Is this fixable, or is my screen dead?” The answer depends entirely on whether you’re dealing with a hardware problem or a software problem and the good news is, you can figure this out in about two minutes using two simple tests I’m going to walk you through.
I’ve found that most people jump straight to panic mode and assume the screen is broken. But honestly? About half the time, it’s actually a driver issue or a software glitch that you can fix yourself without spending a dime. The other half is genuinely a hardware fault. The only way to know which camp you’re in is to run these two tests.
Step 1 The Task Manager Flicker Test
Here’s the first thing I do when someone tells me they have black lines or flickering on their Lenovo laptop screen: I ask them to open Task Manager and watch what happens.
This is a legitimate diagnostic test that actually reveals whether your display driver corruption or your GPU is at fault. It’s simple but surprisingly accurate. Here’s how to do it
Press Ctrl + Alt + Delete on your keyboard. This opens a security menu. Click Task Manager from the options that appear.
Task Manager should now be open on your screen. Now here’s the important part—keep your eyes on those black lines while Task Manager is running.
If the black lines or flickering completely stop while Task Manager is open, you’re looking at a software issue. This means a program or driver is conflicting with your display, not that your screen hardware is damaged. This is the best case scenario because you can fix it at home, usually just by updating your graphics card driver or reinstalling it.
If the lines keep going, don’t change appearance and stay visible even with Task Manager is open, then you’re likely dealing with a hardware problem or a deeper GPU issue. The lines are being sent directly from your display driver or graphics card, which means software fixes alone probably won’t solve this
Why does this work? When Task Manager opens, it temporarily reduces the demand on your graphics driver. If the lines vanish, it tells you the driver is struggling under normal load. If they stay, it tells you the driver is sending a faulty signal regardless of what’s running.
Close Task Manager when you’re done watching. Note what you sawwe’re going to use this information in the next test.
Step 2 The External Monitor Test
This is the external monitor test that gives you the clearest answer. If you have access to an HDMI cable and an external monitor or TV, this diagnostic will tell you exactly what’s broken.
Connect an HDMI cable from your Lenovo to an external monitor, TV, or projector. Make sure the external display is set as the primary display in your Windows settings (you can do this quickly by pressing Windows + P and selecting “Extend” or “Second screen only”).
Now look at that external monitor. Pay close attention to the black lines.
If the black lines completely disappear on the external monitor and the display looks clean and normal, your Lenovo’s LCD panel is the problem either the panel itself is cracked or failing, or the LVDS cable connecting it to the motherboard is loose. The external monitor is using a different cable and a different connection path, so if it works fine, you know the issue is internal to your Lenovo’s built-in screen hardware.
If the black lines appear on the external monitor too, then the problem is your GPU or display driver. The graphics card is sending a faulty signal to both displays, which means your screen panel is receiving good hardware but bad signal data. This usually points to driver corruption rather than GPU failure.
This test is powerful because it isolates exactly where the fault is occurring. You’re essentially asking: “Is the problem in the device that’s displaying the image, or is the problem in the computer sending the image?”
I’ve used this test dozens of times, and it rarely misleads. If your external display works perfectly, your Lenovo screen panel is your culprit. If the lines show up on both, your GPU or driver is to blame.
What Your Results Mean (Quick Reference)
I know you might be jumping between sections, so let me give you a quick results guide. Find your scenario below and it’ll tell you what to do next.
Lines stopped in Task Manager test, disappeared on external monitor:
Your Lenovo screen panel is damaged or the display cable is loose. → Skip to Section 5 (Loose Cable Test) or Section 7 (Repair/Replace).
Lines stopped in Task Manager test, still appear on external monitor:
Your GPU or display driver is corrupted and needs updating. → Go to Section 4, Fix 3 (Update Display Driver or reinstall graphics card driver).
Lines continued in Task Manager test, disappeared on external monitor:
Your screen panel is damaged. → Skip to Section 6 (Hardware Confirmation) and Section 7 (Repair Options).
Lines continued in Task Manager test, still appear on external monitor:
Your GPU or display driver has severe display driver corruption. → Go to Section 4 and try all software fixes in order, starting with the graphics card driver update
If you don’t have access to an external monitor, don’t worry. The Task Manager test alone will give you a strong indication of whether this is software or hardware. Just keep in mind that it’s not 100% foolproof, but it’s accurate enough to point you in the right direction.
The reason I love these two tests is that they remove guesswork from the diagnosis. You’re not trusting a repair shop’s guess or making expensive decisions based on assumptions. You’re running actual tests on your hardware and observing real results. That’s the foundation of knowing exactly what you’re dealing with.
What Actually Causes Black Lines on a Lenovo Laptop Screen
Before you can fix black lines on your Lenovo laptop screen, you need to understand what’s actually causing them. I’ve learned that the root cause makes all the difference between a quick software fix and a trip to the repair shop. The good news is that black lines usually come from one of a few specific sources, and once you identify which one is causing yours, you’ll know exactly what to do about it.
Most people assume any line on their screen means the hardware is permanently damaged. But that’s not always true. Sometimes it’s a loose cable that you can actually address. Other times it’s a software issue that clears up in minutes. Let me walk you through each cause so you can understand what’s happening inside your device.
Vertical Black Lines vs Horizontal Black Lines What Each One Means
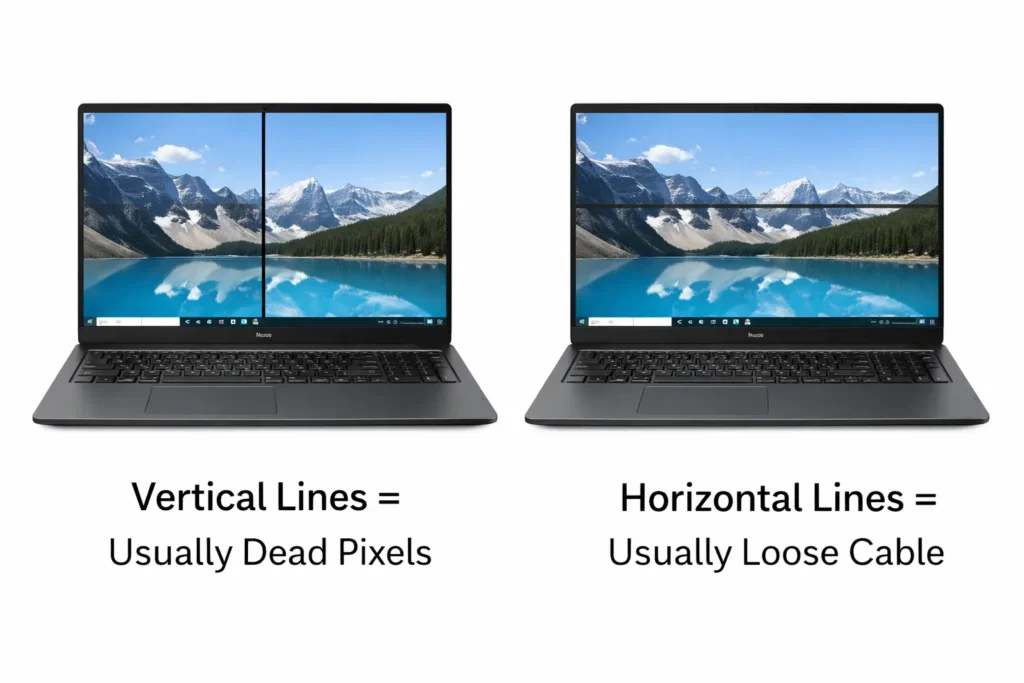
Here’s something I’ve noticed that most people overlook: the direction of the black line tells you a lot about what went wrong.
Vertical black lines on a Lenovo screen usually point to dead pixels within the LCD panel itself or a problem with how the panel receives power.
When pixels in a vertical column short out or fail, they create screen artifacts those telltale lines running up and down your display. These lines typically stay in the exact same spot and don’t change when you move your laptop around.
Horizontal black lines on a Lenovo screen, on the other hand, are more often caused by a loose or damaged display cable. I learned this from repair technicians who work on Lenovo ThinkPad models regularly.
When the LVDS cable connecting your screen to the motherboard works loose, it interrupts the signal that tells certain pixels to light up and you get horizontal lines or bands across the display.
These lines sometimes change appearance when you adjust the screen angle, which is a big clue that it’s a cable issue rather than a panel problem
That said, this isn’t a hard and fast rule. A failing LCD panel can create horizontal lines, and a severely damaged cable can cause vertical artifacts. But in most cases, the direction gives you a strong hint about which component in your Lenovo laptop display system is actually failing.
If you’re seeing vertical lines, think LCD panel. If you’re seeing horizontal lines, think display cable first.
The technical term for these visual problems is “screen artifacts,” and they’re your Lenovo’s way of signaling that something in the display chain isn’t working properly.
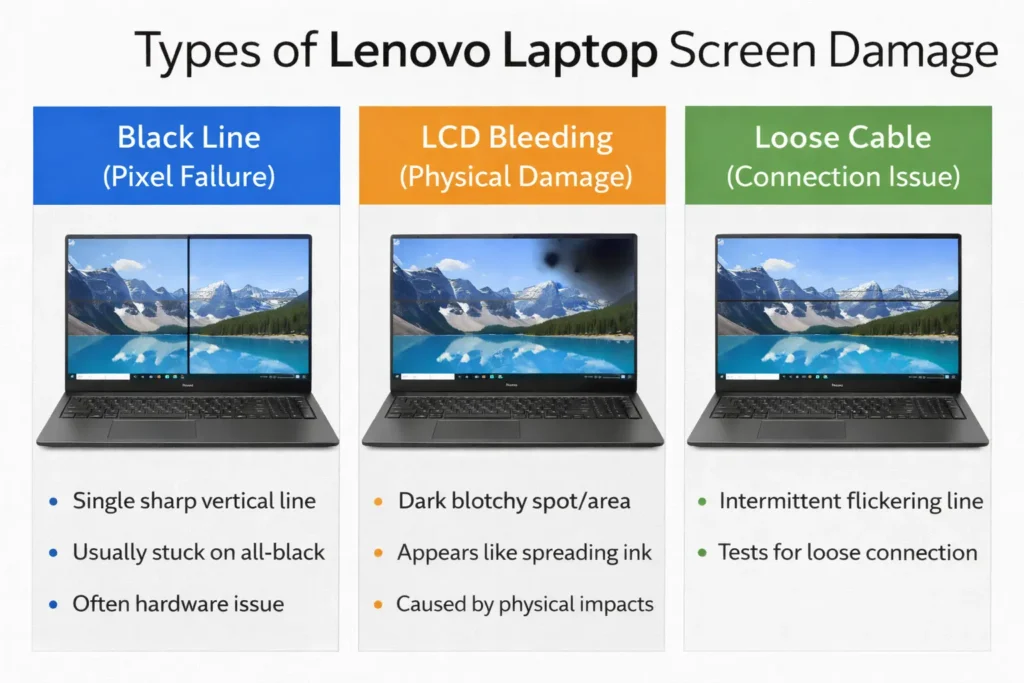
Loose or Damaged Display Cable (LVDS Cable)
Inside your Lenovo laptop, there’s a thin ribbon cable called an LVDS cable that connects your screen to the motherboard. This cable is responsible for sending every signal that tells your display what to show you. When this LVDS cable works loose or gets damaged, your screen receives scrambled or incomplete signals, resulting in display cable damage symptoms like black lines
I’ve seen this happen most often on laptops that get opened and closed frequently, or on devices that have been dropped or handled roughly. The constant movement of the screen hinge can gradually loosen the cable connectors on either end. Sometimes the cable itself develops a tiny crack or tear from bending, which interrupts the signal flow.
What makes a loose display cable tricky is that it’s sometimes intermittent. Your screen might look fine one moment and show lines the next, depending on the angle of your screen or how much pressure is on the laptop. This is actually useful information because it tells you the hardware itself might be salvageable with a simple reseating or replacement of the cable.
A repair technician working on Lenovo ThinkPad models specifically named a faulty display cable as one of the two most common hardware causes of black lines on the screen. The other cause? A defective LCD panel. Understanding which one you’re dealing with is half the battle.
Damaged or Failing LCD Panel
The LCD panel is the actual screen you’re looking at, and it contains millions of tiny pixels that light up to create the image. When individual pixels fail or short out, you get permanent black lines or dead pixels that you can’t get rid of what we call a cracked or damaged LCD panel.
Inside the LCD panel are columns and rows of pixels, and they communicate with the display driver through specific electrical pathways. When a pixel or an entire column of pixels shorts out, the connection breaks, and that section of the screen goes dark. This is what creates those static black lines that never change no matter what you do.
I’ve worked with people who have Lenovo IdeaPad, ThinkPad, and Legion models that all developed dead pixels or pixel lines in the LCD panel. This type of damage is usually permanent and requires professional screen replacement. You can’t fix it with software updates or driver reinstalls because the physical hardware itself is damaged.
One way to confirm this is with the external monitor test I mentioned earlier. If you connect your Lenovo to an external monitor and the lines disappear completely, you know your LCD panel is the culprit. The motherboard and graphics card are working fine, but your built-in screen has developed a fault.
GPU or Graphics Driver Problem
Your graphics processing unit, or GPU, is responsible for creating the images your screen displays. When the GPU starts to fail or when your display driver becomes corrupted, it can send incorrect signals to your screen that create the appearance of black lines or flickering what we call GPU failure laptop screen lines
The key difference between a GPU problem and a panel problem is that GPU issues usually respond to software fixes. When your display driver becomes corrupted, a graphics card driver update or full reinstall often clears up the lines completely.
The graphics card is trying to do its job, but display driver corruption in the software layer is preventing it from communicating correctly with your display
I’ve also found that black lines sometimes appear after a Windows update, which is a clear sign that your display driver and Windows have a compatibility issue.
The update installed a driver version that doesn’t work well with your Lenovo’s specific hardware, so the screen receives garbled signals until you update or uninstall that problematic driver.
GPU failure laptop screen lines happen because the graphics processor itself is aging or overheating. This is far less common than display driver corruption,
but when it does happen, you’ll usually notice the black lines appear when your laptop is under heavy load or has been running for a while. The GPU gets too hot and starts sending bad data signals to the display, creating those visual artifacts
Physical Damage and LCD Bleeding Not the Same as a Black Line
Here’s something important that I don’t see many articles mention: not all dark marks on your screen are actually black lines. LCD bleeding is completely different from a black line and repair shops sometimes try to convince people they need a full screen replacement when they actually don’t.
LCD bleeding happens when the liquid crystal inside your screen gets damaged from physical pressure. This creates dark spots or areas that look like ink has leaked inside the panel. If you’re seeing white spots instead of black lines, check out my complete guide on white spots on Lenovo laptop screens which covers similar damage types and warranty options.
The most common cause of LCD bleeding and physical screen damage laptop issues in general—is carrying your laptop in a bag without proper protection. When something presses against the closed screen, or when you place heavy objects on top of a closed laptop,
the force pushes the liquid crystal around inside the panel. This creates small black or dark spots that can grow over time as the liquid continues to move and spread.
The reason this matters is that LCD bleeding and black lines are caused by completely different problems and need different approaches. A black line is usually a pixel failure or electrical signal problem.
A spot from LCD bleeding is physical damage to the liquid inside the panel. You can’t fix either with software, but understanding the difference helps you have realistic expectations about repair costs and whether your screen can be salvaged.
I’ve talked to people who thought they had permanent black lines when they actually had early stages of LCD bleeding.
The distinction helped them understand whether to pursue repair or replacement and whether prevention would help future devices.
Software Causes Windows Updates and Driver Corruption
Not every black line is a hardware problem. Sometimes black lines after windows update appear, or the culprit is a corrupted display driver file sitting in your system
I’ve seen black lines appear immediately after someone installs a Windows update, and this is a genuine cause that deserves serious consideration before you assume your hardware is broken. What happens is that the update includes a new display driver package that doesn’t play nicely with your Lenovo’s specific screen hardware. The driver tries to communicate with your display, but there’s a mismatch in how it sends signals, so your screen receives incomplete or scrambled information.
This type of problem is actually great news because it’s fixable without touching any hardware. You can uninstall the problematic Windows update, roll back your display driver to the previous version, or update to an even newer driver that fixes the compatibility issue. Within minutes, your screen can be back to normal.
Display driver corruption happens in other ways too. Sometimes a driver file gets damaged or corrupted during the installation process. Sometimes a third-party application interferes with the driver and causes it to malfunction. Sometimes your GPU simply overheats temporarily and triggers error signals that look like lines on your screen.
The difference between a software cause and a hardware cause is that software problems usually respond quickly to fixes. If you restart your laptop, run a driver update, or uninstall a recent Windows update and the lines disappear, you know you were dealing with software all along. Hardware problems persist regardless of what software changes you make.
How to Fix Black Lines on Your Lenovo Laptop Screen (8 Fixes, Easiest First)
Now that you understand what’s causing your black lines, let’s fix them. I’ve arranged these eight fixes from quickest to most involved, so you can start with the simplest solutions and work your way up if needed. Most people find success with the first three fixes, but if those don’t work, the later ones target deeper software and hardware issues.
The key is to try them in order. Each fix builds on the diagnostic information from Section 2, so if you already know whether your problem is hardware or software, you can jump ahead to the relevant fixes. But if you’re unsure, start here and work through them systematically.
Fix 1 — Restart Your Lenovo and Check the Screen Angle
This sounds almost too simple, but I’ve seen temporary driver glitches clear up completely after a fresh restart. When your laptop boots up again, your graphics card resets, your display driver reloads, and often whatever was causing the lines goes away.
Here’s what to do: Save any open work, then shut down your Lenovo completely. Wait 30 seconds, then power it back on. While your laptop is booting up, watch the screen carefully. Do the black lines appear right away on the boot screen, or do they only show up after Windows loads?
Also, once your laptop is fully powered on, try tilting your screen to different angles. Slowly move the display back and forth. If the lines change appearance, disappear at certain angles, or become more pronounced when you angle the screen differently, you’re probably dealing with a loose display cable rather than a damaged LCD panel. This is important diagnostic information that tells you whether a professional repair might be able to reseat the cable instead of replacing the whole screen.
A simple restart fixes issues caused by temporary driver crashes or minor software glitches. If your lines disappeared after the restart, you’re done. If they’re still there, move on to Fix 2.
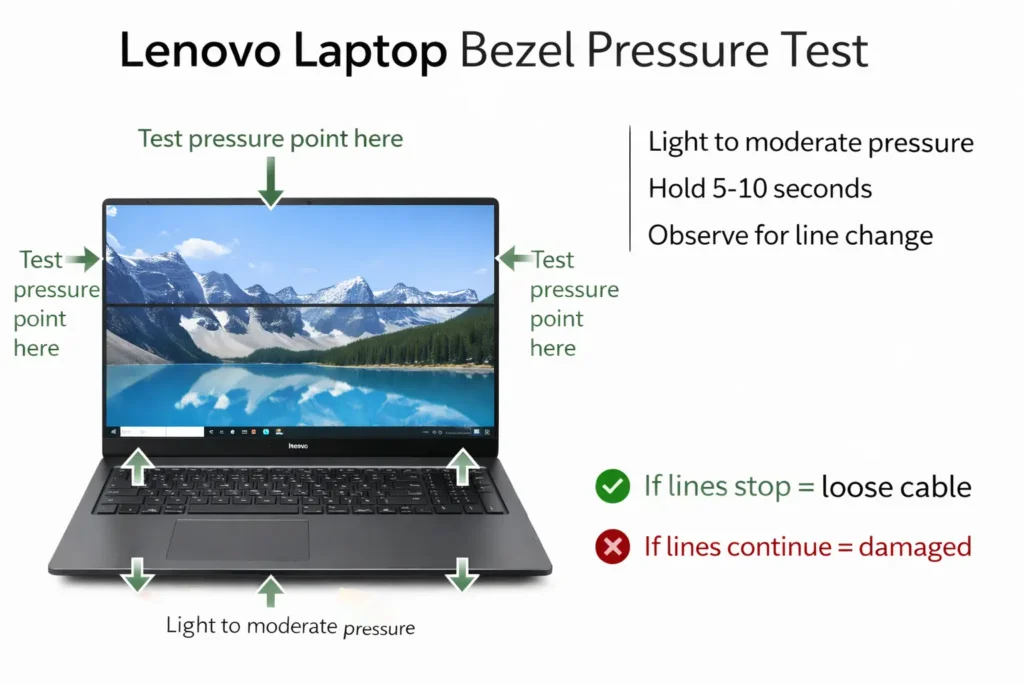
Fix 2 Try the Bezel Pressure Test (Here’s What It Reveals)
This test is one I learned from watching repair technicians diagnose laptop screens, and it’s surprisingly useful for figuring out what’s actually wrong.
Gently press on different parts of your screen frame with your thumb or finger. Start at the bottom of the bezel, then try the sides and top. Press with light to moderate pressure, not hard enough to risk cracking the screen further. Now watch the black lines carefully.
What you’re looking for is whether the lines change, disappear, or shift when you apply pressure. If pressing on the screen frame makes the lines temporarily vanish or change appearance, this is strong evidence that your display cable has come slightly loose from its connection. When you press on the frame, you’re reseating the cable temporarily, which restores the signal long enough for the pixels to light up normally.
This is actually good news. It means your LCD panel might be fine and only the cable connection needs attention. If the lines don’t respond at all to pressure and stay exactly the same no matter where you press, you’re probably dealing with a damaged LCD panel rather than a loose cable.
This test doesn’t fix anything permanently, but it tells you valuable information about what repair option to pursue. A loose cable reseating costs less than a full screen replacement and is worth discussing with a repair technician.
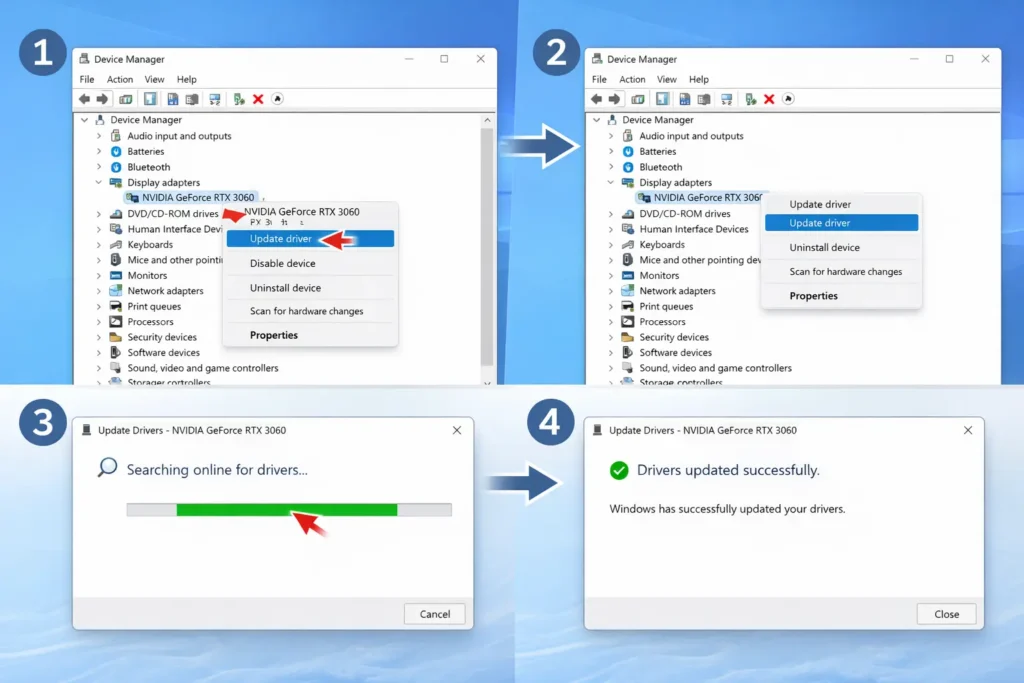
Fix 3 Update or Reinstall Your Display Driver
Your display driver is the software that tells your graphics card how to communicate with your screen. When this driver becomes corrupted or outdated, your screen
receives scrambled signals and displays lines or unusual colors. Updating or reinstalling the driver often clears up the problem completely.
This is actually the most common fix for display issues, whether you’re experiencing black lines blue tint on your monitor or flickering. All of these problems often trace back to display driver corruption.
Here’s how to do it: Right click on your desktop and look for an option that says Display settings or Graphics settings
You’ll see your graphics card listed there, like NVIDIA GeForce or AMD Radeon, depending on what hardware your Lenovo has. Right-click on your graphics card and select “Update driver” to begin the graphics driver update process.
Windows will search for the latest driver version automatically. If an update is found, install it and restart your laptop.
If updating doesn’t fix the lines, try uninstalling the driver entirely. Right-click the graphics card again and select “Uninstall device.”
When you restart your laptop, Windows will automatically reinstall a generic version of the driver, which sometimes resolves compatibility issues that were causing the lines.
This graphics driver update process frequently resolves black screen line issues on Lenovo laptops. I’ve seen this single fix eliminate black lines in cases where the driver had become corrupted after a Windows update or a failed installation attempt
Fix 4 — Adjust Screen Resolution and Check Display Settings
Sometimes what looks like a black line is actually a display artifact caused by a screen resolution mismatch or incorrect scaling settings.
Open Windows Display Settings and check lenovo display settings by right-clicking your desktop and selecting “Display settings,” or search for it in the Start menu. Look for a section that says “Display resolution.”
Check what resolution is currently selected and compare it to what it says is recommended. If there’s a mismatch, click the dropdown and select the recommended resolution instead.
While you’re in Display Settings, scroll down and look for “Scale and layout.” Make sure scaling is set to 100 percent. Some people adjust this to make text larger,
but incorrect scaling can sometimes create line-like visual artifacts on the display.
Also check your color profile and lenovo display settings. Some Lenovo models have specific color management settings that can cause display issues if they become corrupted.
If you’ve recently installed new software or received a Windows update, resetting these display settings back to their defaults sometimes helps
A screen resolution mismatch won’t usually create actual black lines, but it can make existing lines more noticeable or create similar-looking visual problems. Correcting your resolution and scaling settings is worth trying before moving to more advanced fixes.
Fix 5 — Set Your Refresh Rate to 60Hz
Your monitor’s refresh rate is how many times per second your screen refreshes the image. When the refresh rate is set incorrectly, your display can produce scanning artifacts that look like horizontal lines running across the screen.
To access your refresh rate settings, right-click your desktop and select “Display settings.” Scroll to the bottom and look for “Advanced display settings.” Click it. In the next window, look for “Refresh rate” and click the dropdown menu. Select 60Hz.
If you have an older Lenovo laptop, 60Hz is usually the sweet spot. Some newer models support higher refresh rates like 75Hz or 120Hz, but if you’re experiencing lines after a Windows update, dropping back to 60Hz often resolves driver conflicts.
This fix is especially relevant if black lines after windows update issues started happening right after you installed an update. The update may have reset your refresh rate to an unsupported value, causing your display to malfunction.
Restart your laptop after changing the refresh rate and watch to see if the lines disappear. If they do, you’ve found your culprit.
Fix 6 — Run a Hardware Scan with Lenovo Vantage
Lenovo Vantage is a built-in utility on most Lenovo laptops that performs hardware diagnostics and can tell you whether your screen hardware is actually faulty or whether the problem is software-related.
Search for “Lenovo Vantage” in your Windows Start menu and open it. Once it’s running, look for a section labeled “Hardware Scan” or “Diagnostics.” Click it and let the scan run completely. This test will check your display hardware and let you know if the system detects any physical faults.
If the hardware scan reports no issues with your display, you can be confident the problem is software-based, which means one of the earlier fixes should work. If Lenovo Vantage reports a hardware fault with your display, you have confirmation that a professional repair or screen replacement is necessary.
This is particularly useful for ThinkPad users, whose laptops have more robust built-in diagnostic tools. The hardware scan takes about five to ten minutes and gives you an official report you can show to a repair technician.
Fix 7 — Boot Into Safe Mode to Confirm Software Cause
Safe Mode is a special Windows startup mode where only essential drivers and programs load. If your black lines disappear in Safe Mode, you know the cause is software interference, not a hardware fault.
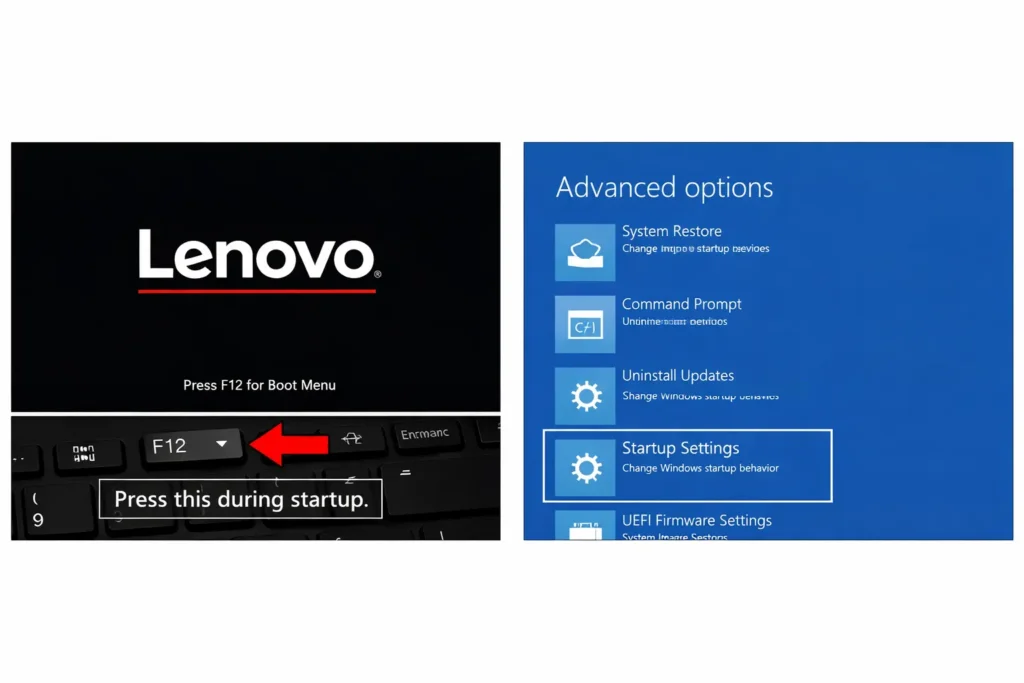
To enter Safe Mode on a modern Lenovo, shut down your laptop completely. Turn it back on, but immediately start pressing the F2 or F12 key repeatedly before the Lenovo logo appears. This should open the boot menu. Look for an option that says “Automatic Repair” or “Troubleshoot.” Click it, then select “Advanced Options,” then “Startup Settings.” Click “Restart,” and when your laptop reboots, press 4 on your keyboard to select Safe Mode.
Once in Safe Mode, look at your screen carefully. Are the black lines gone? If they disappeared, a software conflict or incompatible driver is causing your problem. This means one of the earlier fixes will likely work.
If the lines are still there in Safe Mode, you’re probably dealing with a hardware fault that requires professional repair. Display driver corruption often shows up in normal Windows but goes away in Safe Mode because Safe Mode uses generic drivers instead of your system’s installed ones.
Fix 8 — Uninstall the Problematic Windows Update
If you remember that black lines after windows update appeared right after you installed a specific Windows update, rolling back that update often fixes the problem completely.
Open Windows Settings, go to “System,” then “About,” and look for “Windows Update.” Click “Update history” to see a list of recently installed updates. Note the date the lines started appearing. Look for updates installed around that same date.
Click “Uninstall updates” to see options for removing recent updates. I recommend starting with the most recent quality update first, not the feature updates. Quality updates are smaller and more likely to contain driver compatibility issues. Uninstall it and restart your laptop.
If the lines still appear, go back and uninstall the feature update from around the same timeframe. Some Lenovo display driver packages in Windows updates conflict with specific laptop hardware, and removing the problematic update resolves the issue immediately.
This fix requires a restart for each attempt, so it takes a bit of patience. But if lines appeared after a Windows update, this is often the quickest path to a solution.
If Pressing the Screen Frame Fixes It Temporarily Read This
If you discovered that pressing on your Lenovo laptop’s screen frame makes the black lines disappear, even just temporarily, I have good news for you. This is actually one of the most encouraging signs you can get because it tells you your LCD panel is probably fine. What you’re dealing with is a loose display cable, which is a much simpler and cheaper problem to fix than a damaged screen panel.
Let me explain why this happens and what it means for your repair options.
What a Temporary Bezel Fix Actually Tells You About Your Screen
When you press on the screen frame and the lines vanish momentarily, you’re physically reseating a connection that has come loose inside your laptop. Inside the bezel, the LVDS cable connects your screen panel to the motherboard through a connector. When that connector gets slightly loose, the signal path becomes intermittent. Pressure on the frame temporarily pushes the connector back into place, restoring the signal.
Here’s the key insight: if the LCD panel itself was physically damaged or had shorted pixels, pressing on the frame wouldn’t make any difference. The lines would stay there because the problem is within the panel’s internal structure, not in how it’s connected. The fact that pressure makes the lines disappear or change tells you the panel’s pixels are working fine. Only the connection between the cable and the panel is faulty.
This distinction matters enormously because it changes your repair options. A loose display cable can sometimes be fixed by having a technician reseat it or replace just the cable itself, which costs significantly less than replacing the entire screen. A damaged LCD panel almost always requires full screen replacement, which is much more expensive.
I’ve seen people panic after seeing black lines on their Lenovo screen, only to discover through this simple pressure test that the underlying hardware is intact. It’s a relief when you realize your situation is more manageable than you thought.
The intermittent nature of a loose connection is also why you might have noticed the lines appearing and disappearing at different screen angles. When you tilt the screen one way, the cable might make contact. When you tilt it another way, the connection breaks again. This angle-dependent behavior is a classic sign of a loose internal connection rather than a hardware failure.
The Shim Method A Temporary Fix for Loose Connections
If you need your Lenovo to work while you arrange a professional repair, there’s a temporary technique that repair technicians sometimes use to stabilize a loose display cable connection. I want to be clear upfront: this is not a permanent fix, but it can keep your screen functional until you can get professional help.
The shim method involves wedging a thin piece of material into the bezel to maintain the pressure that makes your lines disappear. A repair technician would use a small plastic shim or spacer designed for this purpose, but in an emergency, a thin piece of cardboard, folded paper, or even a thin plastic card can work temporarily.
Here’s how it’s done: First, identify which part of the bezel seems to produce the best result when you press on it. This is usually where the connection has loosened. Gently open your laptop’s display as far as it will go without forcing it. Insert your thin shim material into the bezel at the spot where pressing helped earlier. You’re trying to maintain constant light pressure against the internal connection point.
Start with very thin material. A single sheet of folded paper or cardboard works for a start. Close your laptop carefully and see if the lines have improved. If you need more pressure, you can add another thin layer.
The goal is to apply just enough pressure to restore the connection without pressing so hard that you risk cracking the screen further.
Watch your screen for 10 to 15 minutes after placing the shim. If the lines disappear and stay gone, the technique is working. If they reappear or worsen, remove the shim and try inserting it at a different location along the bezel.
I need to emphasize that this is a temporary workaround, not a solution. The underlying problem is that your display cable has come loose from its connector, and only a professional can properly reseat or replace that cable.
Using a shim for a few days or weeks while you arrange repair is reasonable. Using one indefinitely risks further damage to the cable or connector.
If you’re in a situation where professional repair isn’t immediately available and you need your Lenovo functioning, the shim method can bridge that gap. But make it your priority to get the loose display cable professionally addressed as soon as possible. A technician can properly disconnect, inspect and reseat the cable or replace it entirely if it’s damaged.
The fact that pressure restores your display is actually valuable information to give to your repair technician.
Tell them about the temporary fix that works, and it confirms their diagnosis that you have a loose cable connection rather than a panel failure. This can help them provide you with an accurate estimate and appropriate repair solution.
When Software Fixes Won’t Work This Is a Hardware Problem
If you’ve worked through the software fixes in Section 4 and your black lines are still there, you’re probably dealing with a hardware fault. At this point, it’s important to accept that your Lenovo needs professional repair rather than spending more time on troubleshooting. Understanding the signs that confirm hardware damage helps you make the right decision and move forward with confidence.
Let me walk you through the key indicators that tell you your screen hardware has actually failed.
Signs Your Lenovo Has a Hardware Problem
The first sign is whether your black lines change or stay completely static. I’ve learned from watching repair technicians diagnose screens that truly hardware-damaged displays show consistent, unchanging lines.
If you see the exact same line in the exact same location every single time you boot your laptop, and it never varies regardless of what you do, that’s a strong indicator of dead pixels or a cracked LCD panel in your Lenovo screen.
Here’s the critical test: look at your lines when your Lenovo is at the Windows login screen, before any programs load. If the black lines are already visible on the boot screen or the Windows login background, this confirms the problem is in your hardware, not in Windows or any installed software. Software issues typically appear only after Windows finishes loading. Hardware problems show up from the very first moment your screen activates.
A technician working on a Lenovo with persistent horizontal lines and flickering confirmed that the LCD panel itself had failed and required full screen replacement. When the panel is damaged internally, the lines appear immediately and never go away no matter what software you install or uninstall.
Also pay attention to whether your lines persist through power cycles. Turn your Lenovo completely off, wait 30 seconds, and turn it back on. If the black lines reappear in exactly the same spot during the boot screen, you’re looking at a hardware failure. Software issues often clear up or change after a restart. Lines that come back in the identical location after every restart are telling you that the hardware itself is broken.
If you’ve already tried the bezel pressure test from Section 5 and pressing on the screen frame made no difference whatsoever, this is another strong sign of a damaged LCD panel rather than a loose cable. A loose display cable usually responds to physical pressure. An internally damaged panel does not.
What This Means for Your Next Steps
Once you’ve confirmed you have a hardware problem, you know that professional repair is your only option. At this point, move to Section 7 where I’ll walk you through your options for getting your Lenovo screen fixed, what to expect in terms of costs, and how to check whether your device is still covered by warranty.
A cracked LCD panel on your Lenovo means the pixels inside the panel have shorted out or the panel’s internal structure has been damaged. This type of damage is permanent and cannot be fixed with software. Dead pixels and pixel lines require professional screen replacement to restore your display to working condition.
Understanding that you need hardware repair rather than software fixes actually simplifies your situation. You’re not going to waste more time on driver updates or Windows troubleshooting. You can focus your energy on finding a qualified repair technician and understanding your warranty coverage and repair costs.
The confirmation that you have a genuine hardware failure is actually valuable information. It tells you your Lenovo IdeaPad, ThinkPad, or Legion model has a physical component that needs professional attention, and there’s nothing wrong with the software or your operating system. This clarity helps you move forward with the appropriate solution.
Repair, Replace, or Claim Warranty Your 3 Options Explained
Once you’ve confirmed that black lines on your Lenovo laptop screen are caused by hardware damage, you face a decision: get it repaired professionally, replace the screen yourself, or check whether your warranty covers the damage.
Each option has different costs and levels of difficulty, and I want to help you choose the right path based on your situation and budget
Let me walk you through each option so you can make an informed decision.
How to Check If Your Lenovo Is Still Under Warranty
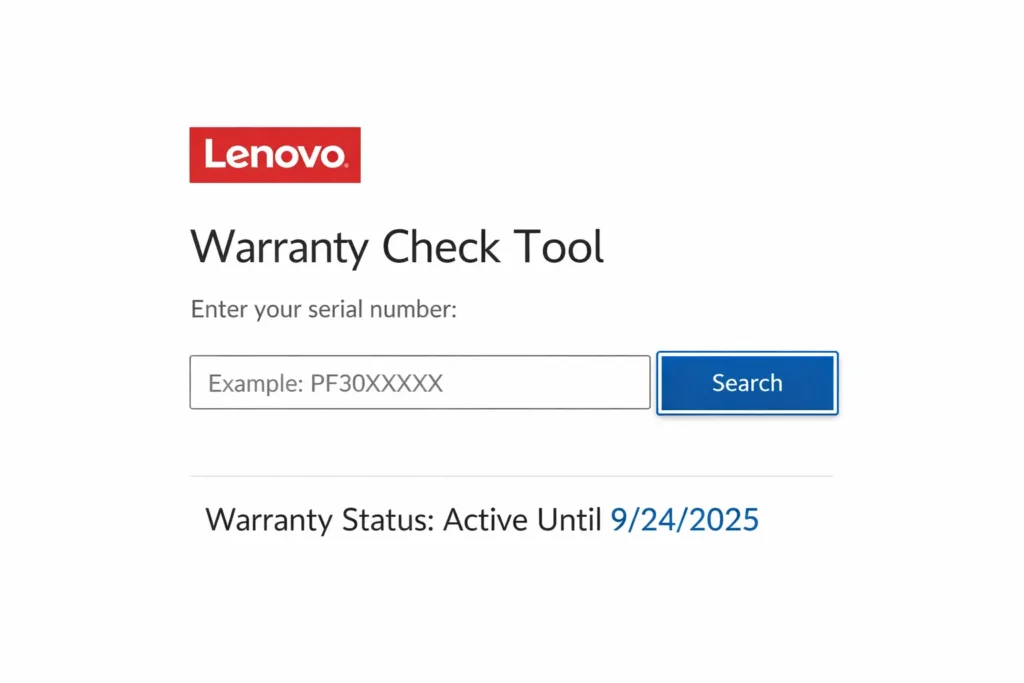
Before you spend money on repairs, check whether your Lenovo warranty covers screen damage. Many people don’t realize their laptop is still under warranty, and getting the repair done for free or at a reduced cost can save you hundreds of dollars.
Here’s how to check your Lenovo warranty status. First, find your laptop’s serial number. Flip your Lenovo over and look for a white or silver sticker on the bottom.
The serial number is usually labeled clearly. If the sticker has worn off, you can also find your serial number by opening Windows Settings, clicking “System,” then “About,” and looking for the device specifications section.
Once you have your serial number, visit Lenovo’s official support website and look for the warranty lookup or warranty check tool. Enter your serial number in the search box.
The system will show you whether your laptop is still covered, what type of warranty you have, and when the coverage expires.
Here’s what you need to know about warranty coverage for black lines on laptop screen Lenovo issues. Standard Lenovo warranties typically cover manufacturing defects, which include screen failures caused by internal component faults.
If your screen developed black lines without any physical damage like drops or pressure, and the laptop is still within the warranty period, there’s a good chance Lenovo will repair or replace your screen at no cost.
However, accidental damage is usually not covered under standard warranty. If you dropped your laptop, sat on it, or placed heavy objects on the closed screen, Lenovo support warranty claim representatives will likely classify this as physical damage rather than a manufacturing defect.
In these cases, you’ll need to pay for the repair unless you purchased an extended warranty or accidental damage protection plan when you bought your laptop.
If your warranty is still active and covers your type of screen damage, contact Lenovo support directly. They’ll walk you through the claim process and arrange either a mail in repair or an authorized service center visit. Make sure to back up your data before sending your laptop in for service.
How Much Does Lenovo Screen Replacement Actually Cost?
If your warranty doesn’t cover the damage or has already expired, you’ll need to pay for the repair yourself. Understanding the realistic laptop screen replacement cost helps you budget and decide whether repair makes financial sense.
Here are the typical cost ranges I’ve seen for Lenovo screen repairs:
DIY screen replacement: If you’re comfortable working with electronics and following video tutorials, you can buy a replacement LCD panel online for about $40 to $100 depending on your Lenovo model. This is the cheapest option, but it requires technical skill and comes with risks. If you damage other components during the replacement or buy the wrong panel, you could end up spending more fixing your mistakes.
Before ordering a replacement panel, make sure you find the exact panel model for your specific Lenovo device. You can find genuine Lenovo replacement parts and part numbers on Lenovo’s official parts and accessories page, which also includes installation guides and compatibility information to ensure you order the correct panel for your model
Local repair shop: Taking your Lenovo to a local laptop screen repair near me shop typically costs between $80 and $200. This price includes both the replacement panel and the labor to install it. Independent repair shops are usually faster than official service centers and often charge less. Make sure to ask whether the repair shop uses genuine Lenovo parts or aftermarket replacements, as aftermarket screens can sometimes have lower quality or color accuracy issues.
Official Lenovo service center: Getting your screen replaced at an authorized Lenovo service center is the most expensive option, usually costing $150 to $300 or more depending on your laptop model. The advantage is that you get genuine Lenovo parts and certified technicians who know your specific model inside and out. You also typically receive a warranty on the repair work itself, which protects you if the new screen develops problems.
Model-specific pricing: The exact cost depends heavily on which Lenovo model you own. Budget IdeaPad models have cheaper screens to replace. Higher-end ThinkPad models with touchscreens or high-resolution displays cost significantly more. Gaming laptops like the Legion series with fast refresh rate screens are among the most expensive to replace.
I always recommend getting at least two or three quotes before deciding where to have your repair done. Call local repair shops, contact Lenovo support for an official estimate, and compare the prices against the current value of your laptop. If your laptop is older and the repair cost approaches 50 percent or more of what a new equivalent laptop would cost, replacement might make more financial sense than repair.
Also consider the turnaround time. Some repair shops can replace your screen the same day if they have the part in stock. Official Lenovo service centers might take one to two weeks, especially if they need to order the specific screen panel for your model.
Understanding these cost ranges helps you make a realistic decision about whether to repair your Lenovo or start shopping for a replacement laptop. There’s no universal right answer. The decision depends on your laptop’s age, its overall condition, your budget, and how urgently you need a working device.
Stop Doing These Things They Make Black Lines Worse
I’ve seen people accidentally turn a small fixable screen problem into a complete hardware failure by doing things that seem harmless but actually cause serious damage. Let me share the most common mistakes so you can avoid making your Lenovo screen damage worse than it already is.
Don’t keep pressing or flexing your screen to test the lines. I know it’s tempting to keep checking whether pressure on the panel makes the lines change, but every time you press on an already compromised LCD screen, you risk spreading the damage further. Physical screen damage laptop issues get worse with repeated pressure because you’re applying force to pixels and liquid crystals that are already fragile. Once you’ve done the bezel pressure test once to diagnose the problem, stop touching the screen.
Don’t carry your Lenovo in a bag without proper protection. One of the leading causes of LCD bleeding and spreading black spots is pressure applied to the closed laptop screen while it’s being transported. When you toss your laptop into a backpack with books, chargers, or other objects pressing against the lid, you’re slowly damaging the delicate liquid crystal layer inside the panel. Always use a padded laptop sleeve or compartment.
Don’t rush to pay for hardware repair if black lines after windows update appeared right after an update. I’ve watched people spend hundreds of dollars on screen replacements when the actual problem was a corrupted driver that could have been fixed in five minutes. Always try the software fixes first before assuming you need expensive hardware repairs.
How to Keep Black Lines From Coming Back
If you’ve fixed your screen or gotten it repaired, here’s how to prevent black lines from appearing again.
Always use a padded laptop sleeve when carrying your Lenovo. Bag pressure is one of the biggest causes of lenovo screen damage that most people don’t realize. Never place heavy objects on top of your closed laptop, even for a few minutes.
Keep your graphics card driver update schedule regular. Set Windows Update to notify you before installing updates rather than installing automatically, so you can research whether other users are reporting display problems with specific updates.
Handle your laptop by the base, not the screen. Opening your laptop by pulling on one corner of the display puts stress on the hinges and internal cables. Physical screen damage laptop issues often start with rough handling over time.
These simple habits protect your investment and keep your display working properly for years.
Quick Summary What to Do Based on Your Situation
I know this was a long guide, so let me give you a quick roadmap based on exactly what you’re experiencing with your Lenovo laptop right now.
If black lines on laptop screen lenovo appeared right after a Windows update: Jump straight to Section 4, Fix 7 and Fix 8. Try booting into Safe Mode and uninstalling the recent update. This is likely a driver conflict, not hardware damage.
If pressing the screen frame makes the lines disappear temporarily: Read Section 5 carefully. You probably have a loose display cable, which means your LCD panel is fine and only the connection needs attention. This is fixable and cheaper than full screen replacement.
If the lines are static, present from the boot screen, and never change: Your situation is covered in Section 6 and Section 7. You’re dealing with hardware damage that needs professional repair. Check your warranty status first before paying out of pocket.
If you tried software fixes and nothing worked: Move to Section 7 to understand your repair options and costs.
The good news is that how to fix black lines on lenovo laptop screen issues depends entirely on the cause, and now you know how to identify yours. Most software causes are fixable at home for free. Hardware problems require professional help, but at least you understand your options and won’t get overcharged.
Your Lenovo screen problem is solvable. You’ve got this.
Frequently Asked Questions
Why does my Lenovo laptop have black lines on the screen?
Black lines on your Lenovo laptop screen are caused by either hardware issues like a loose display cable, damaged LCD panel, or dead pixels, or software issues like corrupted display drivers and Windows update conflicts. The fastest way to tell which one you’re dealing with is the Task Manager test.
If the black lines stop appearing while Task Manager is open, your problem is software-related and fixable at home.
Can I fix black lines on my Lenovo laptop without replacing the screen?
Yes, you can fix black lines without replacing the screen if the cause is software related. Driver corruption, Windows update conflicts, and incorrect refresh rate settings can all be fixed at home for free using the methods I covered in Section 4. Even some hardware causes like a loose display cable can be temporarily managed with the bezel pressure technique, though professional cable reseating is the permanent solution.
Why do the black lines disappear when I press the side of my screen?
When pressing the screen frame makes black lines disappear temporarily, it means your display cable has come slightly loose from its connection point. The pressure you’re applying temporarily reseats the cable,
which restores the signal to those pixels. This is actually good news because it tells you your LCD panel is likely fine and only the cable connection needs professional attention, which costs less than full screen replacement.
Can a Windows update cause black lines on a Lenovo screen?
Yes, Windows updates can absolutely cause black lines on your Lenovo screen. Some updates include display driver packages that conflict with Lenovo’s specific screen hardware, causing lines or flickering that look like hardware damage.
If black lines appeared immediately after a Windows update, try pressing Win + Ctrl + Shift + B to reset your graphics driver, then boot into Safe Mode and uninstall the latest quality or feature update
How much does it cost to fix a Lenovo laptop screen with black lines?
If your black lines are caused by software issues, fixing them costs nothing because you can do it yourself at home. For hardware repairs, third party repair shops typically charge between $80 and $200 for complete screen replacement, while DIY replacement panels cost $40 to $100 if you’re comfortable doing the work yourself. Official Lenovo service centers charge the most but include a repair warranty.

