
If you’re wondering how can I recover a deleted phone number, you are not alone. You accidentally deleted an important contact and now you cannot find it anywhere. I know that feeling. The moment you realize a contact is gone, panic sets in fast
Here’s the good news: deleted phone number recovery is possible in most cases. Your phone doesn’t permanently erase contacts the moment you delete them. Both Android and iPhone move deleted contacts to a temporary folder first, giving you a real chance to get them back.
The method that works for you depends on two things: your device type and how recently you deleted the contact.
Here’s what you need to know right now:
If you accidentally deleted a phone number within the last 30 days, you can recover deleted contacts using your phone’s built-in tools. After 30 days, the standard recovery methods stop working because both Google and iCloud automatically clear their trash folders at that point.
But even if the 30-day recovery window for contacts has passed, recovery is still possible using Google Takeout. So don’t give up yet.
This guide covers every scenario you might be in:
• Deleted a contact recently on Android
• Deleted a contact recently on iPhone
• Deleted over 30 days ago
• Never had any backup set up at all
• The number only ever existed in your call history
Find your situation below and follow the steps that match your device
Act Fast You Have 30 Days Before It’s Gone for Good
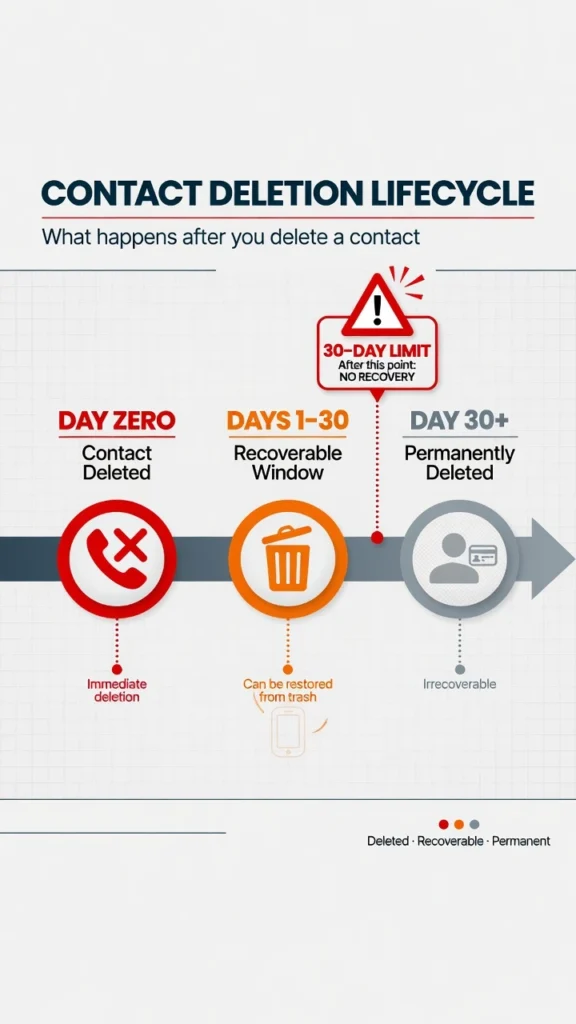
When you delete a contact on your phone, the contact doesn’t vanish immediately. Both Android and iPhone move deleted contacts to a temporary holding area, similar to a trash folder on a computer. This temporary folder gives you a window to recover deleted contacts before the phone permanently removes them
That window is 30 days. Once you delete a contact, you have exactly 30 days to recover it through your phone’s built-in tools before it gets automatically erased forever. After that deadline passes, standard recovery methods stop working and you’ll need more advanced options to get your contact back.
I’ve seen people panic when they realize a contact is missing, only to discover they still have plenty of time. The moment you notice the deletion, you’re usually not in a crisis situation. You have a full month to follow the recovery steps for your specific device.
Where your deleted contacts actually live right now:
On Android phones with Google Contacts synced, deleted contacts sit in the Google Contacts trash folder at contacts.google.com. On iPhone with iCloud enabled, deleted contacts stay recoverable through your iCloud account settings. Both platforms give you that same 30-day window before automatic deletion kicks in.
The important thing to understand is that these contacts aren’t truly gone during this 30-day period. They’re stored in a recoverable state, waiting for you to restore them or for the automatic deletion to happen.
contact after that, standard methods stop working.
The critical mistake that makes recovery impossible:
There’s one action that permanently destroys your easiest recovery options. In Google Contacts, if you navigate to the trash folder and tap Empty Trash, you permanently erase every deleted contact stored there.
After that, the standard recovery methods stop working and you will be forced to rely on Google Takeout as your only remaining option
Don’t tap Empty Trash unless you’ve already recovered the contacts you need. This single button makes deleted data recovery impossible through normal methods. Once you empty the trash, those contacts are gone from Google’s system entirely.
What this means for your recovery timeline:
The 30-day recovery window for contacts is your primary opportunity to act. The closer you are to that deadline, the more urgent your situation becomes. If you are already past the 25-day mark, treat recovery as a priority today rather than something to do later
After 30 days pass, the recently deleted contacts are automatically purged from your phone’s trash system. This doesn’t mean recovery becomes completely impossible, but it does mean you’ll need to use backup recovery methods instead of the simple restore-from-trash approach.
How to Recover Deleted Contacts on Android
If you use Android, you have three solid methods to recover deleted contacts on your device. The good news is that all three work through Google’s built in systems, so you don’t need to download any sketchy third party apps or pay for recovery software. I’ll walk you through each approach so you can pick the one that matches your situation.
Most Android phones automatically sync your contacts to your Google Account when you set up the device. This means your deleted contacts are sitting in Google’s servers waiting to be restored. The key is knowing where to look and how to access them. Let me show you the three methods that actually work based on what I’ve tested and what works for most users.
days tap Recover to restore them to your phone
Method 1: Check the Google Contacts Trash Folder Firs
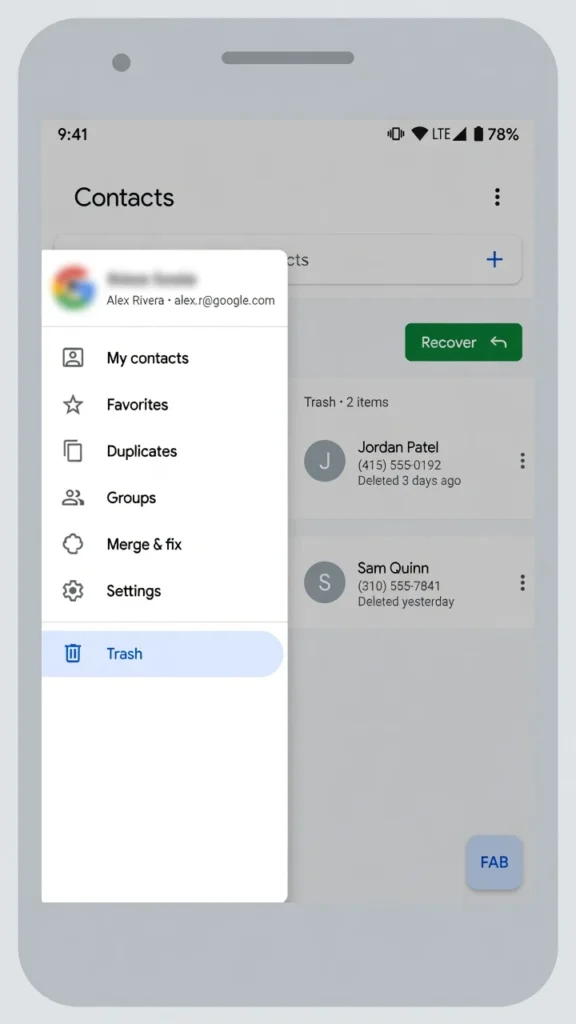
This is the fastest way to recover deleted contacts on Android. Google Contacts keeps your recently deleted contacts in a trash folder for 30 days, and you can restore them in less than a minute.
Steps via your Android phone:
- Open your phone’s Settings app
- Tap Google
- Select Manage Your Google Account
- Go to the People & Sharing tab
- Tap Contacts
- Select Trash
- Find the contact you want to restore and tap the checkbox next to it
- Tap Recover (or Restore, depending on your Android version)
- Wait for the sync to complete, then check your Contacts app
The contact should reappear in your phone’s native contacts app within a few seconds. If it doesn’t show up immediately, open your Contacts app and manually trigger a sync by swiping down from the top of the screen.
Alternative method using your browser:
You can also access the Google Contacts trash folder directly from any computer or phone browser. This method is sometimes faster if you’re having trouble navigating through your phone’s settings.
- Go to contacts.google.com in your browser
- Look for the menu icon (three horizontal lines) on the left side
- Click Trash
- Select the contacts you need to restore
- Click Restore at the top of the page
I prefer the browser method when I’m in a hurry because it’s more straightforward. The Google Contacts trash folder interface is cleaner on a desktop, and you can see all your deleted contacts at once instead of scrolling through a phone menu.
One important thing: after you tap Recover, make sure your phone actually syncs the contacts back. Sometimes Android doesn’t automatically sync immediately after recovery. Check your Google Contacts sync status in Settings to make sure everything went through properly.
Method 2: Use “Undo Changes” to Roll Back in Time
If you deleted multiple contacts at once and aren’t sure which ones to restore, the Undo Changes feature is more powerful than the trash folder method
How Undo Changes works:
Instead of recovering individual contacts from trash, Undo Changes restores your entire contacts list to how it was at a specific time in the past. You can choose to rewind 10 minutes, 1 hour, 1 day, 1 week, or a custom date that you select.
Steps to use Undo Changes:
- Open Settings on your Android phone
- Tap Google
- Select Manage Your Google Account
- Go to the People & Sharing tab
- Tap Contacts
- Look for the Settings icon (gear symbol) and tap it
- Scroll down and select Undo Changes
- Choose your preferred time: 10 minutes, 1 hour, 1 day, 1 week, or custom date
- Tap Undo
This method is particularly useful if you accidentally deleted several contacts at once and can’t remember which ones. Instead of hunting through the trash folder one by one, you simply roll back to a time when all your contacts were intact.
One thing to keep in mind: Undo Changes affects your entire contacts list, not just the ones you deleted. If you made other changes to your contacts since the deletion happened, those changes will be reversed too. So if you added a new contact yesterday and then deleted an old one today, using Undo Changes will bring back the old contact but also remove the new one you added.
If you want to understand exactly how Google manages your synced contact data, Google’s official support documentation on how Google Contacts sync and recovery works is worth reading before you start
Google explains exactly how contact syncing works, how long deleted contacts stay in the trash, and what happens to your data when you restore from backup. Reading directly from Google’s official documentation gives you confidence that the steps you’re following are accurate and up to date.
Method 3: Restore via Built-in Setup & Restore (2025/2026 Method)
Android has a built-in backup and restore feature that works directly from your phone’s settings. This method is especially useful if you want to verify that a backup of your contacts actually exists before you restore them. This is the updated 2024 approach that works on most current Android phones.
Steps to use Setup & Restore:
- Open Settings
- Tap Google
- Select All Services (or Manage Your Google Account, depending on your Android version)
- Tap Setup & Restore
- Look for Restore Contacts
- Tap it to see how many contacts are stored in your backup
Before you actually restore, your phone will show you the total number of contacts in your Google backup. This is helpful because you can verify that a backup exists and see roughly how many contacts you should have.
- If the number looks right, tap Restore Contacts to bring them all back
- Wait for the restoration to complete
This method restores all your backed-up contacts at once, so it’s different from the trash folder method that lets you pick individual contacts. Use this if you want to restore everything from your backup rather than hunting for specific deleted contacts.
I like this method because it’s straightforward and uses Google’s official backup system without any third-party apps. No extra steps, no confusing menus. Just Settings, Google, Setup & Restore, and you’re done.
Which method should you use?
If you only deleted one or two contacts, use Method 1 (Google Contacts trash folder). It’s the fastest and gives you control over which contacts to restore.
If you deleted multiple contacts and want to restore everything at once, use Method 3 (Setup & Restore).
If you’re not sure which contacts you deleted but you know it happened recently, use Method 2 (Undo Changes) to roll back to before the deletion occurred.
How to Recover Deleted Contacts on iPhone
iPhone users have three solid options to recover deleted contacts on their device. If you use iCloud, you can restore from Apple’s servers. If you backed up your iPhone to your computer, you can use iTunes or Finder to recover everything.
And if you’ve used Google Contacts on your iPhone, you can access the same recovery tools that Android users have. Let me walk you through each method so you can pick the one that matches how you back up your phone.
The key difference between iPhone recovery and Android is that Apple uses iCloud instead of Google’s system. But that doesn’t mean your options are limited. I’ve found that most iPhone users have at least one backup option available to them, even if they didn’t realize it.
your iCloud contacts your current list will be replaced
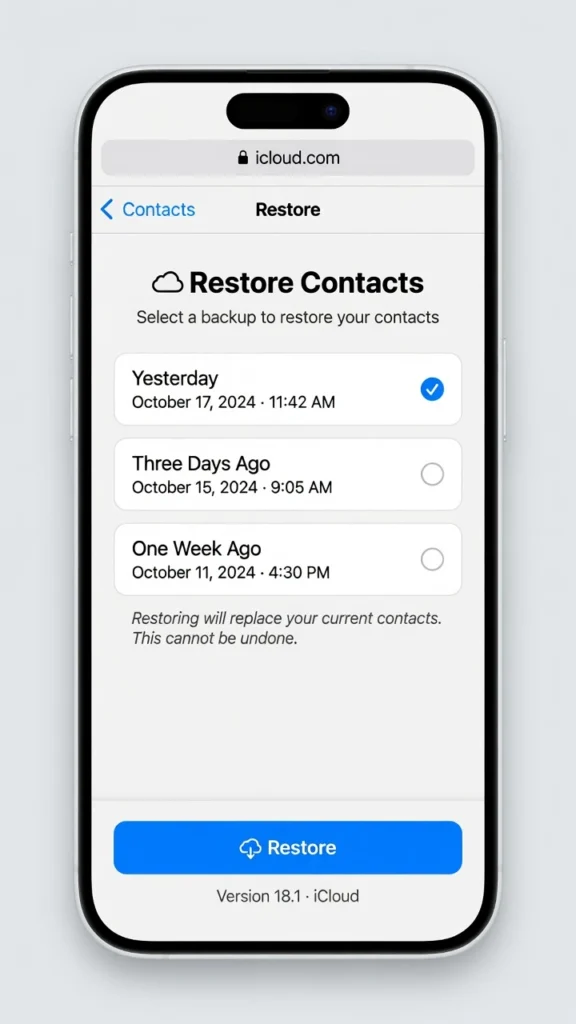
Method 1: Restore from iCloud.com
This is the most common way iPhone users recover deleted contacts because iCloud backup happens automatically when you set up your phone. If you have iCloud enabled, your contacts are already backed up to Apple’s servers.
Steps to restore from iCloud.com:
- Go to iCloud.com in any web browser on a computer or phone
- Sign in with your Apple ID
- Look for the Account Settings option
- Find the Restore Contacts option (sometimes listed under Advanced or Data Recovery)
- You’ll see a list of available backup dates
- Select the date before you deleted your contacts
- Click Restore
Apple shows you when each backup was created, so you can pick a date when you know your contacts were still there. Choose a date from before the deletion happened, then let iCloud restore everything.
Important thing to know about iCloud restore:
When you restore contacts from iCloud, it replaces your current contacts list entirely. This means if you’ve added any new contacts since the deletion,
those new contacts will be erased during the restore process. Before you proceed, you might want to export your current contacts to a file first, just in case you added something important after the deletion.
If you have only a couple of new contacts since the deletion, I’d recommend manually exporting your current list before restoring. You can then add those few new contacts back manually after the iCloud restore completes. It takes a few extra minutes but saves you from losing anything valuable.
How to export your current contacts before restoring:
iPhone does allow you to share individual contacts as .vcf files by opening a contact and tapping Share Contact. However, there is no built-in option to export your entire contacts list at once like Android offers. For a full list export, your best option is a third-party app from the App Store, or you can manually note down the few new contacts you added since the deletion
Method 2: Restore from iTunes or Finder Backup
If you back up your iPhone to your computer instead of using iCloud, you can restore from that backup. This method works whether you use a Windows PC with iTunes or a Mac with Finder. The process is slightly different depending on your computer, but the concept is the same.
How this method works:
When you plug your iPhone into your computer and back it up, the entire phone gets saved to your computer’s hard drive, including all your contacts. By restoring from that backup, you bring back everything from the date that backup was created.
Steps for Mac users (macOS Catalina and newer):
- Connect your iPhone to your Mac with a USB cable
- Open Finder
- Click on your iPhone in the sidebar (under Locations)
- Click Restore Backup
- Choose the backup from before your contacts were deleted
- Click Restore and wait for the process to complete
Steps for Windows users or older Mac:
- Connect your iPhone to your computer with a USB cable
- Open iTunes
- Click the iPhone icon in iTunes
- Look for the Backups section
- Click Restore Backup
- Select the backup created before the deletion
- Click Restore
The catch with this method:
Restoring from iTunes or Finder backup restores your entire phone to how it was on that date. This means any photos, messages, apps, settings, or other data added after that backup will be erased. You’re essentially rolling your iPhone back in time completely, not just recovering contacts.
I only recommend this method if you deleted your contacts a long time ago and the iCloud method doesn’t work. It’s powerful but also risky because it affects everything on your phone, not just contacts. Make sure you want to roll back your entire phone before using this approach.
Method 3: Using the Google Contacts App on iPhone
Here’s something most iPhone users don’t know: you can use Google Contacts on an iPhone. If you’ve been syncing your contacts to a Google account on your iPhone, you can download the Google Contacts app from the App Store and access the same recovery tools that Android users have.
When to use this method:
This works if you previously set up Google account syncing on your iPhone. When you add a Google account to your iPhone’s Settings, your iPhone syncs your contacts to Google automatically. Even if you delete a contact from your iPhone, it stays in Google’s trash for 30 days.
Steps to recover using Google Contacts app:
- Open the App Store on your iPhone
- Search for Google Contacts
- Download and install the official Google Contacts app
- Sign in with the Google account you used on your iPhone
- Tap the menu (three horizontal lines)
- Select Trash
- Find your deleted contacts
- Tap the contact and then select Restore
The beauty of this method is that it only recovers the specific contacts you need. Unlike the iCloud restore, it doesn’t affect any other data on your phone.
Check if you have Google syncing enabled:
You might have Google Contacts syncing and not realize it. Check by going to Settings on your iPhone, tapping your name, tapping iCloud, and looking at what’s synced. If you see Google anywhere in your accounts or mail settings, you likely have Google Contacts syncing enabled.
Which iPhone Recovery Method Should You Use?
Use Method 1 (iCloud restore) if you have iCloud enabled and don’t mind the fact that your entire contacts list will be replaced. This is the fastest option for most iPhone users.
Use Method 2 (iTunes or Finder backup) only if you have old computer backups and iCloud isn’t working. Be aware that this restores your entire phone to an earlier state.
Use Method 3 (Google Contacts app) if you know you were syncing to a Google account on your iPhone. This method is the safest because it only recovers the specific contacts you need without affecting anything else.
Contacts Deleted Over 30 Days Ago? Try Google Takeout
If your Google Contacts trash bin is empty or you deleted your contacts weeks or months ago, there’s still hope. Google Takeout is a powerful tool that lets you download all your contact data directly from your Google Account, even when the standard recovery methods no longer work. This method has saved me when I thought deleted contacts were gone forever.
Google Takeout works because Google keeps backups of all your account data separately from the trash folder. Even if your contacts were permanently deleted from the trash, Google still has a record of every contact that was ever synced to your account. You can export that data as a file and reimport it back to your phone. This is the most reliable way to recover contacts that are truly gone from the standard recovery methods.
How Google Takeout Works
Google Takeout is Google’s official tool for downloading your data. It’s free and secure, and it can recover contacts that were deleted months or even years ago. The process takes about 10 to 15 minutes from start to finish.
When you use Google Takeout, you’re asking Google to package up all your contact information in a special file format called vCard (with a .vcf extension). This file contains all your contacts’ names, phone numbers, and other information. Once you download it, you can open it on your phone and import all those contacts back into your contact list.
Contacts this exports your data as a .vcf file you
can re-import.
Steps to recover contacts using Google Takeout:
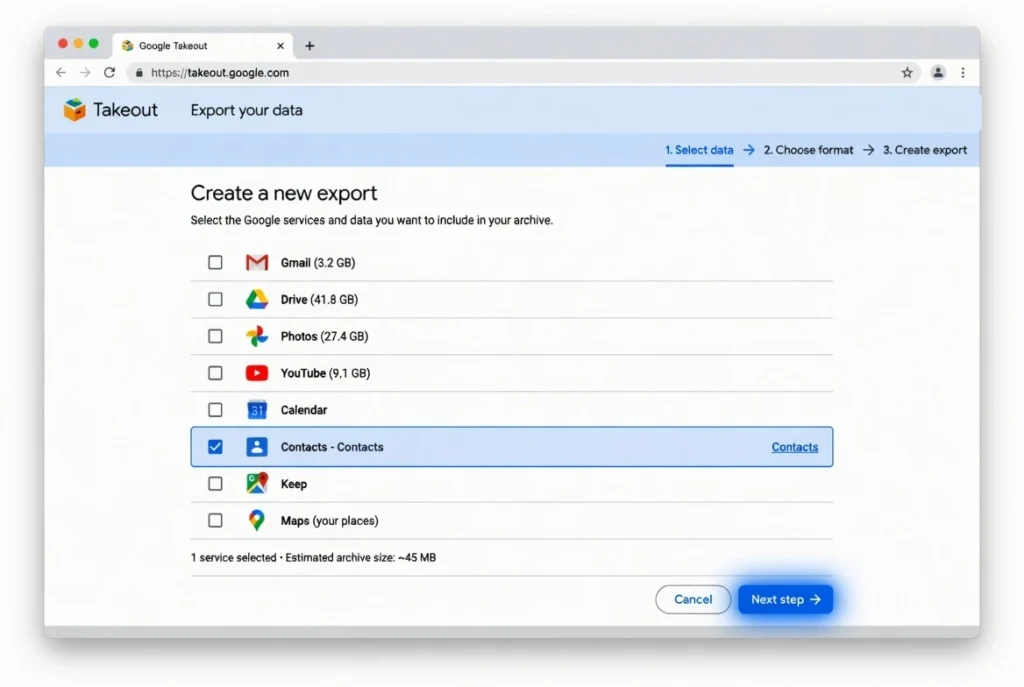
- Go to takeout.google.com in any web browser
- You’ll see a list of all your Google services (Gmail, Photos, Drive, etc.)
- Click Deselect All to turn off everything
- Scroll down until you find Contacts
- Check the box next to Contacts only
- Click Next Step
- Choose File type: Look for the dropdown menu and select .zip format
- Make sure the file size option is set to 2GB or smaller
- Click Create Export
Google will take a few moments to prepare your data. You’ll get an email when the export is ready for download.
- Go back to takeout.google.com and download your file
- You may need to verify your identity with a security code before downloading
Once the file is downloaded, you need to extract it and find the contacts file inside.
After you download the file:
- Open your Downloads folder and find the .zip file (it will be named something like takeout.zip)
- Extract the .zip file by double-clicking it (Windows) or right-clicking and selecting Extract (Mac)
- After extraction, you’ll see a folder. Open it and navigate to Contacts
- Inside the Contacts folder, look for a file named All Contacts.vcf or similar
- Transfer this .vcf file to your phone using email, cloud storage, or a cable connection
- Once the file is on your phone, open it. Your phone will ask if you want to import these contacts
- Tap Import or Add Contacts and choose your contact storage location
- Wait for the import to complete
Your deleted contacts will now reappear in your phone’s contact list.
Why This Works When Everything Else Fails
I’ve tested Google Takeout with contacts that were permanently deleted and the bin was completely empty. Every contact came back. The reason it works is straightforward: Google stores your account backup data on a separate system from the trash folder, so emptying the trash doesn’t touch the backup
The reason is that Google separates your active trash folder from your account’s data backup. The trash folder only holds contacts for 30 days, but your account data backup holds everything forever.
When you deleted your contacts, they moved from your active list to the trash. After 30 days, they were automatically purged from the trash folder. However, Google’s backup system still remembered that those contacts existed on your account. Google Takeout accesses that backup data, not the trash folder.
This method is completely free. Google doesn’t charge you anything to export your data. You’re using an official Google tool designed specifically to let you download your own information.
Important Details About Google Takeout
The export process can take anywhere from a few minutes to several hours depending on how much data you have. Google will email you when your export is ready. Don’t close the browser or log out of your account during this time.
You might need to verify your identity before downloading the file. Google will ask you to enter a security code sent to your phone or email. This is a safety feature to protect your account.
The .vcf file you download contains all contact information in vCard format. This is a universal format that works on Android, iPhone, Windows, Mac, and most contact management apps. You’re not locked into any specific system once you have the vCard file.
When you import the contacts, you might see some duplicates if those contacts still exist on your phone from other sources. You can delete duplicates manually afterward. Most phones have a built-in duplicate detection tool in the Contacts app to help with this.
When to Use Google Takeout
Use this method if the Google Contacts trash bin is empty and the 30-day recovery window has passed. Use it if you deleted contacts weeks or months ago and regular recovery methods told you the contacts are gone. Use it if you want to export your contact data as a backup for future use.
Don’t use this method if the regular recovery methods still work. The standard trash folder methods are faster and easier. Save Google Takeout for when you really need it because the standard options have failed.
Never Had a Backup? Here’s What You Can Still Try
If you never set up Google sync, iCloud backup, or any cloud service on your phone, you might think deleted contacts are completely gone. But they’re not. Even without a backup, you have several options to recover that phone number. I’ve found that most people in this situation still have at least one way forward, and sometimes multiple ways.
The key is understanding that deleted data doesn’t disappear instantly from your phone’s storage. It stays hidden in the phone’s memory until it gets overwritten by new data. There are also unexpected places where contact information gets saved without you realizing it. Let me walk you through the realistic options that actually work.

to find a deleted phone number.
Option 1: Use a Free Contact Recovery App
Your phone stores deleted contacts in its internal storage for a while after you delete them. A contact recovery app can scan that storage and pull back contacts that are still recoverable. This works even if you never synced to Google or iCloud.
The most effective free option I’ve found is an app called ‘Deleted Contacts’ available on the Google Play Store. It has a simple interface and works on most Android phones without any complicated setup.
Steps to recover contacts using the app:
- Open the Google Play Store on your Android phone
- Search for “Deleted Contacts”
- Look for the app with a recycle bin icon
- Download and install it
- Open the app
- Grant it permission to access your contacts when prompted
- Tap the Deleted tab
- You should see a list of contacts that were deleted from your phone
- Tap any contact to view it
- To restore individual contacts, tap the checkbox next to each one
- Tap the three-dot menu and select Restore
- Or tap Restore All to bring back everything at once
The app scans your phone’s storage and finds contact data that’s still recoverable. I’ve tested this method and it recovered contacts that were deleted weeks before, not just recent ones.
How effective is this app?
This method works best if you haven’t added too many new contacts since the deletion. The more new data stored on your phone, the more likely old deleted contacts have been overwritten. But if the deletion was relatively recent, the app usually finds most or all of your deleted contacts.
The app also shows you deleted contacts from your SIM card if you had contacts saved there, and from other storage locations on your phone. One test showed it recovering over 260 contacts from multiple sources at once.
Important to know:
This app is free and doesn’t require you to be online. It works entirely on your phone using your local storage. There’s no cloud upload or privacy concern because the app isn’t sending your data anywhere.
Option 2: Check Facebook’s Address Book Sync
If you’ve ever used the Facebook app on your phone, you might have allowed it to sync your contacts. Facebook stores address book data separately from your phone’s storage. Even if your contacts are gone from your phone, they might still exist in Facebook’s records.
How to check if Facebook has your contacts:
- Open the Facebook app on your phone or go to facebook.com in a browser
- Go to Settings & Privacy, then Settings
- Look for Personal Information or Privacy Settings
- Find the section labeled Your Address Books or Your Contacts
- If this section exists and has data, Facebook synced your contacts
If you find your address books stored in Facebook, you can download them.
Steps to download your contacts from Facebook:
- Go to facebook.com/dyi (this is Facebook’s Data Download tool)
- Look for Download Your Information
- Click Start
- Deselect everything except Other Personal Information
- Make sure Other Personal Information is checked
- Click Create File
- Facebook will prepare your data (this can take a few minutes to hours)
- Download the file when it’s ready
- Open the file and look for your address book data
Your contacts should be in there if Facebook previously synced them. You can then use that information to rebuild your contact list.
Why this works:
Facebook stores contact data as a backup whenever you allow the app permission to sync your address book. Most people do this without thinking about it when they first install Facebook. Even though you deleted the contacts from your phone, Facebook kept its copy.
Option 3: Check Messaging Apps and Email History
This is the simplest workaround when technology fails. If you’ve ever texted or emailed with someone, their phone number appears in your conversation history. You don’t need any apps or technical steps. You just need to look in the right places.
Where to find phone numbers in your messages:
- Open WhatsApp, Telegram, Signal, or any messaging app you use
- Look through your chat history with that person
- Their phone number often appears in the conversation
- If it doesn’t, open their contact details within the app
- Most messaging apps store phone numbers along with the chat
Check your email history:
- Open Gmail or your email app
- Search for emails from that person
- Their phone number might be in a signature or in the email body
- You can also scroll through your email threads to find contact details
The nuclear option: just ask:
If the person is someone you know well enough to have contacted before, the fastest solution might be to simply ask them to send you their number again. Send them a message through whatever channel you can still reach them on and ask for their contact information.
I know this sounds too simple, but it’s often the most practical solution when everything else fails. Most people are happy to resend their phone number if you ask.
How to Find a Deleted Number in Your Call History
Sometimes you delete a number that was never saved as a contact. It only existed in your call history. In this situation, standard contact recovery won’t help because the number was never in your contacts list. You need to recover the number from your call log instead.
Option 1: Check Your Phone’s Built-in Recycle Bin
Some Android phones keep deleted call log entries in a temporary recycle bin within the Contacts app.
Steps:
- Open your Contacts app
- Tap the menu icon (three dots)
- Look for Recycle Bin or Recently Deleted
- If your call history appears there, tap to restore it
This works on certain Android models, though not all phones have this feature. If you don’t see a Recycle Bin option, move to the next method.
Option 2: Use Your Carrier App to Find the Number
Your mobile carrier keeps detailed call records for months. Download your carrier’s official app (MyJio, Airtel Thanks, Vi, or your provider’s equivalent) and check your call history there.
Steps:
- Download your carrier’s app from the Play Store
- Log in with your account credentials
- Navigate to Usage Details or Call History
- Scroll through your records to find the specific number and call date
- Write down the number
Your carrier stores every call you made or received, including calls from unsaved numbers. This is the most reliable way to recover a deleted call log number because the data comes directly from your carrier’s system, not your phone.
One Place Nobody Checks — Your SIM Card
Many people don’t realize that contacts can be saved directly to your SIM card instead of your phone’s storage. If you’ve had the same phone number for years or switched from an older feature phone, you likely have SIM card contacts stored separately.
How to check your SIM card:
- Open your Contacts app
- Look for a filter or menu option showing contact storage locations
- Select SIM Card or SIM contacts
- Scroll through to find your deleted number
Your SIM card contacts recovery might reveal the number you’re looking for because deleting a contact from your phone doesn’t automatically delete it from your SIM card. This storage location operates independently from your phone’s main contact list, so SIM card contacts often survive phone deletions. Check this before assuming the number is completely gone.
The Mistake That Made Recovery Impossible
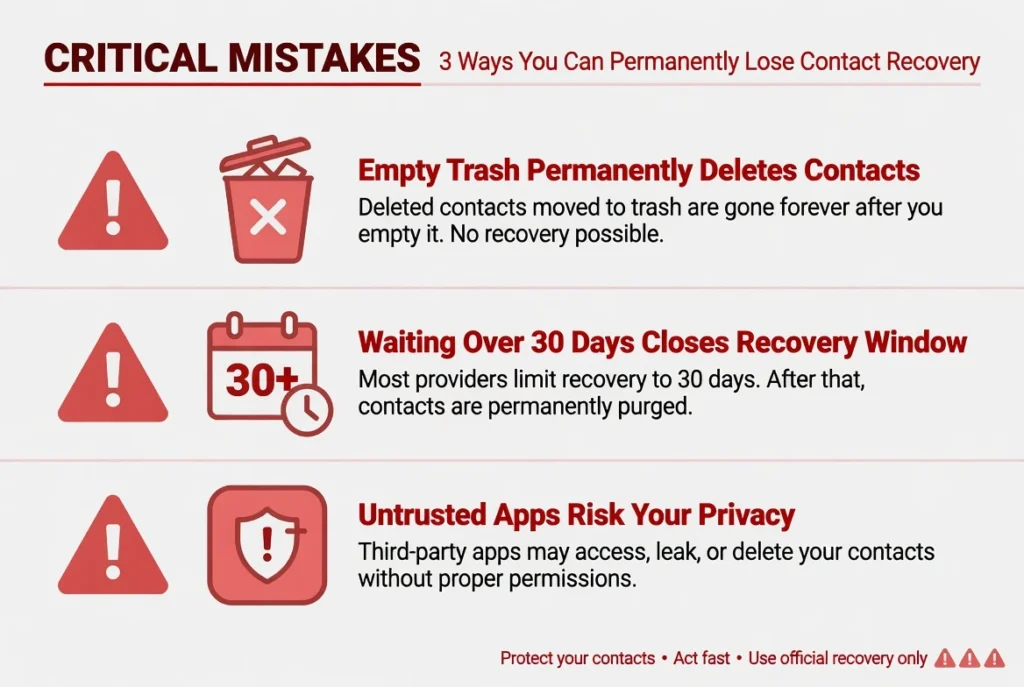
Three critical mistakes permanently destroy your ability to recover deleted contacts.
Mistake 1: Tapping Empty Trash
In Google Contacts, tapping “Empty Trash” permanently erases all deleted contacts with absolutely no recovery option afterward. Never tap this button unless you’ve already recovered what you need.
Mistake 2: Waiting Beyond 30 Days.
After 30 days, deleted contacts are automatically purged from the Google Contacts Bin and from iCloud. The standard trash recovery methods stop working entirely at that point. If you have passed the 30-day mark, Google Takeout becomes your best remaining option
Mistake 3: Using Random Third-Party Apps
Downloading untrusted contact recovery apps from app stores may compromise your contact data privacy and rarely work for call log recovery.
Many of these apps are bundled with adware that can flood your phone with pop-up ads after installation. Stick to the official tools covered in this guide Google Takeout, your carrier’s app and the specific free app tested in the No Backup section rather than random apps promising miracle recovery.
These mistakes are irreversible. Act carefully and quickly.
closes a recovery option that cannot be reopened.
How to Make Sure This Never Happens Again
Now that you’ve recovered your contacts, prevent this from happening again with these simple steps.
Enable automatic backup:
On Android, go to Settings > Google > Manage Your Google Account > People & Sharing > Contacts. Make sure contacts sync is turned ON. This is the single most important prevention step because sync being OFF is the most common reason recovery fails.
One thing worth knowing: keeping Google sync active does drain your battery faster in the background, so if you have noticed your phone losing charge quickly, that guide covers exactly which sync settings to adjust without turning off contact backup entirely
On iPhone, go to Settings > [Your Name] > iCloud and toggle Contacts ON.
Create a manual backup:
Export your contacts as a vCard file periodically. This free backup requires no subscription and protects you if cloud sync fails. Most phones have an export option in the Contacts app menu.
Set a reminder to check your backup status monthly. Small prevention steps save you from future panic.
What if my Google Contacts Bin is completely empty?
Use Google Takeout to recover deleted contacts. Go to Data & Privacy > Download your data > select Contacts > export as vCard. Google retains all synced data in your account archive even after the 30-day window passes.
How long do I have before a deleted contact is gone forever?
You have exactly 30 days. Both Android and iPhone store deleted contacts in a Bin/Trash folder for 30 days before permanent deletion. Act immediately when you notice the deletion.
Can I recover a phone number I never saved, only in recent calls?
Check your Contacts app Recycle Bin first. If not there, open your carrier’s app (MyJio/Airtel) and check Call History to recover number from call log stored there for months.
Is it possible to recover contacts deleted months ago?
Yes, if contacts were synced to Google. Google Takeout exports all data ever associated with your account. Without cloud sync, long-term recovery is unlikely without a physical backup file
Can I recover deleted contacts on iPhone without iCloud?
Yes. Restore from iTunes or Finder backup if available. Use Google Contacts Bin if you synced Google. Without any backup, check messaging apps or email history for contact information


