
Why You Need to Factory Reset Without a Password (And If It’s Even Possible)
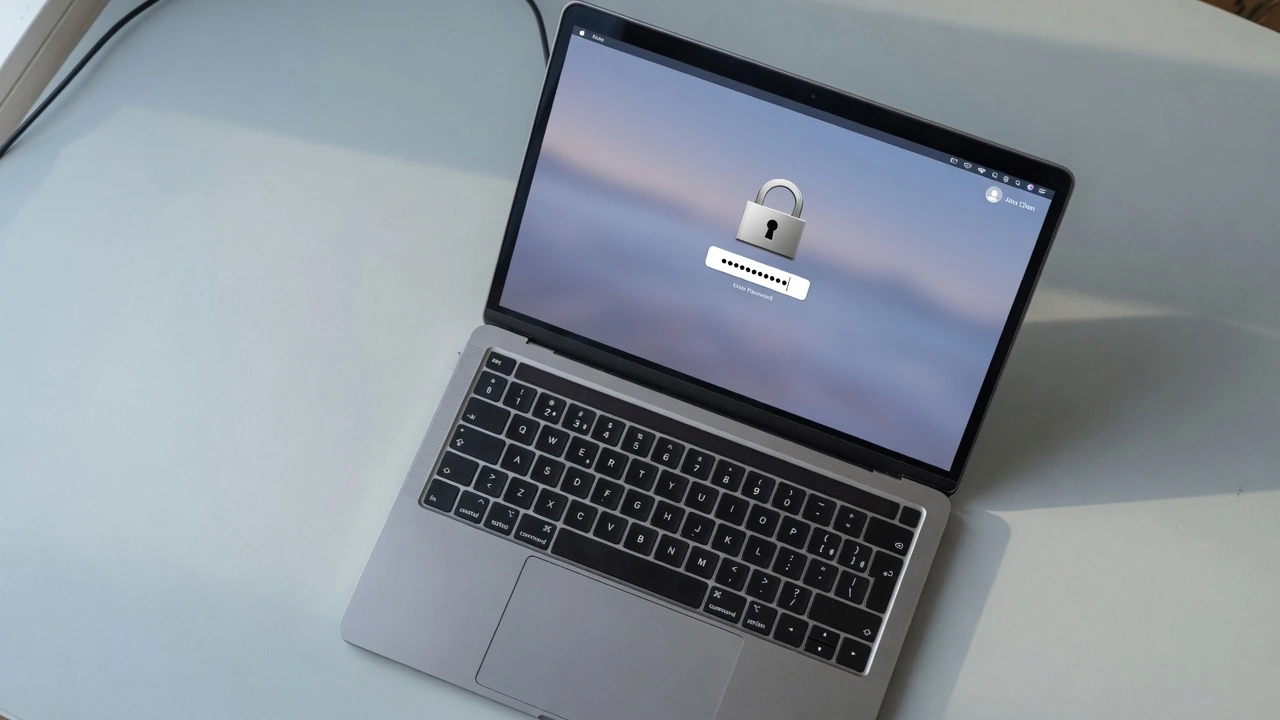
I can’t tell you how frustrating it is to see the Macbook Pro login screen, having no idea at all of the password. Don’t worry, factory reset macbook pro without password is quite possible.
Possibly you have lost your password in the months since you’ve first used Touch ID, or maybe you recently purchased a MacBook from a different user without being told their credentials. In either case, you can’t use what was supposed to be your computer.
Yes, you can often erase and reinstall macOS on a MacBook Pro even if you don’t know the normal login password, but the exact process depends on your Mac model, chip, macOS version, and security settings.
A forgotten Mac login password is different from an Apple Account password, Activation Lock, or a firmware password. Recovery Mode can give you access to disk-erasing and macOS reinstallation tools, but it cannot legitimately bypass Activation Lock or every firmware/security restriction.
If this is your own Mac and you need the files on it, try to recover or reset the login password before erasing anything. If you’re preparing a Mac for a new owner, use Apple’s supported erase process whenever your Mac provides it.
I’ve repeated this process with various machine models and it’s applicable to both MacBook Pro and MacBook Air models, Intel and newer Apple Silicon models such as M1, M2, M3.
Apple includes recovery tools directly on Mac computers for repairing, erasing, and reinstalling macOS. However, Recovery Mode is not a universal way to bypass every password or security feature. Depending on the Mac model, macOS version, and security configuration, Recovery may ask you to authenticate with a user password or other credentials before allowing certain actions.
If your goal is to erase the Mac completely, Recovery provides the tools needed to erase the startup disk and reinstall macOS when the Mac’s security configuration allows it. If the Mac is protected by Activation Lock, a factory reset does not bypass that protection.
It will enable you to fix the laptop while you are at home, without even leaving the area of an Apple store or repair shop, saving you time and money. People come to this process in two primary circumstances and the one you are in dictates how best to proceed:
The first case is where you had forgotten your Macbook password while using your own Mac. Perhaps you have altered the setting or forgotten the login, or someone else has configured it and did not inform you of the login.
Here you have two choices: reset the password first to regain entry and backup all important files or do it all at once if you don’t care about the data. The second case is if you have an old Macbook that has been utilized by someone else previously.
It might be a Mac that you purchased from online or received from a relative or from work as a hand-me-down. When you need a second hand macbook factory reset, it will almost always require a complete wipe of the machine for you to do so since you will not be able to access the previous owner’s account.
The end result is the same: a clean and working MacBook Pro. Throughout this guide I will tell you exactly which method you use, what to expect at each step, and how to avoid the common pitfalls that people fall into. At the conclusion, you will be able to fully control and use a fully functional macOS installation on your Mac, with the original Mac OS being uninstalled entirely.
Locked Out? Two Scenarios and Which Method Works for You
If you are about to undertake any steps, you should ask yourself a very simple question: Is this your Mac that you forgot the password for, or is this a totally different Mac? But you will change your whole method depending on that one question.
I’ve seen folks do the wrong thing because they neglected to do this and end up losing their data needlessly, or get confused in the middle.
There are two situations where one may require a MacBook Pro to be factory reset without password and each have a different approach. I’m here to guide you to the right one for you at this time.
Scenario A: You Forgot Your Own Password
There are more options available than you think if this MacBook Pro is yours and you just can’t remember the password. If your macbook pro is locked out, it doesn’t mean you need to wipe everything and lose your file.
What I would suggest you to try first is to reset your password using macOS Recovery Mode. The built-in resetpassword command in Recovery mode allows you to reset the password for your login without touching any files on your Mac. All your photos, documents and applications remain intact. If you forget your Mac password, it is as if your keys are locked in your house.
No need to set fire to the home to get reentering. All you need is the proper tool to access the door. Complete password reset method is available in Method 1 below.
Scenario B: You Bought or Received a Mac You Don’t Know the Password For
This is the most frequent scenario I get called upon for. You buy a used MacBook Pro from a third party site, get one as a gift, or inherit one from a relative.
Mac starts up OK, but there is already an account and no indication of how to get past the login screen. In this case, the best solution is to reset your Macbook pro without using Apple ID.
You don’t have to keep the data of the previous owner and you don’t have any way of resetting the password without knowing the Apple ID of the previous owner.
The clean wipe method, through macOS Recovery Mode, is just what you’re looking for! One important thing to note before starting is that.
After resetting the Mac, you might experience something called Activation Lock if the previous owner didn’t sign out of their Apple ID prior to giving the Mac to you. One important warning before you reset a second-hand Mac: a factory reset does not automatically remove Activation Lock.
If Find My is still enabled and the Mac remains associated with the previous owner’s Apple Account, the Mac may show an Activation Lock screen after it is erased. The previous owner must remove the Mac from their account, or Apple may need to review valid proof of purchase.
If you’re buying a used MacBook, make sure the seller removes the Mac from their Apple Account and Find My before you complete the purchase. Erasing the disk alone is not a way to bypass Activation Lock.
It is not a cause for alarm, but it’s a good thing to keep an eye on before putting in an hour of resetting the machine. In a separate section below, I explain what Activation Lock is and how to deal with it. If you have an Ovi Suite, proceed directly to method 2 (full factory reset in recovery mode), for now in scenario B.
Which Mac Do You Have? Intel vs Apple Silicon (Check This First)
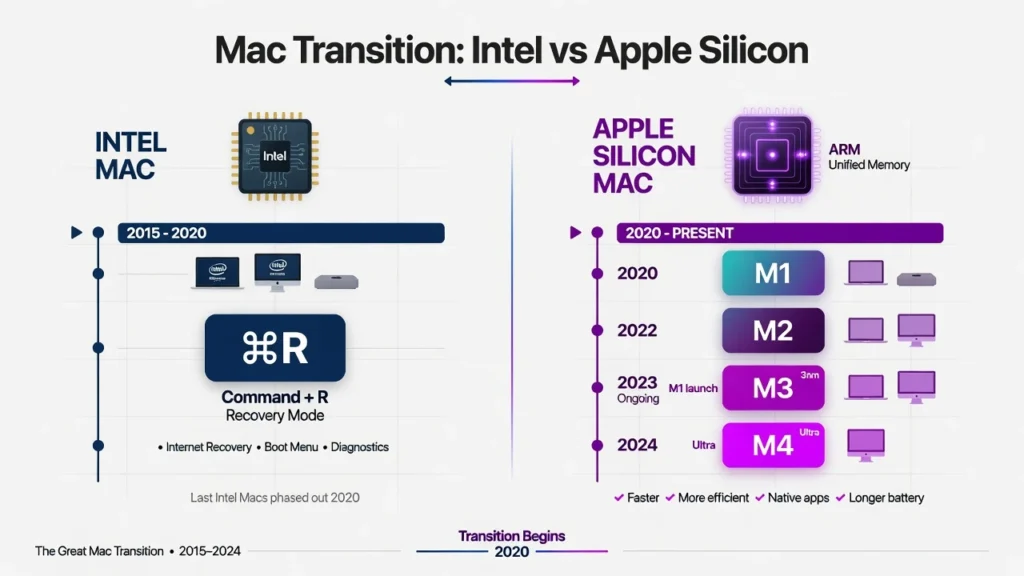
Most guides don’t even bother with this step and that’s why so many people get stuck before they even begin. How you enter into Intel Mac recovery mode is very different than how you can enter into Apple Silicon Mac reset options.
If you do it wrong for your chip type, then nothing will work and you’ll have an hour of “I can’t figure out what I did wrong. I’ve been helping people do this on a variety of Macs and the one thing that is always the same is the cause of the confusion.
This is a guy who has an M2 MacBook Pro pressing Command and R at boot who wonders why nothing is happening as that is a command shortcut used on Intel Macs. Before you do anything more, let’s first determine what Mac you have! Only need to take about 30 seconds, and all the rest of this guide will be much simpler to follow.
If you can log on to the Mac, go to the Apple logo in the top left of your screen, and choose “About This Mac. The pop-up window will let you know all you need to know. Look at the chip or processor line. If there is an Apple M1, M2, M3 or M4, you have Apple Silicon. If it says “Intel Core i5”, “Intel Core i7” or “Intel Core i9”, you will have Intel.
Then, if you can’t log in, turn over the MacBook and check the bottom case. A model number will be printed in small print, typically beginning with the letter A followed by four numbers. For instance A1706 is an Intel MacBook Pro from the year 2016.
A model number is A2338 and represents an M1 Macbook Pro from the year 2020. I’ll explain how to read those numbers in each section below.
Apple Silicon Macs (M1, M2, M3, M4): How to Identify
Apple Silicon is the term Apple uses for its own family of chips, starting with the M1 in late 2020 and continuing through M2, M3, and M4 in the years that followed. If your MacBook Pro was made in late 2020 or any year after that, there is a very strong chance it runs on Apple Silicon.
Here are the MacBook Pro models that use Apple Silicon chips:
- MacBook Pro 13 inch (Late 2020) — M1
- MacBook Pro 14 inch and 16 inch (2021) — M1 Pro and M1 Max
- MacBook Pro 13 inch (2022) — M2
- MacBook Pro 14 inch and 16 inch (2023) — M3, M3 Pro, M3 Max
- MacBook Pro 14 inch and 16 inch (2024) — M4, M4 Pro, M4 Max
The model number on the bottom of an Apple Silicon MacBook Pro typically starts with A2338, A2442, A2485, A2779, A2780, A2991, or A2992 depending on the specific model and year.
On an Apple Silicon Mac, you do not use a keyboard shortcut to enter Recovery Mode. Instead, you press and hold the Power button until the screen shows “Loading startup options,” then click Options and Continue. That’s it. No Command key, no R key, just the Power button held down.
Intel-Based Macs: How to Identify
MacBook Pros with Intel chips come in a wide variety of years, ranging from early 2000s to the present day (2020). If your MacBook Pro is 2019 or older, it is almost guaranteed to be an Intel processor. There are also some 2020 MacBook Pro models that use Intel chips:
The 13-inch model, sold in the first half of 2020, in advance of Apple’s move to Apple Silicon. Common Intel MacBook Pro model numbers include A1706, A1707, A1708, A1989, A1990, A2141, and A2251 among others. What is important to note is that MacBook Pro versions from 2018 to 2020 have the T2 security chip.
This T2 chip is a chip designed by Apple and is a separate part of the Intel Mac that deals with security features such as encrypted storage and secure boot.
Even with an Intel main processor, if the MacBook Pro is from 2018 through 2020, you will have a T2 chip (a security processor) within the machine. The reset process is no different on the T2 chip, but it is important to note since some older guides will contain instructions that aren’t applicable to this extra security measure.
On an Intel Mac: To enter Recovery Mode, boot your Mac and hold down Command and R at the same time. continua to hold the keys until you see the apple logo loading bar recovery screen or spinning globe, then release.
When you don’t have a local recovery partition, your Mac is loading Internet Recovery. The Apple logo and the spinning globe both take you to the same Recovery tools, but via different paths.
How to factory reset MacBook Pro without password using Recovery Mode. This tutorial demonstrates the complete process from start to finishBefore You Start: What to Do If You CAN Still Log In
MacBook Pros with Intel chips come in a wide variety of years, ranging from early 2000s to the present day (2020). If your MacBook Pro is 2019 or older, it is almost guaranteed to be an Intel processor. There are also some 2020 MacBook Pro models that use Intel chips:
The 13-inch model, sold in the first half of 2020, in advance of Apple’s move to Apple Silicon. Common Intel MacBook Pro model numbers include A1706, A1707, A1708, A1989, A1990, A2141, and A2251 among others.
What is important to note is that MacBook Pro versions from 2018 to 2020 have the T2 security chip. This T2 chip is a chip designed by Apple and is a separate part of the Intel Mac that deals with security features such as encrypted storage and secure boot.
Even with an Intel main processor, if the MacBook Pro is from 2018 through 2020, you will have a T2 chip (a security processor) within the machine. The reset process is no different on the T2 chip, but it is important to note since some older guides will contain instructions that aren’t applicable to this extra security measure.
On an Intel Mac: To enter Recovery Mode, boot your Mac and hold down Command and R at the same time. continua to hold the keys until you see the apple logo loading bar recovery screen or spinning globe, then release. When you don’t have a local recovery partition, your Mac is loading Internet Recovery. The Apple logo and the spinning globe both take you to the same Recovery tools, but via different paths.
Back Up Your Data First
Performing a factory reset erases all files, photos, apps and settings from your MacBook Pro. The erase process is irreversible, and it is impossible to recover anything prior to the erase. Back up your files first, if they are important to you.
You can create an external hard drive Time Machine setup, which will back up the entire system. If you’re new to Time Machine, Apple provides a detailed guide on how to use Time Machine to protect your data. You can also ensure that your most critical files are backed up in iCloud Drive so that they’ll be available to you from any device after the reset.
If you’re experiencing performance issues or just want to clean up your Mac, you might consider completely uninstalling unnecessary apps first before resorting to a factory reset. However, if you’ve decided a full reset is necessary, back up your files first. If you are not sure you backed up, and have already performed a reset, dedicated data recovery software may be able to recover deleted files, but it is not always reliable and can be complicated. The much simpler thing to do is to backup first
Sign Out of iCloud and Turn Off Find My Mac
It is the first step you must take before even attempting a factory reset and it’s one that most people do not consider because if they don’t, what happens?
If you sign out of iCloud prior to reset, you will turn off Find My Mac. Once you’ve finished resetting the MacBook Pro, Activation Lock will kick in if find my mac turned off did not occur during the reset process.
When the Mac is on offer, it will ask the former owner for his/her Apple ID password before it can be reset by anyone. This can even prevent the owner from getting into his own freshly reset machine. Proper sign-out:
If you are using macOS Ventura or later, open System Settings; on older versions, open System Preferences. At the top click your name or Apple ID, scroll down and click Sign Out. Your Mac will ask whether you would like to keep your data stored on the Mac.
Either is OK as the reset will wipe everything out anyway. Find My Mac will automatically shut down after signing out. This can be verified by seeing that the Find My option no longer lists your Mac as being active.
Sign Out of iMessage and Deauthorize iTunes or Music
The one most important step before any factory reset, and it’s one most people don’t realize what happens if they don’t do it.
The Find My Mac feature is disabled when you reset the computer after logging out of the iCloud account. If find my mac turned off doesn’t occur before you wipe the MacBook Pro, then Activation Lock will activate as soon as the reset completes.
The Mac will then ask for the password of the previous owner in order to allow anyone else to set it up again. This can prevent the owner from regaining access to their newly reset computer. To log out correctly, in macOS Ventura or later, click on System Settings, then Log out.In older macOS versions, click on System Preferences, then Log out.
At the top of the screen, tap your name or Apple ID, then tap Sign Out in the bottom of the screen. Your Mac will then ask you if you would like to retain a copy of your data on Mac.
You may either select one or the other because the reset will wipe them out anyway Find My Mac is automatically turned off after signing out. You can see this by verifying that your Mac is not listed as “Find My”.
Method 1: Reset Your Password First, Then Factory Reset (For Scenario A)
If you forgot your MacBook password but this is genuinely your own Mac, you do not have to erase everything just to get back in. There is a built-in password reset method that lets you regain access without touching a single file.
This method uses a Terminal command called resetpassword that runs inside macOS Recovery Mode. The resetpassword command creates a new login password for your user account while leaving all your documents, photos, and applications completely intact. Once you log back in with the new password, you can back up anything important and then decide whether you still want to do a full factory reset.
I recommend this approach if you care about your data at all, because it gives you a second chance to save what matters before making any irreversible decisions. Even if you ultimately plan to wipe the Mac anyway, resetting the password first takes less than five minutes and costs you nothing.
One important detail most guides miss is a step called Deactivate Mac that appears during the password reset process. You must select Deactivate Mac when prompted, or the reset may not complete properly. I’ll show you exactly when that prompt appears and what to click.
Step 1: Boot Into Recovery Mode
Important: Entering macOS Recovery does not guarantee that you can access every recovery function without authentication. Your Mac may ask you to select a user and enter that user’s password, depending on its model and security settings. Recovery Mode also cannot be used to bypass Activation Lock.
Before you can reset the password, you need to start your MacBook Pro in Recovery Mode. The method depends entirely on whether you have an Intel Mac or an Apple Silicon Mac, so follow the instructions that match your chip type.
For Intel Macs, completely shut down the MacBook Pro first. Press the Power button to turn the Mac back on, then immediately press and hold the Command and R keys together on your keyboard. Keep both keys held down until you see either the Apple logo or a spinning globe appear on the screen. Once you see either of those, you can release the keys. The Mac will continue loading into Recovery Mode on its own.
For Apple Silicon Macs, shut down the MacBook Pro completely. Press and hold the Power button and keep holding it. Do not release the button right away. After a few seconds, the screen will display a message that says “Loading startup options” along with a gear icon. Once you see that screen, release the Power button. Click the Options button, then click Continue. Your Mac will load into macOS Recovery Mode.
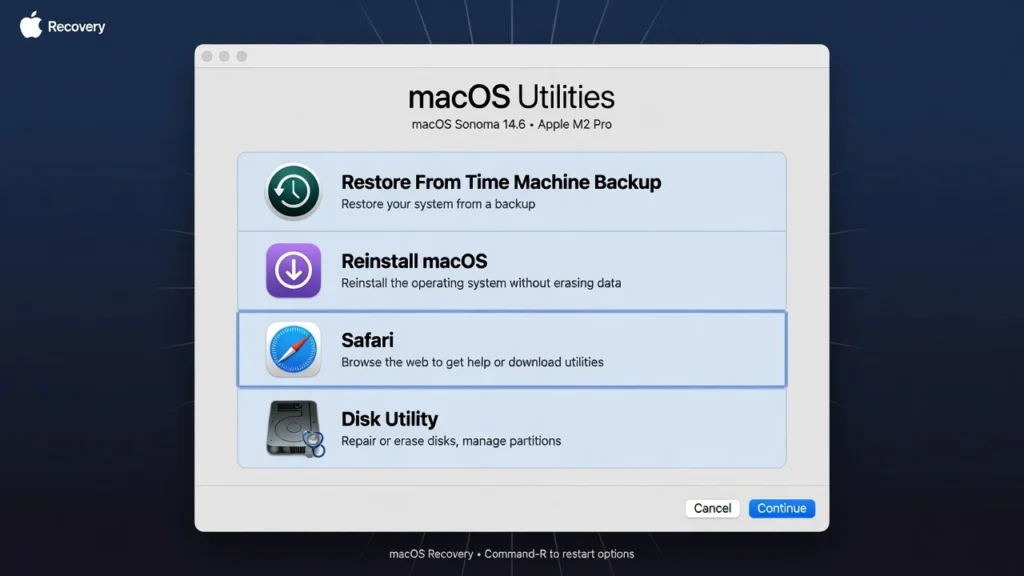
Either method brings you to a screen called macOS Utilities with several options listed. That screen means you successfully entered Recovery Mode.
Step 2: Open Terminal and Type resetpassword
From the macOS Utilities screen, look at the menu bar at the very top of the screen. Click on Utilities in that menu bar, then select Terminal from the dropdown menu that appears.
A Terminal window will open with a command prompt. This is where you run the resetpassword command.
Type the word resetpassword exactly as shown here, with no spaces and all lowercase letters. Then press Enter on your keyboard.
After you press Enter, the Terminal window will close automatically and a new window titled Reset Password will appear behind where the Terminal was. That Reset Password window is the tool you actually use to create your new password.
The resetpassword command does not reset the password directly. Instead, the command launches the Reset Password utility that walks you through the process step by step.
Step 3: Create New Password and Deactivate Mac
In the Reset Password window, you will see a list of user accounts on the MacBook Pro. Select the account that you are locked out of. This is usually the main account with your name on it.
Once you select the account, the window will show fields where you can enter a new password. Type your new password in the first field, then type the exact same password again in the Verify field to confirm it. You can also add a password hint if you want, though this is optional.
Here is something interesting that most people do not realize. You can actually leave the password fields completely blank if you prefer. Setting a blank password means your Mac will not ask for any password at login and will go straight to the desktop when you turn it on. This is convenient for home use, though obviously not recommended if you care about security or if other people have physical access to your Mac.
After entering your new password or leaving it blank, click the Next button.
This is where the Deactivate Mac step happens. A prompt will appear asking if you want to deactivate this Mac. Select the option that says Deactivate Mac or allow deactivation, then confirm your choice. This step is necessary for the password reset to work correctly, and skipping it or clicking the wrong option can cause the reset to fail.
Once you confirm deactivation, click Restart in the final confirmation window. Your MacBook Pro will restart normally. When the login screen appears, use the new password you just created to log in. If you left the password blank, the Mac will boot directly to the desktop without asking for anything.
You now have full access to your Mac again. From here, you can back up your files, run a standard factory reset through System Settings if you still want to, or simply continue using the Mac with your new password. The choice is completely yours.
Method 2: Factory Reset Without Password Using Recovery Mode (Complete Wipe)
This is the method you need if you want to reset your MacBook Pro to factory settings without a password and wipe everything completely. This approach can be used when you cannot log in to macOS, but the exact Recovery experience depends on your Mac model and security configuration.
Recovery Mode provides access to Apple’s recovery utilities, but it may still require authentication before allowing certain actions. If you proceed with erasing the startup disk, all files, applications, and settings stored on the Mac will be deleted before macOS is reinstalled.
I use this method when I’m setting up a second-hand Mac or when someone wants a truly clean start with no remnants of old data left behind. The entire factory reset process using Recovery Mode takes anywhere from one to two hours depending on your internet connection speed, so plan accordingly and make sure you have time to let the process finish completely.
The three main steps are simple. First, you boot into macOS Recovery Mode. Second, you use Disk Utility to erase the Mac hard drive. Third, you reinstall macOS from scratch. Once macOS finishes installing, your MacBook Pro will behave exactly like a brand new Mac straight out of the box.
Step 1: Boot Into Recovery Mode (Intel vs Apple Silicon)
The first step is getting your MacBook Pro into Recovery Mode, which gives you access to the special utilities that let you erase and reinstall macOS without needing a password.
Make sure your MacBook Pro is completely shut down before you start. If the Mac is stuck at a login screen, hold down the Power button for about ten seconds until the screen goes black and the Mac powers off completely.
For Intel Macs, press the Power button to turn the Mac on. Immediately press and hold the Command key and the R key together on your keyboard. Keep both keys held down and do not release them. After a few seconds, you will see either an Apple logo or a spinning globe appear on the screen. Once you see one of those two images, you can release the keys.
The Apple logo means your Mac is loading the local recovery partition stored on your hard drive. The spinning globe means your Mac is loading Internet Recovery, which downloads the recovery tools over your WiFi connection. Both options work perfectly fine and will take you to the same macOS Utilities screen. The spinning globe just takes a bit longer because your Mac needs to download files from Apple’s servers first.
For Apple Silicon Macs, press and hold the Power button. Do not tap the button quickly. Hold the button down continuously. After several seconds, the screen will display a message saying “Loading startup options” along with a gear icon and any available startup disks.
Once that screen appears, release the Power button. You will see an Options icon labeled “Options” with a gear symbol. Click on Options, then click the Continue button below it. Your Mac will load into macOS Recovery Mode within a few seconds.
Either method brings you to a window titled macOS Utilities with several options listed, such as Restore From Time Machine Backup, Reinstall macOS, and Disk Utility. That window confirms you successfully entered Recovery Mode and can now proceed to the next step.
Step 2: Erase Your Hard Drive with Disk Utility
From the macOS Utilities window, click on Disk Utility, then click the Continue button at the bottom of the window. Disk Utility will open and show you a sidebar on the left with a list of all drives and volumes connected to your Mac.
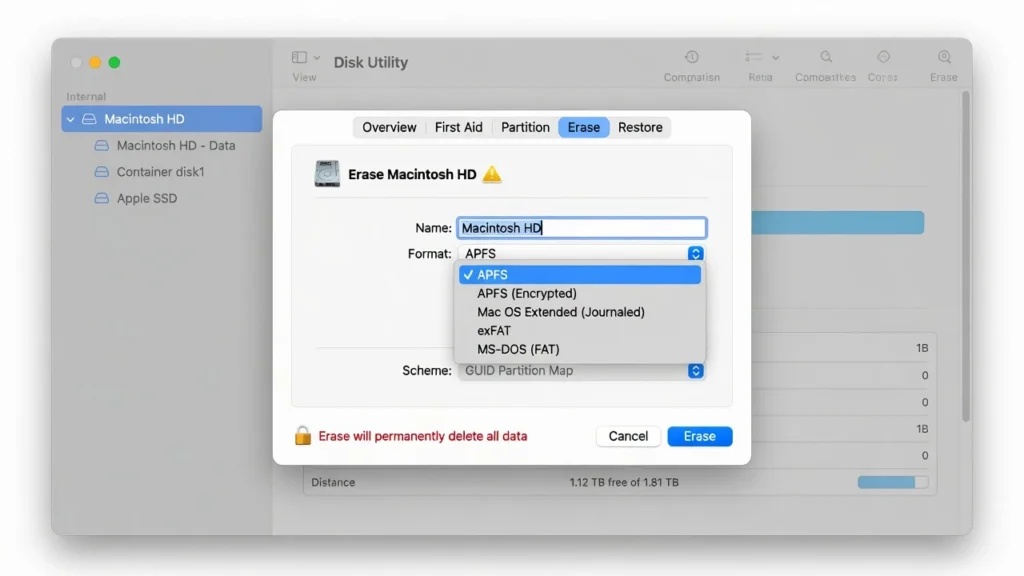
In that sidebar, look for your main startup disk. This disk is usually named “Macintosh HD” and appears near the top of the list. Some Macs also show a separate “Macintosh HD – Data” volume underneath the main disk. You want to select the top level disk, not the Data volume.
Once you select the correct disk, click the Erase button at the top of the Disk Utility window. A dialog box will appear asking you to confirm the erase and choose a format.
Here is where many people get confused, so let me explain the format choice clearly. You need to choose between APFS and Mac OS Extended Journaled.
Which format should you choose in Disk Utility?
For most modern MacBook Pro models with an SSD, APFS is the appropriate format. Apple Silicon Macs use APFS.
If you’re working with an older Intel Mac or a traditional hard drive, Disk Utility may offer or recommend Mac OS Extended (Journaled) depending on the macOS version and storage configuration.
Rather than choosing a format solely from the MacBook’s manufacturing year, check the options shown by Disk Utility for your specific Mac. If Apple provides an “Erase Volume Group” option for Macintosh HD, use that option when instructed, or if your Mac has a solid-state drive and runs macOS High Sierra or newer. APFS stands for Apple File System and is the modern format Apple designed specifically for SSDs and newer Macs. All Apple Silicon Macs must use APFS.
Choose Mac OS Extended Journaled if your MacBook Pro was made before 2017, or if your Mac has a traditional hard disk drive instead of an SSD. Mac OS Extended is the older file system format that works better with spinning hard drives and older versions of macOS.
When in doubt, APFS is the safe choice for any Mac made in the last several years. If you choose the wrong format, the macOS installer will usually give you an error later and you can come back to Disk Utility to change it.
In the Name field, I recommend keeping the name as “Macintosh HD” because that is the default name macOS expects. You can change the name later after setup if you want, but keeping it standard now avoids any potential confusion during the reinstall process.
Click the Erase button to confirm. Disk Utility will begin erasing your MacBook Pro hard drive. This process typically takes between five and fifteen minutes depending on the size and speed of your drive. You will see a progress indicator while the erase happens.
Once the erase finishes, Disk Utility will show a confirmation message. Click Done, then close the Disk Utility window by clicking Disk Utility in the menu bar and selecting Quit Disk Utility. You will return to the main macOS Utilities window.
Step 3: Reinstall macOS
Back in the macOS Utilities window, select the option labeled “Reinstall macOS” and click Continue. Your Mac will connect to Apple’s servers to prepare the installation.
A software license agreement will appear on screen. Click Agree to accept the terms. The installer will then ask you to select a disk where you want to install macOS. Choose the “Macintosh HD” disk that you just erased in the previous step, then click Install.
Here is the part where you need patience. The macOS reinstall process downloads several gigabytes of data from Apple’s servers before it can install the operating system. This download can take anywhere from thirty minutes to two hours or more depending on your internet connection speed.
The progress bar you see on screen may look like it is stuck or frozen at certain percentages for long periods of time. This is completely normal. As long as the progress bar shows any movement at all, even if it only advances one percent every few minutes, your Mac is still working and you should not interrupt the process.
Do not close your MacBook Pro lid, do not force restart the computer, and do not let the Mac go to sleep during this process. Let the installation run to completion even if it takes longer than you expected.
Once the download and installation finish, your MacBook Pro will restart automatically. When the restart happens, you will see a Welcome screen asking you to select your country and language, just like when you set up a brand new Mac for the first time.
That Welcome screen means the factory reset succeeded and your Mac is now completely clean and ready for setup.
Using the Recovery Assistant Menu (Alternative Navigation)
While you are in macOS Recovery Mode, there is another option you can use that some people find easier to navigate. At the top of the screen, look for a menu bar item called “Recovery Assistant.” Click on that menu and you will see additional options including one labeled “Erase Mac.”
The Erase Mac option walks you through a guided process that combines the disk erase and macOS reinstall steps into a single streamlined workflow. This option is particularly helpful if you find the manual Disk Utility method confusing, because Erase Mac handles the technical details automatically and simply asks you to confirm each step.
Not every version of macOS Recovery includes the Recovery Assistant menu, but if you see that option available on your Mac, feel free to use it as an alternative to the manual steps I described above. The end result is exactly the same.
Easier Way: Erase Assistant (macOS Ventura, Sonoma, Sequoia)
If you can actually log into your Mac, I have some good news. You don’t need to mess around with Recovery Mode or external drives anymore.
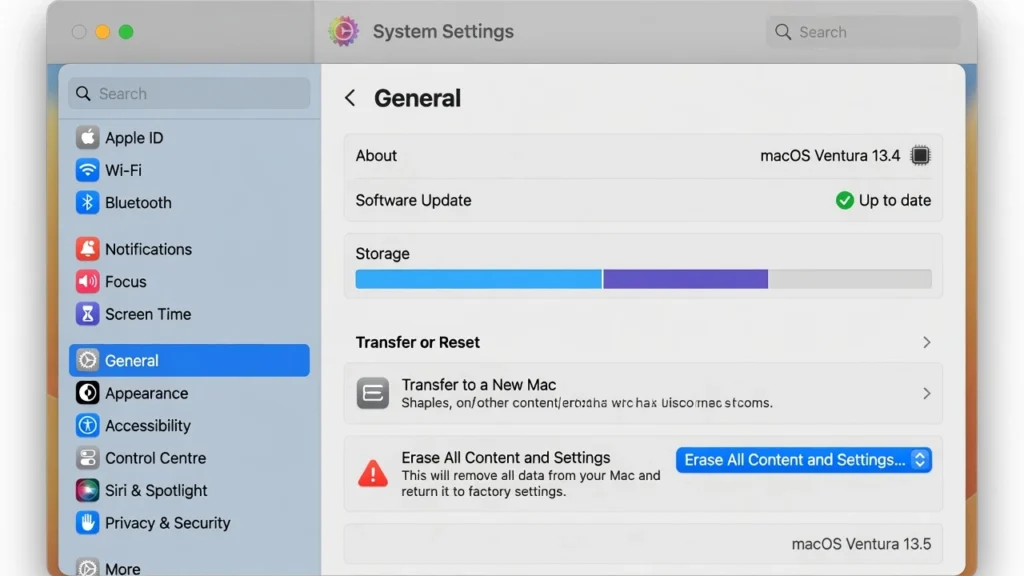
Apple added a feature called Erase Assistant in macOS Ventura that makes factory resetting your Mac incredibly simple. This built-in tool walks you through the entire process automatically, and I honestly wish it had been around years ago when I was wiping my old MacBook.
I’ve used this method several times when helping friends sell their Macs or setting up devices for new users. It’s significantly faster than the old Recovery Mode approach, and you don’t need to worry about making mistakes during the process.
The biggest requirement is that you need access to System Settings. That means you either need to know your password already, or you’ve just used the password reset method I covered earlier to regain access to your account.
This approach works on macOS Ventura, macOS Sonoma, and macOS Sequoia. If you’re running an older version like Big Sur or Monterey, you’ll need to use the Recovery Mode method instead.
Here’s what makes Erase Assistant special. It doesn’t just wipe your data. It also signs you out of iCloud, removes Find My Mac automatically, and ensures your Mac is completely ready for a new owner. I don’t have to remember extra steps or worry about forgetting something important.
When you use erase all content and settings Mac through this method, your computer handles the technical details for you. It’s basically the same experience iPhone users have had for years, finally brought to the Mac.
I should mention that this process requires an internet connection. Erase Assistant verifies your identity with Apple and ensures everything is properly disconnected from your account before wiping the system.
The entire macOS Ventura factory reset process usually takes between 20 to 40 minutes, depending on how much data you have stored. Your Mac will restart itself a few times during the process, which is completely normal.
Step-by-Step Erase Assistant Process (Ventura and Later)
Let me walk you through exactly how to use macOS Sequoia erase assistant and the same process on earlier compatible versions.
First, I click the Apple menu in the top left corner of my screen and select System Settings. The interface looks different from the old System Preferences, so don’t be surprised if things look unfamiliar.
In System Settings, I look for the General section in the left sidebar. I click on that, then scroll down until I see Transfer or Reset. This is where Apple tucked away the erase assistant feature.
When I click Transfer or Reset, I see an option that says Erase All Content and Settings. That’s exactly what I want. I click the blue button next to it.
At this point, my Mac asks me to enter my admin password. This is a security measure to make sure someone isn’t wiping my computer without permission. I type in my password and click Continue.
The next screen shows me what will happen. Erase Assistant explains that it will sign me out of iCloud, remove my data, and reset my settings. I review this information to make sure I’ve backed up everything I need.
If I have FileVault turned on, my Mac might ask for my FileVault recovery key. I keep this handy just in case, though it doesn’t always prompt for it.
I click Erase All Content and Settings one final time to confirm. My Mac doesn’t ask me again after this point, so I make absolutely certain I’m ready.
My Mac screen goes dark for a moment, then shows a progress bar. The system automatically signs out of my Apple ID, deactivates Find My Mac, and begins erasing my data. I don’t need to touch anything during this process.
The computer restarts itself several times. Each restart is part of the macOS Ventura factory reset sequence, and I just let it run without interrupting. Eventually, my Mac boots up to the setup screen like it just came out of the box.
That’s it. The entire process is automated and I find it much less stressful than manually erasing through Recovery Mode.
If Recovery Mode Doesn’t Work (Advanced)
I want to share an advanced technique that most people don’t know exists. Single User Mode allows you to reset your Mac using Terminal commands without going through Recovery Mode at all.
This method forces your Mac into its initial setup state by removing a specific system file. Single User Mode is essentially a text-only diagnostic environment where you can interact directly with your Mac’s operating system before it fully boots up.
I need to be completely upfront with you about something important. This process will result in the loss of all documents, files, pictures, and videos unless you’ve backed them up elsewhere. The commands you’ll type tell your Mac to forget it ever had a user account, which means anything stored under that account becomes inaccessible.
I’ve used this alternative method several times when Recovery Mode wouldn’t load properly or when I needed to create a fresh admin account on a Mac with system issues. It’s particularly useful on older MacBooks where the recovery partition might be corrupted.
The beauty of Single User Mode is that your Mac doesn’t need to load any graphical interface. Even if your operating system is seriously damaged, you can usually still access this text-based environment and run the necessary Terminal commands to reset the setup state.
I learned this technique from watching repair technicians work on Macs that seemed completely stuck. One tech showed me how he used these exact commands on an A1706 MacBook Pro model that wouldn’t boot normally but still responded to Single User Mode.
Here’s what makes this method different from a complete disk wipe. The commands I’m about to show you don’t erase your entire hard drive. Instead, they remove a tiny file called .AppleSetupDone that tells your Mac someone already set it up. When that file disappears, your Mac thinks it’s brand new and boots into the Welcome screen.
After you complete this process, your Mac will boot into the initial Welcome/Setup assistant, just like a brand-new computer fresh from the Apple Store. You’ll be able to create a new administrator account and regain access to your system.
I only recommend this method if you’re comfortable typing commands exactly as written. Terminal commands are case-sensitive, and even a single wrong character will cause the process to fail or potentially create worse problems.
When to Use Single User Mode Method
Should you use Single User Mode instead of the other methods I’ve covered? That depends on your specific situation.
I turn to this alternative method when Recovery Mode simply won’t load. Sometimes the recovery partition gets corrupted, or the keyboard shortcuts to access Recovery Mode don’t work properly on certain Mac models.
Single User Mode can also help in advanced data recovery scenarios where you need to create a new admin account without completely wiping the user data partition. I’ve seen situations where someone needed to preserve certain system files while still resetting the user account structure.
This method is particularly valuable if you’re trying to avoid a trip to the Apple Store. Many people don’t realize they have this option available and assume they need professional help when their Mac won’t boot normally.
I also consider Single User Mode when I’m working with a Mac that has FileVault encryption issues or firmware password complications. Sometimes this text-based approach bypasses problems that would otherwise prevent a normal reset.
Step 1: Boot Into Single User Mode
The first thing I do is shut down my Mac completely. I make sure the computer is fully powered off, not just asleep or in standby mode.
Next, I press the Power button to turn on my Mac. This is where timing becomes critical, and I need to act immediately.
The moment I press Power, I hold down both Command and S keys together. I don’t wait to see the Apple logo or hear the startup chime. I press Command+S right away and keep holding both keys down.
If I did this correctly, my screen turns black and white text starts scrolling rapidly down the display. This text shows my Mac loading its core system files in Single User Mode. The scrolling can look intimidating, but I just let the process run without touching anything.
I wait patiently for the text scrolling to stop. Eventually, the rapid stream of commands slows down and finally halts completely.
Once the text stops and I see the root# prompt appear at the bottom of the screen, I know I’m successfully in Single User Mode. The root# prompt is my visual confirmation that the Mac is ready to accept Terminal commands.
If I don’t see the white text on black background, I probably didn’t hold Command+S early enough. In that case, I shut down the Mac and try again, making sure to hold those keys the instant I press the power button.
Step 2: Type Three Commands Exactly
Now comes the part where precision really matters. I’m about to type three Terminal commands, and each one must be typed exactly as shown with correct spacing and capitalization.
First, I press Enter once at the root# prompt to make sure I have a fresh command line.
The first command I type is mount -uw / and then I press Enter. This command mounts the main drive with read and write permissions, which allows the system to make changes to files. I make sure to include the space after mount, the space after -uw, and the forward slash at the end.
After I press Enter, I might see a brief response or the prompt might just return immediately. Either response is normal.
The second command is rm /var/db/.AppleSetupDone and I press Enter after typing it. This is the critical command that removes the setup completion file. The rm command means remove, and the path that follows tells the system exactly which file to delete.
I pay special attention to the capitalization in .AppleSetupDone. The A and S and D are all capital letters. I also make sure to include the period before AppleSetupDone because that period is part of the filename.
The third and final command is shutdown -h now and I press Enter one last time. This command tells my Mac to shut down immediately in a controlled manner.
After I enter that final command, my Mac’s screen goes dark and the computer powers down completely. I don’t force anything or hold the power button. The shutdown command handles everything automatically.
Step 3: Restart and Complete Setup
After my Mac shuts down from the final command, I wait about a minute before doing anything. This waiting period gives the system time to completely power down and clear any temporary states.
Once that minute passes, I press the Power button normally to start my Mac again.
This time, instead of booting to the login screen I’m used to seeing, my Mac loads the Welcome screen that appears on brand-new computers. The display shows language selection and country options just like when I first unboxed the Mac.
I select my country and language preferences, then click Continue. The setup assistant walks me through the same screens someone would see when setting up a new Mac for the first time.
When I reach the user account creation screen, I create a new administrator account by entering a name, account name, and password. This becomes my new admin account with full control over the Mac.
The entire setup process takes just a few minutes and when I’m done, my Mac boots to a fresh desktop with the new user account I just created.
What Is Activation Lock and What to Do If It Appears After Reset (MacBook Pro Activation Lock After Factory Reset)
Completing a factory reset only to see an Activation Lock screen is one of the most frustrating experiences a Mac user can face. I’ve seen this happen to people who bought second-hand Macs in good faith and ended up with a computer they couldn’t use at all.
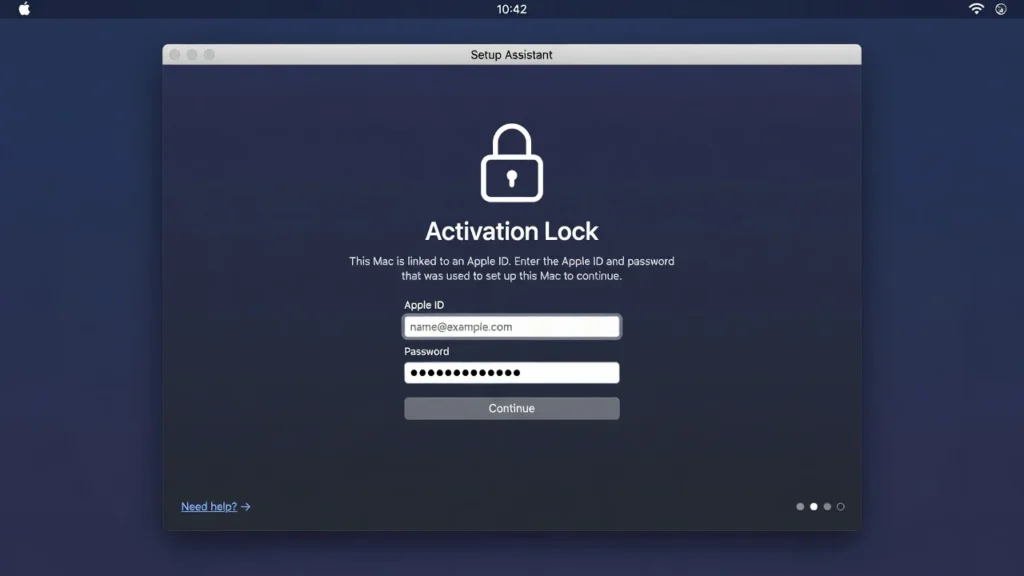
Activation Lock is Apple’s security feature that ties your Mac to a specific Apple ID through iCloud. When Find My Mac is enabled on a device, Activation Lock automatically activates. After a factory reset, if the previous owner never signed out of their Apple ID, the Mac demands the original owner’s login credentials before anyone else can use it.
The hard truth is that Activation Lock is extremely effective at what it was designed to do. A Mac stuck behind Activation Lock is essentially unusable until the original Apple ID owner removes the device from their account.
I want to cover this topic from two perspectives because the right advice completely depends on whether you’re the person selling a Mac or the person who just bought one.
What Is Activation Lock and Why Does It Appear?
Activation Lock appears after a factory reset when Find My Mac was still turned on and the original Apple ID account was never removed before the reset took place.
Here’s how it works. When Find My Mac is enabled in iCloud settings, Apple links the Mac hardware directly to the owner’s Apple ID. Performing a factory reset doesn’t break that link. The connection lives at a deeper level than the operating system, so wiping the drive doesn’t clear Activation Lock.
When someone starts the Mac after a reset, Apple’s servers check whether the device is still registered to an Apple ID. If the answer is yes, the Mac displays the Activation Lock screen and asks for the original owner’s email address and password before it allows anyone to proceed.
Apple designed Activation Lock specifically to make stolen or lost devices useless to anyone who doesn’t have the original owner’s credentials. The feature works exactly as intended, which creates a real problem when someone forgets to disable Find My Mac before selling or gifting their computer.
An apple id locked mac situation after a reset almost always means Find My Mac was still active at the time the factory reset was performed.
If You’re the Previous Owner Preparing to Sell
If you’re preparing your Mac for sale, disabling Find My Mac before the factory reset is the single most important step you can take. Skipping this step means your buyer will receive a locked device they cannot use, regardless of how much they paid.
The simplest approach is to sign out of iCloud before you reset. I go to System Settings, click on my Apple ID profile at the top, scroll down, and click Sign Out. This automatically disables Find My Mac and removes the device from my Apple ID account.
If I’ve already reset my Mac and realized I forgot to sign out first, I can still fix the problem remotely. I visit icloud.com on any other device, log into my Apple ID account, open Find My, locate the Mac in the devices list, and choose to remove the device from my account. This clears the Activation Lock without needing physical access to the Mac.
Apple strongly recommends that sellers always confirm Find My Mac is turned off and their Apple ID is fully removed before handing over any device to a new owner.
If You Bought a Used Mac That’s Activation Locked
If you bought a second-hand MacBook and are now facing an Activation Lock screen, here are the legitimate options available to you.
Contact the previous seller first. This is the most straightforward path to a resolution. The seller can either give you their Apple ID credentials to unlock the device in person, or they can remotely remove the Mac from their account through icloud.com. Most honest sellers will help you resolve this quickly once they understand the problem.
Contact Apple Support with proof of purchase. If the seller is unreachable or unresponsive, Apple Support can sometimes help when you provide valid proof of purchase documentation such as a receipt or invoice. Apple reviews these requests on a case-by-case basis and cannot guarantee removal, but presenting genuine ownership evidence is your best legitimate option.
Check Activation Lock status before buying any used Mac. I always recommend powering on a second-hand Mac before purchasing. If the screen shows a normal login or setup screen, the device is clean. If you see an Activation Lock screen asking for someone else’s Apple ID, walk away from that purchase entirely.
I also want to address something important directly. Searching for an activation lock bypass solution will lead you to websites and services promising to unlock any Mac for a fee. None of these services are legitimate. There is no real bypass for Activation Lock, and paying for these supposed services results in lost money with no resolution. Apple’s Activation Lock has no back door, and anyone claiming otherwise is not being truthful.
The honest reality is that a Mac with Activation Lock can only be unlocked by the original Apple ID owner or through Apple’s official support process with proof of purchase. If neither option is available to you, the Mac unfortunately cannot be used.
Troubleshooting: When Factory Reset Gets Stuck or Fails
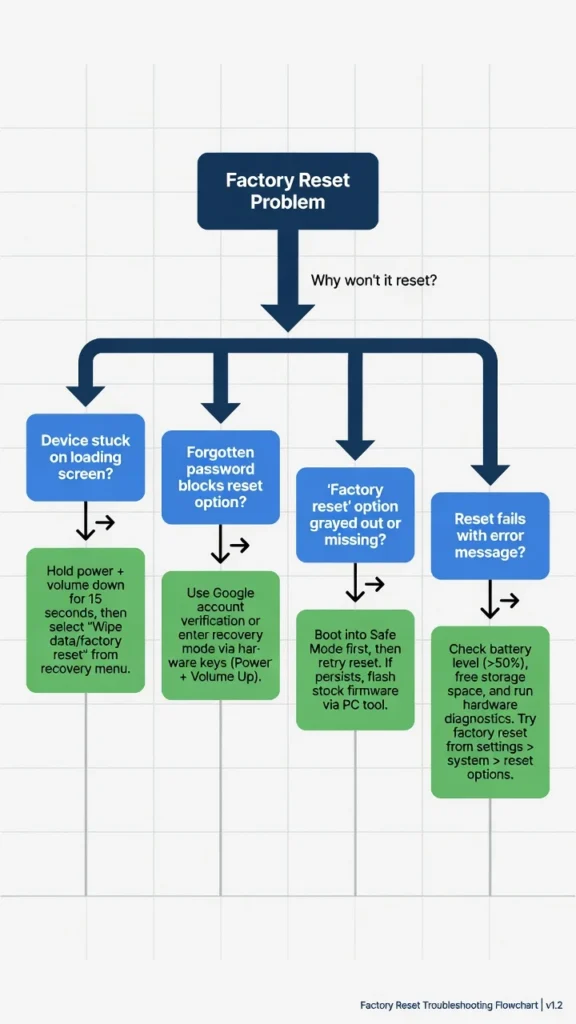
Factory resets don’t always go smoothly, and I want to be honest about that. Most guides show you the ideal path and leave you stranded when something unexpected happens. This section covers the real problems people actually run into and what to do about each one.
I’ve worked through most of these issues personally, and I know how stressful it feels when your Mac stops responding in the middle of an important process. The good news is that most problems have a straightforward solution once you know what’s causing them.
Stuck on Progress Bar During Erase or Reinstall
If your progress bar appears completely frozen, don’t panic immediately. macOS reinstallation can genuinely take a very long time, and what looks like a frozen screen is often just a slow but active process running in the background.
I generally give the process at least two hours before assuming something is wrong. Large reinstalls over slower internet connections can push that timeline even further. Patience saves a lot of unnecessary restarts.
If the progress bar truly hasn’t moved at all after two full hours, a force restart is your next step. Hold the Power button down for about ten seconds until your Mac shuts off completely, then release and press it again normally to restart.
After a forced restart, I recommend switching to macOS internet recovery instead of trying the same local recovery again. A strong and stable internet connection matters a lot here. If your WiFi signal is weak, move closer to your router or connect with an ethernet cable if your Mac supports it.
“macOS Could Not Be Installed” Error
This macOS installation error is more common than Apple’s documentation suggests, and the cause is almost always one of two things. Either the disk format chosen in Disk Utility doesn’t match what your Mac expects, or the installer file itself got corrupted during download.
The format issue is the most frequent culprit. Newer Macs using SSDs need the APFS format selected in Disk Utility during the erase step. Older Mac models with spinning hard drives need Mac OS Extended (Journaled) instead. Choosing the wrong format causes the installation to fail even though the erase appears to complete successfully.
If I see this error, I go back into Disk Utility, erase the drive again using the correct format for my specific Mac model, and then try the installation again. If the same error returns after correcting the format, I switch to internet recovery using Command+Option+R to download a completely fresh installer directly from Apple’s servers rather than using the potentially corrupted local copy.
Mac Won’t Boot to Recovery Mode: Try macOS Internet Recovery
When pressing Command+R at startup produces nothing useful or just loads a broken Recovery Mode environment, the local recovery partition is likely corrupted or missing entirely. This happens more often on older Macs or on drives that have experienced errors.
macOS internet recovery is the backup solution Apple built specifically for this situation. Instead of loading recovery tools from your hard drive, internet recovery downloads everything directly from Apple’s servers over WiFi.
To access internet recovery, I shut down my Mac completely, press the Power button, and immediately hold Command+Option+R together. The key difference I notice is on the startup screen. Instead of the familiar Apple logo, a spinning globe icon appears. That spinning globe confirms my Mac is connecting to Apple’s servers to load the recovery environment.
The command option R shortcut requires a working internet connection, so I make sure my Mac is within good range of my WiFi network before attempting this. Internet recovery takes longer than local recovery to load since macOS downloads the necessary tools from scratch, but the result is a clean and fully functional recovery environment.
Try NVRAM Reset Before Factory Reset
If your Mac has been behaving strangely before you attempt a factory reset, performing an NVRAM reset macbook procedure first can clear up underlying issues that might interfere with the reset process.
NVRAM stores small pieces of system information like startup disk preferences, display resolution settings, and volume levels. When NVRAM data becomes corrupted, Macs can behave unpredictably during startup sequences including those needed for Recovery Mode access.
Resetting NVRAM is simple and completely safe. I shut my Mac down fully, then press the Power button and immediately hold Command+Option+P+R all at the same time. I keep holding all four keys for about 20 seconds. On older Intel Macs, I might hear the startup chime twice during this process, which confirms the reset worked. On newer models the screen simply stays dark during the reset period.
After releasing the keys, my Mac boots normally. Once it finishes starting up, I can then proceed with whichever factory reset method applies to my situation. Clearing the NVRAM beforehand removes one more potential obstacle and gives the reset process the cleanest possible starting point.
What to Expect After Factory Reset: Setup Walkthrough
When your Mac restarts after a successful factory reset, the first thing you’ll see is the Welcome screen. That colorful screen with the word “Welcome” floating across the display in different languages is your confirmation that everything worked correctly. Your Mac is now in exactly the same state it was when it left the factory.
The setup assistant is the guided process that walks you through configuring your Mac from scratch after a reset. Once the installation is complete, your Mac will restart and present the initial setup assistant automatically. You don’t need to do anything special to trigger it.
The first few screens ask you to select your country or region and then choose your preferred language. I click through these quickly since they’re straightforward choices. After that, the setup assistant asks you to connect to a WiFi network.
I always connect to WiFi at this stage rather than skipping it. Connecting early allows the setup assistant to check for software updates and ensures your Apple ID verification works properly during the next steps.
After WiFi setup, you’ll reach the user account creation screen. Here you create a brand new administrator account by entering a full name, account username, and a password you choose yourself. This becomes the primary account on your freshly reset Mac.
One screen that sometimes surprises people is the Migration Assistant prompt. Your setup assistant may ask whether you want to transfer data from a backup, another Mac, or a Time Machine drive. If you’re keeping the Mac for yourself and want to restore your files, this is the right moment to do it. If you’re selling the Mac or want a completely fresh start, simply click “Not Now” to skip the transfer entirely.
If you find your macbook erased stuck on setup assistant and the screen won’t move forward, the most common cause is a lost WiFi connection or an Apple ID verification issue. Reconnecting to your network usually resolves this immediately.
After completing the final setup screens, your Mac loads a clean desktop with no personal files, no previous applications, and no account history. The entire experience genuinely feels like using a brand-new computer, because from a software perspective that’s exactly what it is.
Frequently Asked Questions About Factory Resetting a MacBook Pro
Can I factory reset a MacBook Pro without the Apple ID password?
Often, you can erase a Mac through macOS Recovery without knowing the normal Mac login password, but the exact requirements depend on the Mac model and its security configuration. Recovery may ask you to authenticate before allowing certain actions.
An Apple Account password and a Mac login password are different credentials. More importantly, erasing a Mac does not bypass Activation Lock. If the Mac is still associated with another person’s Apple Account through Find My, the previous owner must remove it from their account or you must follow Apple’s legitimate support process with valid proof of purchase.
What’s the difference between resetting my password and factory resetting my Mac?
A password reset using the resetpassword command recovers your access without deleting any files. A factory reset wipes everything and reinstalls macOS completely. If you’re locked out, reset your password first, back up your files, then decide whether a full factory reset is needed.
How long does it take to factory reset a MacBook Pro?
Disk erase takes 5 to 15 minutes. macOS download and reinstall takes 30 minutes to 2 hours depending on internet speed. Total time is typically 1 to 2.5 hours. If the progress bar looks frozen during reinstall, be patient as slow connections can make the process appear stuck.
Which macOS version will be installed after factory reset?
The macOS version you get depends on your Mac and how you start macOS Recovery.
On an Intel-based Mac:
Command-R: Reinstalls the current version of the most recently installed macOS.
Option-Command-R: Installs the latest version of macOS that is compatible with your Mac.
Shift-Option-Command-R: Reinstalls the version of macOS that came with your Mac, or the closest version still available.
On a Mac with Apple silicon (M1, M2, M3, M4, and later): macOS Recovery normally reinstalls the current version of the most recently installed macOS. Apple silicon Macs use the power-button startup process to enter Recovery rather than the Intel keyboard shortcuts.After erasing the Mac with Disk Utility, an earlier macOS version may sometimes be installed, particularly if the Mac had previously been upgraded. You can update to the latest compatible version afterward through Software Update.
Can I factory reset a Mac without an internet connection?
You may be able to start macOS Recovery without an internet connection, depending on your Mac and the recovery method you’re using. However, reinstalling macOS requires an internet connection because your Mac needs to download the macOS installer and other required information from Apple’s servers.
If you’re using an Intel-based Mac, Command-R can start the built-in macOS Recovery system, while Option-Command-R and Shift-Option-Command-R use Internet Recovery. If Internet Recovery is required, your Mac must have a working internet connection.
On a Mac with Apple silicon, you can enter Recovery by holding the power button until the startup options appear, but an internet connection is still required when you reinstall macOS.
In short: You can enter Recovery in some situations without internet, but you should have a reliable Wi-Fi or Ethernet connection available if you plan to erase the Mac and reinstall macOS.