
Quick Guide: All Dell Laptop Screenshot Shortcuts (Copy This)
I know you probably just want the keyboard shortcut screenshot methods right now without scrolling through pages of explanations. I get it. When I need to capture something on my screen quickly, I don’t want a novel either.
So here’s every Windows screenshot shortcut that works on Dell laptops, organized by what you’re trying to do:
For the fastest screenshot on any Dell:
Windows + Shift + S – This opens the Snipping Tool instantly. You can select any area of your screen, a specific window, or capture everything. This is the method I use most on my Dell Inspiron because it’s quick and works perfectly on Windows 11.
For auto-saving a full screenshot:
Windows + PrtSc – Your screen will dim briefly, and the screenshot saves automatically to your Pictures folder. On some Dell models, you’ll need to press Fn + Windows + PrtSc instead if your function keys are set differently.
For copying the screen to your clipboard:
PrtSc (or Fn + PrtSc) – This copies everything on your screen. You’ll need to paste it into Paint or another app to see and save it.
For capturing just one window:
Alt + PrtSc – Click the window you want, then press this. It copies only that active window to your clipboard.
I’ve tested all these shortcuts across different Dell laptops, and they work reliably. The Fn key requirement catches people off guard sometimes, especially on Dell’s compact keyboards, but once you know which combination your laptop uses, taking screenshots becomes second nature.
What You Need to Know Before You Screenshot on Your Dell
I’ll be honest with you. If you’ve ever taken a photo of your Dell laptop screen with your phone, you’re not alone. I see it all the time, and I totally understand why people do it. It’s quick, convenient, and your phone is probably right there next to you.
But here’s the thing I’ve learned after using Dell Technologies laptops for years. Taking proper screenshots instead of phone pictures makes a huge difference. The image quality is crystal clear instead of grainy. You can easily share the file digitally without worrying about weird angles or lighting. Plus, if you’re showing something to a colleague or asking for help online, a clean screenshot looks much more professional.
Learning to screenshot on a Dell laptop takes literally two seconds once you know where the keys are.
Dell laptops use the same Windows screenshot methods as other computers, but there’s one small catch that trips up a lot of people. Some Dell models require you to press the Fn key along with other keys, especially if you have a compact keyboard. If you’re also working with HP laptops, the methods are very similar – check out our guide on how to screenshot on HP EliteBook laptop for Windows 10 specific steps
The good news is that once you figure out which key combination your specific Dell uses, taking screenshots becomes second nature. Whether you have a Dell Inspiron, XPS, or Latitude, the basic screenshot methods work the same way across all models.
Where is the Print Screen Key on Dell Laptops?
The Print Screen button on Dell keyboards is typically located in the top right section of your keyboard. You’ll see it labeled as “PrtSc,” “PrtScn,” or sometimes the full “Print Screen” depending on your Dell model.
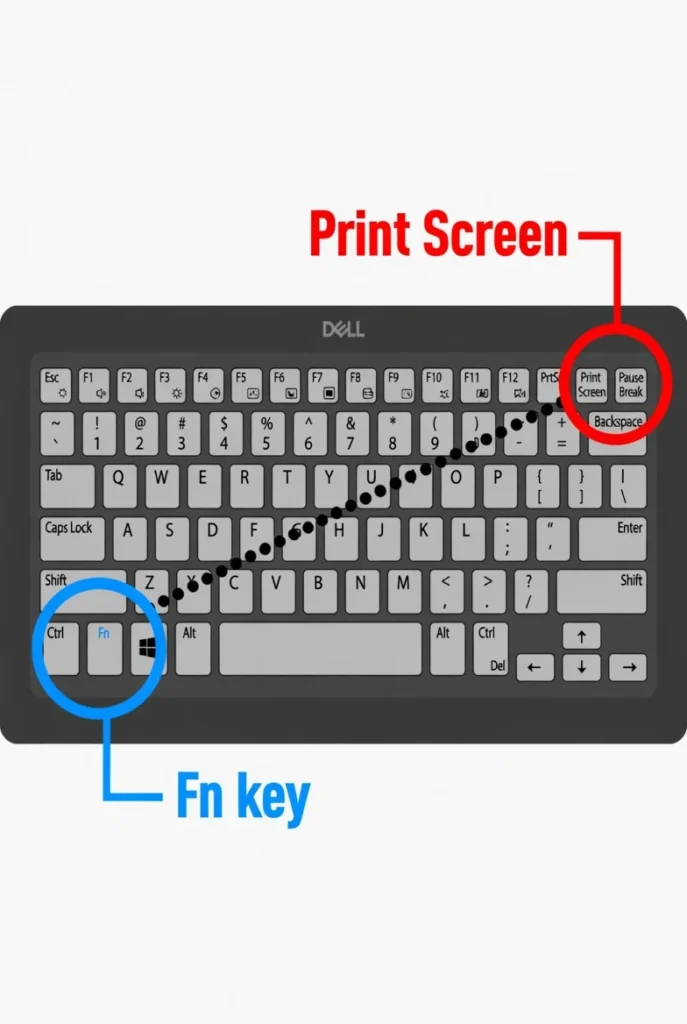
On many Dell laptops, especially the compact ones, you’ll need to hold the Fn key while pressing Print Screen. The Fn key is usually found in the bottom left corner of your keyboard. This Fn + PrtSc combination is necessary because Dell often assigns multiple functions to the same key to save space.
If your Print Screen key has a small “F” symbol or different colored text, that’s your clue that you’ll need to use the Fn key with it.
The Fastest Way to Screenshot on Your Dell Laptop (Takes 2 Seconds)
The absolute fastest way to learn how to screenshot on a Dell laptop is using Windows + Shift + S.This shortcut instantly opens the Snipping Tool and lets you capture exactly what you need in about two seconds.
I’ve been using this method on my Dell for the past few years, and it’s become my go-to because it’s so much more flexible than the old methods. The traditional Windows + Print Screen approach doesn’t always work as expected in Windows 11, which is why I switched to this newer technique.
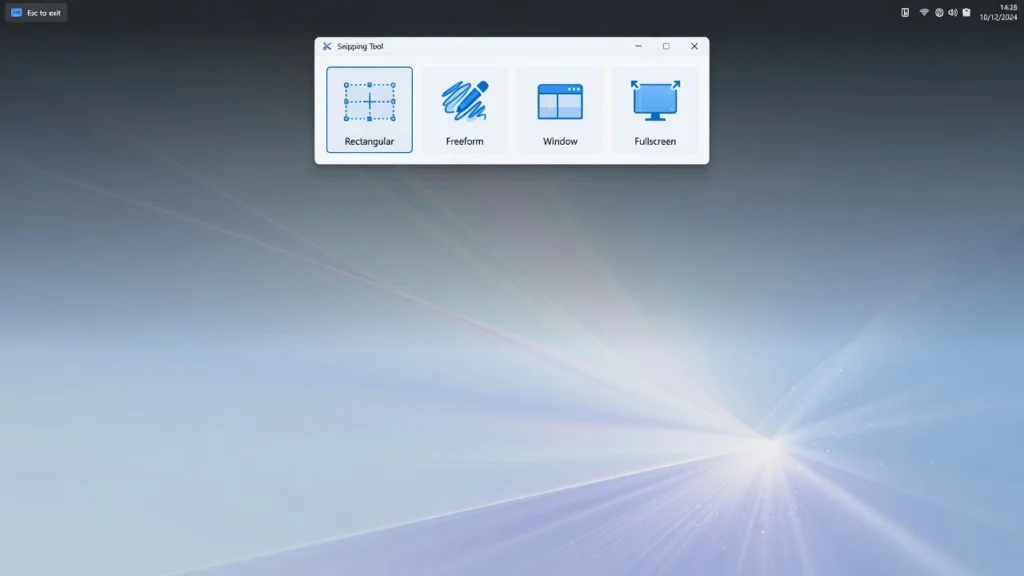
When you press Windows + Shift + S, your screen dims slightly and four capture options appear at the top. You get a rectangular snip for selecting any area, a free-form snip for drawing custom shapes, a window snip to screenshot a specific window, and a full-screen snip for everything. This gives you way more control than just capturing your entire screen every time.
What I love about this method is how it handles partial screenshots. You can grab just the section you need instead of taking a full screenshot and then cropping it later. Whether you want to capture a specific error message, a section of a webpage, or just one program window, you can do it all with the same shortcut.
The one thing that caught me off guard initially is that Windows 11 changed how saving works. You need to click the notification that pops up after capturing to actually save your screenshot. It doesn’t automatically save like some of the older methods do.
Microsoft provides comprehensive documentation about all Windows screenshot features and updates in their official support documentation. As Windows continues to evolve, new screenshot capabilities and improvements are regularly added to enhance the user experience across all laptop brands, including Dell models.
How to Use Windows + Shift + S
Press Windows + Shift + S at the same time. Your screen will darken and you’ll see four icons at the top of your screen. Click the rectangular snip icon (it’s usually selected by default), then click and drag to select the area you want to capture.
Once you release your mouse, the captured area gets copied to your clipboard automatically. You’ll also see a small notification appear in the bottom-right corner of your screen. Click this notification to open the Snipping Tool where you can annotate, edit, or save your screenshot to a specific location.
This method activates the built-in Snipping Tool without having to search for it in your Start menu, which saves you several clicks and makes the whole process much faster.
How to Know It Worked (Visual Confirmation)
You’ll know your screenshot worked when your screen darkens immediately after pressing the key combination. This dimming effect is your visual confirmation that the capture mode is active and ready for you to select an area.
After you capture something, a notification will slide in from the bottom-right corner of your screen. This notification means your screenshot was successful and is now saved to your clipboard. Unlike older methods that save screenshots automatically, Windows 11 requires you to click this notification if you want to save the image as a file rather than just keeping it in your clipboard.
4 More Screenshot Methods for Your Dell Laptop
While Windows + Shift + S is my favorite method, there are four other screenshot techniques that work great on Dell laptops. Each method has its own strengths depending on what you’re trying to accomplish.
I use different methods for different situations. Sometimes I need a quick full-screen capture without any editing. Other times I want to grab just one window or edit the screenshot before saving. Having multiple options means you can choose the best approach for whatever you’re working on.
Method 1: Windows + PrtSc (Best for Speed – Auto-Saves)
Windows + PrtSc is the fastest way to capture and save your entire screen automatically. When you press these keys together, your screen will briefly dim, and the screenshot saves directly to your Pictures folder without any additional steps required.
This method gives you a full screen capture of everything visible on your Dell laptop. I use this when I need to quickly grab everything on my screen and don’t want to deal with selecting areas or saving files manually. The auto-save feature makes this incredibly convenient for rapid screenshots.
On some Dell laptops, especially those with compact keyboards, you might need to press Fn + Windows + PrtSc instead. The function key requirement depends on how your Dell keyboard is configured. You’ll know the screenshot worked when your screen dims briefly, which serves as visual confirmation.
Your screenshots automatically save to the Pictures > Screenshots folder on your computer. Windows creates this folder automatically the first time you use this method, so you don’t need to set up anything in advance.
Method 2: PrtSc + Paint (Best for Editing Before Saving)
The PrtSc key method is perfect when you want to edit your screenshot before saving. This approach copies your entire screen to the clipboard, giving you full control over how you save and modify the image.
Press the PrtScn key on your Dell laptop (you might need Fn + PrtSc depending on your model). Nothing visible happens because this clipboard screenshot method doesn’t show visual confirmation like the auto-save methods do. Your screen gets copied to the clipboard, ready for pasting.
Open Paint by searching for it in your Start menu, then press Ctrl + V to paste your screenshot. Now you can edit the image however you want. Crop it, add text, highlight important areas, or draw arrows to point out specific details.
When you’re ready to save, go to File > Save As and choose your preferred screenshot file format. PNG gives you the highest quality and is best for screenshots with text or detailed graphics. JPG creates smaller files but with slightly lower quality, which works fine for simpler images.
This method lets you edit screenshots on Windows using the built-in Paint app, so you don’t need any additional software. I find this approach especially useful when I need to crop out sensitive information or highlight specific parts of the screen.
Method 3: Alt + PrtSc (Best for Single Window)
Alt + PrtSc captures only your active window instead of your entire screen. This method is perfect when you want to screenshot a specific window without including your desktop, taskbar, or other open programs.
Click on the window you want to capture to make it active, then press Alt + PrtSc. This creates a clipboard screenshot of just that window. Like the regular PrtSc method, you’ll need to paste the image into Paint or another program to see and save it.
I use this method constantly when I’m working with multiple programs and only need to share one specific application. Instead of taking a full screenshot and then cropping it, Alt + PrtSc gives you exactly what you need right away. The captured window includes its title bar and borders, so the recipient can clearly see which program you’re showing them.
This technique works with any application window, whether it’s a web browser, document, spreadsheet, or any other software running on your Dell laptop.
Method 4: Snipping Tool App (Best for Annotations)
The Snipping Tool app gives you the most control when you want to annotate your screenshots with drawings, highlights, or text. You can open this built-in Windows app by searching for “Snipping Tool” in your Start menu.
Click the “New” button in the Snipping Tool to start capturing. You can select a rectangular area, draw a freeform shape, capture a specific window, or grab your full screen. After you make your selection, the captured image appears in the Snipping Tool window.
Here’s where this method really shines for annotation work. You can use the pen tool to draw arrows or circle important areas,
the highlighter to emphasize text, or add typed text boxes to explain what you’re showing. These features let you annotate screenshot content perfectly, making the Snipping Tool ideal for creating instructions or pointing out specific details.
The Snipping Tool automatically saves your screenshot to the Screenshots folder, even though the preview window stays open for editing.
This means your image is safe even if you forget to manually save it. Windows 11 merged the old Snip & Sketch app into the Snipping Tool, so you get all the annotation features in one place whether you’re using Windows 10 or Windows 11.
How to Screenshot on Dell Laptop Without Print Screen Key
You can absolutely screenshot on Dell laptop without Print Screen if your key is broken, missing, or just not responding. I’ve been in this frustrating situation before, and there are several reliable alternatives that actually work just as well as the traditional Print Screen method.
The most common reasons you might need these alternatives include a non-functioning Print Screen key, keyboards where the key requires complex function combinations that aren’t working, or if you simply can’t locate the key on your specific Dell model. The good news is that Windows provides multiple ways to capture your screen that don’t rely on that particular key at all.
I actually prefer some of these alternative methods because they’re often more flexible and user-friendly than the traditional Print Screen approach. You can also use Windows accessibility features like the On-Screen Keyboard if you need the Print Screen function but your physical key isn’t working.
Use Windows + Shift + S Instead
Windows + Shift + S completely bypasses the need for a Print Screen key. This keyboard shortcut directly opens the Snipping Tool and lets you select what you want to capture.
I use this method regularly even when my Print Screen key works fine because it’s so much more convenient. You get immediate control over what part of your screen to capture, and the whole process takes just a few seconds from start to finish.
Free Tools That Replace Print Screen (Greenshot, ShareX)
Several excellent free screenshot tool options can completely replace your need for the Print Screen key. These screen capture software alternatives often provide more features than the built-in Windows methods.
Greenshot is my top recommendation if you frequently create documentation or instructions. This free screenshot tool lets you capture any area of your screen, automatically adds arrows and annotations, and can save directly to various formats. Many users swear by Greenshot for its editing capabilities and ease of use.
ShareX offers more advanced features for power users. This open-source tool provides automatic uploading to cloud services, customizable hotkeys, and extensive capture options beyond basic screenshots. ShareX works great if you need to capture and share screenshots regularly.
Flameshot is another solid option that’s particularly popular among users who want a lightweight, no-nonsense screenshot tool. All three of these free screenshot tools work independently of your Print Screen key and often provide better functionality than the default Windows methods.
These tools install quickly and integrate seamlessly with your Dell laptop, giving you reliable screenshot capabilities regardless of your keyboard situation.
Where Are Screenshots Saved on Your Dell Laptop?
Where are screenshots saved on Dell laptop depends entirely on which method you used to capture them. This is probably the second most common question I get after showing someone how to take a screenshot, and I completely understand the confusion because different methods save to different locations.
I’ve spent way too much time hunting for screenshots that I thought disappeared, only to realize I was looking in the wrong place. The save location changes based on whether you used an auto-save method or a clipboard method, and Windows 11 added some new wrinkles to the saving process that can catch people off guard.
The easiest way to find your screenshots is to know which method you used, because that determines exactly where Windows stored your image file. Some methods save automatically while others require you to manually choose where to put the file.
Save Locations by Method (Quick Reference)
Here’s exactly where each screenshot method saves your images on your Dell laptop:
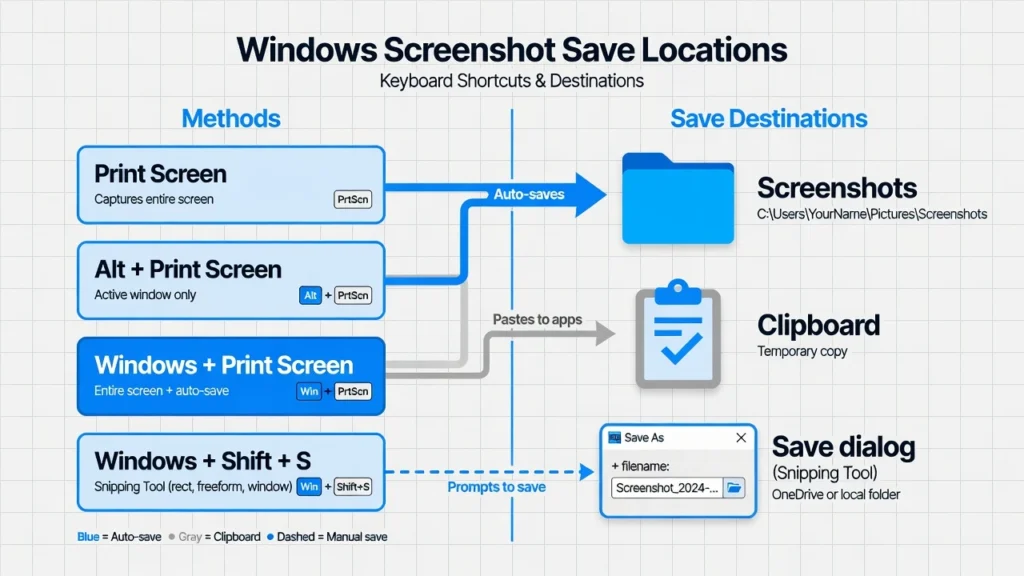
Windows + PrtSc: Screenshots saved in Pictures folder under a subfolder called ‘Screenshots.’ This is where all your auto-saved screenshots go automatically
PrtSc alone: Goes to clipboard only. You must paste it into Paint, Word, or another program to save it as a file.
Windows + Shift + S: In Windows 11, you choose the save location when you click the notification. In Windows 10, it typically saves to the Screenshots folder by default.
Alt + PrtSc: Clipboard only, just like the regular PrtSc key. No automatic saving happens with this method.
Snipping Tool app: Auto-saves to the Screenshots folder even though the preview window stays open. You can also manually save to any location you prefer.
To find your Screenshots folder, open File Explorer and navigate to Pictures > Screenshots. The screenshot folder location stays consistent across all Dell laptop models because it’s a Windows feature, not something Dell controls.
Why You Can’t Find Screenshots in Your Photos App
Your screenshots don’t appear in the Windows Photos app the same way they do in your phone’s gallery. Windows saves screenshots to a traditional folder structure that you access through File Explorer, not through the Photos app.
The Photos app might eventually display your screenshots if it scans the Pictures folder, but this isn’t immediate or reliable. When you need to find a screenshot quickly, always go directly to File Explorer and look in Pictures > Screenshots rather than expecting them to show up in the Photos app like they would on your phone.
How to Send Screenshots from Your Dell Laptop to Your Phone
The biggest hurdle for most people is sending screenshots from their PC to their phone, and I totally get why this stops people from taking proper screenshots. When you need to share an image quickly and your phone is right there, it’s just easier to take a picture of your screen rather than figure out how to transfer a file.
But here’s what I’ve learned after dealing with this exact problem countless times. Sending screenshots from your Dell laptop to your phone is actually much easier than you might think, and once you set up one of these methods, it becomes faster than taking phone pictures.
I use different approaches depending on the situation. Sometimes I need the screenshot on my phone immediately for a text message. Other times I’m building a collection of images that I want to access later. Having multiple transfer options means you can pick the method that works best for your specific workflow.
Method 1: Windows Phone Link (Built-In, Works Best)
Windows Phone Link is built into Microsoft Windows 10 and Windows 11, and it’s honestly the best solution for sending screenshots from your Dell laptop to your phone. This app creates a direct connection between your laptop and your Android phone or iPhone.
You set up Phone Link once by installing the companion app on your phone and pairing it with your Dell laptop. After that initial setup, you can access your screenshots directly from your phone without any additional file transfers. The connection works over WiFi, so both devices just need to be on the same network.
What I love about Phone Link is that it works in both directions. You can view and access photos from your phone on your laptop, and you can also send screenshots from your laptop straight to your phone’s gallery. The integration feels seamless once you get it configured, and it eliminates the whole transfer process entirely.
Method 2: OneDrive Auto-Upload (Set It and Forget It)
OneDrive auto-sync solves the problem by automatically making your screenshots available everywhere you sign in with your Microsoft account. When you save screenshots to your OneDrive folder on your Dell laptop, they automatically appear in the OneDrive app on your phone.
I recommend creating a dedicated Screenshots folder inside your OneDrive so these images don’t get mixed up with your other files. This method works great if you frequently take screenshots and want them backed up to the cloud anyway.
The setup takes about five minutes, but then your workflow becomes completely automatic. Every screenshot you save to the OneDrive folder on your laptop shows up on your phone within a few seconds, assuming you have a decent internet connection.
Method 3: Email to Yourself (Old Reliable)
Emailing screenshots to yourself is the most universal method because it works with any phone and any email provider. Compose a new email on your Dell laptop, attach your screenshot file, and send it to your own email address.
Open your email app on your phone, find the message you just sent yourself, and save the screenshot to your phone’s gallery. This method works every time, doesn’t require any special apps or setup, and gives you a backup copy of the screenshot in your email.
Method 4: WhatsApp Web or Telegram Web
If you use WhatsApp or Telegram, you can send screenshots to yourself through the web versions of these apps. Open WhatsApp Web or Telegram Web in your browser on your Dell laptop, start a chat with yourself, and send the screenshot as you would to any other contact.
The image immediately appears in the app on your phone, and you can save it to your gallery from there. This method is particularly convenient if you’re already using these messaging apps regularly, because it fits naturally into your existing communication workflow.
Method 5: USB Cable or Bluetooth
Traditional file transfer methods still work if the cloud-based options don’t suit your needs. Connect your phone to your Dell laptop with a USB cable and copy the screenshot files directly to your phone’s storage.
Bluetooth file transfer also works, though it’s slower than the other methods. These approaches give you complete control over the transfer process and don’t require internet connectivity.
Print Screen Key Not Working on Your Dell? Try These Fixes
When the Print Screen key not working on Dell laptops, it’s usually one of four common issues that I’ve encountered repeatedly over the years. The good news is that most of these problems have simple solutions that take just a minute or two to fix.
I’ve been in that frustrating situation where you press what should be the right keys and absolutely nothing happens. Sometimes the timing is tricky with multiple key combinations, or another program has hijacked your keyboard shortcut without you realizing it. Other times it’s just a matter of knowing which specific key combination your Dell model requires.
The most important thing to remember is that these problems are almost always software-related, not hardware failures. Dell laptops use the same Windows screenshot functions as every other computer, but they sometimes have unique keyboard configurations that can cause confusion.
Fix 1: Check if You Need to Press Fn + PrtSc
Many Dell laptops require you to hold the Fn key along with PrtSc to activate the screenshot function. This is especially common on Dell’s compact keyboards where the Print Screen key shares functionality with other features.
Try pressing Fn + PrtSc instead of just PrtSc by itself. Hold both keys down at the same time and look for the screen to dim briefly, which indicates the screenshot worked. Some Dell models also require Fn + Windows + PrtSc for the auto-save screenshot method.
You can tell if your Dell needs the Fn key by looking at your Print Screen key. If it has small text in a different color or shows multiple functions on the same key, that’s your clue that Fn is required.
Fix 2: Try the Timing Trick (Hold Keys Longer)
Sometimes the timing can be tricky when you’re pressing multiple keys for a keyboard shortcut screenshot, especially with three-key combinations like Fn + Windows + PrtSc. I’ve found that many people press the keys too quickly or don’t hold them together long enough.
Try this sequential approach: Press and hold Fn first, then add Windows while still holding Fn, then add PrtSc while holding both other keys. Keep all three keys pressed for a full second before releasing them. This method often works when the quick simultaneous press doesn’t.
Alternatively, some Dell users find success with a deliberate simultaneous press where you hit all three keys at exactly the same time and hold them together. The key is being intentional about the timing rather than rushing through the key combination.
Fix 3: Check if Another Program Is Using That Shortcut
OneDrive, Dropbox, gaming software, and other programs can hijack your Print Screen keyboard shortcut and redirect it to their own functions. This explains why some users see the search menu or other unexpected behavior when trying to screenshot.
Check OneDrive settings first since it’s commonly installed on Dell laptops. Look for screenshot or Print Screen options and disable them if you want to use the standard Windows screenshot functions. Gaming software like Steam or graphics card control panels also frequently reassign screenshot keys.
You can also test this by temporarily closing all non-essential programs and trying your screenshot again. If it works with programs closed, you’ve confirmed a conflict exists.
Fix 4: Use Windows + Shift + S as Backup Method
If your Print Screen key is physically broken or completely unresponsive, Windows + Shift + S provides a reliable alternative that doesn’t require the PrtSc key at all. This keyboard shortcut works on every Dell laptop regardless of the Print Screen key status.
This method actually offers more flexibility than traditional Print Screen since you can select specific areas, capture individual windows, or grab the full screen. Many users find this approach more convenient once they try it.
Screenshot Tips That Actually Save Time
After taking thousands of screenshots on my Dell laptop over the years, I’ve picked up some time-saving tricks that most people don’t know about. These aren’t just theoretical tips either – I use these techniques regularly and they genuinely make my screenshot workflow faster and more efficient.
The biggest time-savers involve understanding when to use different file formats and learning how to skip the “save as file” step entirely for quick sharing. Once you know these shortcuts, you’ll wonder why you ever did screenshots the slow way.
I’m sharing these because they solve real problems I used to have. Waiting for large screenshot files to upload, having to save and then attach files to emails, and dealing with blurry screenshots were all frustrations that these techniques eliminated.
PNG vs JPG: Which Format Should You Use?
Choose PNG for screenshots with text, software interfaces, or anything that needs crisp, clear details. PNG maintains perfect quality for screenshots and handles sharp edges and text beautifully, though it creates larger file sizes.
Choose JPG when you’re screenshotting photos, videos, or image-heavy content where a slightly smaller file size matters more than perfect quality. JPG compression works well for these types of screenshots and can significantly reduce file size for faster sharing and uploading.
Here’s what I’ve learned from experience: Windows auto-save methods default to PNG, which is usually what you want anyway. When you use the PrtSc + Paint method, you can choose your screenshot file format at save time by selecting either PNG or JPG from the dropdown menu. Most of the time, PNG is the right choice unless you’re dealing with very large images or slow internet connections.
The quality difference isn’t huge for most screenshots, but PNG gives you that extra crispness that makes text and user interface elements look professional.
Paste Screenshots Directly into Email or Documents
Skip the saving step entirely by pasting clipboard screenshots directly into emails, documents, or chat messages. After using PrtSc or Alt + PrtSc, press Ctrl + V in Outlook, Word, Google Docs, Teams, or almost any other application to insert the screenshot immediately.
This direct pasting method saves enormous amounts of time when you’re sharing screenshots quickly. Instead of taking a screenshot, saving it as a file, finding the file, and attaching it, you just take the screenshot and paste it wherever you need it. The image quality is identical to saving as a file first.
Which Dell Laptop Screenshot Method Should You Use?
Choosing the right screenshot method for your Dell laptop depends on what you’re trying to accomplish. I get this question a lot after showing someone all the different options, and honestly, it confused me at first too when I learned there were so many ways to capture screens.
The truth is, you don’t need to master every method. Pick one or two that match how you typically use screenshots, and stick with those. I personally use Windows + Shift + S about 80% of the time because it’s so flexible, but I switch to other methods based on the specific situation.
Here’s how I decide which method to use based on what I need to accomplish:
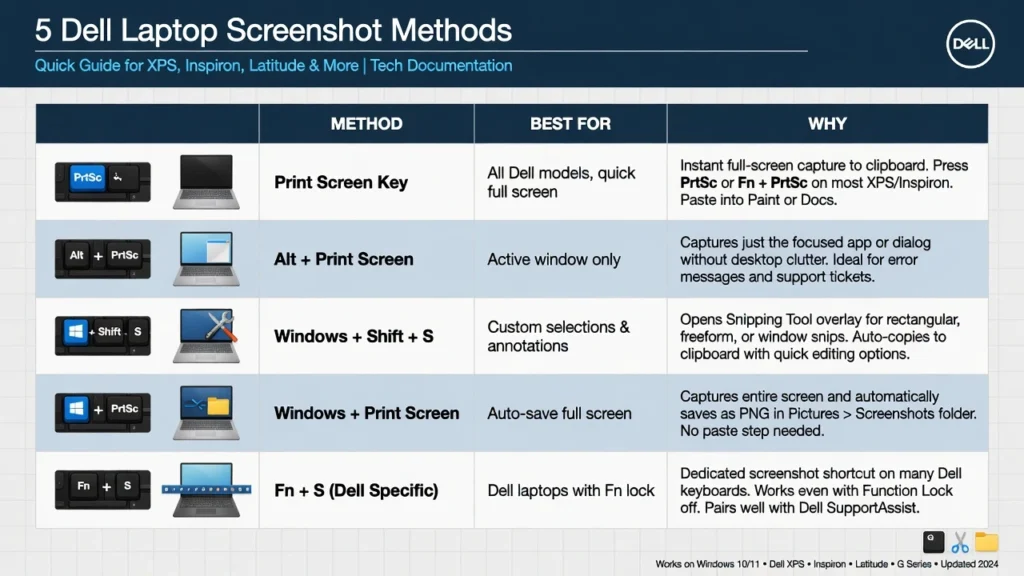
| Your Need | Best Method | Why |
|---|---|---|
| Quick full-screen shot | Windows+PrtSc | Auto-saves, fastest |
| Select specific area | Windows+Shift+S | Flexible, 4 modes |
| Edit before saving | PrtSc + Paint | See and edit first |
| Just one window | Alt+PrtSc | Isolates active window |
| Add arrows/annotations | Snipping Tool app | Built-in markup tools |
| PrtSc key broken | Windows+Shift+S | Doesn’t need PrtSc |
The key is matching the method to your workflow. If you frequently need to crop or edit screenshots, the PrtSc + Paint approach saves time because you see and modify the image before saving. If you mainly capture full screens for quick sharing, Windows + PrtSc gets you there fastest.
For most Dell laptop users, I recommend starting with Windows + Shift + S as your default method. This approach handles both full screen capture and partial screenshots, works reliably across all Windows versions, and gives you the flexibility to choose your capture area every time.
Once you’re comfortable with that method, you can explore the others when you need specific functionality like window-only captures or advanced annotations.
Start Screenshot Like a Pro on Your Dell
You now have everything you need to master screenshots on your Dell laptop. Start with Windows + Shift + S as your go-to method since it’s the most flexible and works reliably across all Dell Technologies laptops, whether you have an Inspiron, XPS, or Latitude model.
Keep Windows + PrtSc in your back pocket for those moments when you need lightning-fast full-screen captures that save automatically. And remember the PrtSc + Paint approach when you want to edit or crop before saving.
The game-changer is solving that PC-to-phone transfer problem. Set up Phone Link or OneDrive auto-sync once, and you’ll never again feel tempted to take grainy phone pictures of your laptop screen. Your screenshots will look professional and transfer seamlessly to your mobile device.
My advice? Try Windows + Shift + S right now on something simple, like capturing a section of this article. Get comfortable with selecting areas and clicking the notification to save. Once that feels natural, you’ll find yourself using proper screenshots instead of phone cameras automatically.
Learning how to screenshot on Dell laptop properly takes about five minutes, but it saves you time and improves your image quality for years to come. Your colleagues and friends will definitely notice the difference in clarity when you share clean screenshots instead of tilted phone photos.
Frequently Asked Questions
Where is the screenshot button on a Dell laptop?
Dell laptops don’t have a dedicated screenshot button, but they use the Print Screen (PrtSc) key located in the top-right area of your keyboard. Many Dell models require you to press Fn + PrtSc instead of just the Print Screen key alone. The fastest modern method is Windows + Shift + S, which doesn’t need the Print Screen key at all.
How do I know if my screenshot worked?
Look for visual confirmation to know your screenshot succeeded. Windows + PrtSc makes your screen dim briefly when it captures successfully. Windows + Shift + S shows a notification in the bottom-right corner after capturing. PrtSc alone gives no visual confirmation, so check if it worked by pasting into Paint or another app. If you don’t see these confirmations, your screenshot likely failed.
Where do Dell laptop screenshots go?
Screenshot location depends on which method you used. Windows + PrtSc automatically saves to your Pictures > Screenshots folder. PrtSc alone only copies to clipboard and requires you to paste into an app to save. Windows + Shift + S lets you choose the save location when you click the notification. Open File Explorer and navigate to Pictures > Screenshots to find automatically saved screenshots.
Why can’t I find my screenshots in the Photos app?
Windows screenshots save to traditional folder structure through File Explorer, not the Photos app gallery like on your phone. Navigate directly to File Explorer > Pictures > Screenshots folder for immediate access to your screenshots. The Photos app might eventually display them if it scans that folder, but this isn’t reliable or immediate.
What if Windows + Shift + S isn’t working?
Try pressing the keys slowly and deliberately rather than quickly. Check if OneDrive, Dropbox, or gaming software hijacked the shortcut in their settings. Restart your computer to clear any temporary conflicts. Use the Snipping Tool app from your Start menu as an alternative. Update Windows to the latest version if the problem persists.

