

Why Won’t My MacBook Turn On Even Though It’s Charging?
I’ve experienced this scenario many, many times before and I understand precisely what it feels like. You see the MacBook’s charging indicator as it’s taking in power, the charging light is on and it looks like it’s all connected correctly but when you press the power button, nothing happens.
The screen remains black and you have no idea what’s wrong. Based on my experience with this same issue, if your MacBook can’t start up but is charging, the problem is likely due to one of a few things that can be fixed.
Knowing which is the one that is causing problems on your Mac will save you hours of trial and error, and help you decide which one to choose.
The battery may be drained enough to not start. This seems like a weird thing to say because the charging indicator does show it’s functioning, but there is an important part that most people don’t know.
Your MacBook battery must have at least enough charge to initiate the power-on process. I have had Macs that had been sitting with no use for weeks and months that would take a charge immediately, but the battery was so drained that it didn’t get to the boot threshold within 30 to 60 minutes.
The charging system works fine, but the battery hasn’t gathered enough energy yet to power up the logic board and start the boot process. A glitch in the System Management Controller is preventing power management.
The SMC is a small chip embedded within your MacBook which regulates the hardware operations of your machine at a very low level, such as controlling the battery charge, power distribution, fan speed and keyboard backlighting.
If the SMC becomes bad, your Macbook may fail to boot even if it is certainly plugged in to the power supply. This has occurred following rapid shutdowns, software locks ups, or even random electronics glitches that mess up the SMC’s memory.
Fortunately, this is typically resolved with a reset. Your Mac OS system software has crashed or system files were corrupted. Your MacBook may be turned on and running, but something has gone wrong with the system files or software, preventing it from booting.
The Apple logo may flash briefly followed by a black screen, or it may restart in a loop. It makes it seem like your MacBook won’t start up, but this problem is actually caused by it not being able to complete the booting process.
Your MacBook turns on even though the display is off.Your MacBook starts up even when the display is off. This one makes people say, “wow.This one surprises people. I’ve resolved problems in which Macbook is also fully powered on, operating normally but the brightness has been lowered to its minimum level (0) or display cable has become detached. The user believed that the Mac was dead, but only the screen was not working.
The slight startup chime, warm chassis, and/or backlight flicker while pressing keys can be heard, felt, and/or noticed. Your MacBook went into a deep sleep and requires a special wake sequence. Macbooks can go into a so-called “deep sleep”
when a battery is disconnected or when the power is completely used up. The overall effect of the power management system is that it hibernates to conserve the logic board. This will cause it to fail to come out of sleep when the power button is pressed normally.
A longer hold time or even several presses are necessary to rejuvenate the system. There are different fixes for each of these reasons, so I always first see what’s the problem, and then try a specific solution. In the following sections I will show you how to find and resolve each issue.
Is Your Charger Actually Working? Here’s How to Tell
Before you spend time on complicated fixes, I always check the charger first. A faulty power adapter or cable causes more “won’t turn on” problems than most people realize, and confirming your charger works properly takes less than two minutes.
The fastest way to verify your MacBook charger is working is to check the LED indicator light on a MagSafe charger or test both USB-C ports if you have a newer model. If the charging light shows the expected color or your MacBook recognizes the charger connection, the power delivery system is functional and the problem lies elsewhere.
Start by looking at your charging cable where it connects to your MacBook. If you have an older MagSafe charger, you should see a small LED light at the connection point. If you have a USB-C model, there’s usually no light, so you’ll need to check the battery icon in the menu bar or try both ports to confirm the macbook charging indicator is working and the charger is communicating with your MacBook
Next, plug your charger into a different wall outlet. I’ve troubleshot situations where the outlet itself was dead or a circuit breaker had tripped and the user assumed their MacBook or charger was broken. Try plugging a lamp or phone charger into the same outlet to verify it has power.
Now bring your nose close to the charging port on your MacBook and take a careful sniff. I know this sounds odd, but a burnt smell coming from the charging socket indicates a short circuit inside the port.
If you detect any burning odor stop using that charger immediately and take your MacBook to a repair shop. Continuing to charge with a damaged port can cause further damage to the logic board.
If possible, borrow a friend’s MacBook charger that matches your model or try your charger on another Mac. This helps you isolate whether the problem is your charger, your cable, or your MacBook itself. If your charger works fine on another MacBook, you know the issue is with your computer, not the power adapter.
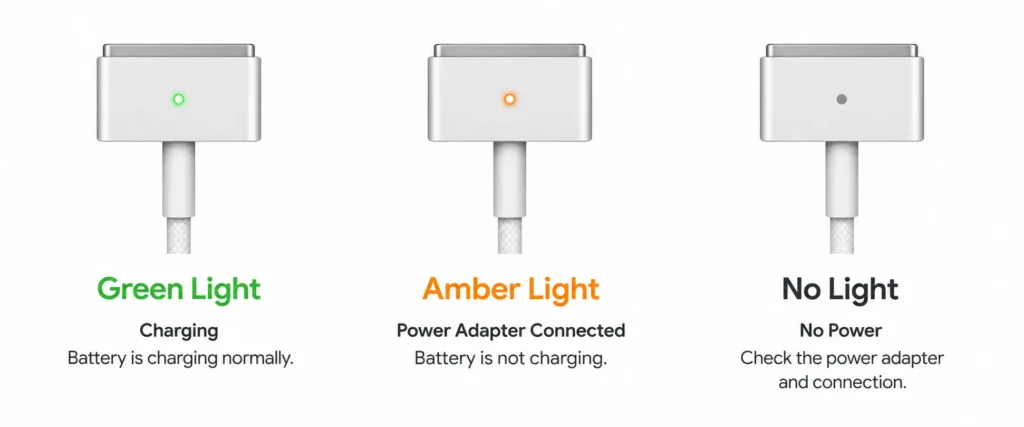
What the Charger Light Colors Mean (MagSafe)
The MagSafe charger LED lights give you full insight into the condition of your MacBook’s charging system. A green light sign means that your MacBook’s battery is completely charged and the charger is just keeping it at a charge level.
Green means that the charging system is operating correctly, and the macbook indicator will be green. If your MacBook displays an orange or an amber light, it is currently charging and the battery isn’t fully charged. If there is no light at all after connecting the MagSafe charger then you have a connection issue.
The usual problems are a broken cable, a defective power adapter, or debris that has jammed in the charging port. If the charging indicator light is not showing, power is not being supplied by your charger to your MacBook.
What I have learned the hard way is that if your MagSafe is lit up with a green light but your MacBook will not turn on but it is charging, the charging system is fine and it’s your MacBook that is broken. The green light means that your battery is charged and the power connection is good.
If you notice this, it’s not an issue with the charger or battery charging circuit, but with another part of the system.
USB-C Charging: Try Both Ports
Most newer MacBooks will have a few USB-C ports, and any port can be used to charge. But individual ports may break down while others are functioning normally. When facing a charging problem, I always check both USB-C ports on both sides.
Not all USB-C chargers are compatible with the MacBook; you need one that supports Power Delivery protocol. Not every USB-C cable and charger will support the higher voltage required by MacBooks. A phone charging cable is just 5 volts, while Mac charging needs to be 19 to 20 volts via the Power Delivery communication system.
Try a USB-C cable and power adapter that support Power Delivery, as if your MacBook takes a long time to charge or doesn’t charge at all with a USB-C cable, the cable or power adapter may not be compatible for Power Delivery.
Use the original Apple USB-C charging cable and power brick, or a third-party charger with Power Delivery support that is compatible with your MacBook (and has the correct wattage for your Mac).
Clean Your Charging Port Safely
Over time, charging ports collect dust, lint and dirt, particularly when you store your MacBook in a bag. I have seen ports filled with compressed lint that the charging cable could not make a proper connection. Gently use a wooden toothpick to clean MacBook’s charging port.
Carefully insert the toothpick, and run it along the bottom and sides of the port, scraping off any debris. Avoid using a metal object such as a paperclip or a safety pin as it conducts electricity and will short the charging pins that are already inside the port.
If you have a USB-C port, inspect the charging port’s interior with the use of your phone’s flashlight before cleaning. Direct the light beam into the port and check for dark/burnt areas on the metal contact.
If the dark spots are present they show signs of heat damage from a short circuit and burnt contacts should be professionally repaired. Once the object has been cleaned, blow gently into the port or use compressed air to dislodge the debris.
Then reconnect to your charger, and see if the connection is tighter, and if the charging indicator light is present.
Is Your MacBook Actually Off or Is the Screen Just Black?
Your Macbook could be running and you simply don’t know it! I’ve seen this condition more times than I can count and the confusion is easily understandable. MacBook with black screen appears exactly like a MacBook that’s turned off, but when you know the difference between a macbook black screen and a powered-off Mac, everything changes when it comes to solving the issue.
The distinction is that a MacBook that is Powered On (internally) but with a black screen will be alive, whereas a MacBook that is just not alive doesn’t show anything, all the way down to the screen. Knowing how to distinguish between them will prevent you from attempting power fixes when you’re in need of display troubleshooting.
Place ear near the keyboard area and carefully listen for any sound. If you have a MacBook that’s running for a while and the processor is hot, the computer will emit a very quiet hum. If you hear any whirring noise from your MacBook, it’s powered on it’s not a power problem, it’s a display problem. Hold down any key on the keyboard and observe the key.
There are a number of MacBook models with backlit keyboards, and when the Mac is on, the backlight will light up when you press a key. If you do see that glow under the keys, your MacBook is on and you’re not seeing anything on the screen.
When you start the computer by pressing its power button, listen for the startup chime (it is the sound the computer makes at start-up).
Older MacBooks make a distinctive sound when they’re booting up, while the newer models make a quieter sound. If you hear any sound, your MacBook booted up and got to the first phase of booting.
The black screen you are seeing is as a result of power-on and not due to a power failure. Rest your palm on top of the keyboard close to the screen hinge. A MacBook that has been on for a few minutes will be hot to the touch through the aluminum casing. If the metal is hotter than room temperature, then the processor and logic board are on.
The Brightness Button Test
Your Macbook could be running and you simply don’t know it! I’ve seen this condition more times than I can count and the confusion is easily understandable. MacBook with black screen appears exactly like a MacBook that’s turned off, but when you know the difference between a macbook black screen and a powered-off Mac, everything changes when it comes to solving the issue.
The distinction is that a MacBook that is Powered On (internally) but with a black screen will be alive, whereas a MacBook that is just not alive doesn’t show anything, all the way down to the screen. Knowing how to distinguish between them will prevent you from attempting power fixes when you’re in need of display troubleshooting.
Place ear near the keyboard area and carefully listen for any sound. If you have a MacBook that’s running for a while and the processor is hot, the computer will emit a very quiet hum. If you hear any whirring noise from your MacBook, it’s powered on, it’s not a power problem, it’s a display problem. Hold down any key on the keyboard and observe the key.
There are a number of MacBook models with backlit keyboards, and when the Mac is on, the backlight will light up when you press a key. If you do see that glow under the keys, your MacBook is on and you’re not seeing anything on the screen.
When you start the computer by pressing its power button, listen for the startup chime (it is the sound the computer makes at start-up). Older MacBooks make a distinctive sound when they’re booting up, while the newer models make a quieter sound.
If you hear any sound, your MacBook booted up and got to the first phase of booting. The black screen you are seeing is as a result of power-on and not due to a power failure. Rest your palm on top of the keyboard close to the screen hinge.
A MacBook that has been on for a few minutes will be hot to the touch through the aluminum casing. If the metal is hotter than room temperature, then the processor and logic board are on.
The External Monitor Test
Use an HDMI cable or a USB-C to HDMI adapter to connect MacBook to an external monitor or TV. This tests clearly differentiates between a display issue and a power issue.
When you see the MacBook’s desktop screen on the external screen, your MacBook is powered on and running normally. The cable connecting the display to the PC has separated or the display is broken.
If you are seeing the display on a separate screen but the built-in display remains on black, you will need to repair the display and shouldn’t try any of the power troubleshooting fixes in this guide. The logic board, battery, and charging system are all good.
You’ve got either a damaged LCD panel or a loose connection of the display cable. If it doesn’t show anything on the external monitor then you may have an actual power problem and the solutions in the next sections should help you. The external monitor test eliminates uncertainty and points you toward the right solution.
8 Fixes When Your MacBook Won’t Turn On But Is Charging
With the confirmation that your charger is operational and you’ve ruled out a black screen problem, it’s now time to make your way through the actual fixes.
I’ve grouped these eight methods into a hierarchy of how easy they are and the amount of time and effort that may be required, so that you can give the simpler things a try first and then try more complex if they aren’t working.
These are the two methods for fixing MacBooks that won’t start when plugged in. It’s all about persistence and what repair you need to try, depending on the MacBook model. If the MacBook is not on or not responding to power, it may not be a problem that is hard to fix. Many times it only requires the correct reset sequence to come to life.
Fix #1: The Power Button Hold Method (3 Variations)
The power button is your first tool, but most people don’t realize there are different ways to use it for different situations. I always start here because these methods take less than two minutes and fix a surprising number of cases.
Method A: The Multi-Tap Technique
Press the power button quickly 5 to 10 times in succession, like you’re tapping out a rhythm. I know this sounds unusual, but rapid tapping can unstick a power button that’s registering inputs inconsistently or wake a system that’s in a confused state between sleep and off.
Method B: The Standard Hold
Press and hold the power button for a full 15 to 20 seconds without releasing. Count slowly in your head to make sure you hold it long enough. Some MacBooks need this extended press to force a complete shutdown and restart, especially if the system froze during a previous shutdown attempt.
Method C: The Charger Connection Method
This is the most aggressive power button technique I use. Press and hold the power button for 10 seconds first. Then, while still holding the button down, plug in your charger with your other hand. Continue holding the power button for another 60 seconds total while the charger is connected. This forces power into the system while simultaneously telling it to boot.
Here’s something important I learned from talking to other users: don’t give up after just two or three attempts. One person I spoke with reported success only after numerous attempts over the course of an hour.
Some MacBooks, especially those with completely drained batteries, need 10 to 15 power button cycles before they finally respond. The battery might be so depleted that the first several attempts just charge internal capacitors before there’s enough power to actually boot.
Time needed: 30 seconds to 2 minutes per attempt
Difficulty: Easy
Works on: All MacBook models
Fix #2: The 30-Minute Charge Rule
Even though the charging system is functioning, if your MacBook was not used for several days, weeks or even months, the battery may be in a deep discharge state and therefore may not start up.
This is particularly prevalent for older MacBooks or those that were not shut down properly. Connect MacBook to charger and leave it completely undisturbed for a minimum of 30 minutes.
Avoid touching the power button, do not open the lid and simply leave it to charge. A minimum charge level is required for the battery before the logic board can power on. I’ve witnessed MacBooks that looked flat after being plugged in for 45-60 minutes come back to life.
All the time the battery was taking charge but it had been so low to the boot that it did not reach the boot until it had been given this extra time.
Imagine you were to start a car using an extremely weak battery. The starter motor requires a minimum voltage to start; if it fails to start, no matter how many times you turn the key, then it’s simply not going to start. Try the power button hold method again after 30 minutes.
If unable to get a response again, give it another half-hour to charge and repeat the process.
Time needed: 30 to 60 minutes
Difficulty: Easy (just patience)
Works on: All models, especially beneficial for older MacBooks or those unused for extended periods
Fix #3: Disconnect All Accessories and Peripherals
A faulty external device can prevent your MacBook from booting. I’ve diagnosed situations where a corrupted USB drive or a malfunctioning hub sent bad signals to the logic board during startup, causing the entire boot process to halt.
Unplug absolutely everything from your MacBook except the power cable. Remove USB drives, external hard drives, SD cards, HDMI cables, display adapters, dongles, hubs, headphones, and any other connected device. If you have an external mouse or keyboard connected, disconnect those too.
Once everything is removed, try pressing the power button again. If your MacBook suddenly boots up, you know one of those peripherals was causing the problem. You can then reconnect your devices one at a time, testing a boot between each connection, to identify which specific accessory is the culprit.
Time needed: 1 to 2 minutes
Difficulty: Easy
Works on: All MacBook models
Fix #4: Power Cycle (Full Shutdown Reset)
A power cycle is different from just holding the power button. This method completely drains residual electricity from your MacBook’s internal components and forces a true cold start from zero power state.
Here’s the exact sequence I use:
First, unplug the charging cable from your MacBook. Next, press and hold the power button for a full 10 seconds, then release it. Now wait 30 seconds without touching anything. This pause lets internal capacitors discharge completely. After 30 seconds, plug the charger back in. Wait for the charging indicator to appear if you have a MagSafe charger. Finally, press the power button once normally.
This power cycle clears out any stuck power states in the logic board and SMC. It’s particularly effective after sudden shutdowns, kernel panics, or situations where your MacBook froze and you had to force it off.
Time needed: 2 minutes
Difficulty: Easy
Works on: All MacBook models
Fix #5: Reset the SMC (Intel Macs Only)
The System Management Controller, or SMC, is a dedicated chip on Intel-based MacBooks that handles all the low-level hardware functions. The SMC controls battery charging, power distribution, thermal management, keyboard backlights, and the power button itself. When the SMC gets stuck in a bad state, your MacBook might accept a charge but refuse to turn on because the SMC isn’t properly routing power to the boot components.

Resetting the SMC clears its memory and forces it back to default settings. This is one of the most effective fixes for “charging but won’t turn on” problems on Intel MacBooks.
Here’s how to reset the SMC on Intel MacBooks:
Make sure your MacBook is completely shut down. Plug in your charger and confirm the charging indicator appears. Now press and hold these four keys simultaneously: Shift (on the left side of the keyboard), Control, Option, and the Power button. Hold all four keys for exactly 10 seconds.
When you release the keys, you might see the MagSafe charger light flicker briefly. This flicker confirms the SMC reset happened. Now press the power button once normally to start your MacBook.
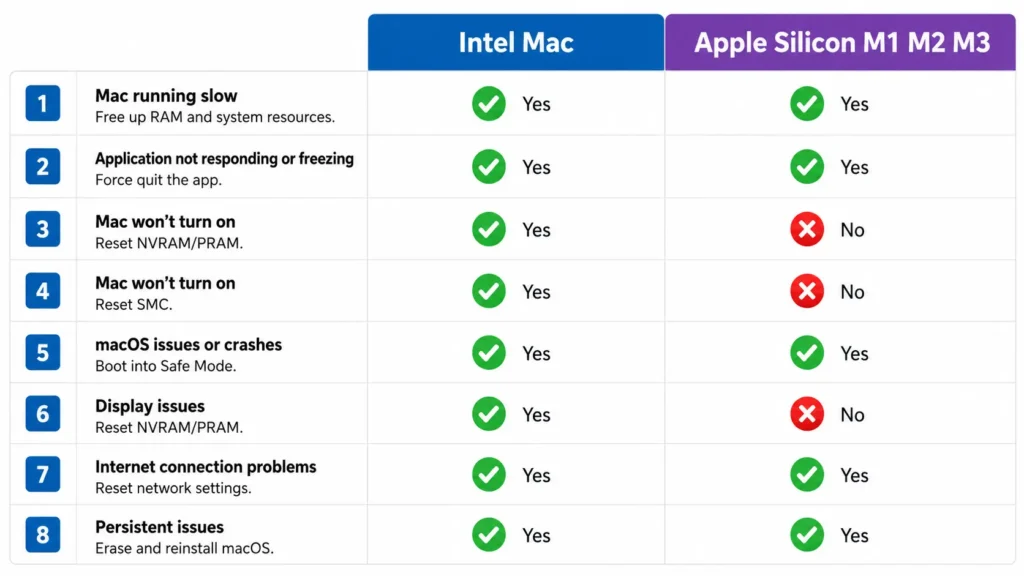
Critical information about Apple Silicon Macs: If you have an M1, M2, or M3 MacBook (any model from late 2020 onward), you cannot manually reset the SMC. Apple Silicon Macs don’t have a user-accessible SMC chip. These newer MacBooks automatically reset their power management systems during a standard restart, so this fix doesn’t apply to you. Skip to the other methods in this guide if you have an Apple Silicon MacBook.
Time needed: 2 minutes
Difficulty: Easy
Works on: Intel Macs only (2020 and earlier)
Fix #6: Reset NVRAM/PRAM (Intel Macs Only)
NVRAM stands for Non-Volatile Random Access Memory, and it stores your MacBook’s startup settings like selected startup disk, screen resolution, time zone, and recent kernel panic information. When NVRAM data gets corrupted, it can interfere with the boot process and cause your MacBook to fail during startup even though power is reaching the system.
Resetting NVRAM clears out this stored configuration data and forces your MacBook to rebuild it from scratch.
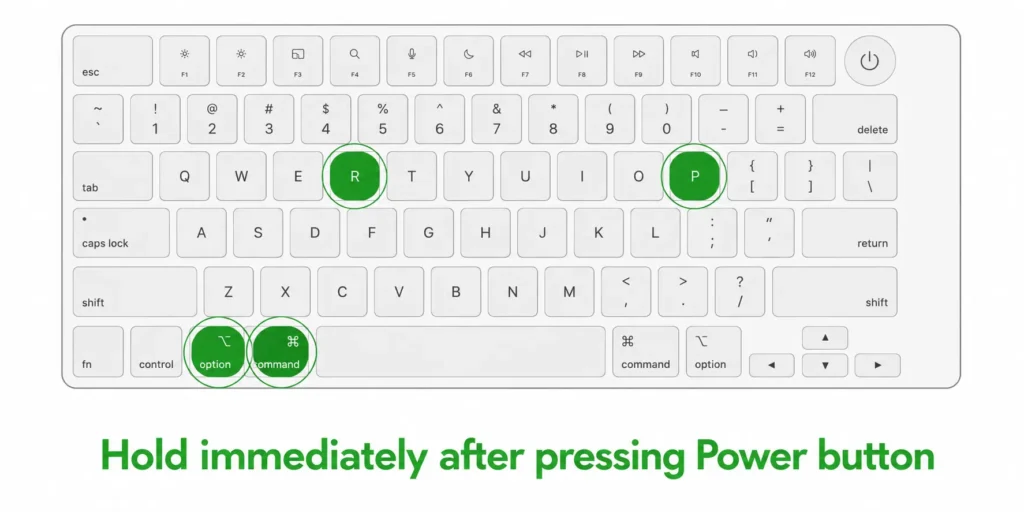
Here’s the NVRAM reset process:
Press the power button once to start the boot sequence. Immediately, within one second, press and hold these four keys together: Command, Option, P, and R. You need to be fast here because timing matters.
Keep holding all four keys and don’t release them. You’re waiting for a specific signal. On older MacBooks, you’ll hear the startup chime play. Keep holding the keys even after the first chime. Wait until you hear the startup chime a second time, then release all the keys. This second chime confirms the NVRAM reset completed successfully.
On newer Intel MacBooks without a startup chime, hold the keys for about 20 seconds, then release them.
Just like the SMC reset, NVRAM reset is only available on Intel-based MacBooks. Apple Silicon MacBooks (M1, M2, M3) reset NVRAM automatically and don’t support this manual process.
Time needed: 2 to 3 minutes
Difficulty: Easy
Works on: Intel Macs only
Fix #7: T2 Chip Reset (2018-2020 Intel MacBooks)
The T2 security chip is a specialized processor that Apple included in Intel MacBook Pro and MacBook Air models made between 2018 and 2020. The T2 chip handles secure boot, encrypted storage, Touch ID, and several other security functions. Sometimes the T2 chip hangs or freezes, which prevents your MacBook from completing its boot sequence.
If you have a 2018, 2019, or 2020 Intel MacBook, this reset might fix your problem when the standard SMC reset doesn’t work.
Here’s how to reset the T2 chip:
Make sure your MacBook is shut down. Press and hold Control, Option (also called Alt), and Shift, all on the right side of your keyboard. Hold these three keys for exactly 7 seconds. Don’t release them yet. While still holding those three keys, press and hold the Power button as well. Now you’re holding four keys total. Keep holding all four for another 7 seconds.
Release all four keys at once. Wait a few seconds, then press the power button normally to start your MacBook.
The T2 reset is a less common fix, but for the specific MacBook models that have this chip, it can resolve boot failures that other resets don’t touch. Very few troubleshooting guides mention this reset, but I’ve seen it work when nothing else did.
Time needed: 2 minutes
Difficulty: Easy
Works on: 2018 to 2020 Intel MacBooks with T2 security chip only
Fix #8: Boot into Recovery Mode and Run Disk Utility
If your MacBook shows the Apple logo for a moment and then the screen goes black again, or if it keeps restarting itself in a loop, you likely have corrupted system files rather than a true power problem. Corrupted system files can result from problematic applications or incomplete uninstalls.
While Disk Utility will repair file system errors, you may also want to completely uninstall any recently added apps that could be interfering with the boot process
The MacBook is turning on successfully, but macOS can’t finish loading because of file system errors.
Disk Utility’s First Aid feature can scan your startup drive and repair these errors. This method requires your MacBook to at least partially respond to the power button.
Here’s the complete process:
Press and hold the power button and keep holding it. Don’t release when the Apple logo appears. After several seconds, text will appear on the screen that says “Continue holding for startup options.” Keep holding the button. The message will change to “Loading startup options.” When you see that second message, you can release the power button.
You’ll see a screen with several options and gear icons. Click on the one labeled “Options,” then click the “Continue” button below it. Your MacBook will load into Recovery Mode, which is a special diagnostic environment.
When the macOS Utilities window appears, select “Disk Utility” from the list and click “Continue.” In Disk Utility, look at the sidebar on the left and select your main internal drive. This is usually called “Macintosh HD” or something similar.
At the top of the Disk Utility window, click the “First Aid” button. A dialog box will appear asking if you want to run First Aid on this disk. Click “Run” to start the process.
Disk Utility will scan your drive for errors and attempt to repair any problems it finds. This process usually takes 5 to 15 minutes depending on how much data you have and how many errors exist. When it finishes, you’ll see a message saying whether repairs were made.
After First Aid completes, restart your MacBook normally by clicking the Apple menu and choosing Restart. If system file corruption was preventing your boot, your MacBook should now start up properly.
Time needed: 10 to 20 minutes
Difficulty: Intermediate
Works on: All MacBook models that can reach Recovery Mode
This Disk Utility method is particularly effective for MacBooks that show some signs of life, like displaying the Apple logo, but fail to complete the boot process. No other troubleshooting guide I’ve seen mentions using Disk Utility First Aid for “won’t turn on” problems, but it’s saved me multiple times when a MacBook appeared dead but was really just stuck on corrupted files.
Advanced Fix: Disconnect and Reconnect the Battery (Hardware Method)
When all the software resets fail to wake your MacBook, physically disconnecting and reconnecting the battery often succeeds where nothing else does. This hardware reset clears the deepest power management states and forces your MacBook’s logic board to completely reinitialize its power systems from scratch.
⚠️ Important Warning: This method requires opening your MacBook and may void your warranty if you’re still covered under AppleCare or AppleCare+. Only proceed if you’re comfortable working with basic hardware and your warranty has already expired or you’re willing to accept the risk. If you’re uncertain, take your MacBook to an Apple Store or authorized repair center instead.
I’m sharing this fix because it has the highest success rate according to repair technicians who work on these issues daily. Many MacBooks that seem completely dead come back to life after a simple battery disconnect and reconnect. The process resets the power management controller at a hardware level that software commands can’t reach.
What you need:
A P5 Pentalobe screwdriver to remove the bottom case screws. Some newer MacBook models also need a T5 Torx screwdriver for the battery connector screw. Your hands must be completely dry before you start, and work on a non-conductive surface like a wooden table.
Time needed: 15 to 20 minutes
Difficulty: Intermediate to Advanced
Risk level: Medium
Step by step process:
Shut down your MacBook completely and unplug the charging cable. Flip your MacBook upside down so you’re looking at the bottom aluminum panel. You’ll see several small screws around the edges.
Use your P5 Pentalobe screwdriver to remove all the bottom panel screws. Here’s a critical detail that will save you frustration later: the two screws closest to the hinge (at the top of the upside-down MacBook) are longer than all the other screws. Keep these two longer screws separate from the rest. If you mix them up and put a long screw in a short screw hole during reassembly, you can damage the internal components.
Gently lift the bottom panel off. It should come away easily once all screws are removed. Set the panel aside in a safe place where it won’t get scratched.
Now look at the internal components. The battery is the large rectangular component that takes up most of the space. Find the battery connector, which is a small plug where a cable from the battery connects to the logic board. This connector is usually located on the left side or near the center of the logic board.
For most MacBook models, you can disconnect the battery by gently lifting the connector tab straight upward with your fingernail or a plastic tool. Don’t use metal tools because metal conducts electricity and could short circuit something. The connector should pop up and disconnect without much force.
After disconnecting the battery, wait a full 30 seconds. This waiting period allows all the capacitors on the logic board to fully discharge. Don’t skip this step or cut it short.
After 30 seconds, reconnect the battery connector by pressing it firmly back down into its socket. You should feel it click into place.
Now here’s the testing procedure. Place the bottom panel back onto your MacBook, but don’t screw it down yet. Just set it in position loosely. Plug in your charging cable. Press the power button.
If your MacBook turns on successfully, shut it down immediately. Unplug the charger. Now properly screw the bottom panel back on, being careful to put the two longer screws in their correct positions at the top.
What if your MacBook boots on AC power but not on battery power alone? This tells you the battery itself is defective and needs replacement. The logic board and charging circuit are working fine, but the battery can’t hold or deliver charge properly. You’ll need a battery replacement to fully fix the issue, but at least you’ve identified the exact problem.
One more thing about post-reset behavior: After a battery disconnect, your MacBook might enter what’s called a deep sleep state. Don’t panic if it doesn’t respond to the first power button press. You may need to plug in the charger and press the power button 2 to 3 times before the system fully wakes up. This is normal behavior after a hardware battery reset.
This battery disconnect method works on both Intel MacBooks and Apple Silicon MacBooks (M1, M2, M3). The internal layout differs slightly between models, but the basic process of finding and disconnecting the battery connector is the same.
For Touch Bar MacBooks: Special Steps
If you have a MacBook Pro with a Touch Bar (models from 2016 to 2019), there’s an extra step you need to handle carefully. These models have a small flex cable that covers the battery connector, and you must release this cable first before you can access the battery.
Look for a thin ribbon cable near the battery connector area. This cable has a small black plastic locking mechanism at the point where it connects to the logic board. The lock looks like a tiny black bar or tab.
Use your fingernail to flip this black lock upward about 90 degrees. The lock will stay in the up position. Now you can gently pull the ribbon cable straight back to disconnect it. Don’t pull at an angle or you might damage the connector pins.
With the flex cable out of the way, you can now access and disconnect the battery connector using the same method I described earlier.
When you’re ready to reassemble everything, the process reverses. Reconnect the battery first. Then slide the flex cable back into its connector, making sure it’s fully seated. Finally, flip the black lock back down to secure the cable in place. If you forget to flip this lock down, your keyboard and trackpad won’t work after you close up the MacBook.
The flex cable lock mechanism is the most delicate part of this entire procedure. Take your time with it and don’t force anything. If the cable doesn’t slide in easily, pull it back out and try again with better alignment.
MacBook Air Won’t Turn On But Is Charging – What’s Different
If your MacBook Air won’t turn on but is charging, there are a few unique characteristics of the Air design that change how you diagnose and fix the problem. MacBook Airs differ from MacBook Pros in ways that affect troubleshooting, and knowing these differences saves you time.
M1 and M2 MacBook Air models have no cooling fan. This means you can’t use the fan sound diagnostic I mentioned earlier. When you try to determine if your MacBook Air is actually on with a black screen versus truly powered off, you won’t hear any fan noise either way. You’ll need to rely entirely on chassis warmth, keyboard backlight, and the external monitor test to figure out if the system is running.
The lighter, thinner chassis of the MacBook Air makes internal connectors more vulnerable to loosening. Because the Air weighs less and flexes slightly more than the heavier Pro models when you pick it up or put it in a bag, internal cable connections can work loose over time from this repeated flexing. The battery connector and display cable are the most common victims. If you’ve been carrying your MacBook Air around frequently and it suddenly won’t turn on, reseating these internal connections often fixes the issue.
MacBook Air batteries are smaller than MacBook Pro batteries, which means they deep discharge faster when the Air sits unused. If you haven’t used your MacBook Air in several weeks or months, the battery likely drained completely and needs the full 30 to 60 minute charging period before it can boot.
Older MacBook Air models from 2010 to 2013 sometimes need a MagSafe adapter reset. If you have one of these older Airs, try unplugging the MagSafe charger from both the wall outlet and your MacBook Air, wait 15 seconds, then plug the charger back into the wall first and the MacBook Air second. This resets the charging circuit in the MagSafe adapter itself, which can sometimes get stuck in a fault state.
The Apple Silicon MacBook Airs (M1 and M2 models from 2020 onward) also follow all the rules I mentioned about automatic SMC and NVRAM resets. Don’t waste time trying manual resets on these newer models.
Apple Silicon Macs (M1/M2/M3): What You Need to Know
If you have a MacBook with an M1, M2, or M3 chip (any model from late 2020 onward), Apple Silicon mac troubleshooting works fundamentally differently than the Intel-based guides you’ll find all over the internet. This is critical information that almost no troubleshooting article mentions, and I’ve seen countless people waste hours trying fixes that simply don’t apply to their newer MacBooks.
Apple Silicon Macs do not have manual SMC or NVRAM resets. These newer MacBooks perform both of these resets automatically during a standard restart. You cannot manually trigger an SMC reset or PRAM/NVRAM reset on an M1, M2, or M3 MacBook no matter what key combination you press. The hardware architecture changed completely, and Apple moved these reset functions into the automatic power management system.
This means if you have an Apple Silicon MacBook and online guides tell you to hold Shift + Control + Option + Power for SMC reset, or Command + Option + P + R for PRAM reset, skip those steps entirely. Those key combinations do nothing on your Mac. You’re just holding keys down for no reason.
Here’s what does work on Apple Silicon MacBooks when your Mac won’t turn on but is charging:
All the power button methods I covered in Fix #1 work perfectly. The 30-minute charge rule applies. Disconnecting all peripherals helps. The power cycle method works. The battery disconnect hardware method works exactly the same way. Disk Utility from Recovery Mode works.
Recovery Mode access changed slightly on Apple Silicon Macs, but the process is actually simpler. You still hold the power button, wait for the “Continue holding for startup options” message, then release when you see “Loading startup options.” The Recovery environment looks the same and Disk Utility functions identically.
Charging differences on Apple Silicon models: The M1 MacBook Air and M1 MacBook Pro (2020) use only USB-C charging with no LED indicator. The 2021 and newer MacBook Pro models brought back MagSafe with the MagSafe 3 connector, which does have an LED light. If you have a 2021 or later MacBook Pro with MagSafe 3, you can use the charger light diagnostic I described earlier.
When I troubleshoot an Apple Silicon MacBook that won’t turn on but is charging, I focus on Fixes #1 (power button variations), #2 (charge time), #3 (disconnect peripherals), #4 (power cycle), and #8 (Disk Utility). I completely skip Fixes #5, #6, and #7 because those are Intel-only procedures. This targeted approach saves at least 15 minutes of wasted effort and prevents the frustration of trying resets that your macOS system doesn’t even recognize.
If you’re not sure whether you have an Apple Silicon Mac or an Intel Mac, click the Apple logo in the top left corner, then choose “About This Mac.” Look at the “Chip” or “Processor” line. If it says M1, M2, or M3, you have Apple Silicon. If it says Intel Core i5 or Intel Core i7, you have an Intel Mac.
Your MacBook Turned On – Now What? (Immediate Next Steps)
Your MacBook finally powered on, and I know the relief you’re feeling right now. But before you dive back into your work or close this guide, there are several critical steps you need to take immediately to protect your data and prevent this problem from happening again.
Back up your data right now. I’m serious about the timing here. Don’t wait until tomorrow or the end of the week. If one of the fixes in this guide got your MacBook running again, there’s a chance the underlying issue could return. Open Time Machine and run a full backup to an external drive, or make sure your important files are synced to iCloud. If your MacBook won’t turn on again tomorrow, you’ll be grateful you grabbed your data while you had the chance.
Check your MacBook battery health next. A failing battery is one of the most common causes of power-on problems, and checking the battery status tells you if you’re dealing with a one-time glitch or a degrading component that will cause repeated failures.
On macOS Ventura or newer, click the Apple logo in the top left corner, choose System Settings, then click Battery in the sidebar. Look for the battery condition indicator. If it says “Normal,” your battery is healthy. If it says “Service Recommended,” your battery has degraded significantly and needs replacement soon.
On older macOS versions, go to System Preferences, click Battery, then look at the Battery Health button or battery condition message. You can also check detailed battery information by holding the Option key, clicking the Apple logo, and choosing System Information. Click Power in the sidebar and look at the cycle count. Most MacBook batteries are rated for 1000 cycles. If your cycle count is above 800 and you’re having power issues, the battery is likely the culprit.
Run Apple Diagnostics to check for hardware problems. Shut down your MacBook completely. Press the power button and immediately hold down the D key. Keep holding D until you see the Apple Diagnostics screen appear. The diagnostic tool will scan your MacBook’s hardware components and report any issues it finds. This test takes about 5 minutes and catches failing components that might cause future boot problems.
Update macOS if you’re not on the latest version. Many power management bugs and boot failures get fixed in macOS updates. Click the Apple logo, go to System Settings (or System Preferences on older versions), and click Software Update. If an update is available, install it. Software updates often resolve intermittent power issues that seem like hardware failures.
Write down which fix worked for you. I keep a simple note on my phone that says which troubleshooting step finally got my MacBook running. If the problem happens again, I go straight to that fix instead of working through the entire list. If it was the SMC reset that worked, note that. If it was the battery disconnect, write that down. This saves enormous time if you face the same issue in the future.
Monitor for patterns if the problem returns. If your MacBook won’t turn on again in the coming days or weeks, pay attention to when it happens. Does it fail after the battery drains completely? Does it happen after you close the lid for several hours? Does it occur after macOS updates? Recognizing a pattern helps you and any repair technician diagnose whether you’re dealing with a battery issue, a software bug, or a failing logic board component.
When to Stop DIY and Take Your MacBook to Apple Store
Knowing when to stop troubleshooting yourself and seek professional repair saves you time, prevents further damage, and protects your data.
If you’ve tried every single fix in this guide multiple times over 2 to 3 days and your MacBook shows absolutely zero response (no sounds, no lights, no warmth, nothing on external monitor), you’re dealing with a logic board failure or a completely dead battery.
Before concluding it’s hardware failure, note that severe malware infections can sometimes mimic complete power failure by freezing the logic board. If you suspect malware might be the culprit, see how to check for malware on Mac using external diagnostics
Here are the clear signs you need professional MacBook repair:
If you smell anything burnt coming from your charging port or anywhere on the MacBook chassis, stop using your MacBook immediately and take it to a repair shop. A burnt smell indicates a short circuit or component failure that can cause further damage if you keep trying to power it on. This is a hardware failure that requires component-level repair or replacement.
If your charging port is physically damaged, loose, or wobbles when you plug in the charger, the port has likely broken away from the logic board. No amount of software resets will fix physical damage. This repair requires soldering or logic board replacement.
If you dropped your MacBook and it hasn’t turned on since, you’re almost certainly dealing with internal physical damage. Common drop-related failures include disconnected display cables, cracked logic boards, or dislodged components. While you could try the battery disconnect method to reseat connections, drops often cause damage that needs professional diagnosis.
Check your trackpad and the area around it. If the trackpad feels raised, sits higher than it used to, or the click mechanism feels different, your battery is likely swollen. A swollen battery pushes upward against the trackpad and logic board, and it can prevent your MacBook from turning on. Never try to remove a swollen battery yourself because puncturing a swollen lithium battery creates a serious fire risk. Take your MacBook to a repair shop for safe battery replacement.
If you’ve tried every single fix in this guide multiple times over 2 to 3 days and your MacBook shows absolutely zero response (no sounds, no lights, no warmth, nothing on external monitor), you’re dealing with a logic board failure or a completely dead battery. At this point, professional diagnosis is the only way forward.
If your MacBook turns on when plugged into AC power but won’t run on battery power alone, and your MacBook is still under warranty or AppleCare coverage, take it to the Apple Genius Bar instead of attempting battery replacement yourself. Apple will replace the battery at no cost under warranty, but opening your MacBook voids that coverage.
If you suspect any liquid damage (spilled water, coffee, or any liquid on your MacBook), professional cleaning and repair is necessary. Liquid causes corrosion on the logic board that spreads over time. Even if your MacBook seems dry on the outside, internal liquid damage requires specialized cleaning to prevent long-term failure.
Understanding your repair options:
Taking your MacBook to an Apple Store or making a Genius Bar appointment gives you genuine Apple parts, certified technicians, and preserved warranty coverage. This is the most expensive option, but it’s the safest choice if your MacBook is still under warranty or if you want guaranteed quality. Apple Store repairs typically cost $200 to $800 depending on what needs replacement.
Apple Authorized Service Providers use genuine Apple parts and Apple-certified repair processes, but they often charge less than the Apple Store itself. These providers are a good middle ground between cost and quality. You can find authorized providers on Apple’s website.
Independent repair shops offer the lowest prices and often the fastest turnaround. A quality independent shop can replace batteries, screens, and other components for significantly less than Apple charges. However, using non-Apple parts or unauthorized repair may void any remaining warranty coverage. If your MacBook is already out of warranty, independent shops are worth considering.
DIY component replacement is possible for some parts. Battery replacement and SSD upgrades are reasonably straightforward if you’re comfortable with basic hardware work. Logic board replacement or repair is not recommended for DIY because logic boards require specialized diagnostics and often micro-soldering to fix.
What about your data?
If your MacBook won’t turn on and you don’t have a recent backup, I know you’re worried about your files, photos, and documents. Professional data recovery is possible even when a MacBook won’t boot. Data recovery specialists can remove your SSD from the MacBook and extract your files using specialized equipment. This service typically costs $300 to $1000 depending on the complexity.
Here’s what I recommend: if your MacBook contains critical data you haven’t backed up, tell the repair shop about this before they start any work. Some repairs involve replacing the logic board, and if your SSD is soldered to the board (common on 2016 and newer MacBooks), replacing the board means losing your data permanently. A good repair shop will attempt data recovery first or advise you about data risks before proceeding with repairs that could erase everything.
How to Prevent This From Happening Again
The best way to handle MacBook battery problems is to prevent them before they start. I’ve learned that battery health depends less on luck and more on the daily habits you build around charging and storage.
If you’ve tried all eight methods in this guide and your MacBook still won’t turn on, it’s time to seek professional help. Apple’s official support team can run diagnostic tests to identify hardware issues that DIY methods can’t fix. Visit Apple’s MacBook Service and Repair page to schedule a repair appointment at your nearest Apple Store or authorized service provider.
They can assess whether your issue requires battery replacement, logic board repair, or other professional solutions. Getting professional diagnostics is especially important if your MacBook is still under warranty, as attempting hardware repairs yourself could void your coverage
Keep Your Battery Out of the Danger Zone
Your MacBook battery health suffers most when you let it completely drain repeatedly. Lithium batteries degrade faster with deep discharge cycles, so I make it a point to keep my battery above 20% whenever possible. Think of it like your gas tank—constantly running on empty wears out the engine faster.
When you do need to store your MacBook long-term, charge it to 50% before shutting it down completely. This balanced state is actually the sweet spot for lithium battery preservation. Store it in a cool, dry place, and your battery will maintain its health far better than if you left it fully charged or completely dead.
Shutdown Matters More Than You Think
I used to think sleep mode was fine for storage, but I was wrong. Sleep mode still drains your battery slowly, which isn’t ideal when you’re not using your MacBook for weeks. Always use proper shutdown for storage instead. It’s a small step that makes a real difference over time.
Use the Right Power Adapter
Cheap chargers damage your MacBook’s charging circuitry and hurt macbook battery drain patterns. I always use original Apple chargers or quality third-party options that match your MacBook’s wattage requirements. The wattage matching is important because mismatched power adapters can trigger overcharge protection and stress your motherboard.
Here’s a sequence trick I learned: plug your laptop first, then connect the wall outlet. This simple order prevents overcharge protection triggers that can damage your charging system.
Stay On Top of Maintenance
I clean my charging port quarterly to prevent debris buildup that interferes with proper charging. Keep macOS updated as well, since software updates frequently fix power management bugs that drain your battery unnecessarily.
Small preventive habits add up. Your MacBook battery health will thank you for the attention.
Conclusion
You now have everything you need to fix a MacBook that won’t turn on but is charging. This problem is almost always fixable, and I’ve walked you through eight proven methods that work for the vast majority of cases.
Start Simple, Then Go Deeper
The most important thing I can tell you is to start with the simplest fixes first. Try holding the power button, give your MacBook time to charge, and force restart before you consider any hardware methods. Many people jump straight to complicated solutions when a five minute charge would have solved everything.
If you’re one of the few who needs to go deeper, remember that the battery disconnect method is the most effective hardware approach. This single step resolves stubborn power issues that nothing else can touch.
Key Things to Remember
If you own an Apple Silicon MacBook, skip the SMC and PRAM reset entirely because your machine doesn’t have those the same way older models do. Know when to stop troubleshooting and seek professional help too. If you’ve tried multiple methods without success, an Apple Genius Bar visit is the right call rather than risking damage.
I learned from Reddit users that persistence matters. One person shared that numerous attempts over several days finally got their MacBook working again. Sometimes the fix takes patience.
You’re Ready Now
You’ve got professional-level troubleshooting knowledge that most people don’t have. When your MacBook won’t turn on but is charging, you’ll know exactly what to try and in what order. That confidence alone is worth something. You can handle this.
Frequently Asked Questions
How many times should I try the power button before giving up?
Don’t give up after just 2-3 attempts—some MacBooks need 10-15 power button cycles to boot, especially after complete battery drain. Try different hold intervals like 10 seconds, then 15-20 seconds, then the 60-second method with charger connected, giving each attempt at least 3 tries over a 24-hour period before moving to the next fix
Will resetting SMC delete my data?
No, SMC reset only affects hardware settings like power management and battery charging—your files, photos, and applications stay completely intact. Just remember that SMC reset only works on Intel Macs from 2020 and earlier, as M1/M2/M3 models reset SMC automatically.
Do I need to do both SMC reset AND NVRAM reset?
Try SMC reset first since it directly controls power management and battery charging, then move to NVRAM reset if that doesn’t work. You don’t always need both, but there’s no harm doing both since neither deletes data, and both are Intel Mac only (2020 and earlier)
Why does my MacBook show green charging light but won’t turn on?
Green MagSafe light means your battery is fully charged, not actively charging right now, which actually tells you the charging system works fine. Focus instead on power button methods, SMC reset for Intel Macs, or checking if your screen is just dark versus the MacBook being completely off.
Can I use any USB-C charger with my MacBook?
No—your charger must match your MacBook’s wattage (usually 30W, 61W, 67W, or 96W) and support Power Delivery protocol. Many cheap USB-C chargers only provide phone-level charging and won’t work, so stick with Apple original or certified brands like Anker and Belkin.