
Why You Might Need to Factory Reset Your HP Laptop
Over the years, I have talked to many HP laptop owners and whenever they mention “factory reset,” I know there is something that is bothering them. A factory reset will essentially reset your HP laptop to the same state in which it was when it left the factory.
It’s a potent remedy, however people tend to only resort to it when other remedies have failed. Then why, you’re asking yourself, do you need to reset your HP laptop to factory? Let me take you through the most frequently occurring ones.
The first and the most common trigger is the slow performance of the laptop. When your HP laptop is taking too long to boot up, it freezes regularly or when you simply log on to the web, you feel it is slow, a factory reset may help it live once more.
Sometimes slow performance is also connected to hardware issues like display problems, which you can troubleshoot separately before resorting to a full factory reset. Laptops accumulate junk files, outdated software, and background processes over time that slow them down. Basically, a factory reset gets rid of all of that clutter and provides you with a fresh start.
The next significant one is virus or malware elimination. A factory reset is typically the best way to get rid of persistent malware that antivirus software can’t eradicate easily if you have a laptop that is infected.
Sometimes I’ve set up systems where the only way to make sure that the malware was effectively gone was to wipe the systems down and set them up again.
For those who need to sell or donate a used HP laptop, the first thing that you will need to do is to factory reset the laptop. So all your personal information, passwords, saved logins and files are completely wiped out before giving the laptop to someone else. Do not want the new owner to get your old e-mail or photos.
When users change the configuration of their HP laptop or install software that is causing conflicts, they may want to reset their laptop to default settings. These are all the changes that can be problematic and make your laptop unstable and dysfunctional, until you perform a reset and restore the laptop to a working condition.
For instance, if you’ve changed your start-up programs, disabled Windows services, or installed software that affects the stability of your system, a factory reset may be the quickest remedy. Then there’s the situation where you’ve lost your password, and you simply can’t even log into Windows.
You can use a factory reset to regain control of your laptop, but this will wipe your data from the laptop if you haven’t backed it up. In either case, I’ll show you all the ways to reset your HP laptop to factory settings safely and effectively.
What Happens When You Factory Reset an HP Laptop?
I have performed factory reset for many individuals and the first question I always get is exactly the same: am i going to lose everything? Here’s a simple reply. An HP laptop factory reset eradicates the installed programs, settings and personal configurations.
Your computer is reset to its factory settings, as the day you first turned it on. But most people don’t realise it is their choice of how thorough this reset will be. When you are resetting you will have two options in Windows. Which way you go makes all the difference.
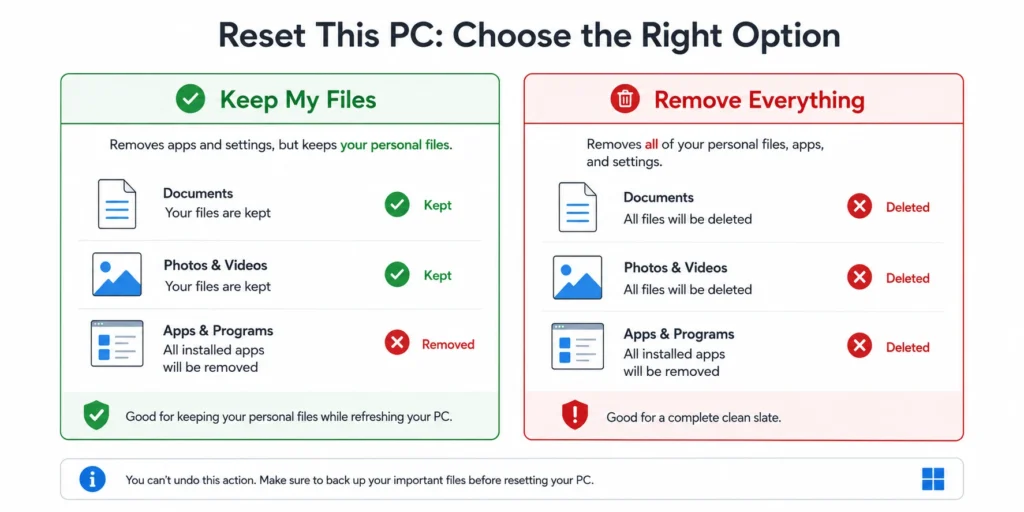
The “Keep My Files” option will delete all of your installed applications and system settings, but will keep your personal files, photos, videos, and downloads. You’ll start your laptop with windows and your personal files will stay in their folders.
The “Remove Everything” option is what it implies. This option will remove all information on your HP laptop. All files, all programs, all settings go away. You get a completely clean slate. First, I should explain some details that are confusing people.
A factory reset does not equal a system restore. System restore will restore your computer to an earlier time when it was not damaged or infected. It’s similar to an undo on recent changes. A factory reset is much more thorough, and clears the slate completely.
In both resets, the Windows OS is not affected. You won’t lose Windows or need to reinstall your operating system from scratch.
The reset automatically reinstall a clean Windows. Your hardware drivers are also reinstalled; now your laptop will know that it has a keyboard, trackpad, screen and more!
It’s mostly a matter of data loss. The one option is to clean up all the other files while protecting the personal ones. The other way of thinking is to view everything as a disposable..
“Keep My Files” vs “Remove Everything”: Which Should You Choose?
This should be based on your individual circumstances. I always ask people why they’re doing the reset in the first place. If you have small performance issues, select “Keep My Files. When your computer laptop becomes slow, freezes every now and then or acts oddly after installing new software, this is typically the answer.
It’s also an ideal solution if you need to clean up your system but you don’t want to lose your work files, photos of the family, documents, etc.
I use it for myself when my laptop requires a little tune up. It gets rid of the garbage without the need to backup hundreds of gigs of personal content.
Before you reset, I recommend taking screenshots of important information or settings you want to remember this can be helpful when reconfiguring your laptop after the reset.
However, there is a caveat I found out the hard way: If you are infected with severe malware, “Keep My Files” might not be able to cure you.
If you are having a serious problem with your computer due to a virus or some kind of malware, then you may end up keeping the virus along with your files. Malware can be embedded within documents particularly in folders that the average user wouldn’t look in. Only remove everything in three situations.
First, this is a must if you are selling or giving away your laptop. The last person you don’t want getting your old files, passwords, or personal information. Second, choose this if you computer is persistently infected with malware and is severely corrupted.
In some cases, the cleanup of an infected system can only be accomplished by burning it down and rebuilding it. Third, if you are having serious system errors, which “Keep My Files” was unable to correct. If the damage to Windows is too great to afford a partial reset, then remove everything and you have a fresh start.
I’ve used “Keep My Files” one time, on a laptop with a hard to remove rootkit infection. After the reset, the malware appeared again as it was in my backups. I needed to run the remove everything option and then the infection had gone.
Removing everything will take longer as it is a more thorough method of overwriting your hard drive. In some cases, you can even specify the number of times to over-ride the data and then recovery is virtually impossible. Consider “Keep My Files” to be spring cleaning in your home, but not letting the furniture go. You’re cleaning up and getting organized, but your stuff remains.
Remove everything means to pack up all of your belongings and give the keys to another person. Nothing is taken away, and the space is utterly empty.
Both options provide you with a new start with Windows, but it’s a very different freshness. One is a thorough cleaning. The other one is a complete demolition and reconstruction.
Before You Start: 3 Critical Steps (Don’t Skip These!)
I’m going to be rude. Doing these preparatory steps can make a simple factory reset into a disaster that could result in the loss of some valuable files, hours of frustration, or both.
Here are the three essential tasks to do: backup your data, use AC electric power and get your BitLocker recovery key if necessary. You have to do three tasks, all essential, before you reset any reset button on your HP laptop. I’ve seen far too many people rush in and do a factory reset and then halfway through realize that they did a bad thing.
It may take anywhere between 15 minutes to 3 hours to complete a factory reset on an HP laptop, depending on the method you’re using. In that period, your computer is totally inaccessible. If you select the wrong reset option, any files not backed up will be lost.
What you left out could be a surprise to Windows when it needs information that you’re missing. These are the 3 most prevalent disasters I see people fall into. They only take minutes each, but just one can mean days of recovery work.
Step 1: Back Up Everything You Want to Keep
The number one rule I share with everybody is that data must always be backed up prior to factory reset, no exceptions. If you make a choice to use the “Keep My Files”, there is still need to make a backup of the files. Why? Because technology fails.
I have personally seen the “Keep My Files” delete documents that should have been kept even though they were protected. Unexpected data loss can occur during the reset due to Windows updates, power outages or hardware problems.
Your backup provides protection against all possibilities that can go wrong, which is why backing up your important files should never be optional before a reset. There are a number of good choices for backing up your data. The simplest way I would suggest is an external hard-drive or a USB flash drive.
Simply plug it in to your HP laptop, copy all important folders on to the drive and safely unplug the drive before you reset. If you do use Microsoft’s cloud storage service, OneDrive is another great backup option.
Move your documents, photos and important files to OneDrive prior to the reset. Once the laptop resets, you can download all the stuff back from the cloud. Any other cloud storage such as Google drive, Dropbox is good too.
Choose the one that you are already using or feel comfortable with. What should you save to? These categories are always in my list to save: documents, photos, videos, music, download, desktop files and browser bookmarks.
If your browser remembers your passwords, be sure to export them out in case you forget them. The following are not items that need to be backed up: installed programs and applications.
These programs will be reinstalled after reset anyway, so there is no point in backing them up. Just be sure you’ve the set-up files or know where to get them again.
Step 2: Plug Into AC Power (Required!)
This is a surprising move but this is not going to be possible with Windows as the machine will not allow the factory reset to be performed without being plugged in. The RESET will need the laptop to be plugged in to AC power during the entire RESET.
This power requirement is automatically enforced by Windows. A factory reset on battery will be prevented. What is the reason for Windows to require continuous power? You don’t want to lose power midway through a factory reset, as it can completely corrupt your operating system.
Your laptop may become unbootable and need to be professionally recovered or have a fresh Windows installation from an external source. Once I saw somebody ignore a low battery warning, and reset began. The battery ran out at 60%.
The laptop was put back together again, and it took another four hours, and required technical skills most people don’t possess, to reinstall Windows from a USB drive.
Avoid such risk. Locate the AC adapter, connect the HP laptop to the wall outlet and always ensure the charging light is on before you use the laptop.
This power requirement is more crucial if your battery is already very old and will not retain its charge well. You will have to use AC power on your laptop during the entire reset process.
Step 3: Find Your BitLocker Recovery Key (If Enabled)
This is a surprise to people, and many of them won’t realize that they should be concerned with BitLocker until they are asked for a recovery key during the reset. BitLocker is Windows’ built-in system of encryption that locks up your hard drive and secures your data.
BitLocker is enabled by default on many HP laptops, particularly those with Windows 10 or Windows 11 Pro editions, and on many business-class and new consumer laptops.
If BitLocker encryption is activated, the laptop may ask for your BitLocker recovery key before you can reset the laptop. Without this key, you can’t complete the reset process.
Knowing how to determine if you need the BitLocker recovery key and knowing where to find your key before issues arise. Sign-in to your Microsoft profile, using any internet browser. Sign in to account.microsoft.com using the same Microsoft account you sign in to your HP laptop with.
In the section, find one named “Devices” or “BitLocker recovery keys. If you do see recovery keys there, make a note of or take a screenshot of the recovery key for your HP laptop.
BitLocker recovery key is a series of numbers divided into segments. Keep this key somewhere safe and easy to access, such as with your phone or on a piece of paper with you.
If you don’t find any BitLocker keys in your Microsoft account, what should you do? In most cases, this also implies that BitLocker is not turned on your laptop, so you don’t need to worry about this.
However, checking only takes two minutes and may prevent you from getting locked out of your own computer while resetting.
This lesson was learned after I assisted a friend with resetting their HP laptop. Windows asked for a BitLocker key 30 minutes into the reset process. My friend was not aware of what BitLocker was, nor where they could find the key.
We were forced to suspend our work, log into their Microsoft account on another computer, retrieve the key and then resume our work. This was supposed to be a straightforward process, but it got quite stressful. Don’t let that happen to you.
See if your BitLocker recovery key is available today before you need it. It will only take you perhaps 15 minutes for these three preparation steps.
This trivial investment will help you avoid losing the irreplaceable files, getting stuck half way through resetting, or bricking your laptop due to a power outage. Believe me, those 15 minutes are worth the time.
Check for your BitLocker recovery key right now before you need it. These three preparation steps take roughly 15 minutes total. This small time investment protects you from losing irreplaceable files, getting stuck mid-reset, or bricking your laptop due to power failure.
For official BitLocker troubleshooting and detailed encryption information, Microsoft’s BitLocker Recovery Guide provides comprehensive documentation that covers advanced encryption scenarios and recovery options. Trust me, those 15 minutes of preparation are worth it
How to Factory Reset HP Laptop Using Windows Settings (Easiest Method)
The easiest and most secure method of reverting your HP laptop to the factory settings is through the Windows Settings app. This in-built feature is applicable to all HP Laptops running on Windows 10 or Windows 11 and doesn’t require any special technical knowledge for the successful implementation of this feature.
I like to use this method whenever I need to factory reset an HP laptop, since Windows takes me step-by-step through each choice, explaining why.
All this is done automatically after the initial choices are made. You can find the Windows reset feature in the Settings menu under the name “ Reset this PC”. This will take you back to a clean state of Windows and remove all the installed programs, but leave you with the option to keep or delete your personal files.
It takes anywhere from 15 to 45 minutes to complete the process of resetting a normal Windows system on a HP laptop, depending on the speed of the laptop and the amount of files that need processing. There will be multiple “resets” as the computer restarts itself, this is normal.
I will explain the exact steps to follow for both Windows 11 and Windows 10, as the menus are slightly different for these two versions.
Step-by-Step for Windows 11
If your HP laptop runs Windows 11, follow these specific steps to factory reset the laptop through the Windows Settings app.
Step 1: Click the Start button in your taskbar. You can also right-click the Start button if you prefer that approach.
Step 2: Select “Settings” from the menu. The Settings window opens with various categories along the left side.
Step 3: Click “System” in the left sidebar. System should already be selected by default when Settings first opens, but click the option anyway to make sure you’re in the right section.
Step 4: Scroll down the System options until you see “Recovery.” Click on Recovery to open the recovery options page.
Step 5: Look for a button labeled “Reset PC” or “Reset this PC” at the top of the Recovery screen. Click that button to begin the factory reset process.
Step 6: Windows 11 now displays a popup asking you to choose an option. Pick either “Keep my files” or “Remove everything” based on your needs. Remember, “Keep my files” preserves your personal documents but removes all installed programs. “Remove everything” wipes the entire HP laptop completely clean.
Step 7: Next, Windows asks how you want to reinstall Windows. Choose either “Cloud download” or “Local reinstall.” I’ll explain the difference between these options in detail below.
Step 8: Review the settings Windows shows you. The screen lists exactly what will happen during the reset. If everything looks correct, click “Reset” to start the factory reset process on your HP laptop.
Your HP laptop will now restart and begin the reset process. Don’t turn off your computer or unplug the power during this time.
Step-by-Step for Windows 10
The process to factory reset an HP laptop running Windows 10 follows a similar path, but the menu structure differs slightly from Windows 11.
Step 1: Click the Start button, then click the gear icon to open Settings. You can also press the Windows key plus I on your keyboard as a shortcut to open Settings directly.
Step 2: In the Settings window, look for “Update & Security.” This option usually appears in the bottom row of the Settings categories. Click on Update & Security to open that section.
Step 3: Along the left sidebar inside Update & Security, click “Recovery.” The Recovery page contains all the reset and recovery options for Windows 10.
Step 4:Under the “Reset this PC” heading, click Get Started to launch the factory reset wizard.
Step 5: Windows 10 asks you to choose between “Keep my files” and “Remove everything.” Select the option that matches your situation and goals.
Step 6: Choose your reinstall method between “Cloud download” and “Local reinstall” when Windows presents that screen.
Step 7: Windows 10 displays a summary screen showing what the reset will do. Read through the information carefully. If you’re ready to proceed, click “Reset” to factory reset your HP laptop on Windows 10.
The reset process begins immediately, and your HP laptop will restart multiple times as Windows reinstalls itself.
Cloud Download vs Local Reinstall: Which Is Faster?
If you reset an HP laptop using Windows Settings, you will have to select one of the following: cloud download, or local reinstall. This option will determine where Windows will get the fresh installation files from.
The “Local reinstall” option will reinstall the Windows Operating System files already on your HP laptop. This option will recreate windows from the existing files on the system without downloading anything from the web. Local reinstall completes quicker since your laptop does not need to download a number of gigabytes of information.
I would suggest local reinstall to most people due to the speed benefit. The process to install the full reset will take 15-30 minutes on your HP laptop, whereas a cloud download may take hours if you have a slow internet connection.
Cloud download is downloading a NEW version of Windows from Microsoft’s servers. This approach will download approximately 4 gigabytes of information, which requires a solid Wi-Fi signal and adequate internet bandwidth capacity.
The primary benefit of cloud download is that you’ll receive the most up-to-date version of Windows, including all the latest updates. Local reinstall may provide you with a slightly-older version of Windows that will require updates following the reset.
What situations warrant cloud download vs. local reinstall? I choose cloud download during two particular situations. First, if I think the Windows files that are currently on my HP laptop are corrupted or damaged, downloading new ones from Microsoft will give me a clean install.
Secondly, when the laptop is infected with persistent malware which can have damaged system files I know that I can be assured that every Windows file is completely clean.
If you need to do a normal reset on an HP laptop that you just want a better performance or just want to do it all over again, the local reinstall option is perfect and won’t waste much of your time.
Pro Tip: Check What Apps Will Be Removed
Most people overlook this feature but it’s very handy to have whenever you reset an HP laptop! Windows will display a link to “View apps that will be removed” or something to that effect before you click on the last “Reset” button.
That link will list all the programs that the Windows reset will remove from your HP laptop. This transparency feature allows you to go back and confirm that all important data has been backed up, before the reset removes any programs you may have installed.
Every time, I click on this link and it asks me to think twice. It displays all the application names installed on the machine.
If a program appears in that list and at some point you realize you need some data from that program, you can cancel the reset, save the data you want to save, and resume the reset process. A time I saw one of the programs I didn’t want to remove on the removal list, before I reset the laptop.
I didn’t remember that program but seeing the name prompted me to remember there was a program with the name that I had project files for that had not been backed up. Thanks to that one click I didn’t waste a lot of hours.
This also enables you to make a list of programs to install again once the factory reset has completed. I’ll sometimes take a picture of the list of apps or list down the crucial program names to remember what it is that I need to reinstall later!
During the final confirmation screens before the reset will begin, the “View apps that will be removed” link is displayed. Search the summary window for the link in the small text near the bottom of the summary window.
Click on it, read through the list, and then you can move forward with confidence and know what will happen to your HP laptop.
How to Factory Reset HP Laptop Without a Password (Locked Out?)
Getting locked out of your HP laptop feels like a nightmare, but you can still factory reset the laptop without knowing the administrator password. Windows includes a built-in method to reset your HP laptop directly from the login screen, even when you can’t access your account.
I’ve helped countless people who forgot their passwords or bought secondhand HP laptops with unknown login credentials. The good news is that you don’t need the password to perform a complete factory reset.
The key to resetting an HP laptop without a password is accessing the Advanced Startup menu from the sign-in screen. This special menu lets you troubleshoot and reset Windows without ever logging into your account.
The entire process takes about 30 minutes or more depending on your laptop’s speed. Your HP laptop will restart several times during the reset, and all user accounts and data will be erased from the computer.
Let me show how do i factory reset my hp laptop exactly settings when you’re stuck at the login screen.
Method 1: Shift + Restart from the Login Screen
This technique works on both Windows 10 and Windows 11, and I consider this method the most reliable way to factory reset an HP laptop without a password.
You access the reset options by forcing your HP laptop to boot into the Advanced Startup environment instead of loading Windows normally.
Here’s the exact step-by-step process for an HP laptop reset from the sign-in screen.
Step 1: Turn on your HP laptop and wait until you see the password login screen. Don’t try to enter any password yet.
Step 2: Look at the bottom right corner of the login screen. You’ll see a power button icon there.
Step 3: Click the power button icon to reveal the power options menu. You should see options like Sleep, Shut down, and Restart.
Step 4: Press and hold the Shift key on your keyboard. Keep holding Shift with one hand while you continue to the next step.
Step 5: While still holding the Shift key, click “Restart” with your mouse. Keep holding Shift even as the laptop begins to restart.
Step 6: Your HP laptop will restart, but instead of going back to the login screen, Windows will load into the Advanced Startup menu. You can release the Shift key now.
Step 7: On the Advanced Startup screen, click “Troubleshoot.” This opens the advanced troubleshooting options.
Step 8: Inside Troubleshoot, click “Reset this PC.” This is the same factory reset feature you’d normally access from Windows Settings, except you’re reaching the feature without logging in.
Step 9: Choose “Remove everything” when Windows asks which reset option you want. You must select “Remove everything” because the “Keep my files” option requires you to enter the administrator password first.
Step 10: Select your reinstall preference between “Cloud download” or “Local reinstall.” I recommend local reinstall for faster completion.
Step 11: Windows may ask if you want to clean the drive thoroughly. Choose “Just remove my files” for a faster reset, or pick “Remove files and clean the drive” if you’re selling the HP laptop and want to make data recovery more difficult.
Step 12: Review the final confirmation screen. When you’re ready, click “Reset” to begin the factory reset process on your HP laptop.
Your HP laptop will now restart and begin erasing all accounts, passwords, programs, and data. The process happens automatically without requiring any password entry.
I’ve used this Shift + Restart method dozens of times on HP laptops where people forgot their passwords. The technique works consistently because Windows deliberately provides this emergency reset option for exactly these situations.
One important warning: this method only works if your HP laptop can at least boot to the login screen. If your laptop won’t boot at all or shows error messages before reaching the login screen, you’ll need to use recovery media or HP’s recovery partition instead.
Method 2: Third-Party Password Reset Tools (Last Resort)
Sometimes you might want to reset your HP laptop password instead of wiping everything through a factory reset. This approach makes sense if you have important files on the laptop and you don’t have a backup.
Third-party password reset tools can remove or reset the administrator password on your HP laptop, allowing you to log in normally. Once you’re logged in, you can back up your files and then perform a standard factory reset through Windows Settings.
One tool I’ve seen work reliably is PassFab 4WinKey. This software creates a bootable USB drive that can reset Windows passwords without needing to know the original password.
Here’s how the third-party tool approach works in general terms. You need access to a different working computer to create the password reset media. Download the password reset software on that working computer, then follow the program’s instructions to create a bootable USB drive.
Boot your locked HP laptop from the USB drive you created. The password reset tool loads instead of Windows. Follow the on-screen instructions to select your user account and reset or remove the password.
After the tool resets your password, restart your HP laptop normally. You can now log into Windows using the new password or with no password at all depending on which option you chose.
Once you’re logged in, back up any important files to an external drive or cloud storage. Then perform a normal factory reset through Windows Settings to completely clean the HP laptop.
I mention this method as a last resort because third-party password tools require technical confidence and access to another computer. The Shift + Restart method I described earlier is simpler and works without any additional software or equipment.
However, the password reset approach does give you one crucial advantage: you can retrieve your files before wiping the laptop. If you realize you need files from the locked HP laptop, this method provides a path to access those files first.
Just remember that resetting passwords using third-party tools requires you to verify ownership of the laptop. These tools should only be used on computers you legally own or have permission to access. Never use password reset tools on someone else’s HP laptop without their explicit permission.
For most locked-out situations where you own the HP laptop and don’t need the existing files, I strongly recommend the Shift + Restart method. The technique is faster, free, built into Windows, and accomplishes the same end goal of giving you a fresh HP laptop you can use again.
How to Reset HP Laptop That Won’t Turn On (Recovery Mode)
When your HP laptop won’t boot into Windows normally, you’re trapped in a frustrating situation. The screen either stays black, shows error messages repeatedly, or loops endlessly through startup screens without ever fully loading Windows.
The good news is that Windows includes a built-in system recovery environment called WinRE this system recovery tool lets you factory reset your HP laptop even when normal Windows won’t load. This recovery system exists specifically for situations where your computer is broken but not completely dead.
I’ve rescued HP laptops from boot loops and startup failures using the Windows recovery environment many times. The recovery system bypasses the damaged Windows installation and gives you access to reset tools that can restore your laptop to working condition.
Accessing the Windows recovery environment requires a specific technique because you can’t use the normal Windows Settings menu when Windows won’t even start. Instead, you’ll trigger the recovery environment either through repeated power cycling or by pressing a special key during startup.
The entire factory reset process from the recovery environment takes roughly 30 to 45 minutes, depending on your HP laptop’s speed and which reset options you choose.
Access Windows Recovery Environment (WinRE)
There are two primary methods to access the Windows recovery environment on your HP laptop. I’ll explain both techniques because one might work better than the other depending on your specific situation.
Method 1: Forced Restart Technique
This method forces Windows to recognize that something went wrong during startup, triggering the recovery environment automatically.
Step 1: Power on your HP laptop normally.
Step 2: Wait 10 seconds, then hold the power button until the laptop completely shuts down. Don’t just let it shut down naturally, keep pressing the power button until all lights go dark.
Step 3: Wait a few seconds, then power on your HP laptop again.
Step 4: As soon as you see any startup screen appear, force a shutdown again by holding the power button for 10 seconds.
Step 5: Repeat this power on and power off cycle one more time. After the third forced shutdown, power on your HP laptop.
Step 6: This time, Windows should recognize the pattern of failed startups and automatically load the Windows recovery environment instead of attempting to start Windows normally.
The recovery environment screen displays several troubleshooting options. Look for “Troubleshoot” and click that option.
From Troubleshoot, click “Reset this PC” to access the factory reset tools.
Method 2: F11 Key During Startup
This technique works on many HP laptops specifically and often proves faster than the forced restart method.
Step 1: Power on your HP laptop and immediately begin tapping the F11 key repeatedly. Start tapping before any text or logo appears on screen, and keep tapping throughout the startup sequence.
Step 2: Keep tapping F11 until your HP laptop loads the recovery environment. You should see the Windows recovery environment screens rather than the normal startup process.
Step 3: Click “Troubleshoot” from the recovery menu options.
Step 4: Select “Reset this PC” to begin the factory reset process.
The F11 key method accesses your HP laptop’s recovery partition, which is a hidden section of your hard drive that contains recovery tools. The recovery partition exists separately from your main Windows installation, so it can function even when Windows itself is completely broken.
I prefer the F11 method on HP laptops because it’s faster and more reliable than forced restarts. If F11 doesn’t work on your specific HP model, then fall back to the forced restart technique.
Important Note About Recovery Partitions
Some HP laptops have had their recovery partition deleted or disabled. If neither the forced restart nor the F11 key method works, your recovery partition might be missing.
In that case, you’ll need to create bootable Windows recovery media using another computer. You can download Windows 10 or Windows 11 installation media from Microsoft’s website, then use a USB flash drive to create a bootable recovery drive.
Boot your HP laptop from the USB drive and access the same troubleshooting and reset options from the Windows installation media instead of the recovery partition.
Once You Access the Recovery Environment
The Windows recovery environment presents the same factory reset options you’d normally see in Windows Settings. Choose either “Keep my files” or “Remove everything” depending on your situation.
Select your reinstall method between cloud download and local reinstall. Local reinstall works best when you’re stuck in recovery mode because it doesn’t require downloading data from the internet.
For an HP laptop that won’t boot normally, I always recommend “Remove everything” to ensure you start with the cleanest possible Windows installation. Boot loop problems often indicate corrupted system files, so a complete wipe and reinstall gives you the best chance of getting a stable, working computer back.
HP Recovery Manager & HP Sure Recover (HP-Specific Tools)
Most factory reset guides focus on generic Windows tools, but HP laptops come with their own proprietary recovery solutions that often work better than standard Windows methods. HP Recovery Manager and HP Sure Recover are specialized tools designed specifically for HP computers, and they can save you time and frustration.
These HP-specific tools exist because HP preloads them onto their laptops to provide faster, more reliable recovery options. Generic Windows reset tools work fine, but HP’s native recovery tools are optimized specifically for HP hardware and can handle certain problems that standard Windows tools might struggle with.
I’ve found that using HP’s built-in recovery tools often produces better results than relying solely on Windows Settings, especially when dealing with stubborn performance issues or hardware-specific problems.
The tool you’ll use depends on your HP laptop model and age. Older HP laptops typically have HP Recovery Manager, while newer business-class HP models like the EliteBook and ProBook lines come equipped with HP Sure Recover.
HP Recovery Manager (Pre-Installed on Older Models)
HP Recovery Manager is HP’s traditional recovery application that comes preloaded on most HP laptops manufactured before 2018 and many consumer models even today. This tool restores your HP laptop by retrieving a factory image from the recovery partition on your hard drive.
The recovery partition is a hidden section of your hard drive that contains a complete backup of your HP laptop exactly as it shipped from the factory. HP Recovery Manager accesses this partition to restore your computer to its original state.
You can launch HP Recovery Manager directly from Windows if your computer still starts normally. Look for HP Recovery Manager in your Start menu or search for it using Windows search. The application displays a simple interface with options to start the recovery process.
If your HP laptop won’t boot into Windows, you can access HP Recovery Manager through the boot menu. Restart your computer and tap F11 repeatedly as it powers on. On many HP models, pressing F11 during startup launches HP Recovery Manager directly instead of loading Windows.
The HP Recovery Manager interface guides you through a simple process. You select whether to keep your files or erase everything, just like the standard Windows reset. The tool then retrieves the factory image and begins restoring your HP laptop.
The factory image restore process typically takes 20 to 40 minutes depending on your laptop’s speed. Your computer will restart several times during the process, and you should not interrupt the recovery while it’s running.
One major advantage of HP Recovery Manager is that it restores your HP laptop with HP’s optimized drivers and software preinstalled.
After recovery completes, your HP laptop includes all the manufacturer-specific tools and utilities that HP includes with new units. Standard Windows reset tools don’t automatically reinstall these HP-specific applications.
I’ve used HP Recovery Manager on dozens of HP laptops, and it consistently produces clean, stable systems. The recovery process feels faster than Windows Settings reset because it’s pulling from a local partition rather than downloading files from the internet.
HP Sure Recover (Business Models with Intel CPUs)
HP Sure Recover represents HP’s next-generation recovery solution for business-class HP laptops like the EliteBook and ProBook series. This cloud based recovery system downloads a fresh Windows installation directly from HP’s servers rather than relying on a local recovery partition.
HP Sure Recover works even if your HP laptop’s recovery partition is missing or corrupted. Because the recovery image comes from the cloud, local hard drive problems don’t prevent you from recovering your system.
You access HP Sure Recover through the boot process, similar to HP Recovery Manager. Restart your HP EliteBook or ProBook and tap F11 during startup. If your HP laptop has Sure Recover installed, you’ll see the option to use cloud-based recovery.
HP Sure Recover downloads roughly 2 to 4 gigabytes of data from HP’s cloud servers, so you need a stable internet connection during the recovery process. The tool automatically handles downloading, verifying, and installing the Windows image onto your HP laptop.
This cloud-based approach gives you a significant advantage when dealing with stubborn corruption. If your hard drive has severe damage to the recovery partition or system files, HP Sure Recover retrieves a completely clean copy from the cloud that’s guaranteed to be uncorrupted.
The recovery process takes longer than HP Recovery Manager because it involves downloading several gigabytes. Expect 45 minutes to an hour for a complete HP Sure Recover process, depending on your internet speed.
After recovery completes, your HP EliteBook or ProBook includes all HP-specific drivers, utilities, and security software that came with the original laptop. HP Sure Recover automatically configures these tools with business-appropriate settings.
I recommend HP Sure Recover for business HP laptops that experienced severe system failures or corruption. The cloud-based approach ensures you get a pristine Windows installation without any possibility of local corruption carrying over into the recovered system.
To determine which recovery tool your HP laptop has, check your HP model name. Consumer HP laptops like Pavilion and ENVY typically use HP Recovery Manager. HP EliteBook, ProBook, and business-class models use HP Sure Recover if they have Intel processors.
Both tools accomplish the same goal as standard Windows reset but with HP-specific optimizations and reliability advantages built in.
The HP Recovery Shortcut: F11 + Power Button Method
If you know the right physical button combination, you can boot your HP laptop directly into recovery mode without waiting for Windows to load or using the Windows Settings menu. This hardware shortcut is built into HP laptops and works whether your computer is powered on or completely off.
I use this method constantly because it bypasses everything and takes you straight to the recovery console in seconds. Most people don’t realize this shortcut exists because it’s not documented in standard Windows guides.
The F11 plus Power button technique is an HP-specific hard reset method that activates the recovery partition at the hardware level. This means the recovery system loads before Windows even attempts to start, making it incredibly useful when Windows refuses to load normally.
This shortcut works on virtually every HP laptop model manufactured in the last decade. The timing and button combination matter, so I’ll walk you through the exact technique to ensure success.
Step-by-Step Physical Button Technique
This method works whether your HP laptop is currently powered on or completely off. I’ll explain the process starting from a powered-off state, which is the most common scenario.
Step 1: Make sure your HP laptop is completely powered off. If the computer is currently on, hold the power button until it shuts down completely.
Step 2: Once your HP laptop is off, locate the Power button and the F11 key on your keyboard. The Power button is usually on the side or front edge of your laptop.
Step 3: Press and hold the Power button with one hand. At the exact same moment, press and hold the F11 key with your other hand. Hold both buttons down together.
Step 4: Keep holding both the Power button and F11 simultaneously. Within a few seconds, you’ll see the power light on your HP laptop illuminate. This indicates the laptop is receiving power.
Step 5: As soon as the power light turns on, release the Power button but continue holding F11. This is the critical timing step. Release power but keep F11 pressed.
Step 6: Continue pressing F11 repeatedly. You might need to tap F11 multiple times or hold it down, depending on your specific HP model. Keep tapping F11 even as the laptop starts to boot.
Step 7: Within 10 to 15 seconds, your HP laptop should display a “Please wait” message or the HP Recovery Manager screen. You’ve successfully entered recovery mode.
Step 8: Once the recovery console appears, release the F11 key. You now have access to recovery options including factory reset, recovery image restore, and system diagnostics.
The recovery menu displays different options depending on whether your HP laptop has HP Recovery Manager or HP Sure Recover installed. Select “Factory Reset” or “System Restore” from the available options.
I’ve performed this button combination hundreds of times on HP laptops, and the timing is consistent across models. The key is pressing Power and F11 simultaneously, then releasing Power while keeping F11 pressed.
If the recovery console doesn’t appear after following these steps, try the combination again. Some HP models require slightly different timing. Wait a full 30 seconds from when you release the Power button before giving up.
Why This Method Works So Well
The F11 plus Power button combination directly activates your HP laptop’s recovery partition at the hardware level. The BIOS, which is the firmware that controls your computer before Windows loads, recognizes this key combination and boots into recovery mode instead of attempting to load Windows normally.
This approach bypasses Windows completely, which means it works even when Windows is completely broken, corrupted, or refuses to load. You don’t need Windows Settings, you don’t need to get to the login screen, and you don’t need to reset from within Windows itself.
I recommend this method as your first choice whenever you need to factory reset an HP laptop that won’t boot normally. It’s faster than waiting for the forced restart method to trigger the Windows recovery environment, and it gives you direct access to HP’s recovery tools.
What If the Button Combination Doesn’t Work?
If pressing Power and F11 together doesn’t trigger recovery mode, your HP laptop might have a different button combination. Some older HP models used different keys like Escape, Delete, or F10 to access recovery.
Check your specific HP laptop model online or consult the manual that came with your computer. The recovery key combination varies slightly between different HP product lines like Pavilion, ENVY, ProBook, and EliteBook.
You can also try the forced restart method from the login screen as a fallback. Hold Power until the laptop shuts down, restart it, and repeat the shutdown when you see the startup screen. After three forced shutdowns, Windows should trigger the recovery environment automatically.
The F11 plus Power button method remains the fastest approach when it works on your HP model. Having this hardware shortcut available gives you a reliable recovery option that doesn’t depend on Windows functioning at all.
What to Do When Reset Fails or Gets Stuck
Sometimes the standard factory reset methods don’t work. Your HP laptop might freeze halfway through the reset process, or the reset option disappears from your menus entirely. When built-in recovery methods fail, you need a backup plan that doesn’t depend on Windows functioning normally.
I’ve encountered stubborn situations where the operating system became so corrupted that even Windows’ own reset tools couldn’t fix the damage. In these cases, you need to bypass Windows completely and perform a clean installation using external recovery media.
The good news is that Microsoft provides free tools to create Windows installation media on a USB drive. This method works when every other approach has failed and gives you a way to completely rebuild Windows from scratch.
A failed reset usually indicates one of two problems. Either your operating system files are too damaged for Windows to repair itself, or the recovery partition has become corrupted or inaccessible. In either situation, external installation media becomes your solution.
When Your OS Is Too Corrupt to Reset Itself
Sometimes Windows damage runs too deep for the built-in reset function to handle. The reset process relies on system files that might themselves be corrupted.
When the operating system is too damaged to execute its own repair tools, you need to take control from outside the system.Creating Windows installation media allows you to reinstall Windows on your HP laptop completely from scratch.
This approach works because you’re not relying on any existing Windows files to do the repair. You’re essentially replacing the entire operating system with a fresh copy.
I recommend this method when your HP laptop experiences any of these situations: the reset process freezes or hangs indefinitely, the reset starts but fails partway through with error messages, or your computer won’t even reach the Windows login screen to attempt a reset.
Here’s how to create Windows installation media and perform a clean install:
First, you need access to another working computer. Visit Microsoft’s official website and search for “Windows Media Creation Tool” for your specific Windows version (Windows 10 or Windows 11).
Download the Media Creation Tool and run the program on the working computer. You’ll need an empty USB flash drive with at least 8 gigabytes of storage capacity. The tool will format your USB drive and create bootable Windows installation media.
The process takes 15 to 30 minutes depending on your internet speed. Once the Media Creation Tool finishes, you’ll have a USB drive that boots into Windows setup.
Take the USB drive back to your HP laptop. Plug the USB drive into an available port and restart your computer. During startup, press F12 or Escape repeatedly to access the boot menu. Select the USB drive from the boot options.
Your HP laptop will now boot from the USB drive and load the Windows Setup wizard. Follow the setup screens and select “Custom Install” or “Clean Install” when prompted. This option allows you to completely erase your hard drive and perform a fresh Windows installation.
Select your main hard drive as the installation target. Setup will erase all existing data and install a clean Windows operating system. The entire installation process takes 20 to 45 minutes.
After Windows installation completes, your HP laptop will restart and load a clean Windows system. You’ll need to set up Windows again from scratch, create a new user account, and reinstall your applications.
If “Reset This PC” Option Is Missing
Occasionally, the “Reset this PC” option simply disappears from Windows Settings or the recovery menu. This happens when the recovery tools themselves become corrupted or disabled. If you can’t find the reset option where it should be, you’ve encountered a situation where external installation media is necessary.
The Windows recovery environment depends on system files that might be damaged. When those files are corrupted beyond automatic repair, Windows hides the reset option to prevent failed reset attempts.
Use the same Windows Media Creation Tool method described above. Creating bootable installation media bypasses the broken recovery environment and gives you access to Windows Setup without depending on any existing Windows functionality.
Insert the USB drive you created and boot from it on your HP laptop. The Windows Setup wizard displays the same installation options, including the ability to clean install Windows. This approach works regardless of whether your reset option is missing.
Important Note About Lost Data
Performing a clean Windows installation using installation media will erase all files on your hard drive. Make absolutely certain you’ve backed up any important documents, photos, or files before proceeding with this method.
If you have files you need to recover but can’t access them normally, consider consulting a data recovery professional. Hard drive data recovery services can retrieve files even after the operating system has been completely replaced, though these services can be expensive.
For most situations where you need external installation media, erase everything and start fresh. A completely clean Windows installation is the most reliable solution when the operating system itself has become too corrupted for standard reset methods to function.
When to Seek Professional Help
If your HP laptop won’t boot from USB installation media, or if the Windows installation process fails, hardware problems might be causing the issues. Hard drive failure, memory problems, or other hardware damage could prevent any software-based reset or installation from working.
At that point, professional computer repair becomes your best option. A technician can diagnose hardware issues and determine whether your HP laptop needs hard drive replacement or other repairs. Attempting more complex troubleshooting without proper diagnostic equipment might cause additional damage.
Most HP laptops recover successfully using the Windows installation media method. But if even the clean installation fails, hardware repair is likely necessary.
After the Reset: First 5 Things to Do
Your HP laptop factory reset is complete, but your work isn’t finished yet. The moment your computer restarts with a fresh Windows installation, you need to complete several setup steps before your laptop is truly ready to use. Skipping these tasks leaves your system vulnerable, missing essential drivers, or running at less than full capability.
I always guide people through a specific post-reset checklist because the order matters. Complete these five steps in sequence, and your HP laptop will be optimized, secure, and fully functional.
Most people don’t realize that a freshly reset HP laptop runs in a temporary state until you finish the initial setup process. Your display might show the wrong resolution, critical drivers might be missing, and your backed-up files won’t be accessible until you restore them.
These five steps take roughly 30 to 60 minutes total, depending on your internet speed and how many files you’re restoring. The good news is that most of these steps run automatically in the background while you handle other tasks.
1. Fix Your Display Resolution First
This is the step that catches almost everyone off guard. After your factory reset completes, your HP laptop’s display resolution might look stretched, blurry, or wrong. Text appears pixelated, windows look too large or too small, and the overall visual quality feels degraded.
This happens because Windows installs with a generic display driver that doesn’t recognize your specific monitor or laptop screen. The generic driver uses a default resolution that often doesn’t match your screen’s native capabilities.
Fixing your display resolution takes just two minutes and makes an immediate difference. Open Windows Settings by pressing the Windows key plus I on your keyboard. Navigate to System, then click Display.
Scroll down until you see a dropdown menu labeled “Display resolution” or similar wording depending on your Windows version. Click the dropdown menu to see available resolutions. Windows displays a recommended resolution with a label saying “Recommended.” Select that recommended option.
Your display will flicker briefly as Windows applies the new resolution. The change takes effect immediately. Your screen should now display text clearly and windows should appear properly proportioned.
If the resolution looks wrong after selecting the recommended option, try a different resolution from the list. Most HP laptop screens work best at resolutions like 1920×1080 or 2560×1440 depending on screen size and model.
I’ve seen people spend hours complaining about their post-reset display quality when the fix was just a one-click resolution change. This simple adjustment transforms your visual experience on the freshly reset HP laptop.
2. Complete Windows Setup (OOBE)
OOBE stands for Out of Box Experience, which is Microsoft’s term for the initial setup wizard that appears after Windows installation. This process configures your regional settings, language preferences, Microsoft account, and security options.
When your HP laptop first boots after the reset, Windows displays the OOBE setup screens automatically. Don’t skip these screens even though you might be tempted to rush through them.
Region and Language: The first screens ask which region and country you’re in, and which language and keyboard layout you prefer. Select your actual region because Windows uses this information for regional settings, time zone, and language-specific features.
Wi-Fi Connection: Windows asks you to connect to a Wi-Fi network. Select your home Wi-Fi network and enter the password. A stable internet connection is essential for the next steps.
Microsoft Account Setup: Windows prompts you to sign in with a Microsoft account or create a new one. I recommend signing in with your existing Microsoft account if you have one. Your Microsoft account connects your HP laptop to OneDrive, Microsoft 365, and other Microsoft services.
If you don’t have a Microsoft account, you can create one during setup or create a local account instead. A Microsoft account provides better integration with Windows features, so I recommend taking a few minutes to create one if you don’t already have an account.
Windows Hello PIN: Windows asks you to create a 4-digit PIN for quick login. This PIN is separate from your account password and exists just for your HP laptop. Choose a PIN you’ll remember easily.
Privacy Settings: Windows displays various privacy options including tracking preferences, diagnostics, and data sharing. Review these settings and disable any options you’re uncomfortable with. The default settings prioritize Microsoft’s data collection, so many people adjust these preferences.
Optional Trial Offers: Windows might display offers for Microsoft 365 trials or OneDrive upgrades. You can safely skip these offers if you’re not interested. Click “Skip” or decline the offers to continue setup without subscribing.
After completing OOBE, Windows finishes loading and displays your desktop. Your HP laptop is now set up with your regional preferences, language, and security settings configured.
3. Install HP Drivers and Windows Updates
Your freshly reset HP laptop has basic drivers installed, but it needs HP-specific drivers to fully utilize your laptop’s hardware. Windows Update automatically downloads many drivers, but checking for HP drivers ensures you have the most optimized versions.
Open Windows Settings and click Update & Security. Click “Check for updates” and let Windows scan for available updates. Windows will download and install system updates and many device drivers automatically. This process might take 15 to 30 minutes and might require a restart.
After Windows Updates completes, visit the HP Support website. Enter your HP laptop model number to find your specific model’s support page. Download any drivers listed as “Critical” or “Recommended.” Common drivers include graphics drivers, chipset drivers, audio drivers, and touchpad drivers.
Run the driver installers you downloaded from HP. These installers add HP-optimized drivers that improve performance and functionality specific to your laptop model. Some drivers might require a restart after installation.
Having proper drivers installed makes a noticeable difference in your HP laptop’s performance. Graphics will run smoother, audio quality improves, and your touchpad will be more responsive.
4. Windows Updates (Continued Monitoring)
Even after the initial Windows Update scan completes, Windows continues installing updates in the background. Allow your HP laptop to remain plugged in and connected to Wi-Fi for at least a few hours after the factory reset.
Check Windows Update again the following day to ensure all updates have been installed. Sometimes Windows requires multiple update cycles to deliver all available patches and features.
Keeping Windows fully updated protects your HP laptop against security vulnerabilities and ensures you have all the latest bug fixes and performance improvements.
5. Restore Your Backed-Up Files
Once your HP laptop is set up, updated, and fully functional, you can restore the files you backed up before the factory reset.
If you backed up files to an external hard drive, plug the drive into your HP laptop. Open File Explorer and navigate to the external drive. Copy your documents, photos, videos, and other important files back to your laptop’s default folders.
If you backed up files to cloud storage like OneDrive, Google Drive, or Dropbox, sign into those services and download your files back to your HP laptop. Your Microsoft account might automatically restore OneDrive files if you signed in during OOBE.
Take your time restoring files, and verify that important files actually transferred back to your HP laptop. Make sure your documents are accessible and haven’t been corrupted during the backup and restore process.
After all five steps are complete, your HP laptop is fully set up, secured, updated, and restored with your personal files. Your factory reset is truly finished, and your laptop is ready for regular use.
How Long Does Each Reset Method Take?
The time your factory reset takes depends entirely on which method you use and what options you select during the process. Knowing realistic time expectations helps you plan when to start your reset and prevents you from interrupting the process halfway through.
I’ve timed every reset method on various HP laptops, and the differences are significant. Some resets finish in 30 minutes while others take several hours depending on your choices.
Here’s a breakdown of what to expect for each reset approach.
Windows Settings Reset with Local Reinstall: 15 to 45 Minutes
This is the fastest option for most people. Local reinstall uses Windows files already on your HP laptop, so no downloading happens. Your computer restarts several times during the process, but the entire factory reset completes in about 30 minutes on average.
Newer laptops with fast solid-state drives finish on the faster end of this range. Older laptops with slower hard drives take closer to 45 minutes. The “Keep my files” option completes slightly faster than “Remove everything” because the system doesn’t need to securely erase your hard drive.
I use local reinstall whenever possible because the speed advantage is worth it.
Windows Settings Reset with Cloud Download: 1 to 3 Hours
Cloud download is significantly slower because Windows downloads several gigabytes of fresh installation files from Microsoft’s servers. The time depends almost entirely on your internet speed.
With a fast fiber internet connection, cloud download might complete in 60 to 90 minutes. With standard broadband internet, expect 2 to 3 hours. Slow or unreliable internet connections could extend the process even longer.
This method requires your Wi-Fi to stay connected throughout the entire reset. If your internet drops during the download, the reset will pause or fail. I only recommend cloud download when you suspect your local Windows files are corrupted.
HP Recovery Manager or HP Sure Recover: 20 to 60 Minutes
HP Recovery Manager on older HP laptops typically completes in 20 to 40 minutes since it works from your local recovery partition. HP Sure Recover on newer business models takes longer because it downloads from the cloud, usually 45 minutes to an hour depending on internet speed.
Both methods are faster than Windows Settings reset in most cases because they’re optimized specifically for HP hardware.
Reset from Windows Recovery Environment (WinRE): 30 to 90 Minutes
The forced restart method that triggers Windows recovery environment takes similar time to the Windows Settings method. Expect 30 to 45 minutes for the reset itself, but add time if you needed multiple restart cycles to trigger recovery mode initially.
If you attempted the reset multiple times before succeeding, total elapsed time could stretch to 90 minutes or more.
F11 Key Hardware Method: 30 to 60 Minutes
The F11 plus Power button shortcut boots directly into recovery, which saves time compared to waiting for forced restarts. The actual factory reset process takes 30 to 60 minutes depending on your laptop’s speed and which reset options you select.
Windows Installation Media from USB: 45 Minutes to 2 Hours
Creating the USB installation media takes 15 to 30 minutes on another computer. The actual clean Windows installation on your HP laptop takes 20 to 45 minutes depending on your hard drive speed. Add time if you need to troubleshoot boot issues or select partition options.
Total time from start to finish is roughly 45 minutes to 2 hours if everything goes smoothly.
Post-Reset Setup Time: Add 30 to 60 Minutes
After any reset method completes, you need to complete the Windows setup wizard, apply display resolution fixes, and install updates. This adds another 30 to 60 minutes to your total time.
Windows updates especially can take considerable time if your HP laptop needs security patches. Allow several hours for post-reset setup and updates to fully complete in the background.
Complete Timeline for Full Reset and Setup
If you start fresh with a Windows Settings reset using local reinstall, budget 45 minutes to 1 hour for the reset itself, then add 30 to 60 minutes for post-reset setup and updates. Total elapsed time is roughly 1.5 to 2 hours.
Cloud download resets take 2 to 4 hours total when you include setup time.
I always recommend choosing your reset time wisely. Start your factory reset in the morning or early afternoon so you have hours available if the process takes longer than expected. Never start a factory reset when you need your laptop to be ready in a few hours.
Frequently Asked Questions About HP Laptop Factory Reset
How long does it take to factory reset an HP laptop?
Local reinstall takes 15 to 45 minutes, while cloud download takes 2 to 3 hours. Add 30 to 60 minutes for post-reset setup and Windows updates.
Will I lose all my files if I factory reset my HP laptop?
“Remove everything” erases all data completely. “Keep my files” preserves documents and photos but removes all installed programs. Always backup your data before resetting regardless of which option you choose.
Do I need my BitLocker recovery key to factory reset?
Yes, if BitLocker encryption is enabled. Windows will prompt for your recovery key during the reset and won’t proceed without it. Retrieve your key from your Microsoft account before starting.
Can I factory reset my HP laptop without the password?
Yes. Hold Shift and click Restart from the login screen to access Advanced Startup, then select Troubleshoot and Reset this PC. Alternatively, use the F11 key method during startup.
Should I choose “Keep my files” or “Remove everything”?
Use “Remove everything” for malware, selling the laptop, or severe corruption. Use “Keep my files” only for minor performance issues when you’re certain no malware is present.