
The Fastest Way to Delete Apps on iPad (Works in 15 Seconds)
Want to delete apps on iPad quickly? The standard press-and-hold method is your fastest option—it takes just 15 seconds from start to finish. Learning how do you delete an app on the ipad properly ensures you free up storage space without accidentally losing important data
Here’s exactly how to do it:
How to Delete Apps on iPad: Step-by-Step Home Screen Method
Find the app you want to delete on your iPad home screen.
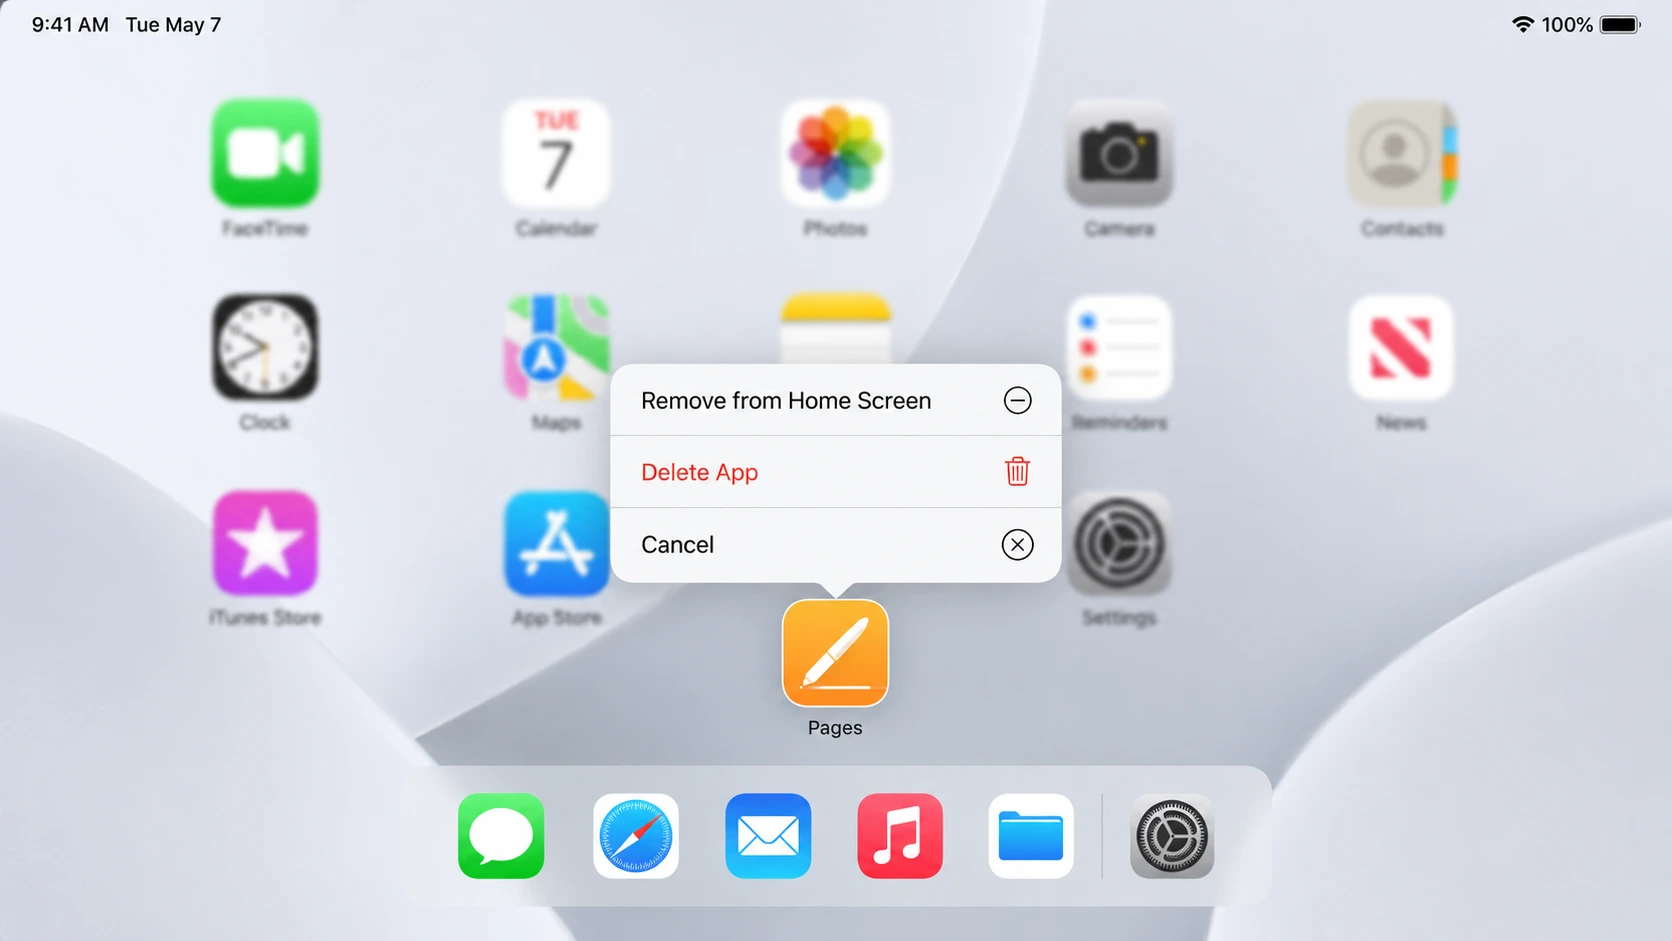
Long press the app icon with your finger until a pop-up menu appears. (Keep the pressure light and steady about 2 seconds is all you need.)
From the context menu tap “Remove App.”
Three options will appear:
Cancel – Stops the deletion process
Remove from Home Screen Hides the app icon from your home screen but keeps the app installed in your App Library
Delete App Completely removes the app and all its data from your iPad
Tap “Delete App” to remove the application permanently. Then tap “Delete” once more to confirm. The app disappears completely from your iPad no longer on your home screen, App Library, or search results
Understanding “Delete App” Versus “Remove from Home Screen”
Many iPad users mix these up, and the difference matters significantly for how your storage behaves.
When you choose “Remove from Home Screen,” the app icon disappears from your main home screen layout, but the app itself stays fully installed on your iPad. You can still access it in the App Library by swiping right, and it continues consuming storage space on your device.
When you choose “Delete App,” the application gets completely removed along with all its local data. Your storage gets freed up immediately. The app vanishes everywhere—your home screen, the App Library, and search results can’t find it anymore.
So which option should you pick? If your goal is freeing up storage space or getting rid of an app for good, select “Delete App.” Use “Remove from Home Screen” only when you want a cleaner home screen but still need the app periodically
How to Delete Apps from App Library on iPad (iPadOS 14+)
The App Library—that organized grid of category folders on your iPad’s last home screen page—actually gives you a faster path to delete apps compared to the home screen method because it skips an extra confirmation step.
To access it, swipe left through your home screen pages until you reach the rightmost page. The App Library automatically sorts all your apps into categories like Productivity, Games, and Utilities.
I use the App Library when I’m cleaning up my iPad because it’s quicker than hunting through multiple home screens. From inside the library, you have two deletion options.
First, you can open a category folder, find your app, then long-press its icon directly. The Delete App option appears immediately.
Second, you can use the alphabetical search list at the library’s top. Tap the search bar, type your app name, then long-press the small icon on the left side of that row. The delete menu pops up right there.
The real advantage? When you delete from the App Library, iPadOS removes the app completely without showing you that “Remove from Home Screen” step. It goes straight to permanent deletion—no extra screen, no confusion, no accidental half-deletions.
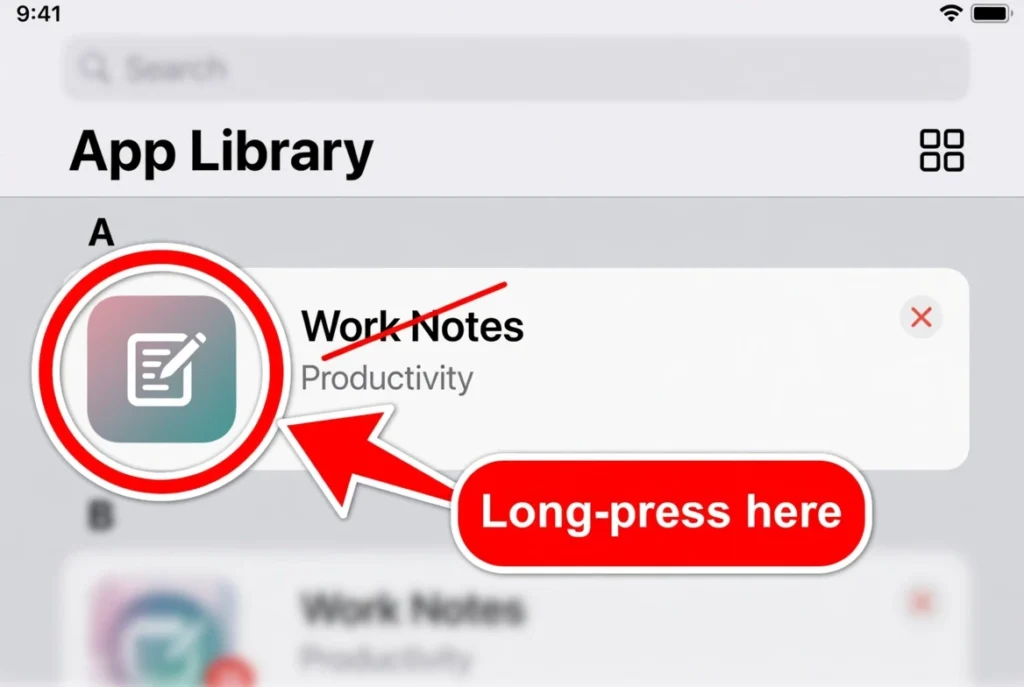
Critical Warning: Press the App Icon, Not the App Name
I’ve seen many iPad users tap the app name and get frustrated when the delete option vanishes, replaced by the ability to drag the app elsewhere. This confusion costs time and frustration.
When you long-press the app name itself or the empty space beside it, iPadOS interprets your gesture as a request to reorder your apps. The delete option never appears—instead, you get drag functionality.
What actually works: Long-press the small square app icon on the left side of the row. Only that specific target triggers the delete menu. Your finger position changes everything about what happens next—aim for the icon, not the label.
Delete Apps Fast Using Spotlight Search (The Method Most People Miss)
When your iPad home screens sprawl across multiple pages with apps scattered everywhere, spending minutes hunting for one app to delete becomes ridiculous. Spotlight Search bypasses all that hunting entirely.
Here’s the process: From any home screen page, swipe down from the middle to reveal the Spotlight Search bar. Type the name of the app you want to uninstall. When your app appears in the search results, long-press its icon. A menu materializes and the Delete App option sits right there waiting.
One long-press and the app disappears. No scrolling through pages. No folder hunting. No wasted time finding what you’re looking for.
I rely on this method whenever I need to remove apps from my iPad quickly it takes about ten seconds once you’ve learned the rhythm, and it works on any recent iPad running a current iPadOS version
As you see in the video, this method takes roughly 10 seconds once you’ve mastered it. No scrolling. No hunting through folders. Just search, long-press and delete. Next, let me show you another powerful
method most people don’t know about.
Manage Storage on iPad: Delete Apps Through Settings (The Data-Driven Method)
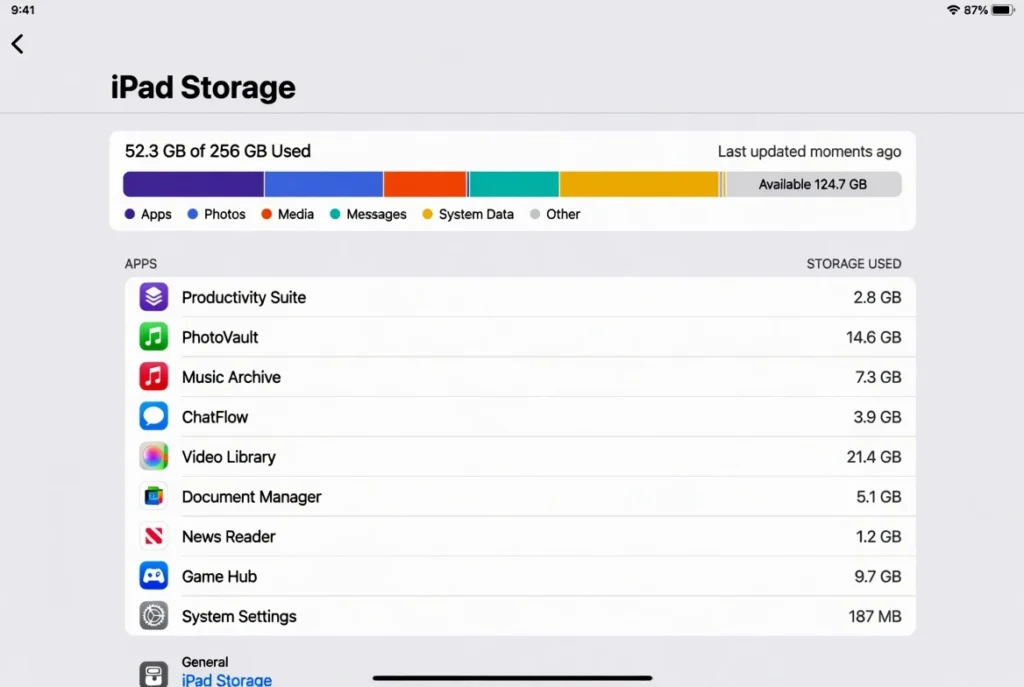
When you want to make informed decisions about which apps to remove, the iPad Storage settings screen is your best starting point. It shows you exactly how much storage each app consumes before you delete anything.
This approach matters because you can see at a glance which apps hog the most space and prioritize removing the biggest offenders instead of guessing blindly.
Here’s the path: Open Settings on your iPad, tap General from the left sidebar, then tap iPad Storage. A visual bar appears at the top showing your total storage capacity plus a breakdown of what’s using space.
Scroll down past Apple’s recommendations and you’ll see your full app list. If apps don’t appear immediately, tap Show All to expand the complete list.
Select the app you want to remove. The next screen reveals how much storage that app occupies—both the app itself and any data it’s cached. Tap Delete App to proceed. Confirm the deletion when the confirmation prompt appears.
I prefer this method because it transforms iPad storage management from random guessing into evidence-based decisions. You’re removing apps by actual numbers, not hunches
Offload App vs Delete App: Which Action Serves Your Needs?
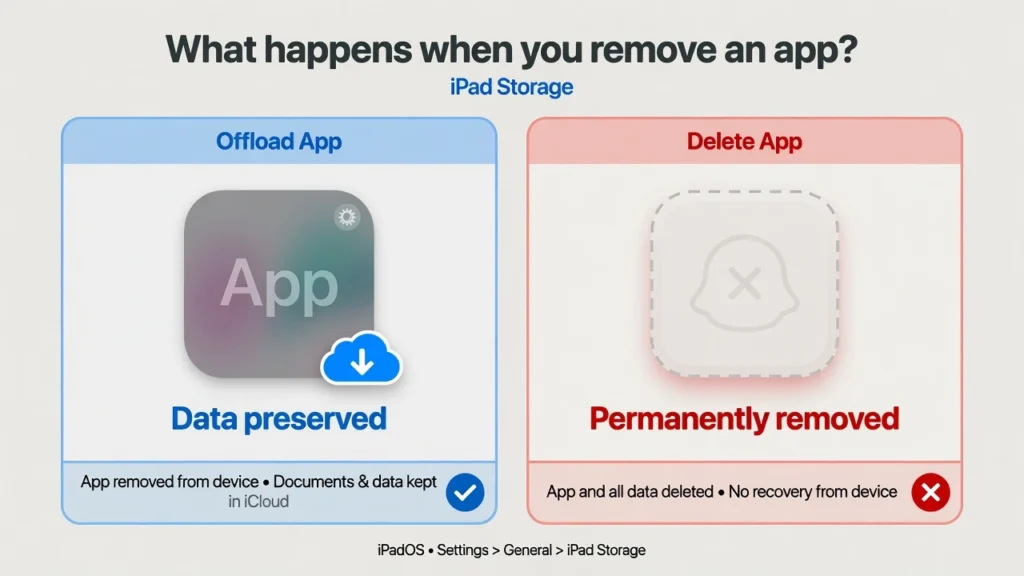
When you long-press an app on your iPad, two distinct options appear: Offload App and Delete App. Many people tap Delete without pausing to consider the difference, but understanding when to use each one prevents accidental data loss.
Deleting an app removes everything permanently. The app disappears, and all its locally stored data vanishes with it—saved progress, login credentials, downloaded files, everything. Once you confirm that deletion, the data doesn’t return unless that specific app syncs to iCloud or maintains cloud backup features.
Offloading works fundamentally differently. When you offload an app on your iPad, iPadOS removes the app to reclaim storage space but preserves all its documents and data untouched. The app icon remains on your home screen with a small cloud badge. Tapping that icon again triggers a re-download from the App Store, and all your information reappears exactly as you left it.
The memory device works here: offloading pauses the app; deleting says permanent goodbye.
When Offloading Makes More Sense Than Deletion
Offload an app when you meet certain conditions. Games with extensive save files benefit from offloading—you reclaim storage without losing hours of progress. Apps holding important documents that you might access later also deserve offloading. Before downloading large files or new apps, offload unused apps on iPad temporarily to make room without committing to permanent removal.
When to Offload Instead of Delete
Offloading is the smarter choice in a few specific situations.
If an app is large but you only use it occasionally, offloading lets you free up storage on your iPad without losing your progress or settings. Games with lots of saved data are a good example of this.
If an app holds important documents or files that you might need later, offloading protects that information while still reclaiming space.
And if you are doing a temporary storage cleanup before downloading something big, offloading unused apps on your iPad is a safe way to make room without committing to a permanent deletion.
Local Data Deletes Permanently But iCloud Data Stays Safe
This question haunts every user before they hit delete, and the confusion is legitimate. Here’s what actually happens inside iPadOS when you initiate app deletion.
Your iPad deletes all locally stored data immediately. That includes settings, cached files, login sessions, and anything the app keeps directly on your device. This deletion is permanent and cannot be undone.
But iPadOS shows you this exact message before finishing: “Deleting this app will also delete its data, but any documents or data stored in iCloud will not be deleted.”
That distinction changes everything. If the app syncs to iCloud—which most Apple apps and modern productivity apps do automatically—your information remains protected. Your iCloud account holds that data safely. Reinstall the app later, sign back in, and everything you saved reappears untouched.
Before you delete, spend 30 seconds confirming: Does this app use iCloud? For most productivity tools, note-taking apps, and Apple’s native applications, the answer is yes, and deletion is completely safe. The local copy disappears. Your iCloud copy persists.
Their official support documentation covers everything from managing iCloud storage to identifying large files and reducing photo library size. For detailed storage optimization strategies directly from Apple, visit their official iPad storage management guide.
Once you understand what happens to your app data after deletion, you might realize that locally cached files sometimes survive the deletion process. If you want to be absolutely thorough about freeing
up iPad storage after removing apps,
I recommend checking my complete guide on how to clear app cache on iPhone. While that guide focuses on iPhone, the same cache clearing principles apply to iPad, and the settings method I cover works identically on both devices.
This combination—deleting unused apps plus clearing their cached data—gives you maximum storage recovery. Many people delete apps expecting a huge storage boost, then wonder why their iPad still shows low storage. Usually, that’s cached data lingering in the background taking up space you didn’t realize was there.
When Delete Option Disappears: Screen Time Restrictions Are Blocking You
When you long-press an app and the delete option vanishes, or you tap Delete and nothing occurs, Screen Time restrictions almost certainly block you. It’s the primary culprit.
Screen Time is Apple’s parental control and device management system. Within Screen Time, a specific setting called “Deleting Apps”—found under Content & Privacy Restrictions → iTunes & App Store Purchases—controls whether your iPad permits app deletion.
Two solutions exist depending on your situation.
Solution 1: Disable all Screen Time restrictions if you don’t require them. Navigate to Settings → Screen Time → Content & Privacy Restrictions and toggle off the entire system. Full deletion access returns immediately.
Solution 2: Keep existing Screen Time controls but unlock app deletion only. Go to Settings → Screen Time → Content & Privacy Restrictions → iTunes & App Store Purchases → Deleting Apps and select Allow.
After applying either fix, the delete option should appear when you long-press an app. If it doesn’t, restart your iPad. A restart forces iPadOS to reload its configuration settings and this typically resolves the issue. Then try deleting again
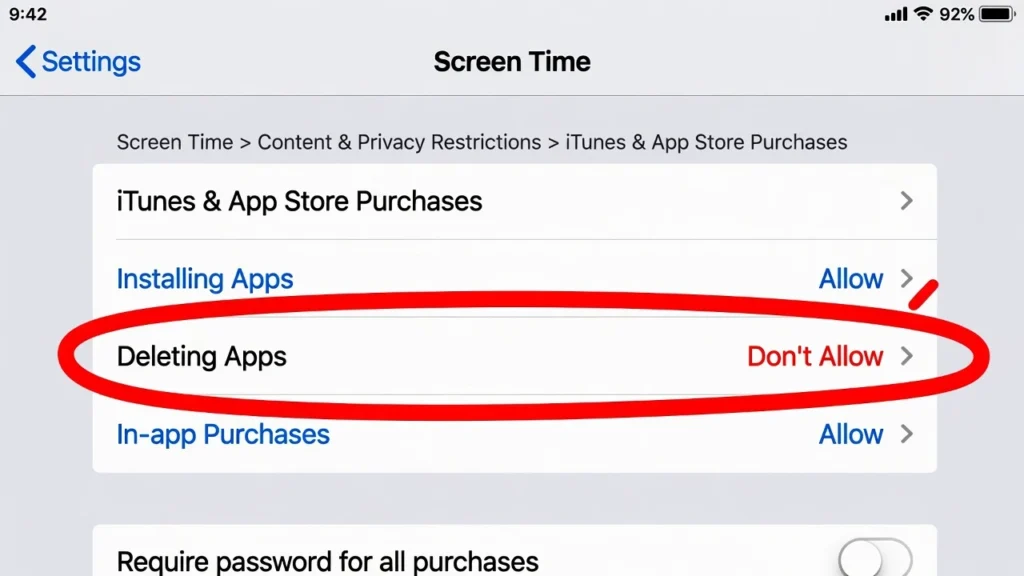
Enable App Deletion in Screen Time Settings
If you want to keep Screen Time restrictions but only allow app deletion:
- Open Settings on your iPad
- Scroll down and tap Screen Time
- Tap Content and Privacy Restrictions
- Enter your Screen Time passcode when prompted
- Tap iTunes and App Store Purchases
- Find “Deleting Apps” in the list
- Tap it and select Allow
After making this change, return to your home screen. Long-press an app—the Delete option should appear immediately.
If you want to disable all Screen Time restrictions completely:
From the Content and Privacy Restrictions screen, tap the toggle switch at the top to turn off the entire restriction system. All Screen Time controls deactivate at once, and app deletion access returns immediately.
Recovering When You Don’t Have the Screen Time Passcode
Two different situations apply here, and each requires a different approach.
Scenario 1: Someone else created the Screen Time passcode
If another family member or guardian set up Screen Time, you cannot modify the Deleting Apps setting without that passcode. Contact the person who created Screen Time. They can navigate to Settings → Screen Time → Content & Privacy Restrictions → iTunes & App Store Purchases → Deleting Apps, enter their passcode, and select Allow. They can also change the Screen Time passcode itself from that same Screen Time settings screen if needed.
Scenario 2: You created the passcode but forgot it
You can reset your own Screen Time passcode. Go to Settings → Screen Time, tap “Change Screen Time Passcode” at the bottom of the screen, and follow the password reset flow. Apple will verify your identity using your Apple ID before allowing the reset. Once you’ve created a new passcode, return to Content & Privacy Restrictions and update the Deleting Apps setting
System Apps You Cannot Delete (Apple’s Protected List)
Not every app on your iPad permits deletion—understanding which ones is protected saves frustration.
Apple pre-installs system apps essential to iPadOS operation. Settings, App Store, Safari, Photos, and Messages are locked from removal. Long-press these apps and you’ll see options like “Edit Home Screen” or “Move,” but the Delete App option never materializes. Apple protects these built-in apps because they’re fundamental to how your device operates.
Everything else—third-party apps, games, utilities, anything you downloaded after purchase—can be deleted without restriction.
So if you’re trying to uninstall an app and the delete option won’t appear even after disabling Screen Time, that’s your signal: it’s a system app, and Apple doesn’t allow deletion.
Another common misconception I see is when people think they’ve successfully deleted an app, only to discover it’s still taking up storage space because it actually got hidden instead of deleted.
Before you assume an app is completely gone from your iPad,
check my guide on how to find hidden apps on iPhone the same methods work on iPad. It’s surprisingly easy to accidentally hide an app when you meant to delete it completely, especially if you used the “Remove from Home Screen” option instead of “Delete App.”
If you’re expecting more storage space after removing apps but your numbers haven’t
changed, a hidden app is often the culprit. This guide shows you exactly where Apple hides apps and how to distinguish between truly deleted apps and ones that are just hidden from view.
Restore Deleted Apps: Simple Reinstallation from the App Store
The fear that haunts app deletion is permanence but deleted apps aren’t gone forever. That’s critical to understand before you start clearing out your iPad.
Every app you’ve ever downloaded, whether paid or free, is permanently linked to your Apple ID. Apple maintains a permanent record of your purchase history and free downloads. That record persists even after you remove the app from your device.
To reinstall any deleted app, open the App Store and search for the app name. When it appears in search results, you’ll see a cloud icon with a download arrow—not a price or Get button. Tap that cloud icon. The app downloads immediately back to your iPad.
Here’s the best part: App Store redownloads are always free. Paid apps you previously purchased redownload at zero cost as long as you’re signed into the same Apple ID that made the original purchase. Free apps obviously redownload free.
Accidentally deleted something? Getting it back takes about 30 seconds
How to Reinstall Deleted Apps iPad (Easy Recovery Guide)
Here’s something that relieved me when I first started deleting apps: you can always get them back. I used to worry that once I deleted an app, I’d lose access to it forever or have to pay again. That’s not how it works on iPad.
If you ever need to reinstall deleted apps iPad, the process takes less than a minute. I’ve done this countless times when I deleted something I thought I wouldn’t need, only to realize a few days later that I actually did.
Here’s exactly how I get deleted apps back:
I open the App Store on my iPad and tap the search icon at the bottom. Then I type the name of the app I deleted. When it appears in the search results, I look for the cloud icon with a download arrow next to the app name.
When I tap that cloud icon, the app downloads immediately. There’s no purchase button, no payment screen, nothing. The App Store redownload happens instantly because the app is already tied to my Apple ID app purchases.
This works for any app you’ve ever downloaded, whether it was free or paid. Your Apple ID keeps a permanent record of everything you’ve installed, so you never lose access.
I find this particularly helpful when I’m clearing space quickly before a trip or a big update. I can confidently delete apps I’m not using right now, knowing I can bring them back the moment I need them again.
The reassurance that nothing is permanently gone has made me much more willing to delete apps I’m unsure about. It removes that fear of making the wrong choice.
Managing Multiple Apps: Batch Deletion and Edge Cases
When you’re cleaning up dozens of apps instead of removing a single one, individual deletion becomes tedious. Understanding a few specialized approaches makes bulk management faster.
Matching your method to your situation determines speed. If your iPad is organized and you’re removing apps you can see, the home screen long-press method wins. For many scattered apps, Spotlight Search saves time versus scrolling through pages. For strategic storage decisions, the Settings method provides data before you delete.
One interface difference appears across iPadOS versions. Older iPadOS versions show an X icon when you activate edit mode; newer versions display a minus icon instead. The function is identical—this is simply a cosmetic change Apple made during updates.
When deleting dozens of apps, consider a factory reset. This wipes all apps at once, but use it only when preparing to sell your iPad or starting completely fresh. Never perform a factory reset without backing up important data first. A reset erases everything—there’s no recovery.
For strategic storage cleanup with many apps, the Settings storage method provides visibility into what’s using space. You see exact numbers and can prioritize removing the biggest offenders rather than guessing randomly.
Quick Decision Guide: Which Deletion Method Fits Your Situation
Scenario 1: You know exactly where the app is on your home screen
→ Use: Home Screen Long-Press Method
Why: Fastest approach—just locate and long-press
Scenario 2: Your apps are scattered across multiple home screens
→ Use: Spotlight Search Method
Why: Finding the app manually takes longer than searching
Scenario 3: You want to delete based on storage consumption
→ Use: Settings Storage Method
Why: See exact storage numbers before deciding what to remove
Scenario 4: You want to hide an app but keep it installed
→ Use: “Remove from Home Screen” Option
Why: Cleans up your home screen; app stays available in App Library
Scenario 5: You need to delete dozens of apps at once
→ Use: Factory Reset (after backup)
Why: Faster than removing individual apps one by one
Scenario 6: Your app is in the App Library and organized
→ Use: App Library Method
Why: Bypasses the “Remove from Home Screen” confirmation step
Frequently Asked Questions
Can I delete apps on iPad if I have parental controls enabled?
Yes, but you’ll need the Screen Time passcode. Navigate to Settings → Screen Time → Content & Privacy Restrictions → iTunes & App Store Purchases → Deleting Apps and change the setting to “Allow.”
If you don’t know the passcode, contact the parent or guardian who created the Screen Time restrictions. They can enter their passcode and make this change for you.
Will I lose all my data when I delete an app from my iPad?
Local app data deletes with the app, but documents and data saved in iCloud stay protected. The deletion confirmation explicitly states: “Deleting this app will also delete its data, but any documents or data stored in iCloud will not be deleted.” When you reinstall the app later, your iCloud-backed data remains intact.
Can I reinstall an app I deleted from my iPad?
Yes. Open the App Store, search for the app name, and tap the cloud icon with the download arrow to reinstall it free of charge. All apps connected to your Apple ID can be redownloaded at no cost, including apps you originally purchased.
What’s the difference between deleting and offloading an app on iPad?
Delete App permanently removes the application and all its locally stored data. Offload App removes the application to free storage but preserves its documents and data, so reinstalling later restores your information. Use offload for apps you might use again; use delete for apps you’re permanently removing.
Why can’t I delete certain apps like Safari or Settings on my iPad?
Built-in system apps—Settings, App Store, Safari, Photos, Camera, and others—come protected by Apple because they’re essential to your iPad’s core operation. Only third-party apps you downloaded from the App Store can be removed.
How do I delete apps on iPad if the delete option won’t appear?
Screen Time restrictions are usually blocking the delete option. Go to Settings → Screen Time → Content & Privacy Restrictions → iTunes & App Store Purchases → Deleting Apps and change it to “Allow.” If the delete option still won’t appear after changing this setting, restart your iPad to apply the changes properly.