
Why Your WiFi Keeps Cutting Out (And It’s Usually Not Your ISP’s Fault)
You’re not alone in this frustration. I’ve seen countless people blame their internet service provider when their WiFi suddenly drops during important video calls or streams buffer right when they’re about to watch something. The truth is your slow WiFi and constant dropouts usually have nothing to do with your ISP at all.
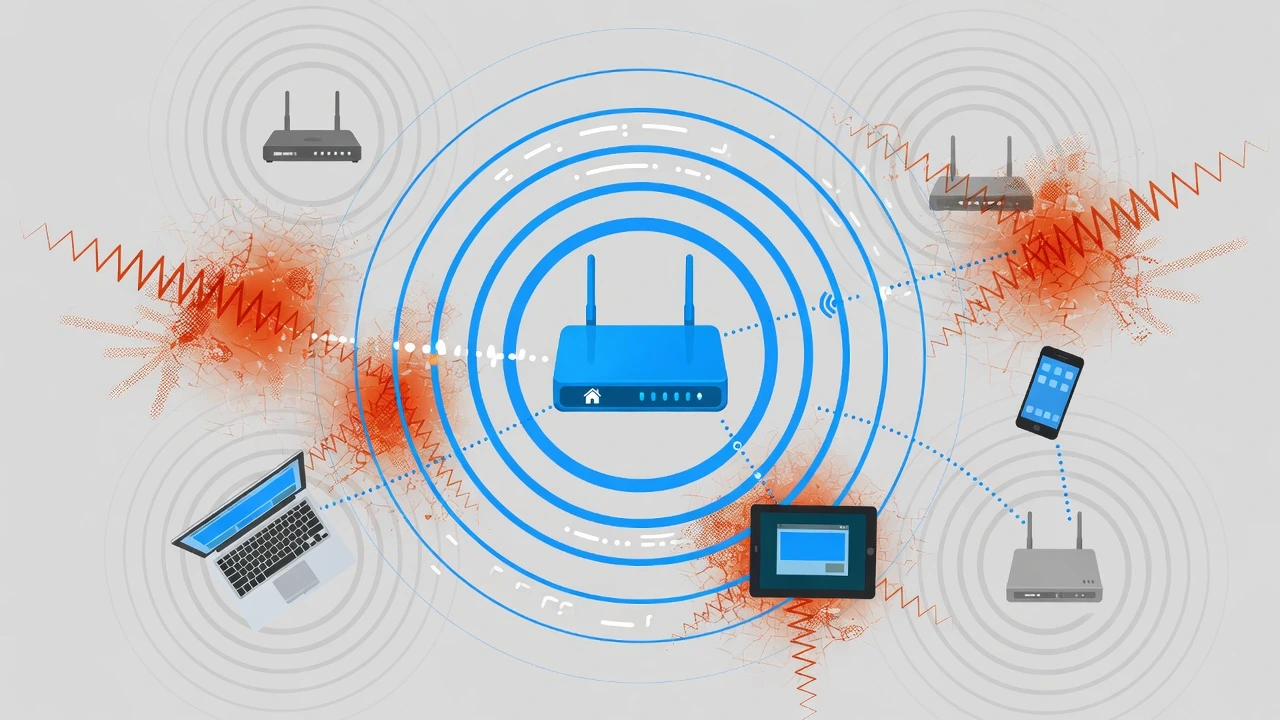
So what’s really happening? Your WiFi router is fighting with your neighbors’ routers for space on the same radio frequency channel. Imagine two radio stations trying to broadcast on 104.3 FM at the same time in the exact same city. Not taking turns. Not working together. They just blast against each other until all you hear in your car is static. That’s what happens to your WiFi signal when channels overlap
The Real Culprit Behind Slow WiFi
WiFi operates on invisible radio waves that travel through the air just like old school radio broadcasts. Your router sends these waves out on specific channels within two main frequency bands: 2.4 GHz and 5 GHz. Inside those bands exist multiple channels that your router can use to transmit data to your devices.
Here’s the problem I see happen constantly: if you live in an apartment building, townhouse complex, or even a dense neighborhood, your neighbors almost certainly have WiFi routers too.
And there’s a very good chance many of them are broadcasting on the exact same channel as yours. When multiple networks occupy that identical channel in the same area, they create what experts call co-channel interference—signals that collide rather than coexist
When two networks share a channel, they don’t simply share the space like polite roommates. They yell over each other. Your devices start struggling to understand which signal is yours and which one belongs to your neighbor. This back and forth confusion causes your connection to slow down dramatically or drop entirely.
I walked into a friend’s apartment one weekend and immediately noticed her WiFi was miserable. Speeds were crawling. She was frustrated. So I grabbed my phone, opened WiFi Analyzer and started scanning. Twelve apartments in her building.
Seven using the same ISP. And almost every single one broadcasting on channel 1. It hit me right away: she wasn’t dealing with a bad internet connection. She was dealing with twelve routers screaming over each other on the exact same frequency.
When I told her she could fix this in minutes by switching to a clear channel, she looked at me like I’d just solved a year-long mystery
Why You’re Experiencing Dropouts and Slow Speeds
When network congestion gets severe, your devices don’t just experience slower speeds. They lose connection altogether. Your router starts having trouble finding enough clear space in the radio frequency spectrum to send data. It’s like trying to have a phone conversation in a crowded noisy bar where everyone is shouting at once.
Network congestion from neighboring WiFi networks creates two types of problems. First, your bandwidth gets shared with interference signals that slow everything down. Second, your router has to constantly retry sending data packets because the first attempts get lost in the noise. Both of these issues combine to create that maddening experience of WiFi that cuts out randomly or loads web pages at a snail’s pace.
The most frustrating part is that this problem doesn’t indicate anything is wrong with your router or your internet service. Your ISP connection itself might be perfectly fine. The bottleneck is happening at the WiFi level because of what’s happening in the airwaves around your home.
The Good News: You Can Fix This in Minutes
Here’s what I want you to know right now: you can resolve this entire problem by changing one simple setting on your router. I’m talking about adjusting which channel your WiFi broadcasts on. By moving your network to a less crowded channel, you eliminate most of that interference and free up the airwaves around your home.
The best part is that this fix takes maybe five to ten minutes once you understand the process. You don’t need to buy new equipment, call your internet service provider, or pay anyone for help. You just need to access your router’s settings and select a better channel.
Many people don’t realize they have this option because their router settings aren’t exactly obvious. The interface looks different depending on whether you have a Netgear, TP-Link, Asus, or whatever brand sits under your TV or in your closet. But the fundamental process is the same everywhere.
What You’ll Learn in This Guide
I’m going to walk you through exactly how to find the best WiFi channel for your specific situation. I’ll explain why certain channels work better than others. I’ll show you how to scan your environment and see what your neighbors are using. Then I’ll give you step-by-step instructions for changing your channel on virtually any router brand or internet service provider gateway.
By the time you finish reading this, you’ll understand the science behind why channel congestion happens, you’ll know exactly which channel to pick, and you’ll have clear instructions for implementing the fix on your specific equipment.
The reality is that slow WiFi and constant dropouts are almost always fixable without expensive new equipment or service upgrades. And it usually comes down to this one setting that most people never even know exists.
Let me show you how to find that solution and get your WiFi working properly again.
Why WiFi Channels Matter: How Radio Waves and Interference Work
WiFi operates using invisible radio waves that travel through the air just like the radio stations you listen to in your car. Your router broadcasts these waves on specific frequency bands, and within those bands exist multiple channels that determine exactly where in the electromagnetic spectrum your network transmits.
Understanding how this works is the key to understanding why changing your WiFi channel can transform your internet experience from frustrating to reliable.
The Radio Frequency Basics You Need to Know
Think back to the last time you tuned an old fashioned radio by rotating the dial. You were looking for a clear frequency where a radio station was broadcasting.
If two stations tried to broadcast on the exact same frequency in the same area, you’d hear both signals mixed together creating static and noise. That’s essentially what happens with WiFi networks.
Your WiFi router works the same way that radio station operates. It picks a specific frequency and transmits your data on that frequency. Your devices listen on that same frequency to receive the data. This system works beautifully when you’re the only network using that frequency in your area.
But here’s where the problem starts: if your neighbor also has a WiFi router and they’re broadcasting on the identical frequency, both signals occupy the same space simultaneously.
The radio waves overlap with each other and create what I call a frequency collision the same radio frequency interference that causes your devices to struggle.
Understanding Frequency Bands and WiFi Channels
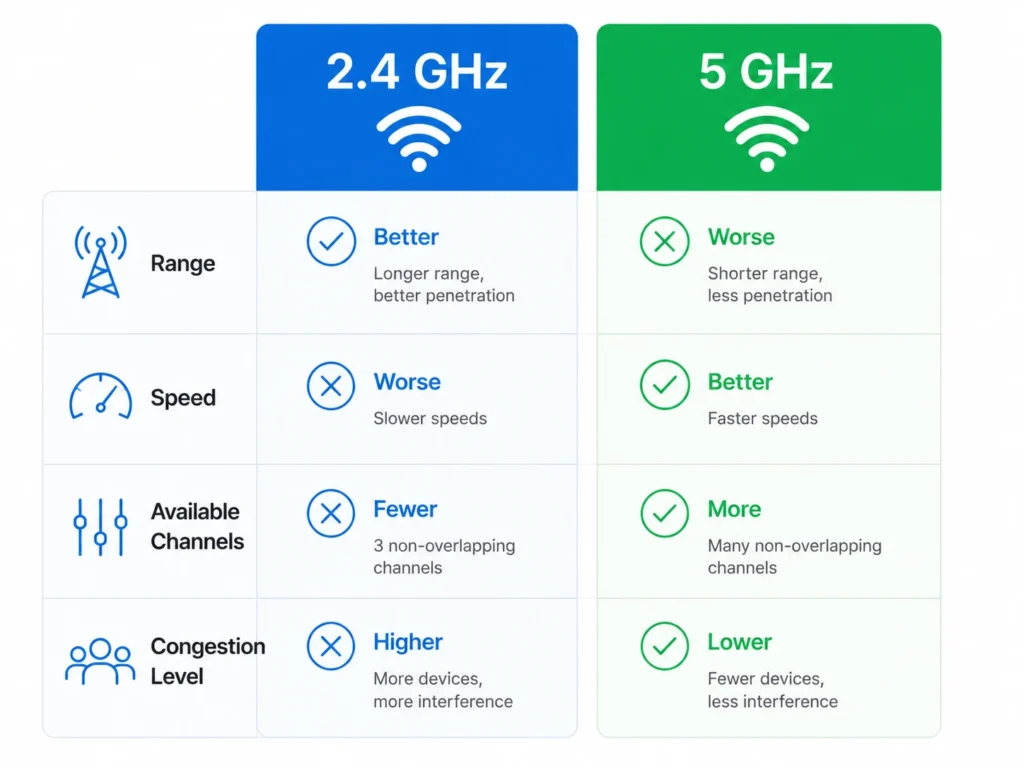
Modern routers broadcast on two main frequency bands. The 2.4 GHz band is the older standard that provides longer range but operates in a more crowded portion of the wireless spectrum. The 5 GHz band is newer, offers faster speeds, and exists in a less congested area of the electromagnetic spectrum.
Within each frequency band sits a collection of individual channels. Think of channels like different lanes on a highway. Your router picks one lane and broadcasts all its data down that lane. When multiple routers use the same lane, traffic gets congested and everyone moves slower.
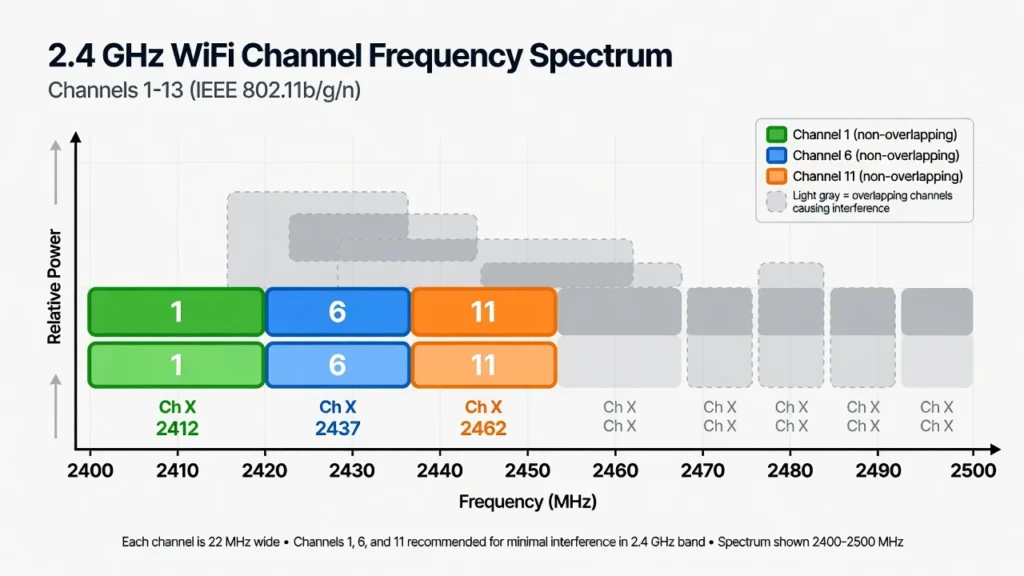
Here’s the weird part: 2.4 GHz has thirteen channels available. But—and this is crucial—you can realistically use only three of them. Channels 1, 6, and 11. That’s it. Every other channel is basically worthless because it overlaps too much with one of these three.
Why? Physics. Each channel takes up 20 megahertz of space. Sounds like plenty, right? Except the next channel starts only 5 megahertz away. So channel 2 overlaps channel 1 massively.
Channel 3 overlaps 1 and 2. It’s like trying to park cars so close together that they’re actually sitting on top of each other. Channels 1, 6, and 11? They’re spaced far enough apart—25 megahertz between centers—that they don’t overlap at all.
How Radio Frequency Interference Creates Your WiFi Problems
Radio frequency interference happens when multiple networks broadcast on overlapping or identical channels in the same geographic area. The signals don’t work together. Instead, they create noise and static that corrupts the data transmission.
When your WiFi channel overlaps with your neighbor’s channel, your router and their router are constantly competing for the same airspace. Your devices struggle to distinguish between your network’s signal and the neighboring network’s signal. Every packet of data has to fight through the interference to reach its destination.
This interference causes several observable problems. Your internet speeds drop because your router has to retry sending data multiple times before packets successfully arrive.
Your connection becomes unstable and drops frequently because some packets get lost in the noise entirely. Video calls stutter and freeze. Streaming buffers constantly. Large file downloads crawl at a snail’s pace.
The frustrating part is that this problem has nothing to do with how fast your actual internet connection is. Your ISP might be delivering 100 Mbps of speed to your house, but the WiFi interference prevents you from accessing that full speed wirelessly.
The Solution: Moving to a Clear Channel
The solution is surprisingly simple once you understand the problem. By moving your WiFi network to a channel that fewer neighbors are using, you eliminate most of the radio frequency interference in your immediate area.
Think of it this way: if channels 1, 2, and 3 are all packed with neighboring networks, switching to channel 6 or channel 11 moves your traffic to a less congested lane. Your router’s signal faces far less interference. Your devices can send and receive data more reliably. The improvement in connection stability and speed is often immediate.
Not every channel works equally well in every location. The best channel for your situation depends on what channels your specific neighbors are using and which channels have the least congestion in your particular area. That’s why I’m going to show you how to scan your WiFi environment and identify exactly which channel will work best for you.
The beautiful part is that you likely already have access to clearer channels. You’re probably just not using them yet.
Choosing Your Perfect Channel: The 2.4 GHz vs 5 GHz Decision
Most modern WiFi routers broadcast on two different frequency bands simultaneously, which means you actually have two separate networks running at the same time. Understanding the difference between these two bands and knowing which one to optimize first is crucial to getting your WiFi working properly.
The choice between 2.4 GHz and 5 GHz isn’t about picking one or the other. It’s about understanding what each band does well and deciding which one needs optimization in your specific situation.
What Is a Dual-Band Router and Why This Matters
A dual-band router is simply a router that broadcasts on two different frequency bands simultaneously. Your router creates one network on the 2.4 GHz band and another separate network on the 5 GHz band at the exact same time. You can see both networks when you look at your available WiFi list on your phone or computer.
The important thing to understand is that these bands operate independently from each other. When you change the channel on your 2.4 GHz network, it has absolutely no effect on your 5 GHz network. You can optimize each band separately and they won’t interfere with each other. Some routers even let you name them differently so you can easily distinguish between the two networks.
Most home users have a dual-band router without even realizing it. If you’ve ever seen your WiFi network listed twice with slightly different names, you were looking at your two bands. One name might end with something like 2.4G and another with 5G to help you tell them apart.
2.4 GHz Channel: Longer Range, Lower Speed
The 2.4 GHz band is the older wireless standard that most devices have supported for decades. This band has a major advantage and a major disadvantage that affect your decision about which band to optimize.
The range advantage of 2.4 GHz is significant. Radio waves at this frequency travel much better through solid obstacles like walls, doors, and dense building materials. If you need WiFi to reach every corner of your house including the basement or bedroom far from your router, the 2.4 GHz band will get you there. Devices using this band stay connected from much greater distances compared to the 5 GHz band.
However, this same band operates much slower than 5 GHz. When you connect a device to your 2.4 GHz network, data transfers at a slower rate. Video streaming quality drops. Large file downloads take longer. The fundamental speed of the 2.4 GHz band is just naturally slower than what 5 GHz can deliver.
The biggest problem with 2.4 GHz is that it’s incredibly crowded. This frequency band only has three truly non-overlapping channels available in most countries. That’s a severe limitation. Many devices beyond just WiFi routers use this same frequency band including cordless phones, microwave ovens, Bluetooth devices, and baby monitors. All that traffic competing for the same space creates congestion that’s hard to escape.
Because so many home WiFi routers rely on 2.4 GHz, apartments and dense neighborhoods turn this band into a constant traffic jam. Most residential areas have dozens of networks all broadcasting on the same three channels. This congestion is why many people experience slow speeds and dropped connections in their homes.
5 GHz Channel: Shorter Range, Higher Speed
The 5 GHz band is the newer standard that offers dramatically better speed performance. When you connect a device to a 5 GHz network, data flows much faster. Streaming plays without buffering. Video calls stay crystal clear. Large file uploads and downloads complete quickly.
The reason 5 GHz performs so much better is simple. This frequency band has far more available channels. Instead of the three non-overlapping channels available on 2.4 GHz, the 5 GHz band provides twenty-four entirely non-overlapping channels. That enormous difference means networks have plenty of room to operate without stepping on each other.
The massive availability of channels on 5 GHz means that channel congestion is rarely a problem even in apartment buildings. You can pick almost any channel and find one with little to no interference from neighboring networks. The 5 GHz band simply doesn’t get nearly as crowded as 2.4 GHz because there’s so much more frequency space available.
The downside of 5 GHz is that its range doesn’t travel as far. These radio waves don’t penetrate walls and obstacles as effectively as 2.4 GHz waves. If your device is far from your router or separated by multiple walls, the 5 GHz signal strength drops significantly. Devices sometimes struggle to maintain a 5 GHz connection from distant rooms.
The other limitation is that older devices don’t support 5 GHz at all. Many legacy devices including older smart home equipment and internet connected appliances only work on 2.4 GHz. Your newest smartphone and laptop support both bands, but that older printer or smart home device in your closet might only connect to 2.4 GHz.
Should You Optimize 2.4 GHz, 5 GHz, or Both
The decision about which band to optimize first depends entirely on your specific situation and what problems you’re actually experiencing.
Start with 2.4 GHz if most of your devices are in distant rooms from your router or if you have older smart home devices that only support this band. The 2.4 GHz band is also where most congestion happens in residential areas, so optimizing this channel typically provides the biggest improvement in connection stability and speed.
Focus on 5 GHz if your devices are located close to your router and you’re experiencing speed problems during high bandwidth activities like gaming or streaming. The 5 GHz band handles speed optimization better. If buffering and slow connections happen primarily when you’re near your router, 5 GHz optimization helps more than 2.4 GHz changes.
The ideal situation is actually to optimize both bands over time. Your router broadcasts both simultaneously so they both deserve attention. But if you’re starting out, optimize whichever band matches your primary problem first. Most people see the biggest immediate improvement by optimizing 2.4 GHz because that’s where the congestion problem is most severe.
Here’s the beauty of this setup: you can configure each band completely independently. Changing the channel on 2.4 GHz doesn’t affect 5 GHz at all. So you can start with one band, test the improvement, and then optimize the other band if you want even better performance.
Now that you understand which band you want to focus on, the next step is figuring out exactly which channel within that band will work best for your unique situation. That requires taking a look at what’s happening in your WiFi environment around your home.
How to Find Your Best WiFi Channel (Before You Change It)
Before you make any changes to your router settings, you need to understand what’s actually happening in your WiFi environment. Taking time to scan and research which channels your neighbors are using prevents you from making a blind decision that doesn’t improve your situation at all.
This research step is where most people skip ahead and get frustrated later. They change to a random channel thinking it will help, only to discover they’ve moved to an equally crowded channel. The scanning process takes just a few minutes but saves you from wasting time on ineffective changes.
Understand Signal Strength Measurements (dBm Explained)
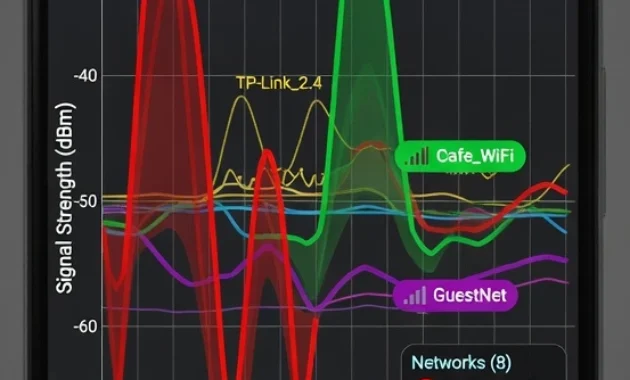
When you scan your WiFi environment using an analyzer app, you’ll see numbers that look confusing at first. These numbers represent signal strength measured in decibel milliwatts or dBm. Understanding what these numbers mean helps you identify which channels have the strongest neighboring networks and which channels might be clearer for you to use.
The dBm measurement works in a counterintuitive way that confuses most people initially. The numbers are negative, and the closer they get to zero, the stronger the signal becomes. Think of it like a temperature scale where closer to zero means hotter rather than colder. It takes a moment to adjust your thinking but becomes second nature quickly.
Here’s what the numbers actually mean when you’re looking at your WiFi scan results. A signal strength above negative 50 dBm is considered strong and indicates a neighbor network that’s definitely using that channel at good power. Signal strength between negative 50 and negative 70 dBm is acceptable range, showing moderate network presence. Anything below negative 70 dBm is weak signal indicating either a distant network or one transmitting at low power.
Why does this matter for your channel selection? When you scan and see that channel 1 has three strong networks at negative 40 dBm but channel 6 has only one weak network at negative 75 dBm, the choice becomes obvious. Channel 6 is your better option because it has less powerful interference. You’re not just counting how many networks use a channel, you’re evaluating the strength of the interference they create.
Find Your Best Channel by Device Type
Every device you own can scan WiFi networks and show you which channels are being used nearby. The tools available differ depending whether you’re using a Windows computer, Mac, iPhone, or Android phone. The good news is that all these tools are either free or built into your device already.
Every device you own can scan WiFi networks and show you which channels are being used nearby. The tools available differ depending whether you’re using a Windows computer, Mac, iPhone, or Android phone. The good news is that all these tools are either free or built into your device already. If you want advanced scanning capabilities beyond what’s built-in, this WiFi analyzer tool comparison breaks down the pros and cons of premium options like NetSpot and Acrylic WiFi Pro
For Windows Users
Windows computers don’t have a built-in WiFi scanning tool like Mac does, so you’ll need to download a free app. I recommend either Acrylic WiFi or inSSIDer, both of which offer free versions with all the features you need for channel selection.
Download your chosen app from the internet and install it on your computer. Once installed, open the app and click the scan button. The app will display a graph or list showing all the WiFi networks in your area along with which channels they’re broadcasting on and their signal strength readings.
Look through the results and identify which channels have the most networks and strongest signals. Note down which channels appear to be the most crowded. Then identify which channels have the fewest networks or weakest signals. Those less crowded channels become your candidates for switching to.
For Mac Users
Mac computers include a powerful built-in WiFi scanning tool that most people never discover. You don’t need to download anything or pay for any apps. The tool is already hidden in your system and takes just a few clicks to access.
On your Mac, hold down the Option key on your keyboard and click the WiFi icon in the menu bar at the top right of your screen. A dropdown menu appears with various WiFi options. Select the option that says Open Wireless Diagnostics from this menu. Your Mac opens a diagnostic window with several tabs across the top.
Click on the Window tab in the menu bar and select Scan from the dropdown options. If you see a setup wizard popup, ignore it and close that window. You’re now looking at your WiFi environment scan. Your Mac displays all nearby networks with their channels and signal strengths. The scan window also shows recommended channels for your area based on current congestion.
Bring your Mac to the areas of your home where you use WiFi most frequently and run the scan from those locations. The recommendations change based on location since different areas may have different neighbor networks. Write down the recommended channels that appear consistently across your home.
For iPhone and iPad Users
iPhone and iPad don’t have built-in WiFi scanning like Mac does, so you need to download the AirPort Utility app from the App Store. This app is free and developed by Apple specifically for WiFi network management and analysis.
Download AirPort Utility and open it on your device. Go to your iPhone settings and find the AirPort Utility app settings. Toggle on the WiFi Scanner feature. This enables the scanning capability within the app.
Now open the AirPort Utility app and select the Wi-Fi Scan option. The app runs a scan of nearby networks and displays which channels your neighbors are using and what their signal strengths look like. You can see a visual representation of the WiFi landscape around your location.
For Android Users
Android offers several free WiFi analyzer apps in the Google Play Store. The most popular and straightforward option is called WiFi Analyzer, which provides clear visual graphs and channel recommendations.
Download the WiFi Analyzer app and open it on your Android phone. The app immediately begins scanning your environment showing you all nearby networks, the channels they use, and their signal strength readings. Scroll through the results to understand your local WiFi landscape.
The app displays channels on a graph that makes it easy to see which channels are crowded and which are relatively clear. Look for channels with minimal network overlap. These are your best candidates for optimization.
Why Only Channels 1, 6, and 11 Work on 2.4 GHz
This is the most important rule to understand about the 2.4 GHz band and it’s the reason channel selection actually matters. If you remember nothing else from this guide, remember this fundamental rule about channel selection.
The 2.4 GHz band has thirteen channels available in most countries around the world. But here’s the surprising truth: you can only realistically use three of those thirteen channels without creating major interference problems. Those three channels are channel 1, channel 6, and channel 11. Every other channel overlaps too much with these three to be practical.
Why is this the case? The answer lies in the physics of how channels are spaced. Each individual channel on the 2.4 GHz band is 20 megahertz wide. That sounds like plenty of space until you learn how close the channels are positioned next to each other. The center points of adjacent channels are separated by only 5 megahertz. That’s an incredibly tight spacing that creates massive overlap between neighboring channels.
To understand what this overlap means in practice, consider what happens when you try to use channel 2. Channel 2 overlaps with channel 1 by roughly 75 percent. That massive overlap means if your neighbor is using channel 1 and you switch to channel 2, you’re not escaping the interference at all. You’ve moved to a channel that’s mostly still competing in the same frequency space. You get almost all the same interference problems with almost none of the improvement.
The reason channels 1, 6, and 11 work so well together is pure physics. These three channels are spaced far enough apart that their centers are 25 megahertz apart instead of just 5 megahertz. At that spacing, they don’t meaningfully overlap with each other. They coexist in the same general frequency band without stepping on each other’s signals.
Here’s a mindset shift that helps people make better decisions about channel selection. If you have to share channel 6 with a neighbor, that situation is actually better than trying to use channel 3 or channel 4 or any other non-standard channel. When two networks share the exact same channel, they politely take turns using the airwaves. The devices sense when another network is transmitting and wait their turn. This turn taking creates some slowdown but it’s far faster than the yelling over each other chaos that happens when networks use overlapping channels.
This is why the rule is absolute: always choose from channels 1, 6, or 11 on the 2.4 GHz band. No exceptions, no alternatives. Every other channel creates more problems than it solves. Most WiFi experts and networking engineers enforce this rule religiously because the physics behind it is rock solid.
A quick note for international readers: some countries like much of Europe use channels 1, 5, 9, and 13 as their non-overlapping set. If you live outside North America, check your local regulations. But the principle remains the same: use only the designated non-overlapping channels for your region.
H3: 5 GHz Advantage: Channel Selection Is Easier
The situation on the 5 GHz band is dramatically different from 2.4 GHz, which is great news for anyone using this band. The 5 GHz band has twenty-four entirely non-overlapping channels available for use. That massive difference means channel selection on 5 GHz is far less critical.
With twenty-four channels available, overlap between neighboring networks is almost never a problem on 5 GHz even in densely populated apartment buildings. You can pick almost any channel and find one that’s relatively clear. The frequency space is simply too large for channels to interfere with each other the way they do on 2.4 GHz.
This abundance of channels means that automatic channel selection actually works fine on 5 GHz. Your router can pick a channel and let automatic optimization handle it without your intervention. Many people let their 5 GHz band run on automatic and never worry about manual channel selection for that band.
If you do manually select a channel on 5 GHz, avoid channels in the 120 to 128 range. These are called DFS channels and they’re reserved for weather radar use in some situations. It’s an advanced topic you don’t need to worry about for basic optimization, but knowing these channels exist prevents confusion if you see them listed in your router settings.
Automatic vs Manual Channel Selection: When to Use Each
Most routers give you a choice between automatic channel selection where your router picks the channel for you, or manual selection where you choose the channel yourself. Deciding which approach works better depends on your specific living situation.
Use automatic channel selection if you live in a rural or suburban area with few neighboring networks. Automatic selection works well when there isn’t much congestion. Your router’s intelligence usually finds a decent channel without your intervention. Automatic is also the right choice if you have a newer mesh WiFi system like Eero, Google Nest WiFi, or TP-Link Deco that uses smart optimization across multiple nodes.
Switch to manual channel selection if you live in an apartment building, townhouse complex, or dense neighborhood with many neighboring networks. Automatic channel selection sometimes picks poorly in congested environments. Routers occasionally choose channels that happen to have strong interference even though better options exist nearby. Your manual selection based on the scan results you just gathered usually outperforms the router’s automatic choice in these situations.
Here’s a practical test you can try: set your router to automatic and test your speeds for a week. Then manually select a clear channel and test speeds for another week. Compare the results. In most congested residential areas, manual selection wins. In rural areas, automatic usually performs just fine.
A word of caution about mesh systems: some mesh systems have smart automatic features that override any manual channel selection you make. The system detects congestion and automatically switches channels in the background without your permission. Check your specific mesh system documentation to understand if manual override is actually possible for your equipment.
Now You Know Your Best Channel—Write It Down
You’ve now completed the research phase. You’ve used your device to scan the WiFi environment around your home. You understand what the signal strength numbers mean and which channels are most congested in your area. You know that on 2.4 GHz you must choose from channels 1, 6, or 11. You understand that 5 GHz offers more flexibility with twenty-four available channels.
Before you move forward to accessing your router and making the actual change, write down the specific channel number you’re going to use. Jot it on a piece of paper or type it into your phone notes. Having this number written down prevents you from getting confused or forgetting your decision when you’re navigating through your router’s settings.
You’re now ready for the next step which is accessing your router’s admin panel and finding the wireless settings. This is where the actual channel change happens. Let’s walk through that process next.
How to Change WiFi Channel Universal Step-by-Step Guide
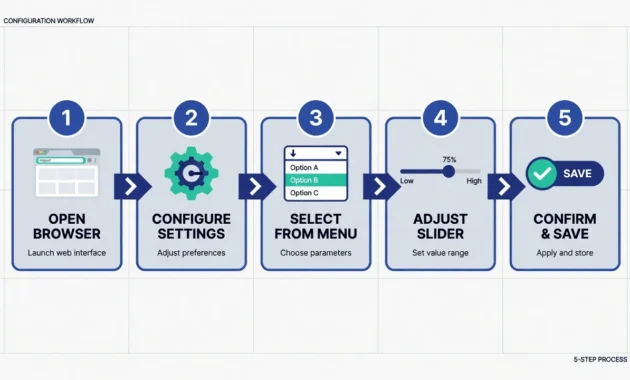
The actual process of changing your WiFi channel follows the same basic steps regardless of what router brand you own or what internet service provider you use. While the buttons and menu labels look different between routers, the fundamental process is identical everywhere.
I’m going to walk you through a universal five step method that works on virtually any router. After you complete these steps, your channel will be changed and your router will restart automatically with the new settings.
Step 1: Find Your Router’s IP Address and Log In
The first thing you need to do is access your router’s admin page where all the settings live. To do this, you need to know your router’s IP address, which is the numerical address that identifies your router on your home network.
The most common IP addresses are 192.168.1.1 or 192.168.0.1. These default addresses work for most routers made by Netgear, TP-Link, and many others. Check the sticker on the back or bottom of your router where the manufacturer usually prints the default IP address along with the default username and password.
Open any web browser on your computer or phone and type your router’s IP address into the address bar exactly as it appears. For example, if your router uses the standard address, you would type 192.168.1.1 and then press Enter. Your browser connects to your router and displays a login page.
Enter your username and password into the login fields. The default is usually admin for both the username and password, but check your router sticker to confirm. Some routers use admin as the username and password as the password instead. After entering your credentials, click the login button or press Enter.
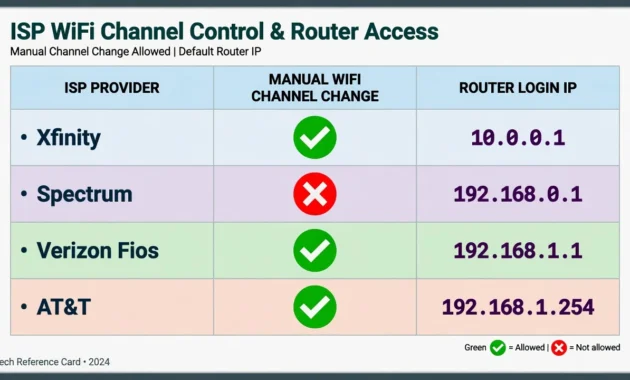
If the standard IP addresses don’t work, check your router’s manual or the manufacturer’s support website. Different ISPs sometimes use different default addresses. Xfinity gateways for example use 10.0.0.1 instead of the standard address. Once you log in, you’ve successfully accessed your router’s admin page where all the settings are located.
The login process is secure because you’re accessing your own router on your home network. You’re not connecting to anything on the internet. No one else can access this page unless they’re physically on your WiFi network or know your login credentials.
Step 2: Navigate to Wireless Settings
Once you’re logged into your router’s admin page, you need to find the wireless settings section. This is where all the WiFi configuration options live.
Look for a menu on the left side or top of the page that says Wireless or WiFi or Network. The exact label varies by router brand but these are the most common names. Click on that menu item to expand the wireless settings section.
If you have a dual-band router, you’ll see separate sections for 2.4 GHz and 5 GHz bands. These are two independent networks that your router broadcasts simultaneously. Click on the section that matches the band you want to optimize. If you decided earlier to optimize 2.4 GHz, click on that section. If you’re optimizing 5 GHz, click on the 5 GHz section instead.
You might see options labeled as Basic Settings or Advanced Settings. For changing your channel, either section usually has the channel dropdown menu. Don’t worry if the menu structure looks different from what you expected. Router manufacturers design their interfaces differently but they all include wireless settings in relatively obvious locations.
Some routers display all settings on one page while others use tabs or nested menus. Spend a moment exploring the wireless section to locate where the channel setting is located. The channel menu is usually labeled clearly as Channel or WiFi Channel or Wireless Channel.
Step 3: Find the Channel Setting and Select Your New Channel
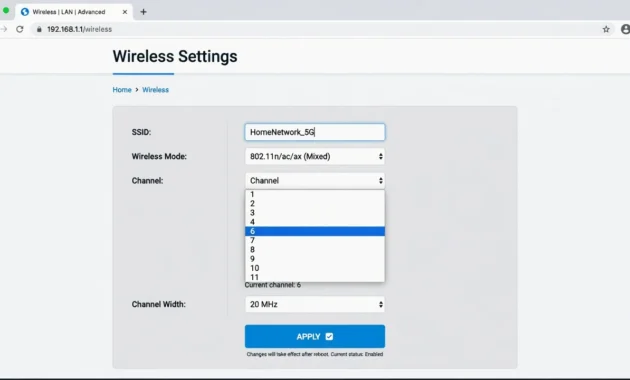
Now you’re looking for the channel dropdown menu. This is the actual setting you’re going to change. Look through the wireless settings section until you find a field labeled Channel or WiFi Channel.
Click on the channel dropdown menu to see what options are available. The menu displays available channels for your band. You might see it currently set to Auto, which means your router automatically chooses a channel. Or you might see it already set to a specific number like Channel 6.
Select the channel number you wrote down earlier from your scanning research. If you determined that Channel 11 was your best option on 2.4 GHz, click on Channel 11 from the dropdown. If you were optimizing 5 GHz and found that Channel 149 was clear, select that option instead.
Don’t overthink this step. You already did the research and identified which channel is best for your situation. Just select the number you previously determined and move forward. The channel change itself is straightforward once you locate the dropdown menu.
If you’re not sure which channel you selected, scroll back through the notes you wrote or look at your scanning results again. It takes just a moment to confirm your choice before clicking.
Step 4: Channel Width Adjustment (Optional Advanced Setting)
This step is completely optional and most people should skip it. Channel width is an advanced setting that affects how much frequency space your WiFi network uses. Unless you specifically need maximum speed performance, leave this at the default setting.
Channel width determines whether your network uses 20 megahertz of frequency space or wider options like 40 or 80 megahertz. A 20 megahertz channel width is the standard safe choice that provides good range. A wider channel width like 40 megahertz provides faster speeds but reduced range.
The fundamental rule for channel width is simple: always use 20 megahertz on the 2.4 GHz band. The 2.4 GHz band doesn’t have enough frequency space to safely use wider channel widths. Using 40 megahertz on 2.4 GHz creates interference problems and defeats your optimization efforts.
On the 5 GHz band, you can safely use 40 megahertz or even 80 megahertz if you want maximum speed and your devices are close to your router. Wider channels on 5 GHz don’t cause the same interference issues as on 2.4 GHz because of the abundance of available frequency space.
For most home users, leaving channel width at the default 20 megahertz is the right choice. It provides reliable range throughout your home and good speed for typical WiFi activities. Only adjust this if you specifically need maximum speed performance and understand the range trade-off.
Step 5: Save and Let Your Router Reboot
You’ve made your channel selection. Now you need to save these changes and let your router restart with the new settings.
Look for a button labeled Save or Apply or OK at the bottom of the wireless settings page. This button confirms your changes and applies them to your router. Click this button now.
Your router processes the change and automatically begins a restart sequence. The restart usually takes between one and two minutes. During this time your WiFi network goes down briefly. Your connected devices lose connection temporarily which is completely normal and expected.
Watch as your devices automatically reconnect to your WiFi network once the router finishes restarting. Most devices reconnect automatically within a few minutes. You’ll see the WiFi icon return on your phone or computer, indicating the connection is restored.
If a device doesn’t reconnect automatically, you can manually reconnect it. Go to your WiFi settings, forget the network, and then reconnect by selecting the network name and entering your WiFi password. This manual approach works immediately if auto-reconnection is taking longer than expected.
Congratulations, you’ve successfully changed your WiFi channel. Your router is now broadcasting on the new channel you selected based on your environmental research. The channel change is complete and your new network configuration is in effect.
The next step is to observe how your WiFi performs with the new channel setting and understand what changes you should expect.
How to Change WiFi Channel on Popular Routers (Brand-Specific Steps)
Now that you understand the universal process, let me show you exactly how it looks on the most common router brands you’re likely to own. While the basic five steps are the same everywhere, the menu layouts and button labels vary between manufacturers.
I’ve included walkthroughs for Netgear, TP-Link, and Asus routers since these brands represent most home WiFi equipment. If you own a different brand, the process follows the same pattern even though your specific menu names might be slightly different.
Netgear Router: Change Your WiFi Channel
Netgear routers use a straightforward admin interface that groups wireless settings in the advanced menu. Here’s exactly how to navigate your Netgear router to change the channel.
Open your web browser and type 192.168.1.1 or 192.168.0.1 in the address bar. Most Netgear routers use one of these standard addresses. Log in with your credentials, which are typically admin as the username and password as the password unless you changed them previously.
Once logged in, look at the left side menu. Click on Advanced to expand the advanced settings section. Within the Advanced menu, find and click on Wireless or Advanced Wireless depending on your specific Netgear model. This opens the wireless configuration page for your Netgear router.
Look for the section labeled 2.4 GHz Wireless if you’re optimizing the 2.4 GHz band. Scroll down until you find the Channel dropdown menu. Click on this dropdown to see available channels. Select your chosen channel number from the list. For 2.4 GHz, remember to select only from channels 1, 6, or 11.
After selecting your channel, scroll to the bottom of the page and click the Apply button. Your Netgear router saves the new settings and automatically restarts. The entire process takes one to two minutes. Your connected devices reconnect automatically once the router finishes restarting.
If your Netgear model displays a different menu structure, the principle remains identical. Look for keywords like Wireless and Channel in the menu system. Netgear consistently uses these terms across their product line even though the layout might vary slightly between models.
TP-Link Router: Change Your WiFi Channel
TP-Link routers organize their settings slightly differently but follow the same logical progression. The TP-Link interface actually makes channel selection quite intuitive once you find the right menu.
Go to 192.168.1.1 in your web browser and log in with admin as both username and password unless you modified the defaults. The TP-Link admin page loads showing the main dashboard.
On the left side of the dashboard, you’ll see a sidebar menu. Click on Wireless in this sidebar menu. The Wireless section expands to show additional options. Under the Wireless section, click on Advanced to access the advanced wireless settings where the channel control lives.
The Advanced Wireless page displays all your channel options. At the top of this page, find the Channel dropdown menu. Click on it to see available channels for your band. Select your channel number from the list. For 2.4 GHz optimization, choose from channels 1, 6, or 11 based on your earlier research.
If you’re optimizing 5 GHz instead, select your chosen 5 GHz channel from the dropdown. Scroll down to the bottom of the page and click Save or Apply. Your TP-Link router saves the configuration and automatically reboots to apply the changes. Devices reconnect within a few minutes after the router restarts.
The TP-Link interface is actually quite similar across their different router models. If your specific model looks different from this description, the wireless settings and channel dropdown follow the same pattern throughout the TP-Link product line.
Asus Router: Change Your WiFi Channel
Asus routers place the wireless settings in an easy to find location at the top of their admin interface. The Asus approach to organizing settings tends to be very user friendly and intuitive.
Type 192.168.1.1 into your browser address bar and log in. The default Asus credentials are typically admin for username and admin for password. Once you’re logged in, look at the top menu bar of the Asus admin page.
Click on Wireless in the top menu. This opens the wireless configuration section. You’ll see separate options for 2.4 GHz and 5 GHz bands. Click on whichever band you’re optimizing. If you’re changing the 2.4 GHz channel, click on the 2.4 GHz option.
The wireless settings page displays. Look for the Channel field which often shows Auto as the default setting. Click on the Channel dropdown to see available channels for your band. Select your chosen channel number from the options. Remember to select only channels 1, 6, or 11 for 2.4 GHz.
Click the Apply button at the bottom of the page to save your changes. Your Asus router processes the new settings and restarts automatically. The restart typically takes one to two minutes. Your devices reconnect once the router finishes restarting.
Asus updates their router interface fairly regularly, so your specific model might look slightly different from this description. The fundamental process of finding Wireless in the top menu and then selecting your channel remains consistent. The principle is always the same even if buttons are in slightly different locations.
Eero Mesh System: Automatic Channel Management
If you own an Eero mesh system or a similar mesh WiFi setup, you need to understand that these systems work differently than traditional routers. Eero, Google Nest WiFi, and TP-Link Deco mesh systems do not allow manual channel selection.
These mesh systems use intelligent automatic channel optimization that constantly monitors your WiFi environment. The system automatically switches channels when it detects interference or congestion. This automatic process happens in the background without your input or approval. You cannot manually override this automatic channel selection on most mesh systems.
The reason mesh systems lock out manual channel control is that they manage multiple access points simultaneously. A traditional router controls one device. A mesh system controls three to five access points all broadcasting together. Automatic optimization across multiple nodes is more complex than a single router can handle manually.
What you can do if you own a mesh system depends on your specific situation. First, trust the automatic optimization for most scenarios because mesh systems are actually quite good at finding clear channels. Second, if you’re having persistent WiFi problems, contact your mesh system manufacturer’s support team for assistance. Third, consider repositioning your mesh nodes to different locations which can improve the signal reaching problem areas.
The limitation of not having manual channel control is actually a feature for most mesh system users. It simplifies the setup process and prevents users from making poor channel choices that slow down their network. Mesh systems handle channel management better than most home users would do manually.
If you absolutely need manual channel control over your WiFi channels, a traditional single router might serve you better than a mesh system. Mesh systems excel at coverage and ease of use, but that convenience comes with less granular control over individual settings like channels.
ISP Gateway Instructions: Xfinity, Spectrum, Verizon and AT&T
Most people don’t realize they have a WiFi gateway provided by their internet service provider instead of a standalone router. These ISP gateways work differently from consumer routers and each major provider uses different settings interfaces and IP addresses to access them.
If you rent your equipment from your ISP rather than owning a standalone router, this section applies to you. The channel change process is similar in principle but the specific steps vary significantly between Xfinity, Spectrum, Verizon, and AT&T.
Important: Check If Your ISP Allows Manual Channel Changes
Before you invest time trying to change your channel, you need to know whether your specific ISP even allows manual channel selection. Some major internet service providers lock this feature entirely.
Spectrum does not allow manual channel changes on any of their gateways. The Spectrum equipment comes locked to automatic channel selection by design. You cannot override this limitation no matter what steps you follow. If you have Spectrum as your provider, manual channel optimization is not an option for you.
Google Fiber and Google Nest WiFi also do not permit manual channel changes. These systems rely entirely on automatic channel optimization. The reasoning is that automatic selection works better than manual choices in most situations, though this approach limits your control.
Starlink satellite internet provides gateway equipment that does not support manual channel changes either. You can split your 2.4 GHz and 5 GHz bands if they’re combined, but you cannot select specific channels. Starlink users are limited to the automatic system.
Xfinity, Verizon, and AT&T all do allow manual channel selection on their gateways. Instructions for these providers appear below with specific step-by-step guidance.
For other internet service providers, check your ISP’s support website or call their technical support line to confirm whether manual channel selection is available. Many smaller regional ISPs do allow manual control similar to Xfinity and Verizon.
If your ISP locks out manual channel changes entirely, you have two options. First, you can accept the automatic optimization and focus on improving WiFi through router placement and device positioning. Second, you can use a separate standalone WiFi router connected to your ISP gateway. Many providers allow this setup, though you should confirm with your ISP before purchasing equipment.
Xfinity Gateway: Complete Setup and Channel Change
Xfinity is Comcast’s consumer internet service, and their gateways do support manual channel selection. The process includes a mandatory password change on first login, which is different from most standalone routers.
Make sure your device is connected to your Xfinity WiFi network before starting. You need an active connection to access the gateway settings. Open any web browser on your computer or phone.
Type 10.0.0.1 into the address bar and press Enter. This is the unique IP address for Xfinity gateways, which differs from the standard 192.168.1.1 used by most other equipment. Your browser displays the Xfinity login page.
Enter admin as your username and password as your password in the login fields. Click the Login button to proceed. Xfinity then displays a mandatory password change screen on your first login. This security requirement forces you to create a new administrative password.
In the password change screen, type password in the Current Password field. Then type your new custom password in the New Password field. Type the same new password again in the Confirm Password field to verify it. Write down your new password in a safe location because you’ll need it to access gateway settings in the future.
Click Save and then click OK. The gateway accepts your new password and logs you in. Re-authenticate by logging in again with admin as your username and your newly created password. This takes you to the main Xfinity gateway dashboard.
Look for a tab or menu labeled Connection on the left side of the dashboard. Click on Connection to expand the options. From the dropdown menu under Connection, select WiFi. This displays the WiFi configuration page showing your 2.4 GHz and 5 GHz bands.
For the 2.4 GHz band, click the Edit button on the right side of the 2.4 GHz section. The edit page loads showing your current 2.4 GHz configuration. Scroll down to find the section labeled Private WiFi Network Configuration. By default, the Channel Selection is set to Automatic. Click the Manual radio button to enable manual channel selection.
Once you select Manual, a dropdown menu appears showing available channels. Click on the dropdown and select your chosen channel from the list. Use channels 1, 6, or 11 for 2.4 GHz based on your earlier research.
Scroll to the bottom of the page and click Save Settings. Your Xfinity gateway processes the change and reboots to apply the new channel. The restart takes one to two minutes.
If you want to also optimize your 5 GHz band, return to the WiFi page and repeat the same process for the 5 GHz section. The steps are identical. Click Edit, toggle to Manual channel selection, pick your 5 GHz channel, and click Save Settings.
The Xfinity gateway interface is somewhat more complex than standalone routers due to the mandatory password change and slightly different menu organization. The additional steps are worth it because many Xfinity users experience significant WiFi improvements after optimizing their channel selection.
Spectrum Gateway: Why You Can’t Change Channels (And What to Do Instead)
Spectrum internet service provides gateways that do not support manual channel selection. This is a conscious design decision by Spectrum that frustrates many customers who want to optimize their WiFi performance.
The reason Spectrum locks out manual channel control is that they claim their automatic optimization works better than allowing users to make manual choices. In theory, their system monitors network conditions and automatically selects the best available channel. In practice, the automatic selection sometimes chooses poorly congested channels even when better options exist nearby.
Unfortunately, there is no workaround within the Spectrum gateway itself. You cannot access settings to change channels manually. Contacting Spectrum support to request manual channel control rarely results in success because the limitation is a fundamental part of their equipment design.
Your practical alternatives if you use Spectrum are limited but worth considering. First, you can contact Spectrum support and request manual control anyway. While unlikely to succeed, it’s worth asking because customer demand sometimes leads to software updates. Second, you can purchase a separate WiFi router and connect it to your Spectrum gateway. This gives you a router where you have full channel control. Ask Spectrum if this setup is allowed on your account before purchasing equipment.
Third, you can work around the channel limitation by repositioning your Spectrum gateway to a more central location in your home. Better physical placement improves signal strength and can sometimes reduce the impact of channel congestion. Fourth, you can try switching between your 2.4 GHz and 5 GHz bands. While you can’t change specific channels, you can control whether your devices connect to 2.4 or 5 GHz.
Fifth, you can accept the automatic channel selection and optimize other aspects of your WiFi setup. Improve router placement, reduce interference from other devices, and manage which devices are connected to your network. These changes sometimes provide improvement comparable to manual channel optimization.
The limitation is frustrating, but millions of Spectrum customers face the same situation. You’re not alone in this restriction, and many people still achieve acceptable WiFi performance despite the locked channel settings.
Verizon Fios Gateway: Channel Change
Verizon Fios provides internet service with gateways that do support manual channel selection. The process is relatively straightforward once you access the gateway settings.
Open your web browser and type 192.168.1.1 in the address bar. Log in with admin as your username and motorola as your password. These are Verizon’s standard default credentials. The gateway dashboard loads.
Look for a menu option labeled Wireless or WiFi. Click on this option to access the wireless settings. Find the Channel dropdown menu in the wireless settings section. Select your chosen channel from the available options. For 2.4 GHz, use channels 1, 6, or 11 based on your research.
Click Apply or Save to save your changes. Your Verizon Fios gateway reboots automatically to apply the new channel setting. The process takes one to two minutes.
Verizon Fios gateways vary by specific model, so your interface might look slightly different from this description. The fundamental process of finding Wireless settings and selecting a channel remains consistent. If you can’t locate the exact menus described, check Verizon’s support website or call their technical support for your specific model number.
AT&T WiFi Gateway: Channel Change
AT&T provides gateways with manual channel selection capability. The process is similar to other ISP gateways but the default login credentials vary by model.
Check the back or bottom of your AT&T gateway for the default login credentials. These vary more significantly between AT&T models compared to other providers. Type 192.168.1.1 in your browser address bar and enter your gateway credentials.
Once logged in, look for a menu option labeled Wireless or Advanced. This section contains your WiFi configuration settings. Find the Channel setting and click on it. Select your chosen channel from the available options. For 2.4 GHz, select channels 1, 6, or 11 only.
Click Save to apply your changes. Your AT&T gateway reboots to activate the new channel. The restart takes one to two minutes.
AT&T has multiple gateway models with different interfaces. If the steps above don’t match your specific interface, contact AT&T technical support and provide your model number. They can provide exact instructions for your equipment.
Other ISPs: Frontier, Cox, CenturyLink, and Regional Providers
Many smaller internet service providers and regional carriers use equipment that follows the same pattern as the major providers. The general process is consistent even when specific details vary.
Most ISP gateways use a standard IP address like 192.168.1.1 or 192.168.0.1. If those don’t work, check the sticker on your gateway for the correct address. Log in with admin as your username and password as your default password, though some providers use different credentials.
Look for a Wireless or WiFi menu option. Find the Channel setting and select your desired channel. Look for a Save or Apply button to confirm your changes. The gateway reboots to apply the new settings.
If you can’t locate channel settings in your gateway interface, your ISP probably locks manual channel selection. Check your ISP’s support website for definitive information about whether your equipment supports manual channel changes.
Many regional ISPs do allow manual channel selection, so it’s worth attempting to find the settings. If you get stuck, contact your ISP’s technical support team and ask directly whether manual channel selection is available on your account and equipment.
After You Change Your WiFi Channel: What to Expect and How Long It Takes
You’ve made the change and your router is now restarting. The next few minutes will involve your devices disconnecting and reconnecting as your router applies the new channel settings. Understanding what’s happening during this process prevents unnecessary worry or frustration.
The channel change process isn’t instantaneous. Your router needs time to restart, your devices need time to recognize the new network, and the benefits take time to become apparent. Let me walk you through what to expect during this transition.
Your Router Will Reboot Automatically
Immediately after you clicked Save or Apply, your router began its restart sequence. This reboot is automatic and completely normal. You don’t need to do anything or restart your router manually.
The restart typically takes between one and three minutes from the moment you save the settings. During this time, your WiFi network goes completely offline. All devices lose their connection. This brief outage is not a problem and not a sign that something went wrong. It’s exactly what should happen when your router applies new settings.
You’ll see the WiFi icon disappear from your phone or computer during the restart. This is normal. Don’t panic or try to reset your router. Just wait patiently for the WiFi to come back online.
Your devices automatically detect when your router finishes restarting and comes back online. Most devices reconnect to your network without any action from you. The WiFi icon reappears on your devices, and you’re reconnected within a few minutes of the restart completing.
Some older devices or devices that are far from your router might take slightly longer to reconnect. If a device hasn’t reconnected after five minutes, you can manually reconnect it by going to your WiFi settings, selecting your network name, and entering your WiFi password again.
How Long Until You See Improvement
The timeline for noticing improvement in your WiFi performance varies depending on your specific situation. Some people see immediate dramatic improvement. Others notice gradual improvement over hours or days. Understanding the realistic timeline helps you evaluate whether the channel change actually worked.
In the best case scenario, you see noticeable improvement within minutes. This happens when you’ve moved from a severely congested channel to a much less crowded one. If you changed from channel 1 where ten neighbors were broadcasting to channel 6 where only one neighbor broadcasts, the improvement can be immediate and dramatic.
In a typical scenario, you notice noticeable improvement within a few hours. Your WiFi becomes more stable and faster, but the improvement might not be night and day. The change reduces interference enough to make a real difference in browsing speed and streaming quality.
In some cases, improvements build gradually over time. This happens because your neighbor’s networks come online and go offline at different times. When you first change channels, you might be alone on that channel. As other devices and networks turn on throughout the day, some might share your channel. Your WiFi performance stabilizes at a better level than before but might fluctuate somewhat.
The most accurate way to measure whether your channel change worked is to run speed tests before and after. Before you make any channel changes, use a free online speed test and write down your download speed, upload speed, and ping. Then wait at least twenty four hours after changing your channel and run the same speed test again.
Compare your before and after results. If your download speed increased by 10 Mbps or more, the channel change definitely helped. If your speeds stayed similar but your connection became more stable and dropped less frequently, the channel change also succeeded. If speeds worsened significantly, the channel you chose turned out to be more congested than expected and you should try a different channel.
Give your new channel at least one to two days before deciding whether it worked. Don’t judge the channel change based on results from just a few minutes after switching. Your neighbors’ activities and network conditions change throughout the day and night, making the full picture clear only after observing multiple time periods.
How to Test If Your Channel Change Actually Worked
Running speed tests before and after your channel change gives you objective data about whether the change improved your WiFi performance. This scientific approach removes guesswork and emotion from the evaluation.
Before making any changes, visit a free speed test website like speedtest.net or fast.com. Run a speed test and record three numbers: your download speed in Mbps, your upload speed in Mbps, and your ping in milliseconds. Write these numbers down or take a screenshot for reference.
Wait until a few hours after your router finishes restarting from the channel change. This gives your devices time to reconnect and stabilize on the new channel. Then run the same speed test again from the same location in your home. Record the new numbers.
Compare your before and after results. If your download speed increased noticeably, the new channel is working better. If your upload speed improved, that’s another sign of success. If your ping decreased, your connection is more responsive. If all three numbers improved, the channel change was definitely beneficial.
If your speeds stayed similar or slightly worse, the channel you selected wasn’t necessarily a bad choice. Channel effectiveness depends on many factors including exactly which neighbors use which channels and how far they are from you. If your new channel doesn’t help, go back to your scanning data and try one of your other options.
If speeds got significantly worse after the change, you definitely chose a channel with more interference than your original channel. Revert to your previous channel immediately and try a different option instead. The channel you originally selected must have been one of the less congested ones in your area.
Devices May Not Reconnect Immediately
Most modern devices automatically recognize when your router comes back online after a restart and reconnect without any action from you. However, some older devices or devices in rooms far from your router might need a few extra minutes or manual assistance.
Automatic reconnection usually happens within a few minutes of your router finishing its restart. You’ll see the WiFi icon reappear on your device. The connection is active even if it takes a moment to fully establish.
Older devices sometimes struggle to recognize the returning network immediately. This is especially true for devices with older WiFi chips that don’t connect as quickly. These devices might take five to ten minutes to automatically reconnect.
If a device doesn’t reconnect automatically after ten minutes, you can manually reconnect. Go to your WiFi settings on that device. Find your WiFi network name in the list of available networks. If the network is already listed as a saved network, you might see a forget option. Click forget to remove the saved network from your device.
Then select the network again from the available networks list. Enter your WiFi password. The device reconnects and stays connected. This manual process takes just a minute and solves the reconnection issue immediately.
Once a device is reconnected, it should stay connected normally. You might need to manually reconnect a device once when you first change channels, but after that initial reconnection, the device remembers the new channel and connects automatically in the future.
Mesh systems and multiple access points sometimes have slightly longer reconnection times than single routers. This is normal. The entire mesh system needs to synchronize and coordinate channels across all nodes. This coordination takes a few extra minutes but completes automatically.
The key point is that temporary disconnection during the router restart is completely expected and normal. Don’t assume something is wrong if your devices disconnect. Wait patiently for them to reconnect. If a device hasn’t reconnected after ten minutes, you can manually help it reconnect using the forget and rejoin process.
Troubleshooting: Why Your WiFi Is Still Slow After Changing Channels
You changed your WiFi channel exactly as instructed, waited the appropriate time, and your speeds are still slow. This is frustrating, and I understand the disappointment. But before you assume the channel change was useless, you need to understand that slow WiFi has many possible causes. Channel congestion is just one of them.
Here’s the hard truth: changing your WiFi channel fixes some slowness problems. Not all. Sometimes your WiFi isn’t slow because of channel congestion.
It’s slow because your router sits in a closet. Or because you’re sixty feet away. Or because your ISP plan is genuinely slow. Knowing the difference between these problems matters. A lot. So let’s figure out which one is actually yours
The Problem Might Not Be Channel Congestion (Check These First)
Before you assume the channel change failed, check whether your slow WiFi actually has anything to do with channel congestion in the first place. Many people blame channels for problems that have nothing to do with neighboring networks.
Your Internet Plan Speed Might Be the Bottleneck
Changing your WiFi channel cannot make your internet faster than your actual internet service plan. If your internet service provider plan delivers 50 Mbps, no channel change will give you 100 Mbps. The channel determines which frequencies your router uses, not how fast your internet connection is.
Run a speed test right now and compare your results to your actual internet plan. Visit speedtest.net and note your download speed in megabits per second. Then check your internet bill or log into your ISP account to see what speed you’re actually paying for. If your speed test shows speeds close to your plan speed, channel congestion is not your problem. If your speed test shows speeds far below your plan speed, you have a real problem that channels might help with.
If your speed test shows that you’re getting the speed you’re paying for, the slowness you’re experiencing comes from somewhere else entirely. Many people assume slow internet means their WiFi is broken when actually their internet plan itself is slow. The solution in that case is upgrading to a faster plan, not changing channels.
Distance from Your Router Creates Range Problems
The farther your device is from your router, the weaker the signal. WiFi doesn’t magically travel through every wall and obstacle with equal strength. Distance degrades signal quality significantly.
The 2.4 GHz band reaches approximately 150 feet in open space, but walls and obstacles reduce this dramatically. Each wall between you and your router cuts the effective range roughly in half. If your router is in your living room and you’re trying to use WiFi in a bedroom three rooms away with multiple walls between, distance is your problem, not channel congestion.
The 5 GHz band has even shorter range, reaching only about 50 to 60 feet in open space before obstacles reduce it further. If you’re far from your router or in a room blocked by concrete walls or metal objects, 5 GHz signal will be weak.
Test this theory by moving your device closer to your router. If your speeds improve significantly when you’re in the same room as your router but degrade when you move away, distance is your actual problem. The solution is moving your router to a more central location or using a WiFi extender to reach distant rooms.
Other Devices Are Causing Interference
Some devices emit radio signals that interfere with WiFi on the 2.4 GHz band. Microwaves, cordless phones, baby monitors, and Bluetooth speakers all use the same 2.4 GHz frequency as WiFi. When these devices transmit, they create noise that interferes with your WiFi signal.
Check what devices are running near your router. If your microwave is directly next to your router, turn off the microwave and test if your WiFi improves. If a cordless phone base station sits right next to your router, try moving the phone away. If your Bluetooth speaker is transmitting while you’re trying to use WiFi, disconnect the Bluetooth and test again.
Switching to the 5 GHz band eliminates most of these interference problems because most household devices use 2.4 GHz. If your router supports dual-band, try connecting to the 5 GHz network to see if speeds improve. The 5 GHz band won’t have microwave interference because microwaves don’t operate at that frequency.
Too Many Devices Connected Simultaneously
WiFi bandwidth is shared among all connected devices. When you have twenty devices connected and five of them are simultaneously streaming video or downloading files, every other device on the network gets slower speeds.
Check how many devices are connected to your WiFi network. Go to your router settings and look at the connected devices list. If you see twenty, thirty, or fifty devices, that’s your bandwidth problem. Each connected device consumes some of your available bandwidth even if it’s idle.
Disconnect devices you’re not actively using. Unplug that old printer nobody uses. Remove the WiFi from that rarely used tablet. Log out of that laptop that’s been sitting in your closet for months. The fewer devices sharing your bandwidth, the faster every device will be.
Also check what activities are consuming bandwidth. If someone is streaming 4K video while someone else is downloading large files while someone else is playing online games, your bandwidth gets divided among all these bandwidth intensive activities. Ask household members to limit bandwidth heavy tasks or spread them across different times.
Your Router Is Poorly Positioned
Physical obstructions between your router and your devices severely reduce signal strength. If your router sits in a closet surrounded by coats and equipment, the signal barely escapes. If your router hides in a cabinet or gets buried under blankets, signal strength suffers.
Metal objects block WiFi signals. Radio frequency cannot pass through metal effectively. If your router sits next to metal shelving or inside a metal cabinet, signal is blocked. Concrete walls and brick also block signals more effectively than drywall.
Move your router to a central, elevated, open location. Place it on a shelf or table in a hallway or living room rather than in a closet or corner. Position the router away from metal objects and dense obstacles. The improvement in signal strength is often noticeable within minutes of repositioning.
Your Signal Strength Is Weak
You might have a signal strength problem rather than a congestion problem. Use a WiFi analyzer app and check your signal strength in the areas where you use WiFi. If your signal strength is below negative 70 dBm, the signal is weak and distance or obstacles are your problem, not congestion.
Move your router closer to areas where you need WiFi. If certain rooms always have weak signal, consider adding a WiFi extender or mesh system to boost coverage. Improving signal strength throughout your home helps more than changing channels in situations where you don’t have adequate coverage.
Try a Different Channel (Maybe Your Chosen Channel Isn’t the Best)
Sometimes you pick the best channel available when you scanned initially, but that choice doesn’t work perfectly once you start using it. The WiFi landscape changes constantly as neighbors’ routers turn on and off throughout the day. A channel that looked clear during your scan might become congested during peak evening hours.
The process from the video showing a user testing multiple channels is actually the best approach for fine-tuning your selection. You’ve already tested one channel. Now test the others in your original shortlist.
Switch back to your router settings and try channel 1 if you’re currently on channel 6. Use channel 1 for one to two hours and pay attention to your connection quality and speed. Run another speed test if you want objective data. If channel 1 performs worse than channel 6, switch back to channel 6.
Then try channel 11 for one to two hours and evaluate performance. Note whether channel 11 feels faster or more stable than channel 6. If it does, keep channel 11. If channel 6 still feels better, stick with channel 6.
This real-world testing in your actual environment often reveals which channel works best. The channel that looked clearest on your scanner might not perform best once you’re actually using your devices. Environmental factors and neighbor activity patterns matter.
Your ISP Might Be Throttling Your Connection
Some internet service providers intentionally limit speeds during certain times or for certain activities. This practice is called throttling. If your ISP throttles your connection, changing channels will not help because the throttling happens at the ISP level, not at the WiFi level.
Throttling typically happens during peak hours when network demand is high. Your speeds might be normal at midnight but throttled at 8 PM when everyone is streaming. Some ISPs also throttle specific activities like video streaming or file sharing.
Check whether your speeds are consistently slow all day or only slow during certain times. If speeds are worse in evenings, throttling might be responsible. If speeds are always slow regardless of time, throttling is less likely.
Contact your ISP and ask directly if they throttle your connection. Be specific about when slowness occurs. Ask if any activities trigger throttling. Some ISPs admit to throttling while others deny it. If throttling is happening, your only solution is upgrading to a plan that doesn’t include throttling or switching to a different ISP.
When to Accept That Channel Changes Won’t Solve This Problem
After trying different channels and checking all the other possible causes, you might come to the conclusion that your slow WiFi problem has nothing to do with channel congestion. This is actually valuable information.
Channel optimization helps when your specific problem is interference from neighboring networks. But if your actual problem is distance from the router, weak signal strength, ISP speed limitations, router placement, or too many connected devices, changing channels won’t fix it.
This isn’t a failure. It just means you’ve identified the real problem so you can address the actual root cause. If you’re experiencing persistent connection drops, the “WiFi connected but no internet” error, or devices that constantly disconnect even after optimizing your channels,
I’ve created a complete troubleshooting resource covering 40+ fixes for when WiFi shows connected but has no internet access. That guide walks through DNS configuration IP address conflicts network adapter resets, and router firmware issues problems that channel changes won’t solve but that cause identical frustrating symptoms.
The channel change approach works great for some people in some situations. For others, the WiFi problem requires a different solution entirely. Knowing that channels aren’t your problem is actually helpful because it tells you what direction to focus your troubleshooting efforts.
Frequently Asked Questions About WiFi Channels
Will changing my WiFi channel disconnect my devices?
Yes, your devices will disconnect briefly when your router reboots, but they reconnect automatically within a few minutes so there’s no data loss and minimal disruption. If a device doesn’t reconnect automatically after five minutes, simply forget the network in your WiFi settings and rejoin by entering your password again.
Should I use automatic or manual channel selection?
Use automatic channel selection in rural areas with few neighbors, but switch to manual selection in apartments and dense neighborhoods where many networks operate nearby. Test both approaches for a week each and compare your speed test results to determine which works better for your specific location.
How often should I change my WiFi channel?
Set your optimal channel once and leave it alone unless new interference appears or your speeds degrade significantly. Check quarterly in high-density apartments and annually in rural areas, but most people never need to change their channel after the initial optimization.
Can changing my WiFi channel improve security?
No, channel selection affects performance only, not security. WiFi security comes from encryption like WPA2 or WPA3 and strong passwords, not which channel you use. Changing your channel won’t stop hackers or protect your network from attacks.
What’s the difference between 2.4 GHz and 5 GHz, and which should I use?
The 2.4 GHz band offers longer range but slower speed while 5 GHz provides shorter range but significantly faster speed. Use 2.4 GHz for distant rooms and older devices, and use 5 GHz for speed-critical tasks near your router, since most modern routers broadcast both bands simultaneously.