
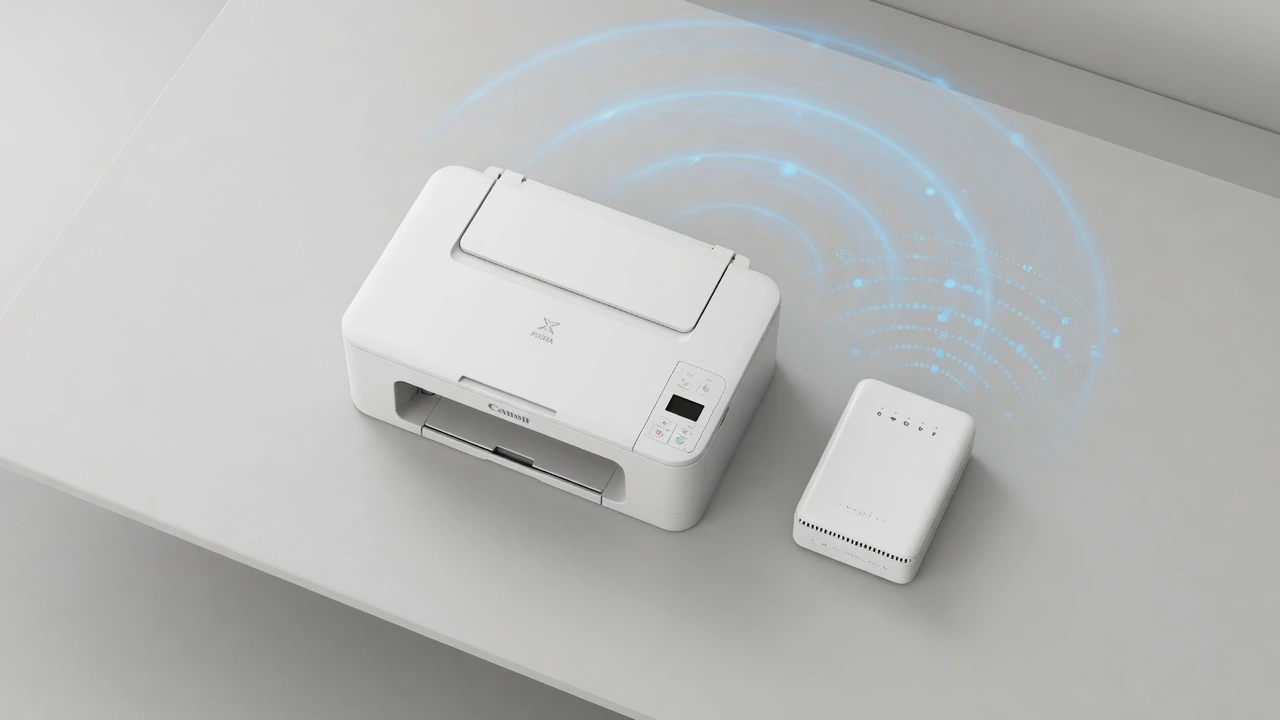
Before You Start: Canon Printer WiFi Connection Requirements
If you have ever turned on a Canon printer and expected it to find your WiFi on its own, you already know how that ends. It doesn’t. Before I walk you through the four methods for how to connect Canon printer to WiFi, let me cover the things you need to have ready first because skipping this step is where most people lose an hour
You need a few things ready before you even press a single button on your printer. In the next few sections, I’ll cover the specific requirements that make or break a successful wireless printer setup.
First, make sure your WiFi router is turned on and actively broadcasting your network. I know this sounds obvious, but I have seen situations where someone restarted their router right before trying to set up the printer, and the network was not fully active yet. Give your router a minute or two to fully boot up if you just turned it on.
Power on your Canon printer and load some paper into the tray. If this is your first time using this device, make sure you have installed the ink cartridges. Once it powers up, you should see a small light on the printer body. Many Canon models feature a blue WiFi indicator light.
When it blinks, the printer is searching for a network or ready to connect. A solid light means the printer might already be connected to a network from a previous setup
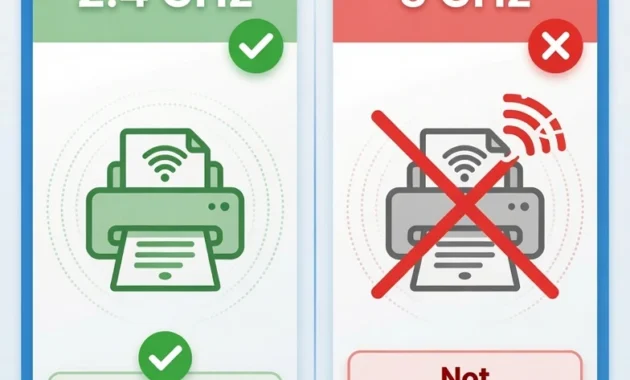
Before you begin any Canon printer WiFi setup, confirm that your router actually supports 2.4GHz networking. While nearly all modern routers broadcast on both 2.4GHz and 5GHz bands, some newer mesh systems or enterprise routers may have limited 2.4GHz support.
Check your router’s WiFi band support to avoid hours of troubleshooting before you even start the Canon printer setup process. Many people purchase routers without realizing their Canon printer won’t connect, making this one verification step worth your time upfront.”
I have watched people spend an hour trying to connect their printer to a 5GHz network that the printer will never detect. Check your router settings or your WiFi network name. Some routers label the two bands separately. You might see “HomeNetwork” for 2.4GHz and “HomeNetwork_5G” for 5GHz. Choose the one without the 5G label.
Some routers label the two bands separately, like “HomeNetwork” for 2.4GHz and “HomeNetwork_5G” for 5GHz. Choose the one without the 5G label.
Have your WiFi password written down before you start. Not on your phone screen actually written down somewhere you can read it while your hands are on the printer.
Many Canon models require you to enter that canon printer wifi password character by character on a tiny screen with physical number pad buttons and having to walk back to the router to recheck the password mid-entry is genuinely painful
Many Canon printers require you to enter this password using a small screen and buttons, which can be slow and frustrating if you have to keep running back to your router to check the password.
Most Canon printers only support canon printer 2.4GHz wifi, and this single fact causes more failed setups than anything else I see. If your router broadcasts both a 2.4GHz and a 5GHz network, your printer can only see the 2.4GHz one. The 5GHz band is faster, but Canon printers — including most PIXMA and imageCLASS models — are not built to detect it.
I have watched people spend a full hour trying to connect a printer to a 5GHz network that the printer will never find. Check your router’s network list. Routers often label the two bands separately, like ‘HomeNetwork’ for 2.4GHz and ‘HomeNetwork_5G’ for 5GHz. Pick the one without the 5G suffix.
Then, your computer or phone can find the printer on that same network and send print jobs to it. I see a lot of people expect their laptop to automatically detect the printer the moment they turn it on. That will not happen until the printer is actually connected to the WiFi network your laptop is using.
Keep your printer within 10 to 15 feet of your router during initial setup — ideally the same room with no walls between them. If the signal is too weak during the pairing process, the printer will either not detect your network at all or drop the connection halfway through. Once the network credentials are saved, you can move the printer to its permanent spot.
You can move the printer to its permanent spot after the setup is complete, but for now, stay within the same room as your router if possible.
Once those four things are in place 2.4GHz network active, printer powered on with paper loaded, password written down, and both devices in the same room you are ready. Let’s get into the actual connection methods.
Method 1: Connect Canon Printer to WiFi Using WPS (Fastest)
If your router has a WPS button, this is the fastest way to handle the canon wireless connection setup under a minute, no password typing required. I always start here because the WPS button on Canon printer models is designed specifically for this kind of instant pairing.
What Is WPS and Why It’s the Easiest Method
WPS stands for Wi-Fi Protected Setup — a feature baked into most routers made in the last decade that lets devices join your network with a button press instead of a password. Two devices exchange encrypted connection details automatically the moment both buttons are pressed.
No menus. No typing. Just a brief negotiation that finishes in under 20 seconds. Canon printers are built to recognize the WPS signal immediately, which is why this wireless printer setup method consistently saves the most time.
You press a button on each device at the same time and they exchange the connection details automatically. No typing required. You don’t have to search through endless menu options. And there’s no frustration waiting for a slow connection process to finish
Most routers made in the last ten years support WPS. If your router is relatively new, you almost certainly have this option available. This method works beautifully for wireless printer setup because Canon printers are designed to recognize the WPS signal immediately.
Where to Find the WPS Button on Your Canon Printer and Router
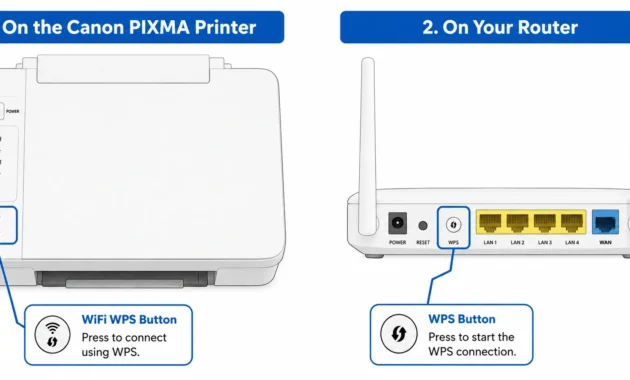
On your Canon printer, look for a button marked with a WiFi symbol or the letters WPS. On most Canon PIXMA inkjet models, this button sits on the top panel next to the power button.
On compact imageCLASS laser models like the LBP 6040 which have no display screen the WiFi button is on the front control panel. It typically has a small blue indicator light built into it or right next to it.
Some Canon LaserJet models without a display screen like the LBP 6040 position the WiFi button on the front near the main control panel. Usually, the button has a small blue light next to it or built into it
On your router, the WPS button is typically on the back or side panel near where the Ethernet cables plug in. It might say WPS, or it might just show a symbol that looks like two arrows forming a circle. Some routers label it as Wi-Fi Protected Setup.
The first time I set up a printer through a Netgear Orbi mesh system, I spent five minutes looking for a WPS button that didn’t exist under that name. On mesh routers, the WPS function is usually labeled Sync. Same process, different label press it the same way you would press a WPS button on any traditional router.
Step-by-Step WPS Connection
Let me walk you through the exact process to connect your Canon printer to your home network using WPS.
Make sure the printer is on and the WiFi light is visible. Then locate the WPS button on both the printer and the router — you will press them at nearly the same time, so know where both are before you start.
Press and hold the WPS button on your Canon printer, then immediately press the WPS button on your router. Hold both for 5 to 10 seconds. On some Canon models, you hold the WiFi button until the indicator blinks twice, then release.
Watch the blue WiFi light. It should start blinking rapidly that means the printer found the WPS signal and is negotiating the connection.
Let go and wait. The process takes 10 to 20 seconds. When the blinking stops and the light goes solid, the printer is connected.
Now press and hold the WPS button on your Canon printer and the WPS button on your router at the same time. Keep holding both buttons for about 5 to 10 seconds.
On some Canon models, you hold the WiFi button until you see the top button blink twice, then you release it quickly. Watch the blue WiFi light on your printer. It should start blinking rapidly.
Release both buttons and wait. Your printer is now searching for the WPS signal from your router and exchanging connection information. This process usually takes 10 to 20 seconds.
Watch the blue light on your printer carefully. When the blinking stops and the light becomes solid and steady, your printer has successfully connected to your WiFi network.
If the connection fails and the light does not turn solid, do not worry. I have seen this happen on the first try. Simply turn your printer off, wait a few seconds, then turn the printer back on and repeat the entire WPS process again. The second attempt usually works.
What the Blinking WiFi Light Means on Canon Printers
The WiFi light on your Canon printer is not just decorative — it tells you exactly what the printer is doing.
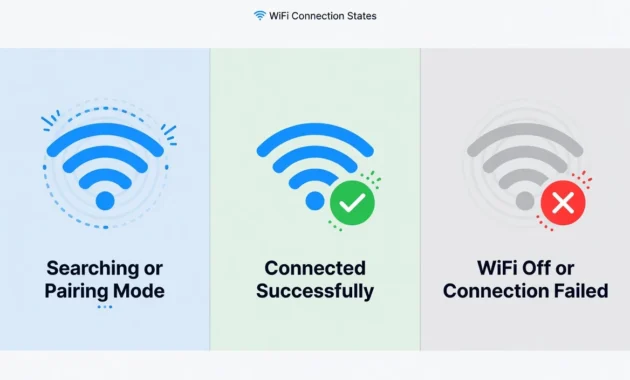
Blinking blue: the printer is searching for a network or sitting in pairing mode. Connection is not finished yet.
Solid blue: connected. You are good to go.
No light at all: the WiFi feature is off or the connection attempt failed completely. Press the WiFi button once to wake the wireless function, then restart the WPS process
A solid blue light means the printer has successfully connected to your WiFi network and is online. You are good to go.
If you see no light at all, either the WiFi feature is turned off on your printer or the connection attempt failed completely. Try pressing the WiFi button once to wake up the wireless feature, then start the WPS process from the beginning.
Method 2: Connect Using Canon PRINT App (Best for Mobile Users)
If you would rather handle setup from your phone than press buttons on the printer itself, the Canon PRINT app is built for exactly this. I reach for this method when someone plans to print from phone to Canon printer regularly because you are configuring the WiFi connection and setting up mobile printing in one pass. It takes a few more minutes than WPS, but it works even when your router has no WPS button.
The Canon wireless connection setup through the app takes a bit longer than WPS, but it gives you more control and works even if your router does not have a WPS button.
Download and Install Canon PRINT Inkjet/SELPHY App
Download the Canon PRINT Inkjet/SELPHY app free on both the Apple App Store and Google Play Store. When you open it for the first time, the app will ask for location and local network access permissions. Grant both. Without them, the app cannot detect nearby printers or communicate with the Canon printer on your network
Once the app finishes downloading, open the app for the first time. The app will ask for permission to access your device location and connect to devices on your local network. You need to allow these permissions for the wireless printer setup to work properly. The app uses location services to detect nearby printers and network access to communicate with your Canon printer.
Put Your Printer in Easy Connect Mode
Before the app can find your printer, you need to put the printer into Easy Connect mode — a temporary state where the printer broadcasts its own short-lived WiFi hotspot so your phone can talk to it directly.
Press and hold the WiFi Connect button on the printer for exactly 3 seconds, then release. The WiFi indicator will change or blink in a new pattern. At this point, your printer is broadcasting a temporary network with a name that starts with Canon_ij_ followed by a string of letters or numbers. That network will appear in your phone’s WiFi list like any other available network. This is completely normal
Turn on your Canon printer and locate the WiFi Connect button. This button usually has a WiFi symbol or the word WiFi printed on it. Press and hold the WiFi Connect button for exactly 3 seconds, then release the button. You should see the WiFi indicator light change or start blinking in a different pattern.
What happens next is important to understand. Your printer now broadcasts a temporary wireless network with a name that starts with Canon_ij_ followed by some numbers or letters.
This network will show up in your phone’s WiFi settings just like any other available network. Do not worry when you see this strange network name. This hotspot is a normal part of the canon wireless connection setup process and only lasts during the initial pairing.
Connect Your Phone and Push WiFi Settings to Printer
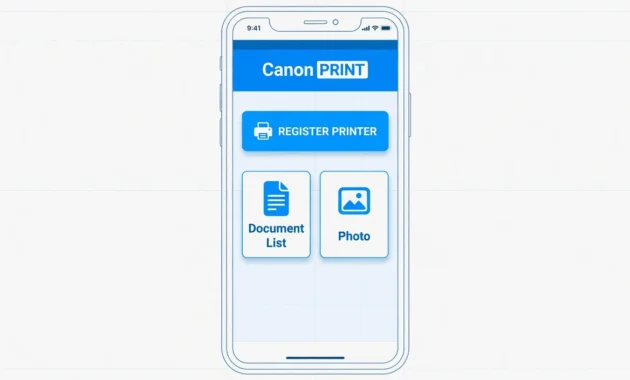
Back in the Canon PRINT app, tap Register Printer or Add Printer. The app scans automatically and your printer model should appear within a few seconds — tap it to select it.
The app will then show a list of WiFi networks your printer can detect. Tap your home network name, then enter your canon printer network password. Passwords are case-sensitive here, so type carefully. One wrong capital letter and the connection will fail.
Tap Apply or Connect. The app pushes your network name and canon printer wifi password from your phone to the printer over that temporary Canon_ij_ hotspot. The printer saves those credentials, drops the hotspot connection, and joins your actual home network. When the app shows a success confirmation, you are done
After a few seconds, your printer model should appear on the screen. Tap on your printer model to select the printer. The app will guide you through the next steps with on-screen prompts.
The app will now display a list of available WiFi networks that your printer can detect. Scroll through the list and tap on your home WiFi network name. Make sure you select the correct network, especially if you see multiple networks with similar names.
Next, the app will ask you to enter your WiFi network password. This is the same canon printer network password you use to connect your phone or laptop to your home WiFi. Type the password carefully because passwords are case-sensitive. A single uppercase letter in the wrong place will cause the connection to fail.
Once you enter the password correctly, tap Apply or Connect in the app. The Canon PRINT app will now push your WiFi credentials from your phone to the printer over that temporary Canon_ij_ hotspot connection. The printer receives your network name and canon printer wifi password, saves the information, and then disconnects from the temporary hotspot to join your actual home network.
The app will display a confirmation message when the connection succeeds. Your printer is now connected to the same WiFi network your phone uses.
How to Print from Phone to Canon Printer After Setup
Once your Canon printer is connected to your WiFi network, you can print from your phone to Canon printer anytime using the Canon PRINT app.
First, make sure your phone is connected to the same WiFi network you just configured on the printer. The app and the printer communicate over your home network, so both devices need to be on the same network for printing to work.
Open the Canon PRINT app and look for options like Document List or Photo on the main screen. Tap on the type of content you want to print. You can print photos from your phone’s camera roll, documents from cloud storage, or files saved on your device.
Select the file you want to print and tap Next. The app will show you a preview of how your document or photo will look when printed. Tap on More Settings or Print Settings to adjust options like paper size, the number of copies, or print quality.
When everything looks good, tap the Print button. Your phone sends the print job wirelessly to your Canon printer, and the printer starts printing within seconds.
Method 3: Manual WiFi Setup (Standard Connection for All Printers)
No WPS button and no interest in the app? This is the method for you. The manual wireless LAN setup canon provides through the printer’s own menu works on every model — touchscreen or basic LCD with physical buttons.
Fair warning: this takes longer than the other methods because you enter your WiFi password character by character using the printer’s number pad. I’ll walk you through the T9 text entry system in detail so you don’t get stuck mid-password.
I will be honest with you. This method takes the longest because you have to enter your WiFi password using the printer’s number pad, which can feel tedious. But once you understand how the text entry system works, the process becomes much easier.
Navigate to WiFi Setup Menu on Your Canon Printer
Press the Setup button on your Canon printer — usually marked with a wrench/screwdriver icon or a gear symbol. On the screen, use the Right arrow key to scroll to Device Settings, then press OK. Inside Device Settings, scroll to LAN Settings → OK, then Wireless LAN Setup → OK.
Your printer will then present connection options. Look for Manual Connect, Standard Setup, or Select Access Point depending on your model. Highlight it and press OK. The printer begins scanning for WiFi networks — this takes 10 to 20 seconds
Press the Setup button once. Your printer screen will display a menu with several options. Use the Right arrow key on the printer to scroll through the menu options until you see Device Settings. Press the OK button to enter Device Settings.
Once inside Device Settings, use the arrow key again to scroll until you find LAN Settings. Press OK to select LAN Settings. Now scroll to Wireless LAN Setup and press OK once more.
Your printer will present you with several wireless LAN setup options. Look for an option labeled Manual Connect, Standard Setup, or Select Access Point depending on your Canon model. Use the arrow keys to highlight that option and press OK.
The printer will now start scanning for nearby WiFi networks. You will see a message on the screen that says Searching or Scanning. This process usually takes 10 to 20 seconds as the printer detects all available wireless networks within range.
Select Your WiFi Network from the List
When the scan finishes, the printer displays all detected networks sorted by signal strength. Use the Right arrow to scroll through them and find your network name — this is your canon printer SSID, the same name that shows up when you connect your phone or laptop. Press OK to select it, then OK again to confirm.
Use the Right arrow button to scroll down through the list of available networks. You are looking for your SSID, which is the name of your home or office WiFi network. The SSID is the same network name you see when you connect your phone or laptop to WiFi.
When you find your network name on the screen, press the OK button to select the network. The printer will ask you to confirm your selection. Press OK a second time to confirm that this is the correct network.
How to Enter WiFi Password Using Printer Number Pad (T9 Method)
Entering your password on a Canon printer number pad is the slowest part of this process. The printer uses T9 input — the same text entry method old flip phones used.
First, check the mode indicator in the top corner of your printer screen. It shows either 1 (numbers), A (uppercase), or a (lowercase). Press the asterisk or A-C button to cycle between modes. Get the mode right before each character.
To type a letter, press the corresponding number key multiple times. The 2 key cycles through A, B, C. The 3 key gives you D, E, F. The 4 key covers G, H, I — and so on across all number keys.
If two consecutive letters share the same key — like typing ‘BB’ — press the Right arrow between them. Without that press, the printer thinks you’re still selecting from that same key.
Use the Back button to delete mistakes. For special characters, press the # key to open a symbol list, then use the arrow keys to select what you need. When the full password is on screen and every character looks correct, press OK Each number key on the printer corresponds to multiple letters.
Before you start typing, look at the top corner of your printer screen. You will see a small icon or letter that indicates the current input mode.
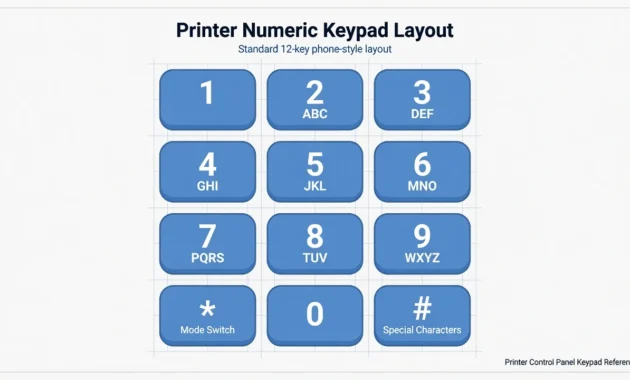
The icon shows either a 1, an uppercase A, or a lowercase a. This tells you whether the keypad is currently set to enter numbers, uppercase letters, or lowercase letters.
To switch between these modes, press the button marked with an asterisk symbol or labeled A-C on your printer. Each time you press this button, the mode cycles to the next option. Press once and the mode switches from numbers to uppercase letters.
Press again and the mode switches to lowercase letters. Press a third time and the mode returns to numbers.
Here is how to type letters using the number keys. If your canon printer network password contains the letter B, you need to press the number 2 key twice because the 2 key represents A, b and C. Press the 2 key once for A, twice for B, or three times for C. Similarly, the 3 key gives you D, E, or F. The 4 key gives you G, H, or I. This pattern continues across all the number keys.
If your password has two letters in a row that share the same number key, you must press the Right arrow button between them to move the cursor forward. For example, if your password is “HELLO,” you would type H by pressing 4 twice, then press the Right arrow, then type E by pressing 3 twice. Without pressing the Right arrow between the H and the E, the printer thinks you are still selecting letters from the 4 key.
If you make a mistake while typing, press the Back button or Return button to delete the last character you entered. You can keep pressing Back to delete multiple characters if needed.
If your password contains special characters like an exclamation point, underscore, or at symbol, press the Pound key marked with the # symbol. This brings up a list of special characters. Use the arrow keys to highlight the character you need and press OK to insert the character.
Once you finish typing your entire password, double check the screen to make sure every character is correct. Passwords are case sensitive, so an uppercase P is different from a lowercase p. When you are certain the password is entered correctly, press the OK button.
The printer will process the information and attempt to connect to your WiFi network using the credentials you just entered. After a few seconds, the screen will display the word Connected if the password was correct and the connection succeeded.
Your Canon printer now saves these network settings to its internal flash memory, which means the printer will automatically reconnect to your WiFi network every time you turn the printer on in the future.
Pro Tip: Speed Up Slow Network Scanning
If the network scanning process takes longer than 15 seconds and you are staring at a screen that says Searching with no progress, I have a shortcut that saves time.
Press the red Stop button on your printer keypad to cancel the search. Wait about 2 seconds, then press the OK button again to restart the network scan. This refresh trick forces the printer to scan again from the beginning, and I have found that the second scan almost always completes faster than waiting for the original slow scan to finish.
Method 4: Connect Using USB Cable and Canon Network Setting Tool (No WPS, No Touchscreen)
If your router does not have a WPS button and your Canon printer does not have a touchscreen or even a basic LCD display, you can still connect your Canon printer to laptop wifi using a USB cable and official Canon software called the Network Setting Tool. This method works perfectly for older Canon LaserJet models like the LBP 6030w or LBP 6040 that have minimal physical controls.
The wireless setup utility canon provides acts as a bridge. You temporarily connect your printer to your computer with a USB cable, use the software to configure the WiFi settings, and then disconnect the cable once the printer joins your wireless network.
Download Canon Printer Drivers and Network Setting Tool
Go to Canon’s official support website and enter your exact printer model in the search box. Find the Drivers & Downloads section for your model. Look for the full driver package — this is your complete canon printer setup guide and it includes the Network Setting Tool you need. Download it, accept the license agreement, and once it finishes, right-click the ZIP file and extract the contents
When you find your printer model page, look for the driver download section. You will see a full canon printer setup guide package available for download. Click the download button and accept the software license agreement when prompted. The file will start downloading to your computer.
Once the download finishes, locate the downloaded file in your Downloads folder. The file will be compressed, usually as a ZIP file. Right click on the downloaded file and select Extract All or Unzip to decompress the contents into a new folder.
Run the Network Setting Tool (Not the Main Installer)
Open the unzipped folder and look carefully at the contents. You will see several subfolders and files. Most people make the mistake of running the main printer driver installer immediately. Do not do that yet.
Instead, find and open the subfolder labeled Network Setting Tool or something similar. Inside this subfolder, you will see a setup application file. Double click on this setup file to launch the wireless setup utility canon provides.
The Network Setting Tool wizard will open. On the first screen, select the option that says Wireless LAN Connection and click Next. The next screen asks if you want to configure network settings. Select Yes, I want to configure network settings and click Next.
The wizard will present several setup methods. Choose Easy Setup and click Next. On the following screen, the software asks about your router. Select the option that reads My wireless LAN access point does not have a WPS button or I cannot find the button. Click Next to continue.
Connect USB Cable and Push WiFi Credentials to Printer
The software will now prompt you to connect a USB cable between your printer and your computer. Take a standard USB printer cable and plug one end into the USB port on your Canon printer and the other end into an available USB port on your computer. Once both ends are securely connected, click Next in the software.
The wireless setup utility canon created will now use the USB connection to communicate directly with your printer. The software searches for all available WiFi networks that your printer can detect. After a few seconds, a list of networks appears on your computer screen.
Look through the list and click on your home or office WiFi network name to highlight your network. Click Next. The software has now pushed your WiFi network information to your Canon printer over the USB cable connection. The printer receives and saves these settings internally.
Disconnect USB and Complete Setup
When configuration finishes, the software tells you to unplug the USB cable. Do that — printer end first, then the computer end. The final screen will say something along the lines of network configuration complete.
Click Exit to close the tool, then go back to the main driver folder and run the standard installer. That completes the full setup and lets your computer send wireless print jobs to the printer
The final screen will display a message that says configuration of the network settings for the printer has ended. Click Exit to close the Network Setting Tool.
Now return to the main downloaded folder and run the standard printer driver installer to complete the full setup. Your computer can now send wireless print jobs to your Canon printer because the printer is connected to the same WiFi network.
How to Check If Your Canon Printer Is Connected to WiFi
Before you walk away, verify the connection actually worked. I have learned this the hard way — assuming a connection succeeded, walking away, and discovering three hours later the printer never joined the network. Use at least two of the verification methods below to be sure
There are several ways to check canon printer wifi connection status, and I recommend using at least two of these methods to be completely sure.
Print a Network Configuration Page (LaserJet and Inkjet Models)
Print a network configuration page directly from the printer — this is the single most reliable verification method I use.
On most Canon imageCLASS laser models (LBP 6040, LBP 6030w and similar), press and hold the lower control panel button for 3 to 5 seconds. The printer outputs a page with all its network details.
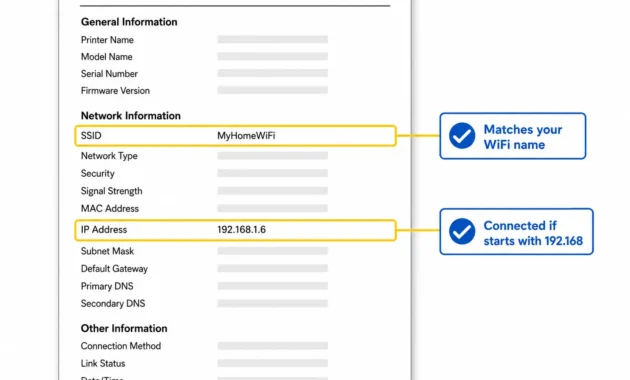
Look for two things on that page. First, the SSID — your printer’s connected network name, which should match your home or office WiFi. Second, the IP address. If it starts with 192.168, the printer has a live network connection. If you see 0.0.0.0 or nothing at all, the connection failed and you need to repeat setup
On most Canon LaserJet models like the LBP 6040 or LBP 6030w, locate the lower button on the printer control panel. Press and hold this button for about 3 to 5 seconds. You will feel the printer start to process, and within a few seconds, a printed page will come out.
This network configuration page displays several important pieces of information. Look for the SSID listed on the page. The SSID is your WiFi network name. If the canon printer SSID shown on this printed page matches the name of your home or office network, your printer successfully connected to the correct network.
The page also shows the IP address assigned to your printer by your router. The IP address will look something like 192.168.1.6 or 192.168.0.15. If you see an IP address that starts with 192.168, your printer has an active connection to your WiFi network. If instead you see 0.0.0.0 or no IP address at all, the connection failed.
On Canon PIXMA touchscreen models, you can usually print this configuration page by navigating to Setup, then Network Settings, and selecting Print Network Configuration or similar wording.
Check WiFi Indicator on Touchscreen Models
If your Canon printer has a touchscreen display or even a basic LCD screen, checking the WiFi status is as simple as looking at the screen.
Look for a WiFi icon on the printer display. This icon usually appears in the top corner of the screen and looks like the standard WiFi signal symbol with curved lines radiating outward. If the WiFi icon is solid and displays signal strength bars, your Canon printer is connected to your network. The number of bars indicates how strong the wireless signal is between your printer and your router.
If the WiFi icon is blinking or flashing, your printer is still attempting to connect or is searching for the network. This means the connection process is not complete yet. Wait a minute or two and check again.
If you see no WiFi icon at all, or if the icon has an X symbol over it, the connection failed. You will need to go back and repeat one of the connection methods from earlier sections.
Test Print Wirelessly from Your Device
Send an actual print job. That is the only test that matters.
On Windows: Settings → Devices → Printers & Scanners, find your Canon printer, click Manage, then Print a Test Page.
On Mac: System Preferences → Printers & Scanners, select your Canon printer, click Print Test Page.
On iPhone or iPad: open any photo, tap Share → Print, and look for your Canon printer in the AirPrint device list.
On Android: open the Canon PRINT app, select a photo or document, and tap Print.
If any of these complete successfully, your canon printer wifi connection is working. The printer stores those network credentials permanently, so it reconnects automatically every time you turn it on
On a Windows computer, go to Settings, then click on Devices, and select Printers & Scanners. Look through the list of available printers and find your Canon printer model. Click on your printer name, then click Manage, and select Print a Test Page. If the test page prints successfully, your computer and your Canon printer are both connected to the same WiFi network and communicating properly.
On a Mac, go to System Preferences, click Printers & Scanners, select your Canon printer from the list, and click Print Test Page or open any document and try to print from phone to canon printer wirelessly.
On a mobile device, the easiest way to test your connection is to open a photo or document and try printing. On an iPhone or iPad, open any photo, tap the Share icon, and select Print. Look for your Canon printer in the list of available AirPrint devices. If you see your printer listed, tap it and print. On an Android phone, open the Canon PRINT app, select a photo or document, and tap Print.
If the wireless print job completes successfully from any of these devices, you can be confident that your Canon printer WiFi setup is complete and working correctly. Your printer will now automatically reconnect to your WiFi network every time you turn the printer on because the network settings are saved in the printer’s internal memory.
Model-Specific Quick Setup Guides
Canon printer menus and button layouts vary enough between models that a general guide only gets you partway. Here are specific steps for the most popular models find yours and skip straight to what applies
If your Canon printer model is not listed here, the general methods I covered earlier will still work. These quick guides simply save you time by pointing out the specific buttons and quirks for these particular models.
Canon TS3522 WiFi Setup (PIXMA Touchscreen Model)
The Canon TS3522 is a compact PIXMA inkjet with a small color touchscreen. The canon ts3522 wifi setup benefits from that touchscreen — you tap through menus and enter your password on a virtual keyboard instead of using a number pad.
Press the Setup button (wrench/gear icon), then tap Wireless LAN Setup on the touchscreen. If your router has WPS, choose WPS Push Button Method, tap OK, then press your router’s WPS button within 2 minutes.
If not, choose Standard Setup, let the printer scan for networks, tap yours from the list, and use the on-screen keyboard to enter your password. That keyboard works like a smartphone keyboard — tap letters directly
Canon MG3620 Wireless Connection (PIXMA Button-Only Model)
The Canon MF643Cdw is a color laser multifunction built for business, and it has a large touchscreen that makes the canon wireless connection setup straightforward — once you get past one setting that catches almost everyone.
Tap Menu → Preferences → Network. Before anything else, tap Select Wired or Wireless LAN and switch it to Wireless LAN. Many business Canon models ship with wired LAN active by default. Also check that Direct Connection is toggled Off — leaving it on will interfere with your wireless setup.
Once those two settings are confirmed, tap Wireless LAN Settings → SSID Settings → Select Access Point. The printer scans for networks, you tap yours, enter the password using the on-screen keyboard, and tap Apply → Yes
For WPS connection, go to your router and press the WPS button within 2 minutes while the printer power light is still flashing. The printer and router will pair automatically. The WiFi indicator light on the printer will become solid when the connection succeeds.
For manual connection without WPS, you need to use the button navigation method I described in detail in Method 3 earlier. You will navigate through the setup menu using arrow buttons and enter your WiFi password using the T9 number pad method. Because the Canon mg3620 does not have a touchscreen, password entry takes longer and requires careful attention to the mode indicator on the small display screen.
Canon LBP6030w LaserJet (No Screen Model)
The Canon LBP6030w is a compact monochrome laser printer with no display screen at all. This model has very limited physical controls, so your connection options are restricted.
The easiest way to connect the LBP6030w is using WPS. Press and hold the WiFi button on the printer for about 5 to 10 seconds, then press the WPS button on your router. The blue WiFi light on the printer will blink and then become solid when the connection completes.
If your router does not support WPS, you must use the USB cable and Canon Network Setting Tool method I explained in Method 4. The LBP6030w has no way to manually enter a password because there is no screen or keypad. The software method is your only alternative when WPS is unavailable.
After connecting, you can verify the connection by pressing and holding the lower button on the printer for a few seconds. The printer will output a network configuration page showing the WiFi network name and IP address.
Canon MF643Cdw and Business Models (Color Laser Multifunction)
The Canon MF643Cdw is a color laser multifunction printer designed for business use. This model has a large color touchscreen that makes the canon wireless connection setup much easier than on smaller printers.
Start by tapping the Menu button on the touchscreen. Navigate to Preferences and select Network from the options.
Here is an important step that causes problems if you skip it. Tap on Select Wired or Wireless LAN and make sure the setting is changed to Wireless LAN. Many business Canon models ship with the wired LAN setting active by default.
Also check that the Direct Connection option is toggled to Off. Direct Connection is a different feature that lets devices connect directly to the printer without a router, but having this feature on can interfere with regular wireless LAN setup.
Once you confirm Wireless LAN is selected and Direct Connection is off, tap on Wireless LAN Settings, then choose SSID Settings. Select the option labeled Select Access Point. The printer will scan for nearby WiFi networks and display a list.
Tap on your WiFi network name from the list. The touchscreen will display a keyboard for you to enter your network password. Type your password using the on-screen keyboard, then tap Apply. A confirmation prompt will appear asking if you want to apply these connection settings. Tap Yes.
The printer will connect to your router and display a success message on the screen when the connection completes.
Canon imageRUNNER and imageCLASS (Enterprise Printers)
Canon imageRUNNER and imageCLASS enterprise models — the larger office copiers and multifunction devices — require an administrator login before you can touch network settings.
Swipe left on the main menu and tap Menu → Preferences → Network. The printer prompts for a System Manager ID and password. If your IT department has not changed the defaults, Canon’s factory default for most enterprise models is ID: 7654321, password: 7654321. Check your specific model’s documentation to confirm, since defaults vary by device and some units ship with blank passwords.
After logging in, tap Wireless Settings → OK → SSID Settings → Access Point. The printer scans for networks. Tap your office WiFi name, enter the password, tap Apply → Yes
The printer will prompt you for a System Manager login before allowing you to change network settings. If your IT department has not changed the default administrator password, enter the factory default credentials. The default System Manager ID is 7654321 and the default password is also 7654321. This is a descending number sequence that Canon uses on most enterprise models.
After logging in, select Wireless Settings and tap OK. Choose SSID Settings and then tap Access Point. The printer will scan for available wireless networks in range.
Scroll through the discovered networks, tap on your office WiFi network name, and tap Next. Enter your network security password using the touchscreen keyboard. Once the password is entered, tap Apply.
A final confirmation screen will ask if you want to apply the wireless connection settings. Tap Yes. The printer will establish the connection and display a success notification when the setup completes.
How to Reconnect Canon Printer to WiFi (New Router or Network)
“You replaced your router, switched providers, changed your WiFi password, or moved the printer to a new location. Now it won’t connect, even though everything worked perfectly before. The printer isn’t broken — it’s still trying to connect to the old network that no longer exists
This is one of the most common frustrations people face with wireless printers. Your Canon printer is not broken. The printer simply remembers your old network settings and does not know how to reconnect canon printer to wifi on a new network automatically.
Why Your Canon Printer Won’t Auto-Connect to New WiFi
When you first connected the printer to WiFi, it saved your network name and password to internal flash memory. Every startup, it searches for that exact saved network. It has no way of detecting that you swapped routers or changed passwords — it just keeps looking for something that isn’t there anymore. That’s why the connection appears stuck no matter what you do on the router side
The problem is that your Canon printer has no way of knowing that you changed routers or networks. The printer keeps searching for the old WiFi network that no longer exists or is no longer in range. Your printer will not automatically detect the new router and will not ask you for new credentials.
This is why your Canon wireless connection setup stays stuck even after you set up your new router. The printer is still trying to connect to a network that is not there anymore.
Reconnect Using Any Method (No Reset Needed)
You don’t need to reset canon printer network settings or do any kind of factory reset. Just repeat whichever connection method suits you best — WPS if your new router supports it, the Canon PRINT app if you prefer your phone, or the manual menu method if neither of those works.
When you complete setup with the new network name and password, those credentials automatically overwrite whatever was saved before. Old settings are gone. The printer connects to the new network and remembers it on every startup from that point on
I recommend using WPS if your new router supports WPS because you can reconnect your Canon printer in under a minute without typing any passwords. Just press and hold the WiFi button on your printer and the WPS button on your new router at the same time, and the canon wireless connection setup completes automatically.
Update Printer Connection on All Your Devices
After your Canon printer successfully reconnects to your new WiFi network, you may notice that your computer or phone still cannot find the printer when you try to print. This happens because your devices are still looking for the printer on the old network configuration.
You need to update the printer connection on each device you use for printing.
On a Windows computer, go to Settings, then Devices, then Printers & Scanners. Find your Canon printer in the list, click on the printer name, and select Remove Device. Once the old printer entry is removed, click Add a Printer or Scanner at the top of the screen. Windows will search your network and find your Canon printer on the new WiFi network. Click on the printer name when it appears and add the printer.
On a Mac, open System Preferences and click Printers & Scanners. Select your Canon printer from the list on the left and click the minus button to remove the printer. Then click the plus button to add the printer again. Your Mac will detect the Canon printer on your new network and connect canon printer to laptop wifi properly.
On your smartphone, open the Canon PRINT app. Go to the printer settings within the app and remove or forget the old printer registration. Then use the Register Printer option to search for and add your Canon printer again on the new network. The app will find your printer as long as your phone is connected to the same new WiFi network the printer is using.
Canon Printer Not Connecting to WiFi—Common Fixes
You followed all the steps correctly, but your canon printer not connecting to wifi still shows as a problem. The setup process seems to complete, but the printer never actually joins your network, or the connection keeps failing halfway through.
I have seen this happen many times, and the good news is that most Canon printer WiFi connection problems have simple fixes. Let me walk you through the most common causes and how to solve each one using these canon printer wifi troubleshooting steps.
Your Router Is Set to 5GHz Only (Most Common Issue)
This is the number one reason Canon printers fail to connect to WiFi, and many people waste hours troubleshooting everything else before discovering this simple problem.
Most Canon home and office printers, including popular models like the PIXMA, imageCLASS, and many LaserJet series, only support canon printer 2.4GHz wifi connections. These printers cannot detect or connect to 5GHz WiFi networks at all. If your router is set to broadcast only on the 5GHz band, or if you are trying to connect your printer to a network name that uses the 5GHz frequency, your Canon printer will never see that network during the scan.
Many modern routers broadcast two separate networks. One network uses the 2.4GHz band and another uses the 5GHz band. Sometimes these networks have the same name with a suffix like “NetworkName” for 2.4GHz and “NetworkName_5G” for the 5GHz version. Other routers combine both bands under one network name and automatically switch devices between bands.
To fix this issue, log into your router settings for canon printer compatibility. Open a web browser on your computer, type your router’s IP address into the address bar (usually 192.168.1.1 or 192.168.0.1), and enter your router admin username and password. Look for the wireless settings section. Make sure the 2.4GHz band is enabled and broadcasting.
If your router combines both bands under one name, check if there is a setting called Band Steering or Smart Connect. Try temporarily disabling this feature so the 2.4GHz and 5GHz bands broadcast as separate networks. Then connect your Canon printer specifically to the 2.4GHz network name.
WiFi Password Is Case-Sensitive
If your printer keeps rejecting your WiFi password even though you are certain you typed it correctly, the problem is almost always a case-sensitivity mistake.
WiFi passwords are case-sensitive, which means that “Password123” is completely different from “password123” or “PASSWORD123”. When you enter your password using the printer’s number pad with T9 text entry, you must pay very close attention to the mode indicator on the printer screen.
Before you type each letter, check whether the screen shows an uppercase A, a lowercase a, or the number 1 icon. Press the asterisk button or the A-C button to switch between these modes before typing each character. One wrong letter in the wrong case will cause the entire connection to fail.
I recommend writing down your WiFi password exactly as it appears, marking which letters are uppercase and which are lowercase, before you start typing the canon printer wifi password on the printer. This small step saves a lot of frustration.
Try Changing Your Router’s WiFi Channel
This fix comes directly from real user experiences shared in online communities, and it has solved WiFi connection problems for hundreds of people who tried everything else without success.
WiFi routers broadcast on specific channels within the 2.4GHz frequency range. If multiple routers in your neighborhood are using the same channel, the interference can prevent your Canon printer from successfully connecting even when everything else is configured correctly.
To change your router’s WiFi channel, log into your router settings for canon printer optimization. Navigate to the wireless settings or WiFi settings section. Look for an option labeled Channel, WiFi Channel, or 2.4GHz Channel.
Most routers default to Auto channel selection. Change this setting to a manually selected channel. I recommend trying channel 1, channel 6, or channel 11 because these three channels do not overlap with each other and tend to have the least interference in most environments.
Save the router settings and restart your router. Wait for the router to fully reboot, then try connecting your Canon printer to WiFi again using any of the methods from earlier in this guide. Many people report that this single change immediately fixed connection problems that persisted for days.
Printer Is Too Far from Router or Blocked by Walls
WiFi signals weaken dramatically when they pass through walls, floors, or large metal objects like filing cabinets or refrigerators. If your Canon printer is located far from your router or separated by multiple walls, the signal strength might be too weak for a stable connection during setup.
For the initial wireless setup, I recommend moving your printer to the same room as your router temporarily. Place the printer within direct line of sight of the router if possible, with no walls or obstacles between them.
Once the printer successfully connects to your WiFi network and saves the network credentials, you can move the printer back to its permanent location. The printer may still work at that distance, but if you notice frequent disconnections or a canon printer offline fix becomes necessary repeatedly, the distance or interference is likely the problem. In that case, you may need a WiFi range extender or a better router placement.
Direct Connection Mode Is Enabled (Business Models)
If you own a Canon business printer like the MF643Cdw or similar multifunction models, there is a setting that often interferes with normal wireless LAN setup.
Canon business printers have a feature called Direct Connection that allows devices to connect directly to the printer without using a router. This feature creates a separate WiFi network hosted by the printer itself. When Direct Connection mode is enabled, the printer may refuse to join your regular home or office network.
On your printer touchscreen, tap Menu, then Preferences, then Network. Look for an option labeled Select Wired or Wireless LAN. Make sure this setting is changed to Wireless LAN, not Wired LAN.
Also check for a setting called Direct Connection. If you see this option, make sure the Direct Connection toggle is set to Off. Once both settings are correct, go back and retry the wireless LAN setup process from the beginning.
Update Printer Firmware to Fix Connection Bugs
Outdated printer firmware can cause WiFi connection instability, random disconnections, or complete connection failures. Canon regularly releases firmware updates that fix known bugs and improve wireless connectivity.
Visit the official Canon support website and enter your exact printer model number in the search box. Navigate to the Drivers & Downloads section for your model. Look for a Firmware category. If a canon printer firmware update is available that is newer than your current version, download the firmware file.
Canon provides specific instructions for each printer model on how to install firmware updates. Some models let you update firmware directly from the printer menu by connecting a USB drive. Other models require you to run firmware update software on your computer while the printer is connected via USB cable.
After the firmware update completes, restart your printer and try the WiFi connection process again. Updated firmware often resolves mysterious connection issues that no other troubleshooting step could fix.
WPS Button Not Held Long Enough
If you are using the WPS method and the connection keeps failing, the most common mistake is not holding the WPS button on canon printer and router long enough.
WPS pairing mode requires you to press and hold both buttons simultaneously for a full 5 to 10 seconds. Simply tapping the buttons quickly will not activate the pairing process. You need to hold both buttons down at the same time and keep them pressed until you see the WiFi light on your printer start blinking rapidly.
If the WPS connection fails on your first attempt, do not give up. Turn your Canon printer off completely, wait about 10 seconds, then turn the printer back on. Wait for the printer to fully boot up, then try the WPS process again with proper button hold timing. The second attempt often succeeds even when the first one failed.
Understanding Your Canon Printer’s WiFi Light Indicators
One of the most helpful ways to know what your Canon printer is doing during WiFi setup is to watch the WiFi indicator light on the printer body. This small light tells you exactly what stage the connection process is in without needing to print test pages or check settings.
Most Canon printers have a blue WiFi light located near the power button or on the control panel. When you see this blue light blinking rapidly, your printer is actively searching for a WiFi network or is in pairing mode waiting to connect. The blinking means the connection process has started but is not finished yet. This is completely normal during setup. Do not turn off the printer or press any buttons while this light is blinking unless the setup instructions specifically tell you to.
When the blinking blue light becomes solid and stays steady without blinking, your Canon printer has successfully connected to your WiFi network. A solid blue WiFi light is the best confirmation that your wireless setup worked correctly. The printer is now online and ready to receive print jobs from devices on the same network.
If you see no WiFi light at all on your Canon printer, the wireless function is either turned off or the printer has never been configured for WiFi. Press the WiFi button once to activate the wireless feature, and the light should appear.
Some Canon printer models show a red WiFi light or a flashing amber light when there is a connection error. A red light typically means the printer tried to connect but failed, usually due to an incorrect password or a network that is out of range. Flashing amber on certain models indicates that the WPS pairing process timed out before the connection completed. If you see a red or amber light, you need to restart the WiFi setup process from the beginning.
Using WiFi Direct as a Backup Connection Method
If you cannot access your router settings, do not have a WiFi router at all, or just need to print something quickly without going through the full network setup, wifi direct canon printer mode offers a simple alternative.
WiFi Direct is a feature that lets your Canon printer create its own temporary WiFi network. Instead of trying to connect printer to home network through your router, your phone or laptop connects directly to the printer as if the printer itself were a mini router. This creates a direct peer to peer wireless connection between your device and the printer without needing any other equipment.
WiFi Direct is useful in several situations. If you are working in a location with no WiFi router, like a remote office or outdoor event, WiFi Direct lets you print wirelessly anyway. If your router is broken or you are waiting for internet service installation, you can still use your printer. If you need to print from a guest’s laptop without giving them your home network password, WiFi Direct keeps your main network private.
To enable WiFi Direct on Canon touchscreen models, go to the printer menu and tap on Settings or Preferences. Navigate to Network settings and look for an option labeled Direct Connection, WiFi Direct, or Access Point Mode. Toggle this setting to On. Your Canon printer will display the WiFi Direct network name and password on the screen. The network name usually starts with “DIRECT” followed by your printer model.
On your computer or mobile device, open your WiFi settings and look for the printer’s WiFi Direct network in the list of available networks. Select the network and enter the password shown on the printer screen. Once connected, you can print to the Canon printer using the normal print function in any application.
There are some important limitations to understand about WiFi Direct. Your device will not have internet access while connected to the printer’s WiFi Direct network because the printer is not connected to the internet. WiFi Direct is only for printing, not for browsing the web. On some Canon models, only one device can connect to WiFi Direct at a time. If a second device tries to connect, the first device gets disconnected. WiFi Direct also does not allow multiple devices on your home network to share the printer the way a normal router connection does.
For permanent everyday printing, I still recommend using one of the standard methods to connect your Canon printer to your home WiFi network through your router. WiFi Direct works best as a temporary backup solution when normal network connection is not possible.
Final Tips for a Stable Canon Printer WiFi Connection
Now that your Canon printer is successfully connected to WiFi, I want to share a few simple habits that will keep your wireless printing working smoothly for months and years ahead.
The most important long-term step is to check for canon printer firmware update releases every few months. Canon regularly releases firmware updates that improve WiFi stability and fix connectivity bugs. Visit the Canon support website, enter your printer model number, and download any available firmware updates. Updated firmware prevents many of the mysterious disconnection problems that develop over time.
Keep your printer within a reasonable distance from your WiFi router. While your Canon printer will automatically reconnect to your network when you turn it on, a weak WiFi signal can cause slow printing, print job failures, or random disconnections during large print jobs.
If you experience ongoing connection issues even after following this guide,
this troubleshooting guide for WiFi connectivity problems covers 40+ additional fixes that may help resolve stability issues.
Try to avoid restarting your router frequently unless necessary. Some Canon printer models do not immediately reconnect after a router reboot and may need manual reconnection using the methods from this canon printer setup guide.
If your printer keeps getting assigned different IP address numbers by your router and this causes connection problems on your computer, consider setting up a static IP address for your printer through your router settings. A fixed IP address ensures your devices can always find the printer at the same network location.
Keep the Canon PRINT app updated on your mobile devices if you use mobile printing. App updates often include improved printer communication and bug fixes.
For additional features and advanced settings specific to your printer model, Canon includes detailed documentation with your printer. Check the “Getting the most out of your printer” manuals that came with your device or are available on the Canon support website for model specific tips and project ideas.
Frequently Asked Questions
How to connect Canon printer to WiFi if my router doesn’t have a WPS button?
Use the Canon PRINT app method by downloading the app and putting your printer in Easy Connect mode. Alternatively, use manual setup through your printer’s menu: Setup → Wireless LAN Setup → Manual Connect, then enter your password using the number pad.
Why does my Canon printer keep asking for the WiFi password even though I entered it correctly?
WiFi passwords are case-sensitive, so “Password123” is different from “password123.” Check the mode indicator on your printer screen and press the asterisk button to switch between uppercase, lowercase, and numbers before typing each character.
How to connect Canon printer to WiFi on a new router after I changed internet providers?
Repeat any of the WiFi setup methods using your new network name and password. The new settings will automatically overwrite the old network information stored in your printer’s memory.
Can I connect multiple devices to my Canon printer once it’s on WiFi?
Yes, any device on the same WiFi network can print to your Canon printer. Each device needs to add the printer through their individual settings, but multiple computers and phones can share one printer wirelessly.
My Canon printer connects to WiFi but shows as offline on my computer. How do I fix this?
Remove the printer from your computer’s printer list and add it again. Go to Settings → Devices → Printers & Scanners, delete the old printer entry, then click Add a Printer to find it on the new network.