
Why You Can’t Enter BIOS in Windows 11 (The Fast Startup Problem)
I’ve helped dozens of frustrated users figure out why their F2 and Delete keys suddenly stopped working when they upgraded to Windows 11. The answer lies in a Windows 11 feature called Fast Startup that most people don’t even know exists.
A corrupted Windows Recovery Environment prevents access to Advanced Startup options, including the UEFI Firmware Settings choice. Microsoft’s comprehensive guide to Windows Recovery Environment explains how this system component works and why it sometimes becomes disabled. You can diagnose and repair the windows recovery environment using built in command line tools that restore this critical functionality
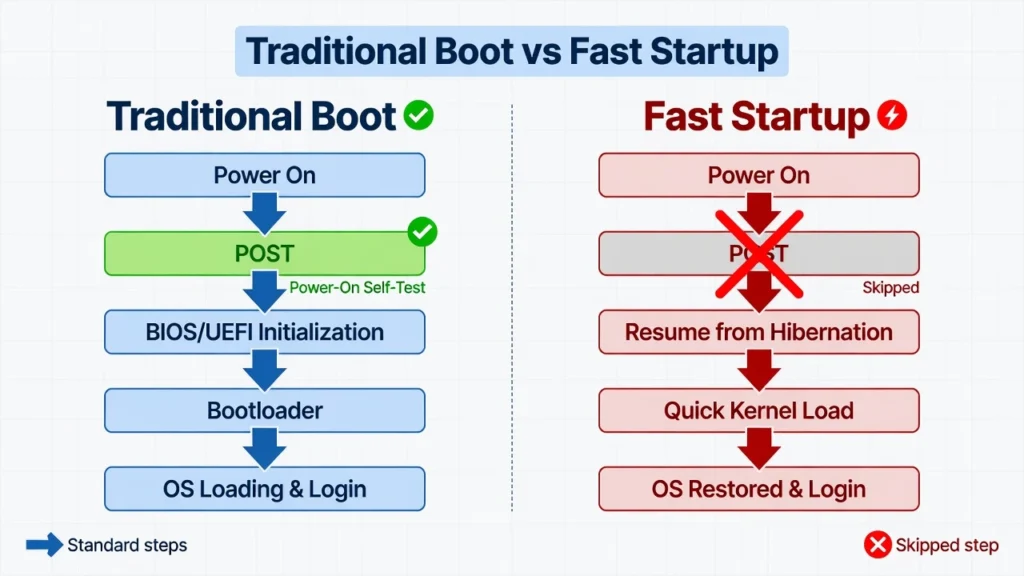
Here’s the problem: your BIOS keys only work during something called the POST screen. POST stands for Power-On Self-Test, and it’s that brief moment when your computer checks its hardware before loading Windows. During a traditional boot, you have several seconds to press F2, Delete, or other BIOS keys while this POST screen displays.
But Fast Startup in Windows 11 skips right over the POST screen entirely. Your computer jumps straight from the hibernation file back into Windows, giving you zero opportunity to interrupt the process with a key press. This explains why you can hammer the Delete key all you want and still boot straight into Windows.
I’ve seen this frustrate users who’ve been accessing BIOS the same way for years. They assume their keyboard is broken or their motherboard is malfunctioning, when really it’s just Windows 11 being too efficient for its own good.
The good news is that once you understand this Fast Startup behavior, there are several reliable ways to access your BIOS in Windows 11. Some methods work around Fast Startup entirely, while others involve temporarily disabling it to restore the traditional boot sequence you’re familiar with.
What Is BIOS and Why Do You Need Access?
BIOS is your computer’s built-in control center that manages all the basic hardware before Windows even starts loading. Think of the bios setup utility as your computer’s backstage area where all the important decisions about hardware configuration get made
Most modern computers actually use something called UEFI instead of the older BIOS system. UEFI firmware settings offer the same core functions as traditional BIOS but with a more user-friendly interface and better security features
Your motherboard firmware controls everything from which device your computer boots from to how fast your memory runs. I’ve found that most people need BIOS access for just a few common tasks, and understanding these can help you decide if you actually need to get into those settings
I’d have to say that the most frequent BIOS access I see is changing the boot order. Perhaps you wish to install another operating system from a thumb drive or execute a diagnostic tool. The boot sequence is the order in which your computer will begin to start up.
This is also a common use for it is to unlock virtualization capabilities. Very often, you will have to enable virtualization support in the BIOS to run virtual machines and/or Windows Subsystem for Linux. These features are disabled by many computers to guarantee their security.
Hardware enthusiasts access BIOS to overclock their processors or memory, adjust fan curves for better cooling, or enable XMP profiles for faster RAM speeds. If you’re planning to overclock or modify hardware settings,
I recommend learning how to check CPU temp in Windows 11 first to monitor your system’s thermal performance. Some users also need to disable Secure Boot when installing alternative operating systems or older Windows versions.
Method 1: Enter BIOS via Windows 11 Settings (Most Reliable)
The Windows Settings method is hands down the most reliable way to access BIOS on Windows 11 because it completely bypasses the Fast Startup issue. I recommend this method as your first choice since it works on every Windows 11 computer regardless of manufacturer or keyboard setup
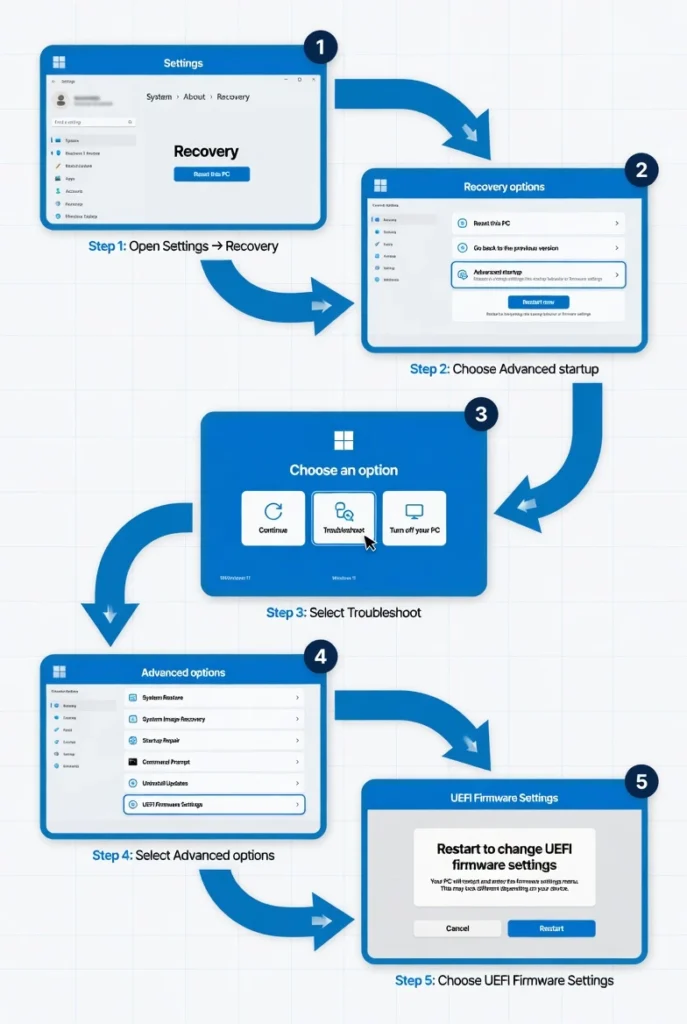
Here’s how to access the advanced startup options windows 11 through the Settings app. Start by clicking the Windows Start button, then select the Settings gear icon. You can also press Windows + I to open Settings directly.
In the Settings window, click on System from the left sidebar menu. This takes you to the main system configuration area where Windows stores most hardware and recovery settings
On the right, scroll down to Recovery section. Click on Recovery to expand the options related to Windows 11 Recovery.
Click on Advanced startup and then the blue Restart now button next to it. A restart dialog will appear in Windows saying “Restart Now?”. To confirm, click Restart now once again. Your computer will reboot, but not into Windows, instead you will see a blue screen that says “Choose an option”.
Click on Troubleshoot on the blue Choose an option screen. This will expand the advanced troubleshooting menu which includes a number of recovery tools and options. On the Troubleshoot menu, click on Advanced options.
There will be a number of options available such as System Restore, Command Prompt and other diagnostic utilities. Look for UEFI Firmware Settings in the Advanced options menu and click on it. This option will be available if your computer has modern UEFI firmware. It may not be available on older computers that have Legacy BIOS.
When asked to restart, press the Restart button. Your computer will restart again and you will immediately be taken to your BIOS or UEFI computer firmware setup. The whole process is completed in approximately 2 minutes.
This approach is consistent and doesn’t require keyboard timing to interrupt the boot process, as it is done with Windows’ own built-in recovery system.
Alternative: Shift + Restart from Start Menu
There is a shortcut on the keyboard which many find quicker than going through the settings to open the same advanced startup menu.
This change restarts the Windows 11 system when you need to access the BIOS quickly. Click Start and then click the Power icon to view the power options. Click Restart, and hold down the Shift key on your keyboard while you click.
Don’t let go of the Shift key until the screen turns blue. Pressing this keyboard combination bypasses the standard shutdown and bypasses into the blue screen with the option to choose what to do next. Then, proceed as follows: Troubleshoot -> Advanced options -> UEFI Firmware Settings -> Restart.
Alternative: Shift + Restart from Login Screen
If you’re stuck at the Windows login screen or locked out of your account, you can still access BIOS using this method. The login screen provides the same windows 11 boot options as the Start menu with a slight variation in location.
Look for the Power button in the bottom right corner of the login screen. Hold down the Shift key and click Restart while keeping the Shift key pressed until the blue recovery screen appears.
This approach works even when you can’t log into Windows, making it perfect for troubleshooting situations where you need BIOS access but can’t reach the desktop.
Method 2: Fix Fast Startup and Use Startup Keys
If you’d rather use the traditional way to enter bios on startup (F2 or Delete), then you can do so in windows 11 if you first disable the fast startup windows 11 feature.
This is useful for users who prefer to get back into the BIOS the way they’ve always done, for years. With Disabling Fast Startup, you will get back to the full boot process with the ability to press f2 to enter the set up and delete to enter the bios screen in the opening stages of booting.
After turning off Fast Startup, your computer will perform the entire POST process when it is starting up, providing you with the time to interrupt the process with your keyboard.
The important thing to note is that Fast Startup is not simply making the booting process faster it is making it more efficient. Fast Startup is a new way to shut down and start Windows that bypasses the part of the process that initializes hardware by reading BIOS keys.
Once you disable Fast Startup, your computer will boot a little slower but will operate the same as older versions of Windows. You will be greeted by the manufacturer’s logo screen, memory tests and most importantly,
the fleeting opportunity of pressing your BIOS key and seeing the result. I suggest this approach for those who are frequently needing access to the BIOS for hardware tweaking, boot device switching or troubleshooting.
If you have the traditional startup key method, you won’t have to browse the Windows menus every time. Note that you will also have a slower normal boot time if you disable Fast Startup.
Depending on your equipment, the computer will boot up in an additional 10-30 seconds. It’s a sacrifice most users are willing to make for the ability to use their pre-existing keyboard shortcuts to enter the BIOS.
How to Disable Fast Startup in Windows 11
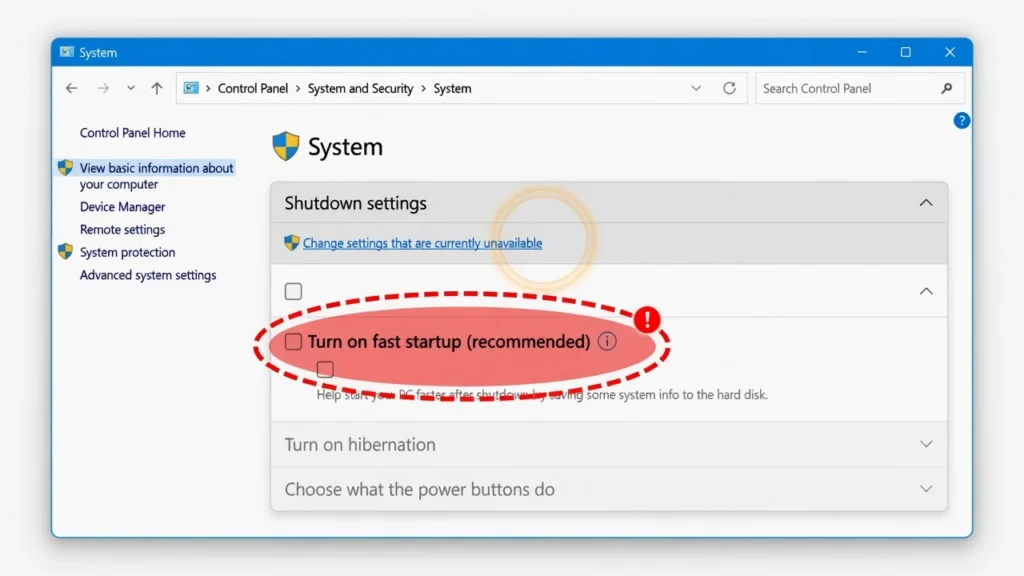
The Fast Startup option appears in the Power Options control panel, distinct from the new Settings app. To open the Power Options window, press Windows + R to bring up the Run box and type in “powercfg.cpl” then press Enter.
From the left sidebar menu, click on “Choose what the power buttons do. This will display the shutdown settings windows 11 and you can adjust the actions of power buttons and lid closure on the laptop.
A “Shutdown settings” area will appear, but the options may be disabled. At the top is the link which says “Change settings that are currently unavailable,” click that link.
This needs to be done with administrator rights and will enable shutdown options. Find the option of “Turn on fast startup (recommended)” and clear that option. To implement the new setting, click “Save changes” at the bottom. When you start up your computer, it will now do a full shut down and boot sequence.
Timing Your Key Presses After Power Cycle
After Fast Startup is turned off, the technology that prevents the boot-up procedure from taking too long is imperative to successful BIOS entry.
As soon as you see any reaction (such as a flashing light or a beep) from the computer after pressing the power button, press the startup button. The POST screen typically will display within 5 – 10 seconds of start-up.
I would suggest to press BIOS key multiple times, instead of holding the key down for a long time. This is a fast tapping method that is more applicable to various keyboard/motherboard combinations.
Don’t stop pressing until you either enter BIOS or see the Windows loading screen. The BIOS key windows on some computers are very short or it provides a few seconds.
Complete BIOS Key Guide by Manufacturer
The shutdown /r /fw command provides a direct way to access bios windows 11 through the command line without navigating through Settings menus. I find this method particularly useful for power users who prefer command-line solutions or need to script BIOS access for multiple computers.
The time and key combinations required will differ from manufacturer to manufacturer so finding out the computer’s brand is the first step to BIOS access. Many manufacturers put their logo at the startup and display a brief message, indicating what key to press, but this message can be there for only a few seconds.
Let’s take a detailed look at each major manufacturer, in both desktop and laptop formats:
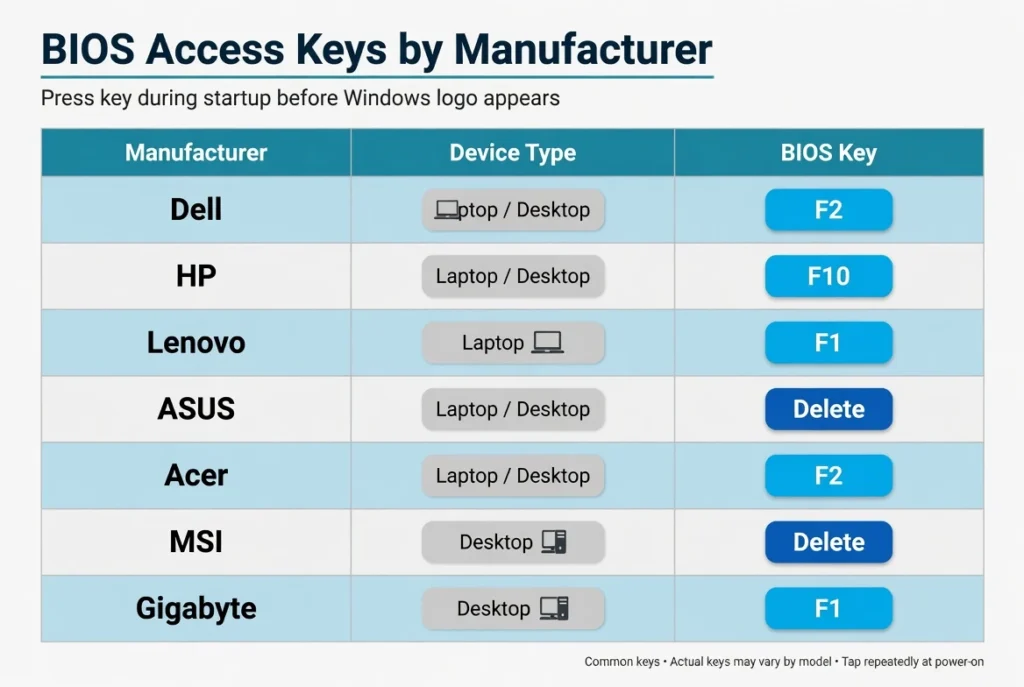
The bios key for dell laptop and desktop models is typically F2. Press F2 repeatedly as soon as you see the Dell logo appear on screen. Some older Dell models use F12 for the boot menu, which also provides BIOS access options. If you need help with other Dell laptop functions like taking screenshots, check out our guide on how to screenshot on Dell laptop for additional keyboard shortcuts
The bios key for the hp laptop systems and HP desktops is typically F10. HP has remained consistent with F10 in the majority of their product lines for the last couple of years. As soon as you see the HP logo, begin pressing F10. In the case of Lenovo Computers, there is a greater variety in the bios key used for the various models.
Typically, Lenovo ThinkPads have F1, and IdeaPad models have F2. The newer Lenovo computers may have a small button labeled Novo beside the power button – press this button rather than a key on the keyboard.
The default bios key on asus laptop and motherboard models is usually the Delete or F2 button. In custom built PCs, the Delete key is almost always used for ASUS motherboards, and in ASUS Laptops, F2 is typically the way to go.
The default BIOS key for MSI laptop and motherboard systems is Delete key. MSI also offers a special Click2BIOS software tool that allows you to restart your computer directly to BIOS mode from within Windows.
The default key to access BIOS on Acer laptops and desktops is F2. There are certain Acer models that require Alt + F10 during the start up to enable access to F2. Custom PCs: Gigabyte motherboards are usually located on the custom PCs and are used with the delete key.
Gigabyte’s also provide a Fast Boot option which can be switched into so that it lets you press keys quicker.
If these are the common keys and don’t work, I recommend looking at your computer manual or searching online for your specific computer model. Some manufacturers have changed keys between generations or have separate keys for special edition models.
Method 3: Command Prompt and PowerShell BIOS Access
There are different keys with which to enter BIOS depending on the brand of the specific computer, and if you know your specific brand, it will save you a ton of frustration. I’ve put together this Vendor Independent Guide from extensive testing of dozens of different computer models and motherboard brands.
The time and key combinations required will differ from manufacturer to manufacturer so finding out the computer’s brand is the first step to BIOS access. Many manufacturers put their logo at the startup and display a brief message, indicating what key to press, but this message can be there for only a few seconds.
Let’s take a detailed look at each major manufacturer, in both desktop and laptop formats: Dell Laptop and Desktop Models: The bios key for these models is usually F2. As soon as you see the Dell logo being displayed on the screen, press F2 repeatedly.
Some older Dell models use F12 for the boot menu, which also provides BIOS access options. The bios key for the hp laptop systems and HP desktops is typically F10. HP has remained consistent with F10 in the majority of their product lines for the last couple of years. As soon as you see the HP logo, begin pressing F10.
In the case of Lenovo Computers, there is a greater variety in the bios key used for the various models. Typically, Lenovo ThinkPads have F1, and IdeaPad models have F2. The newer Lenovo computers may have a small button labeled Novo beside the power button – press this button rather than a key on the keyboard.
The default bios key on asus laptop and motherboard models is usually the Delete or F2 button. In custom built PCs, the Delete key is almost always used for ASUS motherboards, and in ASUS Laptops, F2 is typically the way to go.
The default BIOS key for MSI laptop and motherboard systems is Delete key. MSI also offers a special Click2BIOS software tool that allows you to restart your computer directly to BIOS mode from within Windows. The default key to access BIOS on Acer laptops and desktops is F2. There are certain Acer models that require Alt + F10 during the start up to enable access to F2.
Custom PCs: Gigabyte motherboards are usually located on the custom PCs and are used with the delete key. Gigabyte’s also provide a Fast Boot option which can be switched into so that it lets you press keys quicker.
If these are the common keys and don’t work, I recommend looking at your computer manual or searching online for your specific computer model. Some manufacturers have changed keys between generations or have separate keys for special edition models.
Creating a Desktop Shortcut for Quick BIOS Access
You can create a permanent desktop shortcut that will restart into uefi settings with just a double-click. This saves time when you frequently need BIOS access for hardware tweaking or troubleshooting.
Right-click on an empty area of your desktop and select New, then Shortcut from the context menu. In the location box that appears, type the full command path: shutdown /r /fw /t 5
Click Next and give your shortcut a descriptive name like “Restart to BIOS” or “UEFI Access.” Click Finish to create the shortcut.
Right-click your new shortcut and select Properties. Click the Advanced button and check the box labeled “Run as administrator” since the shutdown command requires elevated privileges. Click OK twice to save these settings.
Now you can double-click this shortcut anytime to restart directly into BIOS. The 5-second timer gives you enough time to save any open work before the restart begins.
Fix Keyboard and Hardware Compatibility Issues
Hardware compatibility problems are often the hidden reason why traditional BIOS access methods fail, even when Fast Startup is disabled. I’ve discovered that modern peripheral devices and display hardware can create timing conflicts that prevent successful entry into the boot menu windows 11 provides.
The most frustrating part about hardware compatibility issues is that they’re completely invisible to most users. Your keyboard might work perfectly in Windows, but fail completely during the brief startup window when BIOS keys are detected. Similarly, your monitor might display Windows beautifully but miss the crucial first few seconds of the boot process.
I’ve seen this hardware configuration problem affect users across all computer brands and price ranges. Gaming keyboards with elaborate LED systems, wireless keyboards with USB dongles, compact keyboards missing dedicated function keys, and even high-end monitors with slow wake-up times can all interfere with BIOS access.
The key insight is understanding that your computer’s startup process happens in stages, and different hardware components become active at different times. During the initial boot phase when BIOS keys are detected, some peripheral devices haven’t fully initialized yet.
Modern computers often prioritize boot speed over compatibility with older input methods. This creates a narrow timing window where everything needs to work perfectly for BIOS access to succeed.
Understanding which specific hardware component is causing your BIOS access problems helps you choose the right solution. Sometimes the fix is as simple as switching to a wired keyboard, while other situations require adjusting monitor settings or using function key combinations you didn’t know existed.
Wireless Keyboard Problems and Solutions
Wireless keyboards frequently fail to register startup key presses because their USB receivers need extra time to establish communication during boot. The wireless connection handshake often takes longer than the brief window when BIOS keys are detected.
I recommend switching to a wired USB keyboard specifically for BIOS access attempts. Plug in a basic wired keyboard before restarting your computer and use that for pressing your startup key combinations.
Gaming keyboards with wireless dongles are particularly problematic because they often include additional software layers that delay initialization. Even expensive mechanical wireless keyboards can miss the startup key timing window.
If you must use a wireless keyboard, try pressing the startup key before powering on your computer to wake up the wireless receiver, then immediately restart while continuing to press the key.
60% Keyboard and Compact Layout Solutions
Compact keyboards without dedicated function keys require special key combinations to press f2 to enter setup or access other BIOS keys. Many 60% keyboards map function keys to number row keys using a function layer toggle.
The most common solution is pressing FN + Ctrl together to switch your keyboard into function mode, then using the mapped F2 key location. On most compact keyboards, F2 is mapped to the number 2 key when function mode is active.
Some compact keyboards require you to hold FN while pressing the mapped key location, while others use FN as a toggle switch. Check your keyboard manual or manufacturer website for the specific function key mapping.
Gaming keyboards often include software that lets you customize which keys act as function keys during boot. Setting up a dedicated BIOS access profile can solve timing issues with complex keyboard layouts.
I’ve found that mechanical keyboards with simple layouts work more reliably than keyboards with extensive RGB lighting or macro programming features during the startup process.
Monitor Display Timing Issues
Slow-waking monitors can miss the entire bios configuration screen phase if they take too long to turn on after your computer starts. Some monitors need 5 to 10 seconds to fully initialize their display panels.
Try connecting a faster secondary monitor or using a different display port if available. DVI and VGA connections often wake up faster than HDMI or DisplayPort on older monitors.
Gaming monitors with high refresh rates or HDR features sometimes have longer initialization sequences that can cause you to miss startup prompts entirely.
When Nothing Works: Advanced Troubleshooting Methods
When every standard method fails to access BIOS, you need advanced techniques that troubleshoot startup windows 11 at the hardware and system level. I’ve compiled these last-resort solutions from experienced users who’ve encountered the most stubborn BIOS access problems.
These advanced methods address situations where Windows itself is preventing BIOS access through corrupted recovery environments, conflicting hardware configurations, or system-level blocks that bypass normal troubleshooting approaches.
Before trying these solutions, I strongly recommend backing up any important data since some methods involve physical hardware manipulation or system-level changes that carry inherent risks.
The most common scenario requiring advanced troubleshooting is when Windows Recovery Environment becomes corrupted or disabled, leaving you unable to access the “UEFI Firmware Settings” option through normal Settings methods.
Another situation involves computers that seem to ignore all keyboard input during startup, regardless of timing, keyboard type, or Fast Startup settings. These cases often require forcing the computer into a state where BIOS becomes the only available option.
Manufacturer-specific utilities provide another avenue when standard Windows methods fail completely. Some computer brands include special software designed specifically to bypass Windows and force system restart bios access.
Physical hardware solutions represent the most extreme troubleshooting approach, but they work when software-based methods are completely blocked or corrupted.
Fix Windows Recovery Environment Issues
A corrupted Windows Recovery Environment prevents access to Advanced Startup options, including the UEFI Firmware Settings choice. You can diagnose and repair the windows recovery environment using built-in command-line tools.
Open Command Prompt as administrator and type “reagentc /info” to check your recovery environment status. If the status shows “Disabled,” your recovery environment needs repair before BIOS access methods will work.
Run “reagentc /enable” to restore the recovery environment functionality. This command rebuilds the recovery partition and restores the Advanced Startup options that Windows needs for BIOS access.
After enabling the recovery environment, restart your computer and try the Settings method again. The UEFI Firmware Settings option should now appear in the Advanced Options menu.
Some Windows 11 updates can disable the recovery environment automatically. Running these commands after major updates can restore BIOS access functionality when standard methods suddenly stop working.
Physical Hardware Solutions (Last Resort)
Disconnecting all storage drives forces most computers to enter BIOS automatically since the system has no bootable device to load. Power off your computer completely, unplug all hard drives and SSDs from the motherboard, then restart.
This hardware configuration approach works because computers typically enter BIOS setup when no valid boot device is detected. Once in BIOS, you can change settings, then power off and reconnect your drives.
The complete power cycle technique involves unplugging your computer for 5 minutes, then reconnecting and immediately pressing BIOS keys during startup. This clears any residual power and resets initialization timing.
Some users report success with manufacturer utilities like MSI’s Click2BIOS software, which forces restart directly into BIOS even when Windows methods fail completely.
UEFI vs Legacy BIOS: Understanding the Difference
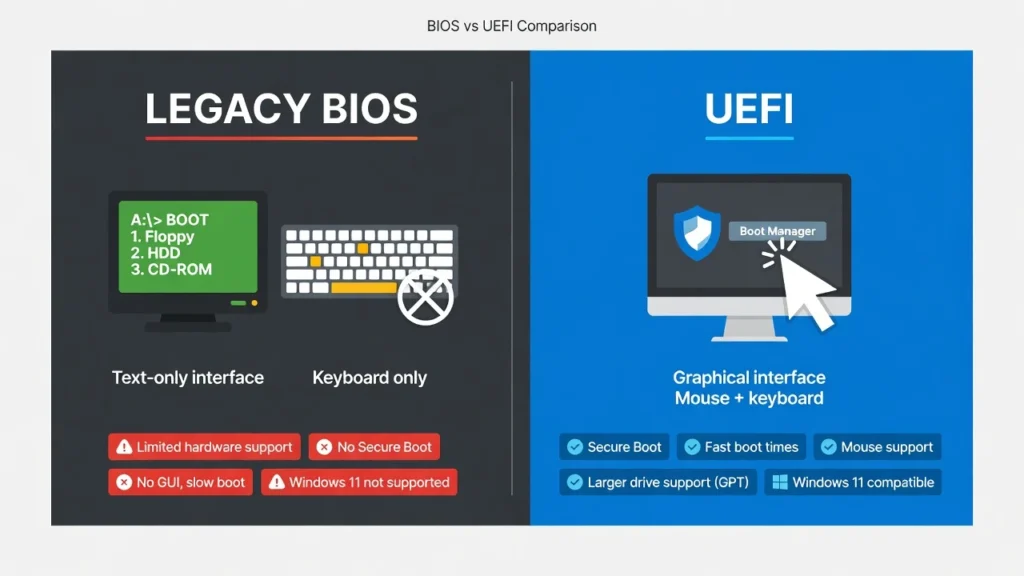
The uefi vs legacy bios distinction explains why some BIOS access methods work on your computer while others don’t. Understanding which firmware interface your computer uses helps you choose the most effective approach for accessing your system settings.
UEFI stands for Unified Extensible Firmware Interface, which is the modern replacement for traditional Legacy BIOS systems. UEFI provides a more advanced firmware interface with better security features, faster boot times, and support for larger hard drives.
Windows 11 requires UEFI firmware and will not install on legacy bios windows 11 systems. This means if you’re running Windows 11, your computer almost certainly uses UEFI rather than the older Legacy BIOS system.
You can easily check which firmware type your computer uses by pressing Windows + R, typing “msinfo32” and pressing Enter to open the system configuration utility. Look for the “BIOS Mode” entry in the System Summary. If it shows “UEFI,” your computer uses modern firmware. If it shows “Legacy,” you have an older BIOS system.
This distinction matters because UEFI systems provide the “UEFI Firmware Settings” option in Windows Recovery menus, while Legacy BIOS systems might not show this option at all. Computers with UEFI firmware typically respond better to the Windows Settings method and command-line approaches.
Legacy BIOS systems rely more heavily on traditional startup key methods like pressing F2 or Delete during boot. These older systems often require disabling Fast Startup to work properly with keyboard timing.
The firmware interface type also affects which advanced features are available in your BIOS setup. UEFI systems typically offer mouse support, better graphics, and more intuitive menus compared to text-based Legacy BIOS interfaces.
If you’re running Windows 11 and the msinfo32 command shows “Legacy” mode, your computer might have been upgraded from an older Windows version while keeping compatibility settings enabled.
Quick Summary: Which Method to Try First
The Windows Settings method should be your first choice to open bios windows 11 because it works regardless of keyboard compatibility, Fast Startup settings, or manufacturer differences. I recommend this approach for 95% of users since it consistently provides reliable results.
If you can boot into Windows normally, start with Settings > System > Recovery > Advanced startup > Restart now. Follow the path through Troubleshoot > Advanced options > UEFI Firmware Settings > Restart. This method bypasses all the common problems that plague traditional keyboard approaches.
When the Settings method isn’t available because you can’t access Windows, try the Shift + Restart combination from the login screen or Start menu. Hold Shift while clicking Restart to reach the same Advanced Startup menu.
For users who prefer traditional keyboard methods or need frequent BIOS access, disable Fast Startup first, then use your manufacturer’s specific BIOS key during startup. This restores the familiar F2 or Delete key functionality that experienced users expect.
If you encounter hardware compatibility issues like wireless keyboard problems or compact keyboard layouts, switch to a basic wired keyboard before attempting startup key methods.
The command-line approach using “shutdown /r /fw” works excellently for power users and provides a reliable backup when other methods fail unexpectedly.
Only resort to advanced troubleshooting methods like drive removal or Recovery Environment repairs when standard approaches consistently fail. Most users will successfully access bios windows 11 using one of the first three recommended methods above.
Frequently Asked Questions
Why doesn’t pressing Delete or F2 work to enter BIOS in Windows 11?
Fast Startup in Windows 11 bypasses the POST screen where BIOS keys are detected, making traditional methods ineffective.
To fix this when learning how to enter bios windows 11, go to Power Options > Choose what the power buttons do > Uncheck “Turn on fast startup” > Save changes. After disabling Fast Startup, restart your computer and immediately press F2 or Delete repeatedly during startup.
Can I access BIOS without restarting my computer?
No, accessing BIOS always requires restarting your computer since BIOS runs before Windows loads. However, the fastest way for how to enter bios windows 11 is using Settings > System > Recovery > Advanced startup > Restart now, which takes you directly to BIOS without multiple restarts.
What if my wireless keyboard doesn’t work for BIOS access?
Wireless keyboards often fail during startup because they need extra time to connect. For reliable results when figuring out how to enter bios windows 11 using startup keys, switch to a wired USB keyboard before restarting. The wireless connection timing usually conflicts with the brief window when BIOS keys are detected.
How do I enter BIOS on a laptop without F-keys?
Use function key combinations on compact keyboards. Press FN + Ctrl to toggle function mode, then press the mapped F2 location (usually the number 2 key). This method works for most compact layouts when learning how to enter bios windows 11 on laptops with 60% or compact keyboards.
Is there a desktop shortcut to open BIOS directly?
Yes, create a desktop shortcut with the command “shutdown /r /fw /t 5” and set it to run as administrator. This provides one-click access and is the most convenient method for how to enter bios windows 11 when you need frequent BIOS access for hardware tweaking or troubleshooting.
")

