
To enable developer mode on a Chromebook, press Esc + Refresh + Power simultaneously to enter recovery mode, then press Ctrl + D and confirm with Enter. The process takes 10–15 minutes and performs a full data wipe. All local files are permanently deleted. Back up to Google Drive before you begin.
| Action | Key Combination | Time Required | Data Loss? |
|---|---|---|---|
| Enable developer mode | Esc + Refresh + Power → Ctrl + D → Enter | 10–15 min | Yes full wipe |
| Boot into Chrome OS (developer mode) | Ctrl + D at warning screen | Seconds | No |
| Disable developer mode | Spacebar at warning screen | 5–10 min | Yes full wipe |
| Skip to auto-boot (developer mode) | Wait 30 seconds | 30 sec | No |
Chromebook Developer Mode Risks: What You’re Actually Giving Up
Enabling developer mode on a Chromebook comes with real trade-offs. These are not scare tactics. They are specific security changes that happen the moment you switch modes.
| Feature | Developer Mode | Normal Mode |
|---|---|---|
| Verified boot | Off | On |
| Malware protection via boot check | None | Active |
| Root access | Full | None |
| Install apps from any source | Yes | No |
| Google security responsibility | On you | On Google |
| Risk of bad APK damage | High if careless | Not applicable |
| Linux terminal access | Full (VT-2 shell) | Limited (crosh only) |
1. Verified boot is permanently disabled while in developer mode.
Chrome OS no longer checks system files at startup. If malware modifies a system file, the device will boot normally without flagging it.
2. Sideloaded apps bypass Google’s security screening.
Apps installed via APK have not been reviewed by Google. A malicious APK can access data that Play Store apps cannot.
3. Root access cuts both ways.
You can edit system files — but so can any app that requests root permissions if you grant them without thinking.
4. The “OS verification is OFF” screen appears every boot.
This is not just an annoyance — it is Chrome OS telling you the device is running at a reduced security level every single time.
5. You take responsibility for your own security.
In normal mode, Google’s verified boot handles system integrity automatically. In developer mode, you are the security layer. If you are not comfortable with that responsibility, the ADB method is a safer alternative for most use cases.
What Is Developer Mode on a Chromebook?
Ever since 2018 I’ve had the Chromebook in my hands, the most frequently asked question I get from frustrated users is this: How do I get my Chromebook into developer mode?
For a few models that amassed more than a dozen over the years, I have enabled Developer Mode and will guide you through all the information you need.
Developer mode on a Chromebook is similar to having admin privileges on your computer. I was amazed at the possibilities of my Chromebook after I found out how to turn on developer mode.
You’re not stuck with the security limits of Chrome OS, you have root access to install Linux applications, sideload Android applications in APK format and access to the crosh terminal for further tweaks and customizations.
When you enable developer mode in Chrome OS, here’s what happens. Your Chromebook shuts off a security feature called verified boot which is designed to verify that there is no one trying to alter your system files every time you turn on your Chromebook.
When you disable verified boot, you have what’s known as root access. That allows you to edit system files, install software from outside the Chrome Web Store and Play Store as well as be able to access the command line terminal.
Many people get this one wrong: Chrome OS developer mode and Android Developer Options are two different things.
I have watched people spending hours trying to enable developer mode in the Chromebook settings; they believe that it is the same. Android Developer Options simply opens several debugging options in the settings menu of Android. For Chrome OS, the developer mode combination is Esc + Refresh + Power keys and the powerwash of the Chromebook is 100%. One is just a simple toggle, the other eradicates everything on your device.
It doesn’t require a system reset, and you won’t lose any data. In contrast, the Chrome OS Developer Mode is a hardware boot process with specific keys to disable and wipes everything off your Chromebook.
They sound similar, but they’re two totally different features. Normal mode / developer mode – like renting an apartment vs owning your house. When using Chrome OS in normal mode, the platform can be used for secure browsing and Play Store app installation, but that’s it.
Once you switch to developer mode, you’ll soon have the ability to install any Android APK you wish on your Chromebook and of course you’ll have access to the full range of developer tools for Chrome OS. The trade-off? You’ve taken over security from Google.
Cracked Developer mode unlocks. Install Linux apps with Crostini, install apps not available in Play Store using APKs, open a crosh terminal for command line tasks and even change the boot process of Chrome OS. The compromise is security.
Google’s restriction of Chromebooks in “normal” mode has a reason. Verified boot will keep you safe from any malware that may try to do something to your system files.
If you turn it off, you’re increasing your risk. That is why Google makes it more complicated to enable developer mode and why your Chromebook will warn you each time you turn it on after you enable developer mode.
Normal Mode vs Developer Mode: What Changes?
Let me show you the actual difference between these mode, it can help you determine whether you really need developer mode. In Normal Mode: Verified boot is enabled on Chrome OS. Each time you boot up your Chromebook, it will scan itself to ensure that no changes have been made without your approval.
No root access, therefore no changes to the system files. Only apps from Chrome Web Store or Google Play can be installed. The system is hardened and developer features, such as the command line terminal, are insecure.
In Developer Mode:
Verified boot is turned off completely. The Chromebook will no longer check for any unauthorized changes to the system. Full root access – you can edit all the files on the system. App sources open up wide. Installation of Linux applications, sideloading of Android APKs from any source, and even custom OS testing are available as well.
System files are now modifiable, and you can make changes that regular users would never see. The crosh terminal and other Chrome OS developer features become available to use. The most noticeable difference you’ll notice is the boot screen.
When you press the Power button in Normal mode, your Chromebook turns on with the Chrome logo. When developer mode is activated, it will display a warning after each boot up that states “OS verification is OFF.” You will have to repeat the Ctrl + D operation to restart into Chrome OS.
It’s a constant reminder to be aware that you are running at a less secure level. I consider normal mode to be the locked front door of your house.
Developer mode opens that door so you can add furniture, redo the rooms and make some changes that you couldn’t do otherwise. There’s a freedom associated with it, but you’re also taking on the responsibility with it.
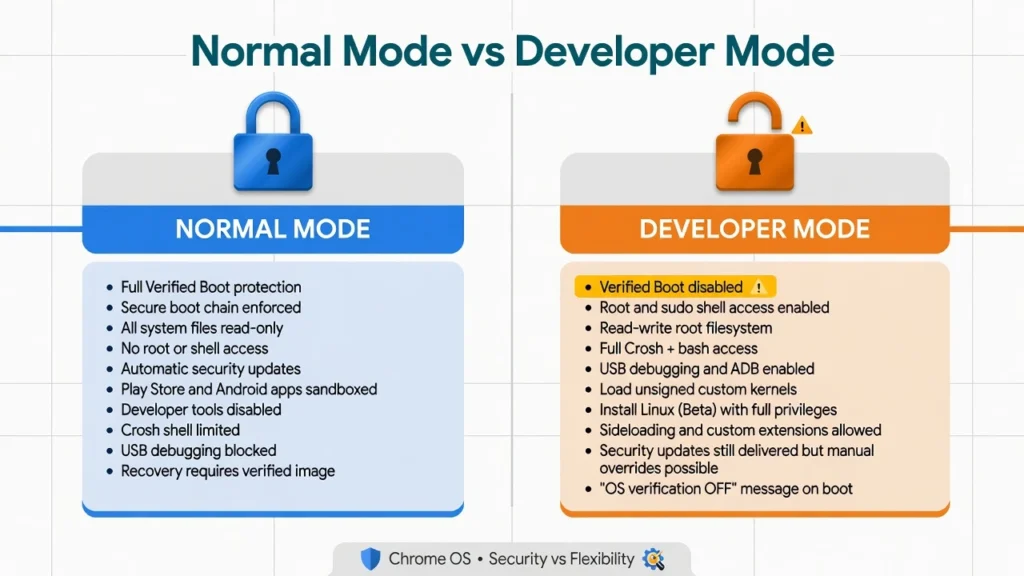
here’s exactly what changes versus normal mode
Before You Start: What You Need to Know (Data Loss Warning)
Before you switch to developer mode, there’s something I have to be honest about: You are about to lose everything on your Chromebook. On the first time I turned on developer mode,
I assumed I was clever enough to evade the loss of data that I would experience, like everyone else had said. I was wrong. Developer Mode resets the Chromebook right away, eradicating all your files. We’re talking about all your local files, all your downloaded apps and all your custom settings… gone.
The first time you turn on your Chromebook in developer mode, it will do a powerwash. This will reset the device back to the factory settings and remove all local data from the device. Imagine that you were leaving an apartment with all of your possessions.
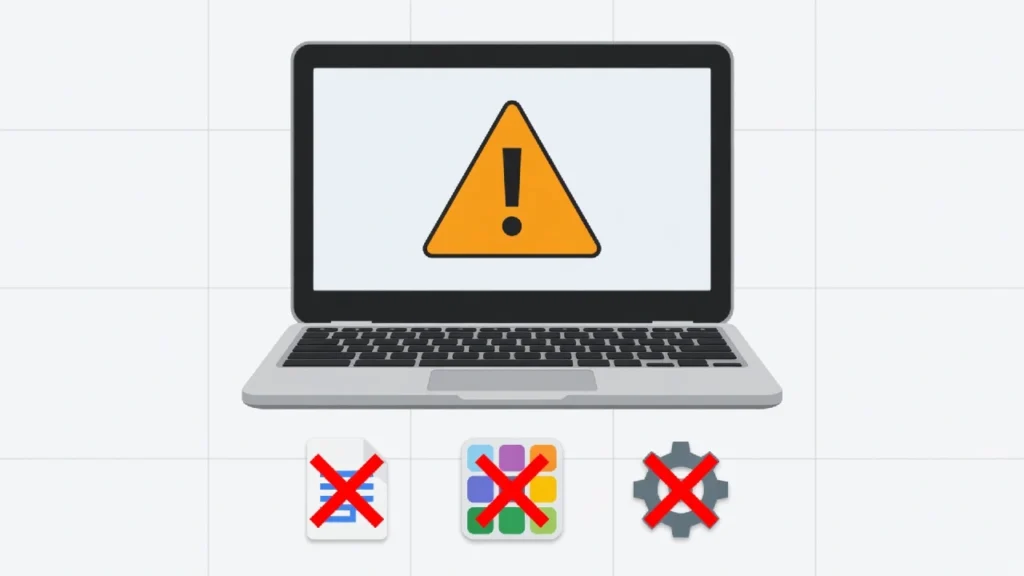
back up everything to Google Drive before you begin
Your Chromebook will look like a new Chromebook, but all the contents will have been removed. First time did this myself, and learned from my mistakes. I assumed my files must be safe somewhere, but they weren’t.
As soon as I was sure the developer mode switch had been made, the system erased everything. It’s actually a security feature that Chrome OS provides. In developer mode, some security restrictions are disabled, and Google created it with security features to destroy data if it is accessed by an individual who does not have the proper permissions.
The Chromebook loses all of the data at once. No undo, no recovery tool and no pause during execution. When you begin the process, the powerwash can proceed to the end. The following is one of the risks that you’ll want to know about before using the chromebook developer mode.
Also, I highly suggest you keep your Chromebook plugged in during the entire process. You don’t want to end up with your battery dead in the middle of a system level change like this, do you? If the power is interrupted during developer mode activation, there can be serious issues other than data loss.
It is critical to grasp these Chrome OS security compromises. Developer mode will provide you with increased control and flexibility, but at the price of some built in protections. The system makes the assumption that you know what you are doing, and will not hold your hand or correct you on every step.
What Gets Deleted When You Enable Developer Mode?
Let me break down exactly what disappears when you enable developer mode. Your local files that aren’t backed up to the cloud will be deleted completely. This includes documents, photos, videos, and any downloads sitting in your Downloads folder.
All installed Android apps and Linux applications get wiped too. If you’ve spent time setting up your favorite apps, write down which ones you use because you’ll need to reinstall them later. The same goes for any customizations or settings you’ve applied to those apps.
Your user settings and preferences reset to defaults. Browser history, cache, cookies, and saved passwords that weren’t synced to your Google account will vanish. Even your wallpaper choice and display settings go back to square one. The Chromebook powerwash treats your device like it just came out of the box.
Local user profiles get removed as well. If multiple people use your Chromebook with separate profiles, all of those profiles and their associated data will be erased. Only cloud synced information tied to Google accounts survives this process.
What You Should Back Up First
Before I ever enter developer mode, I make a list of the things I want to backup and you should do the same. First, ensure that all important things are synced to Google Drive. Check whether all your documents, spreadsheets and presentations appear in your Drive folder.
If there are any files on the local system which are not in the cloud, export them. Be sure to thoroughly check your Downloads folder. Transfer photos to Google Photos or USB drive. Repeat for video or music files that you want to retain.
List the Apps that you installed, or take a screen shot of the Apps list. This helps in future reinstallation to be much quicker.
I have a basic list of apps saved as a note on my cellphone so I don’t forget what I had. If you have bookmarks that have not been synced, then export them.
Bookmarks are automatically synced on Chrome if you’re signed in, but double check your bookmarks manager just in case.
It is better to take 2 minutes to check, rather than losing important links forever. Move any items that are sensitive to the environment to external storage devices.Move any external sensitive items to external storage devices.
In case you have any files that you absolutely cannot lose, you should additionally back them up on a USB flash drive or external hard drive in addition to cloud backup. When you are on the brink of wiping out your whole system, redundancy is important.
How to Turn On Developer Mode on Chromebook (Hardware Method)
To enter developer mode on your Chromebook, press a particular key sequence that puts your Chromebook into Chrome OS recovery mode. Next, you’ll go through a series of prompts and confirmations to enable developer mode.
The entire process should only take about 10-15 minutes, the Chromebook will restart multiple times through the process.
I have done this several times on Chromebooks and hardware has worked for most types of Chromebooks. It is not the buttons, but what and when to press them. A slip-up is not a disaster, but it could mean that you have to start all over again.
The default options is the Esc Refresh Power keys combination to get into recovery mode. When you see the recovery screen, you’ll use a different key combo to enter into developer mode. The system will alert you several times as to what is going on, allowing you to pull out if you decide to. You will be able to see the data wipe progress with a countdown timer on your Chromebook.
This countdown is shown in the top left corner of the screen and will take a few minutes. Just don’t switch off or unplug your Chromebook during this countdown.
The process cannot be interrupted and could cause serious system problems if interrupted. Once you’ve set it up, your Chromebook will display a developer mode warning screen every time you turn it on.
This screen shows that the verified boot is disabled and developer mode is enabled. You’ll have to hit Ctrl + D every time to boot into Chrome OS, but this is part of your regular booting process.
Step-by-Step: Standard Chromebooks and Chromeboxes
Let’s go through the steps of how to enable developer mode on the Chromebook by using the hardware method. I will explain this step-by-step and you can follow along with me.
Step 1. Shut Down Your Chromebook Completely
Do not just close the lid or turn the screen off. Press the power button and select “Shut down” from the menu. Wait until the screen goes fully black and all indicator lights turn off. This ensures a clean starting point for the key combination to work.
2. Press and Hold Esc + Refresh + Power Simultaneously
The Refresh key has a circular arrow icon and sits where F3 would be on a standard keyboard. Hold all three keys down at the same time not one after another. Keep holding until your Chromebook screen turns on and shows the recovery screen.
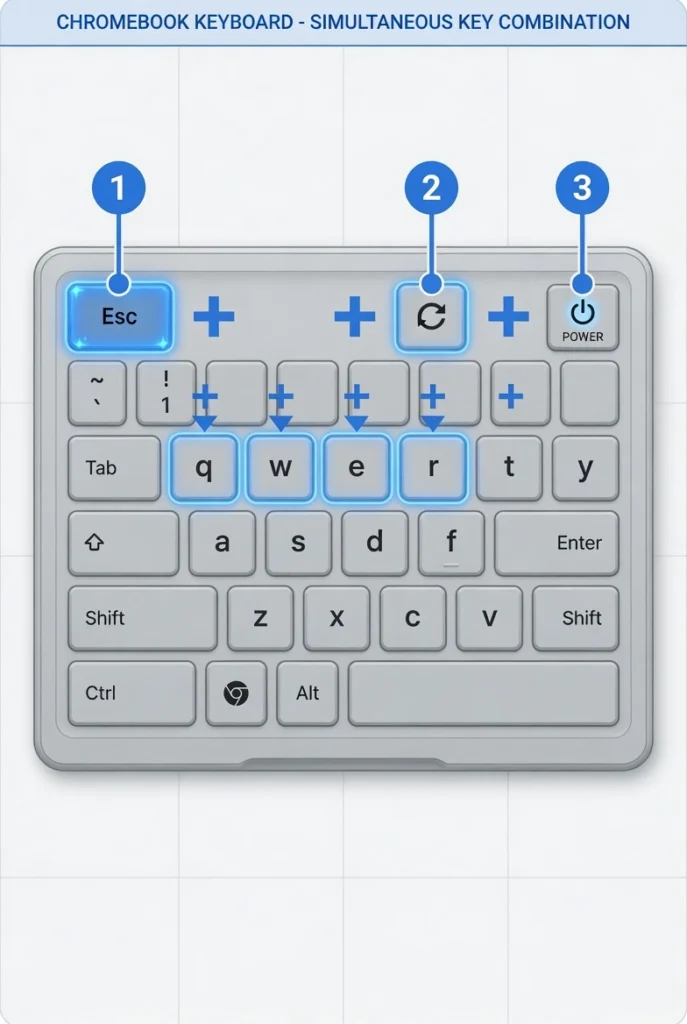
recovery screen appears — this is the key step.
Press and hold the keys until the recovery screen comes up
The message “Chrome OS is missing or damaged” or “Please insert a recovery USB stick” will appear. This is an alarming screen, but if you see this message you’ve done everything right. Your Chromebook isn’t broken, it is just out of place.
3. Wait for the Recovery Screen to Appear
You will see a message saying “Chrome OS is missing or damaged” or “Please insert a recovery USB stick.” This screen looks alarming but it confirms everything is working correctly. Your Chromebook is not broken — this is exactly where you need to be.
4. Press Ctrl + D to Enter Developer Mode
At the recovery screen, press Ctrl + D on your keyboard. Chrome OS will respond with a prompt asking if you want to disable OS verification and switch to developer mode. There is no button to click — this step is keyboard only.
5. Press Enter to Confirm
Chrome OS will ask if you are sure you want to enable developer mode. Press Enter to confirm. Some Chromebook models may ask you to press the Spacebar instead — read the on-screen instruction carefully before pressing.
6. Wait for Confirmation and Second Prompt
After pressing Enter, the screen will display a final confirmation. The system is giving you one last chance to cancel. If you are ready to proceed, follow the on-screen instruction either press Enter again or Spacebar depending on your model.
7. Change the color of the text to black.
A countdown timer appears in the top-left corner of the screen. This shows the developer mode transition progress and takes 5–10 minutes depending on your Chromebook model. All local data is being erased during this time. Do not press any keys, close the lid, or disconnect the power. Let the process run completely on its own.
Once the countdown finishes, your Chromebook will restart on its own. You do not need to press anything. The first reboot into developer mode will show the Chrome logo followed by a loading screen this is normal.
9. At the “OS verification is OFF” screen press Ctrl + D.
After the reboot, a warning screen will appear stating “OS verification is OFF.” This is completely normal. Press Ctrl + D to skip this screen and boot into Chrome OS. This warning screen will appear every time you start your Chromebook from now on pressing Ctrl + D each time is part of your normal boot process in developer mode.
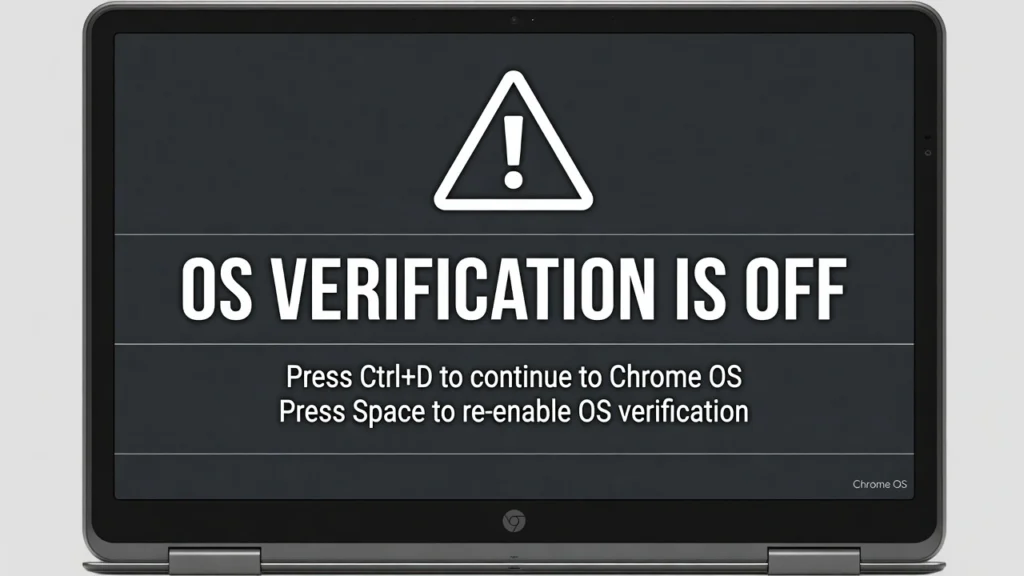
press Ctrl+D to continue, or wait 30 seconds for auto-boot
10. Fill in initial setup
Your Chromebook will load the Chrome OS setup wizard as if it is brand new. Connect to your WiFi network, sign in with your Google account, and set your preferences. Once you finish, developer mode is fully active on your Chromebook.
| Step | Action |
|---|---|
| 1 | Shut down Chromebook completely |
| 2 | Hold Esc + Refresh + Power simultaneously |
| 3 | Wait for recovery screen to appear |
| 4 | Press Ctrl + D at recovery screen |
| 5 | Press Enter to confirm |
| 6 | Wait for second confirmation prompt |
| 7 | Wait for countdown timer (5–10 min) |
| 8 | Let Chromebook reboot automatically |
| 9 | Press Ctrl + D at “OS verification is OFF” screen |
| 10 | Complete initial setup and sign in |
Step-by-Step: Chromebook Tablets
Since the Chromebook tablets don’t have physical keyboards attached, it uses a different button combination. For tablets, the combination is usually held is Volume Up+Power rather than Esc+Refresh+Power.
The key combination will differ for different models of the tablet. There are some Chromebook tablets that will need you to hold Volume Down and Power.
Make sure you look up or on your tablet documentation to understand which buttons the tablet uses. When you start the Chromebook tablet in recovery mode, the prompts on the screen operate like normal Chromebooks. The same warning and confirmation screens will appear.
The big difference is how you use these screens without a keyboard! Most Chromebook tablets have volume controls that you can use to navigate through the menu and to enter selections, as well as the power button to enter selections.
That some models do allow touchscreen taps during the developer mode setup process.That some models do allow touchscreen taps during the developer mode setup process. Instructions will be shown on the screen as to which buttons to use.
What the “OS Verification is OFF” Screen Means
If you have developer mode enabled, the “OS verification is OFF” screen will show each time you start your Chromebook.
The developer mode warning screen is quite normal, no warning occurred. Verified boot is a security mechanism in Chrome OS which verifies system files during the system start.
Developer mode turns off verified boot so you can have more control over the operating system. This protection is off and the warning screen advises you of this. Press Ctrl + D every time you see this screen to proceed with booting the Chrome OS.
Without pressing any button, the Chromebook will sound an alarm after about 30 seconds and start up. It’s easier to simply see Ctrl + D before the timeout than to wait until the timeout. This startup screen is a nuisance for some people because it requires an additional step each time they power on their Chromebook.
Unfortunately, this won’t work while in developer mode. The screen is always visible as a reminder that your system is running with less security protections. Developer mode can be turned off if you want to remove this warning screen permanently and return to normal mode.
Requires another powerwash in turn to wipe away all of your data, which is why most people simply get used to pressing Ctrl + D at boot time.
What Actually Happens When You Turn On Developer Mode
The three big changes that are made to the system when you turn on developer mode chromebook. Chrome OS disables verified boot, wipes the Chromebook clean, and provides root level access to the system partition.
These changes will occur automatically in the transition process I mentioned earlier. The following explanation of what verified boot is, will help you to understand why using developer mode demands such extreme actions.
Verified boot is a security feature of Chrome OS that ensures that all system files are scanned at start-up to detect any changes or tampering.
The feature would work like a security guard that scans each of these before letting the operating system load. Verified boot is completely disabled in developer mode of a chromebook.
If this security check is not enabled, you can change the system files, install custom OS and access some restricted parts of Chrome OS. Developers and advanced users require this, but without it, it opens up security threats.
The Chromebook powerwash is a precautionary measure when the Chromebooks are changing hands. Verified boot is designed into Chrome OS with the assumption that, if it is being turned off, the computer may be in the hands of another person.
The factory reset eradicates any sensitive information before providing the full access to the system. When you turn Developer Mode on you’re really looking for a root password to the system partition. Root access allows you to edit the files of Chrome OS and make changes that regular users of Chrome OS cannot.
Imagine that there is a building and you are given the key to every room, but not the master key. That’s why Google doesn’t simply have a toggle switch in the settings menu; it’s located in the “developer” area of the boot process.
The Esc Refresh Power combination disables remote activation as it requires physical contact to be pressed. Developer mode would require someone to access your Chromebook via hand to enable it, further protecting you from attacks made remotely.
It becomes apparent once you understand these changes that the Chrome OS security trade offs manifest themselves. Flexibility and control, but no verified boot.
Your Chromebook will move from a secure and closed system to a secure and open system where you make your own decisions on security. As you see the “OS verification is OFF” warning screen during start up,
Chrome OS is reminding you about these trade-offs. The warning is confirming that you are not in the most protected state and you have disabled verified boot on your system.
App or system changes that pose risks are no longer being automatically blocked by Chrome OS, but are now your responsibility to judge.
I see developer mode as similar to moving from an apartment with a doorman to being the property owner of your own home. Everything is open to total renovation and changes, but you also have to put your own locks on everything and keep an eye on your own security.
It is a logical option for those requiring such control and aware of the dangers.
Why You Might Want to Turn On Developer Mode
Most people enable developer mode chromebook because they need capabilities that standard Chrome OS deliberately keeps hidden. The reasons range from professional software development work to running specialized applications that aren’t available in the official Chrome Web Store or Google Play Store.
I’ve found that the most common reason people turn on developer mode is to gain access to Chrome OS developer tools that unlock advanced customization options. These tools let you modify system settings, access hidden features, and run software that requires deeper system permissions than regular Chrome OS allows.
Developer mode opens up Chrome OS developer features that transform your Chromebook from a locked down web browsing device into a flexible computing platform. You can install full desktop Linux applications, run command line tools, test experimental software builds, and access parts of the system that Google keeps off limits for security reasons.
Some users need developer mode for practical work tasks. Software developers use the crosh terminal and Linux environments to write and test code. Web developers need access to advanced debugging tools and local server environments. System administrators want command line access to manage files and troubleshoot issues more efficiently than the standard Chrome OS interface allows.
Others want developer mode for personal projects and hobbies. Gaming enthusiasts use developer mode to run emulators and install games from outside the Play Store. Tinkerers enjoy exploring what their Chromebook hardware can actually do when the software restrictions come off. Students learning programming benefit from having a real Linux terminal and development environment on an affordable laptop.
The flexibility comes with responsibility though. Chrome OS developer features give you enough control to break things if you don’t know what you’re doing. Google designs standard Chrome OS to be nearly impossible to mess up, but developer mode assumes you understand the risks and consequences of your actions.
Privacy focused users sometimes enable developer mode to gain more control over their data and system behavior. Developer mode lets you monitor network traffic, inspect what apps are doing behind the scenes, and modify settings that affect how Chrome OS handles your information.
Install Linux Apps and Access the Terminal
Linux on Chromebook becomes significantly more powerful when you enable developer mode. While newer Chromebooks support Linux Crostini in standard mode, developer mode gives you unrestricted access to the full Linux environment without the sandboxing limitations that Crostini enforces.
The crosh terminal opens up when you press Ctrl + Alt + T in Chrome OS, but developer mode unlocks additional commands and capabilities within the Chromebook command prompt. You can access the VT-2 terminal Chromebook by pressing Ctrl + Alt + Forward arrow, giving you a full screen Linux shell that runs directly on your Chromebook hardware.
I use the terminal access for installing development tools, running scripts, and managing files through command line interfaces. Developer mode removes the restrictions on what you can install and run through these terminal environments. You get true root access instead of the limited shell that standard Chrome OS provides.
Power users appreciate having a real Linux environment for tasks like web server testing, database management, version control systems, and software compilation. The Chromebook command prompt becomes a genuine productivity tool rather than just a diagnostic interface.
Sideload Android APKs (Install Apps Outside the Play Store)
Developer mode chromebook allows you to install Android APK files from sources other than the Google Play Store. This capability matters when you need apps that aren’t available in your region, want to test beta versions of software, or use specialized applications that developers distribute outside official channels.
I’ve used APK sideloading to install apps that work perfectly fine but haven’t been published to the Play Store for various reasons. Some developers release early access versions directly to users. Other apps serve niche purposes that don’t justify the effort of Play Store publication.
The process requires enabling Android developer options after you’ve turned on Chrome OS developer mode. You can then use file managers or command line tools to install APK files directly onto your Chromebook. This represents one of the most popular Chromebook hacks that users employ to expand their app selection beyond what Google officially offers.
Security warnings will appear when you install apps from outside the Play Store, which is completely normal behavior. Chrome OS warns you because sideloaded apps haven’t gone through Google’s security screening process. You take responsibility for verifying that the APK files you install come from trustworthy sources.
Gaming and Emulation
Gaming represents a surprisingly common reason why people enable developer mode on Chromebooks. Developer mode allows installation of game emulators and gaming platforms that require system level access or aren’t available through official channels.
I’ve seen users enable developer mode specifically to run emulators for older gaming systems. These emulator applications often need deeper system permissions than standard Chrome OS grants. Developer mode provides the access these programs require to function properly.
Some gaming communities use developer mode as one of their essential Chromebook hacks to run specialized gaming software. The expanded permissions let you install game launchers, modify game files, and run gaming utilities that enhance your experience beyond what the Play Store offers.
Performance monitoring tools available in developer mode help gamers track frame rates, monitor system resources, and optimize settings for better gameplay. These Chrome OS developer tools give you visibility into how games use your Chromebook’s CPU, GPU, and memory.
While developer mode opens up gaming possibilities on Chromebooks, the hardware limitations are still real. Most Chromebooks use integrated graphics and ARM processors that struggle with demanding games.
If you’re serious about gaming and considering whether a Chromebook with developer mode is enough, you might want to explore dedicated gaming hardware instead. I’ve put together a comprehensive guide about whether gaming laptops are worth it in 2026 covering RTX 5000 series performance, OLED displays, and what you actually get for your money compared to modified Chromebooks.
Safer Alternative: Install APKs Without Full Developer Mode (ADB Method)
You don’t actually need to enable full developer mode chromebook if your only goal is sideloading Android APK files. Chrome OS offers a much safer alternative that lets you install apps from outside the Play Store without wiping your data or disabling verified boot. This method uses the Linux development environment combined with ADB debugging tools.
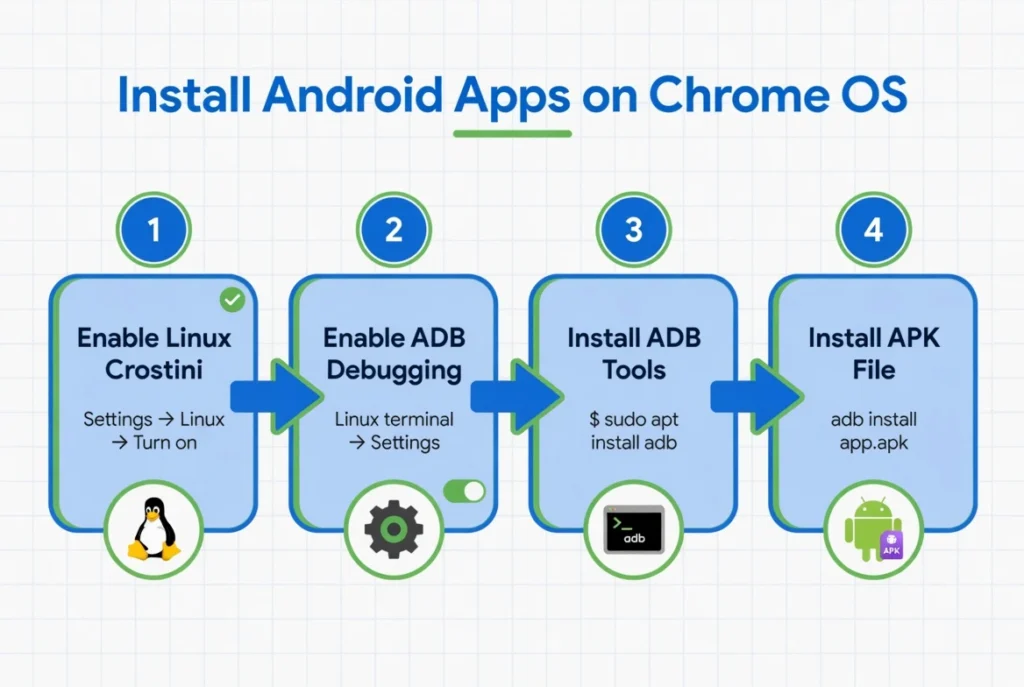
wiping your Chromebook or disabling security protections.
The ADB method keeps all the security protections of standard Chrome OS in place while giving you the specific ability to install Android apps.
You won’t see the “OS verification is OFF” warning screen on every startup. You won’t lose any of your files, settings, or installed applications. Your Chromebook stays in its normal secure mode while gaining this one additional capability.
I prefer recommending this approach to people who specifically want APK sideloading and nothing else. Why go through a full powerwash and permanently reduce your security posture when you can achieve your goal without those trade offs? The ADB debugging method takes about the same amount of time to set up but leaves your Chromebook otherwise untouched.
This alternative works by enabling Linux Crostini on your Chromebook through the standard Chromebook settings menu.
Chrome OS includes built in support for running a Linux container, and this container can communicate with the Android subsystem through ADB, which stands for Android Debug Bridge. Think of ADB as a communication channel that lets Linux send installation commands to the Android environment.
The process involves four main steps. First, you enable the Linux development environment through settings. Second, you activate the “Develop Android apps” option and turn on ADB debugging.
Third, you install the ADB command line tools inside your Linux environment. Fourth, you use terminal commands to install APK files whenever you need them.
I discovered this method from experienced Chromebook users who pointed out that full developer mode chromebook carries unnecessary risks for people who only want app installation capabilities. The ADB approach gives you surgical precision instead of a sledgehammer. You get exactly the feature you need without removing all the security layers that protect your device.
The main limitation is that this method only helps with Android app installation. You won’t gain access to Chrome OS developer tools, root access to system files, or the ability to modify the operating system itself.
If you need those advanced capabilities, you’ll still need full developer mode. But for APK sideloading alone, ADB debugging is the smarter choice.
Step 1: Enable Linux Development Environment
Open your Chromebook settings by clicking the clock in the bottom right corner and selecting the gear icon. Navigate to “About ChromeOS” in the left sidebar, then click on “Developers.” You’ll see an option labeled “Linux development environment” with a “Set up” or “Turn on” button next to it.
Click that button to start the Linux Crostini installation process. Chrome OS will ask you to choose how much disk space to allocate for the Linux environment. I recommend setting at least 10GB if you have the storage available. This gives you enough room for the Linux system files, ADB tools, and several APK files.
The installation takes several minutes depending on your internet speed and Chromebook model. Chrome OS downloads the Linux container image and configures the environment automatically. You’ll see a terminal window open when the process completes, confirming that Linux is ready to use.
Step 2: Enable ADB Debugging
Go back to Chromebook settings and navigate to the same “About ChromeOS” section, then click “Developers” again. You should now see a new section called “Linux development environment” with additional options underneath it.
Look for the option labeled “Develop Android apps” and click the toggle or button to enable this feature. Once you activate Android app development, a new toggle appears for “Enable ADB debugging.” Turn on ADB debugging as well.
Chrome OS will prompt you to restart your Chromebook for these changes to take effect. Save any open work and restart the device. The restart ensures that the Android subsystem properly recognizes the ADB debugging connection from your Linux environment.
Step 3: Install ADB Tools in Terminal
After your Chromebook reboots, open the Terminal app from your app launcher. The Terminal app provides access to the Linux environment you just installed. You’ll see a command prompt waiting for your input.
Type the following command and press Enter: sudo apt update
This command refreshes the package lists so Linux knows about the latest available software. Wait for the process to complete, which usually takes just a few seconds.
Next, type: sudo apt upgrade
Press Enter and type “y” when the system asks if you want to continue. This command updates any existing Linux packages to their newest versions. The upgrade process might take a couple of minutes.
Finally, install the ADB tools by typing: sudo apt install adb
Press Enter and type “y” again when prompted. The crosh terminal downloads and installs the Android Debug Bridge tools into your Linux environment. These tools let you send installation commands to Chrome OS’s Android subsystem.
Step 4: Install Your APK File
Download the APK file you want to install using your Chrome browser. The file will save to your Downloads folder by default. Open the Files app and locate your APK file.
Move the APK file from Downloads to the “Linux files” folder. You can drag and drop the file or right click and select “Copy to folder.” I also recommend renaming the APK to something simple without spaces, like “app.apk” or “game.apk.” Simple filenames make typing terminal commands much easier.
Open the Terminal app again and type: adb devices
Press Enter. A popup notification will appear on your Chromebook asking if you want to allow ADB debugging. Click “Allow” on this popup. The terminal should then display a device ID, confirming that ADB can communicate with your Android subsystem.
Now type the installation command: adb install app.apk
Replace “app.apk” with whatever you named your APK file. Press Enter and wait while the Linux Crostini environment sends the installation package to Android. You’ll see progress messages in the terminal followed by a “Success” message when installation completes.
The newly installed app appears in your Chromebook app launcher alongside your other Android apps. You can open and use the app normally just like any app from the Play Store. Repeat this process whenever you want to install additional APK files without touching your Chromebook settings again.
Why Won’t Developer Mode Turn On? (Troubleshooting)
The most common reason developer mode chromebook won’t activate is that your device is managed by a school or organization. Managed Chromebooks have developer mode permanently disabled through administrator policies, and no workaround exists that bypasses this restriction. If you’re trying to enable developer mode on a school Chromebook, the feature is intentionally locked for security reasons.
I’ve seen countless people struggle with this issue because they follow all the steps correctly but developer mode simply refuses to turn on. The problem isn’t your technique or the instructions you’re following. The problem is that the Chromebook itself has been configured to reject developer mode activation before you even owned or started using the device.
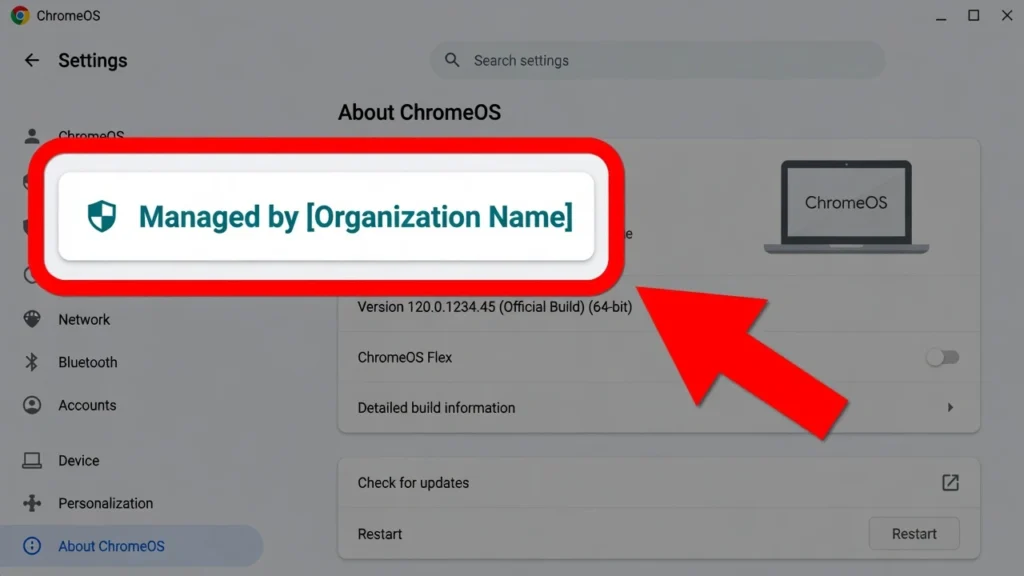
developer mode is permanently blocked by your administrator
Beyond managed device restrictions, a few other issues can prevent developer mode chromebook from activating properly. Sometimes the Esc Refresh Power keys combination needs precise timing that takes a few attempts to get right. Other times, the ADB debugging feature disables itself after restarts due to quirks in how certain Chromebook models handle the setting.
Understanding why developer mode fails saves you hours of frustration trying solutions that can’t possibly work. If your Chromebook is managed by an organization, no amount of key pressing or setting toggling will enable developer mode. The restriction exists at a policy level that overrides any actions you take on the device.
I always recommend checking whether your Chromebook is managed before you even attempt enabling developer mode. This simple check tells you immediately whether developer mode is a possibility or a lost cause. Knowing the answer upfront lets you explore alternatives like the ADB method I described earlier, which works on some managed Chromebooks depending on administrator settings.
Your Chromebook Is Managed by a School or Organization
A managed Chromebook has administrator policies set by a school, workplace, or organization that control what features you can access. These policies get applied through Google’s enterprise management system and override the settings menu options you see on your screen. Developer mode represents a security risk in managed environments, so administrators almost always disable this feature.
Check if your Chromebook is managed by opening Chromebook settings and navigating to “About ChromeOS.” Look at the very top of this page. If you see text that says “Managed by” followed by your school name, district name, company name, or organization name, your Chromebook is under administrative control.
Managed devices block developer mode activation at the firmware level. When you try the Esc Refresh Power keys combination and press Ctrl + D at the recovery screen, a managed Chromebook will display a message stating that developer mode has been disabled by the device owner or administrator. Some managed Chromebooks won’t even show the option to enable developer mode at all.
If you’re an administrator managing Chromebooks for your organization, Google provides detailed documentation about managing developer mode policies through the Admin console. You can learn more about these enterprise management options and security policies in Google’s official Chrome Enterprise documentation, which explains how to control developer mode access across your fleet of managed devices.
Can you bypass this restriction? No. I need to be completely honest about this because I’ve seen people waste days searching for workarounds that don’t exist. School Chromebook developer mode restrictions are intentional security measures. The management policies get enforced before the operating system even loads, which means no software trick or setting change can override them.
Your only option with a managed device is asking the administrator for permission to enable developer mode. Most schools and organizations will refuse this request because allowing developer mode defeats the purpose of device management. Organizations deploy managed Chromebooks specifically because they want locked down, secure devices that users can’t modify.
If you own the Chromebook personally but it was previously managed, you might be able to remove the management. This process typically requires performing a special recovery process or contacting the original organization to release the device from their management console. However, if the school or organization still owns the Chromebook, management cannot be removed without their cooperation.
The ADB debugging method I described in the previous section sometimes works on managed Chromebooks depending on what policies the administrator has set. Some organizations block developer mode but leave Linux development environment access available. Check whether you can enable Linux in your settings as an alternative approach.
ADB Debugging Keeps Disabling After Restart
Some Chromebook models have a frustrating bug where the ADB debugging toggle turns itself off after you restart the device. You enable ADB debugging in Chromebook settings, restart like the system tells you to, and then discover the setting has disabled itself when you check again.
I’ve found that this issue often resolves after multiple restart cycles. Enable ADB debugging, restart, check if the setting stayed enabled, and if not, enable it again and restart again. Some users report needing to repeat this process three to five times before ADB debugging finally stays active after a restart.
Make sure your Linux development environment is completely installed and updated before you try enabling ADB debugging. Sometimes the Android development features don’t work properly if the Linux container hasn’t fully configured itself. Wait at least 10 minutes after Linux installation completes before attempting to enable ADB debugging.
Try using the terminal commands to check ADB status even if the settings toggle shows as disabled. Open Terminal and type “adb devices” to see if ADB actually works despite what the settings menu displays. Occasionally the toggle shows incorrectly while the feature itself functions normally.
Wrong Key Combination or Timing
The Esc Refresh Power keys combination requires precise timing that feels awkward at first. Your Chromebook must be completely powered off before you start, not just sleeping or in standby mode. Press and hold all three keys simultaneously, then release them only when the recovery screen appears on your display.
I find that people often release the keys too early or press them sequentially instead of simultaneously. Think of it like pressing a gaming combo where all buttons need to be down at the same time. Hold Esc first, then add Refresh while keeping Esc pressed, then add Power while keeping both other keys pressed.
The Refresh key location confuses some users because keyboard layouts vary between Chromebook models. Look for the key with a circular arrow icon, typically positioned where F3 sits on traditional keyboards. Some Chromebooks label this key differently or use a slightly different icon design.
Try the key combination multiple times if the recovery screen doesn’t appear on your first attempt. Nothing bad happens if you get the timing wrong. The worst case scenario is your Chromebook just boots normally into Chrome OS, and you can shut down and try again. I usually tell people to expect needing two or three attempts before getting the timing right.
Make sure you’re pressing the Power button firmly enough to actually trigger it. Some Chromebook power buttons require more pressure than you’d expect, especially on models where the power button is small or flush with the device casing.
What to Expect After Enabling Developer Mode
Life with developer mode chromebook active looks different from the standard Chrome OS experience. You’ll see a warning screen every single time you boot up your device, security alerts will appear when you install apps from outside the Play Store, and you’ll need to set up your Chromebook from scratch as if it just came out of the box.
I want to set realistic expectations so you don’t panic when these changes appear. Everything I’m about to describe represents normal behavior for a Chromebook running in developer mode. These aren’t errors, glitches, or signs that something went wrong during the setup process.
Your Chromebook now operates with verified boot disabled, which fundamentally changes how Chrome OS security works during startup. The system no longer automatically verifies that all operating system files are original and unmodified. This change gives you the flexibility you wanted but requires you to manually confirm each boot.
You’ll need to reconnect to your Wi-Fi network and sign into your Google account just like you would on a brand new Chromebook. All your cloud synced data will download automatically once you sign in. Bookmarks, passwords stored in Chrome, and files saved to Google Drive will reappear after the sync completes.
Some aspects of developer mode take getting used to. The startup process takes a few extra seconds because of the warning screen. Security alerts pop up more frequently than you’re probably accustomed to. Certain apps behave differently or refuse to run at all because developer mode changes how Chrome OS handles app permissions.
I tell people to give themselves a week to adjust to the developer mode experience. The first few days feel strange because everything looks slightly different. After a week, pressing Ctrl + D during startup becomes automatic muscle memory and the security warnings stop catching your attention.
The “OS Verification is OFF” Screen on Every Boot
The developer mode warning screen appears every single time you power on your Chromebook. This screen displays a message stating “OS verification is OFF” along with instructions to press Ctrl + D to continue or press the spacebar to re-enable OS verification.
This warning screen is completely normal and permanent as long as developer mode stays active. You cannot disable or skip this screen while keeping developer mode enabled. The warning serves as a constant reminder that verified boot is turned off and your system is running with reduced security protections.
Press Ctrl + D each time you see this screen to boot into Chrome OS. I’ve developed a habit of pressing Ctrl + D immediately when my Chromebook powers on, even before the screen fully loads. The keystroke registers as soon as the warning appears, so you don’t need to wait and read the message every time.
If you don’t press anything, the Chromebook will beep loudly after about 30 seconds and boot into Chrome OS automatically. Some people prefer waiting for the automatic boot, but I find the beep annoying enough that I’d rather just press the keys.
The verification screen adds roughly 5 to 10 seconds to your boot time compared to standard Chrome OS. Your Chromebook takes slightly longer to start up because the system pauses to display the warning and wait for your input. This delay happens on every single boot without exception.
Security Warnings for Sideloaded Apps Are Normal
Chrome OS security warnings will appear when you install or launch apps from outside the Google Play Store. These warnings tell you that the app comes from an unknown source and hasn’t been verified by Google’s security screening process.
The warnings don’t mean the apps are dangerous or contain malware. The alerts simply acknowledge that Google hasn’t reviewed these applications and can’t vouch for their safety. Think of these security warnings like the message you see when downloading files in a web browser. Chrome OS is being cautious, not accusatory.
You’ll see messages like “Install blocked” or “This app is from an unknown source” when you try to sideload APK files. These alerts are standard disclaimers that appear for any app not distributed through official channels. The system is reminding you that you’re proceeding at your own risk.
I’ve installed dozens of sideloaded apps and the warnings appear every single time. You get used to reading the message, confirming that yes you understand the risks, and proceeding with the installation. The warning system isn’t trying to stop you. Chrome OS just wants to make sure you know what you’re doing.
The actual safety of sideloaded apps depends entirely on where you download them from and what’s inside the APK file itself. Developer mode chromebook gives you the ability to install these apps, but you’re responsible for making sure the APK files come from trustworthy sources. Download apps from reputable websites and developers, just like you would on any other platform.
Some Apps May Not Work Perfectly
Not every Android app runs smoothly on Chrome OS, and developer mode doesn’t change this fundamental compatibility reality. Some apps will install successfully but crash immediately when you try to open them. Other apps might launch but display incorrectly or missing certain features.
App compatibility issues stem from how developers designed their Android apps, not from anything wrong with your developer mode setup. Many Android apps assume they’re running on a phone or tablet with specific hardware like GPS, cameras, or cellular connections. Chromebooks lack some of this hardware, which causes certain apps to malfunction.
I’ve encountered apps that boot up and instantly close without any error message. The app icon appears in my launcher, I click it, a loading screen flashes briefly, and then nothing happens. This behavior is frustrating but fairly common with apps that weren’t designed with Chrome OS in mind.
Games tend to have more compatibility problems than productivity apps. Some games check for specific device configurations or require features that Chrome OS doesn’t support. Other games run fine but have interface problems because they were designed for touchscreens held in portrait orientation rather than laptop keyboards and trackpads.
Don’t assume developer mode is broken if a particular app doesn’t work. Try installing different apps to confirm that the sideloading process itself functions correctly. If most apps work but one specific app fails, the problem is that individual app’s compatibility with Chrome OS rather than your developer mode configuration.
How to Turn Off Developer Mode on Chromebook
Turning off developer mode on Chromebook is actually simpler than turning it on. You just need to restart your Chromebook and press the spacebar instead of Ctrl + D when the “OS verification is OFF” screen appears. This action re-enables verified boot and returns your device to standard Chrome OS mode.
The process to disable developer mode chromebook takes only a few minutes, but I need to warn you about something important upfront. Turning off developer mode triggers another complete Chromebook powerwash that erases all your local data just like enabling developer mode did. You’ll lose everything stored locally on your device a second time.
How to turn off developer mode on Chromebook:
- Power on or restart your Chromebook.
- Wait for the “OS verification is OFF” warning screen.
- Press the Spacebar instead of Ctrl + D.
- Read the confirmation message and follow the on-screen prompts.
- Wait 5–10 minutes for the powerwash to complete.
- Sign back into your Google account to restore synced data.
The system will display a confirmation message asking if you want to re-enable OS verification and return to normal mode. Confirm your choice by following the on screen prompts. Your Chromebook immediately begins the transition process.
The device performs a Chromebook powerwash that wipes all local files, settings, and installed applications. Verified boot gets re-enabled, restoring the automatic security checks that developer mode disabled. The entire process takes about 5 to 10 minutes depending on your Chromebook model.
Your Chromebook will restart automatically when the powerwash completes. You’ll see the standard Chrome OS welcome screen just like when you first got the device. The “OS verification is OFF” warning screen disappears permanently once you return to normal mode.
Connect to Wi-Fi and sign in with your Google account to restore your cloud synced data. Your bookmarks, saved passwords, and Google Drive files will download automatically. Any apps you want to use again will need to be reinstalled from the Chrome Web Store or Google Play Store.
I’ve switched back and forth between developer mode and normal mode several times on different Chromebooks. The process works reliably every time, though dealing with the data wipe twice gets annoying if you’re just experimenting with developer mode temporarily.
Will I Lose Data Again When I Turn It Off?
Yes, you will lose all local data again when you disable developer mode chromebook. The Chromebook powerwash happens in both directions, meaning turning developer mode on wipes your data and turning developer mode off wipes your data again.
Chrome OS treats the transition back to normal mode exactly the same as the transition into developer mode. The system assumes that if developer mode was active, potentially unauthorized modifications might have occurred. The powerwash clears any possible security risks before restoring verified boot protections.
Back up everything important before you turn off developer mode. Sync all your files to Google Drive, export any documents you need, and note which apps you’ll want to reinstall. The Chromebook data loss affects everything local, so treat this reversal process with the same preparation you used when enabling developer mode originally.
I recommend staying in developer mode if you’re still using the features that required developer mode in the first place. Switching back and forth repeatedly means losing your data over and over, which gets frustrating quickly. Only disable developer mode chromebook when you’re truly finished needing the advanced capabilities and ready to return to standard Chrome OS permanently.
Common Mistakes to Avoid When Enabling Developer Mode
The biggest mistakes people make when enabling developer mode chromebook stem from rushing through the process without proper preparation or understanding what they’re actually doing. I’ve seen users lose important files, interrupt critical system processes, and waste hours trying to enable developer mode on devices where it’s impossible.
Learning from these common errors saves you time and frustration. Most mistakes happen because people follow the technical steps correctly but miss the preparation work or don’t understand the context behind what they’re doing.
Not backing up data before starting. This is the number one mistake I see repeatedly. People know that developer mode wipes data, but they convince themselves their files aren’t that important or assume everything is already backed up. Chromebook data loss affects everything stored locally, including downloads, screenshots, and files not synced to the cloud. Check your Downloads folder, Google Drive sync status, and any locally stored documents before you start the process.
Unplugging the Chromebook or letting the battery die during transition. The countdown timer during developer mode activation cannot be interrupted safely. Power loss during this process can cause serious system problems that require recovery mode to fix. Keep your Chromebook plugged into a charger throughout the entire process, even if the battery shows full charge.
Confusing Android Developer Options with Chrome OS developer mode. These are completely different features that serve different purposes. Android Developer Options appear in the settings menu of some Chromebooks and control Android app debugging features. Chrome OS developer mode requires the hardware key combination and powerwash process I described. One does not lead to the other.
Attempting to enable developer mode on a managed Chromebook without checking first. School and workplace Chromebooks have administrator policies that block developer mode activation. Check if your device shows “Managed by” in the About ChromeOS settings before you attempt the process. Managed Chromebook restrictions cannot be bypassed, so save yourself the effort and explore alternatives like the ADB method instead.
Panicking at security warnings after enabling developer mode. The “OS verification is OFF” screen and app installation warnings are normal behavior, not signs that something went wrong. Read the warnings, understand what they mean, and proceed confidently instead of assuming your Chromebook is broken.
Pressing Ctrl + D too early during the key combination sequence. Wait until you see the actual recovery screen before pressing Ctrl + D. The Esc + Refresh + Power combination must complete first and display the “Chrome OS is missing or damaged” message. Pressing Ctrl + D while the Chromebook is still powering on won’t work.
Frequently Asked Questions About Developer Mode
Will I lose all my data if I enable developer mode on my Chromebook?
Yes, enabling developer mode performs a complete powerwash that deletes all local files, downloads, installed apps, and settings. Your cloud synced data like Google Drive files, Gmail, and Chrome bookmarks remain safe if properly synced.
Do I have to press Ctrl+D every time I turn on my Chromebook?
Yes, after enabling developer mode, you must press Ctrl + D at the “OS verification is OFF” screen during every boot. This warning screen appears permanently until you disable developer mode and is completely normal behavior.
Can I turn off developer mode and go back to normal?
Yes, restart your Chromebook and press the Space bar instead of Ctrl + D when the warning screen appears. This triggers another powerwash that wipes your data again, so back up everything important first.
Why won’t developer mode turn on my school Chromebook?
If your Chromebook shows “Managed by [organization name]” in Settings > About ChromeOS, developer mode is disabled by administrator policy. Managed devices from schools and workplaces cannot enable developer mode without admin permission.
Can I install APKs without enabling full developer mode?
Yes, use the Linux Development Environment with ADB debugging to sideload Android APKs without a data wipe. Enable Linux in settings, turn on “Develop Android apps,” enable ADB debugging, and use terminal commands like “adb install filename.apk.”
| Field | Detail |
|---|---|
| Website | futuretechtips.com |
| Author | Mustahsan Tariq |
| Author URL | futuretechtips.com/author/mustahsantariq/ |
| Article Topic | Chrome OS Developer Mode |
| Content Type | How-To Guide |
| Primary Keyword | How to turn on developer mode on Chromebook |
| Target Audience | Chromebook users, developers, students |
| Country | Pakistan |
| Language | English |
| Last Updated | 2026-09-13 |