

You open your MacBook Pro, and there they are black lines at the bottom of the screen. It stops you cold. I’ve been in that exact moment more times than I can count, watching someone’s expression shift from confusion to quiet dread as they start calculating what this is going to cost them
I’ve spent over a decade helping people troubleshoot this exact MacBook Pro display problem. And what I keep telling people the thing that actually matters before they do anything else is that black lines on a laptop screen do not automatically mean an expensive repair
Sometimes it’s a software hiccup. Fixed in five minutes with a reset, no money spent. Other times it’s a known design flaw that Apple will repair for free even if your warranty expired years ago. The difference between those two outcomes is diagnosis. Know what you’re actually dealing with before you hand your MacBook to anyone or spend a single dollar
Here’s what this guide actually covers. Three quick diagnostic tests to tell you whether this is a software glitch or a real hardware problem. The free fixes to try first ranked from simplest to most involved. Exact repair cost ranges so you know what a fair quote looks like before you walk into any shop. Emergency workarounds for when you need your files right now and can barely see the screen. And the prevention steps that keep this from happening again once it’s fixed
Whether your MacBook is under warranty, qualifies for a free Apple repair program you had no idea existed, or genuinely needs a paid fix — this guide walks you through all of it. By the end, you’ll know exactly which path applies to your situation. Let’s start with what’s actually causing those lines.
What Causes Black Lines at the Bottom of Your MacBook Pro Screen?
When black lines appear at the bottom of a MacBook Pro screen, the cause almost always lands in one of two buckets: something a free reset fixes in minutes, or something that genuinely needs professional attention. I’ve worked through hundreds of these cases over the years. The split is roughly 30% software, 70% hardware — but you cannot know which side you’re on until you understand what each cause actually looks like.
The cause determines everything. A software glitch, you fix tonight. Flexgate on a 2016 to 2019 MacBook, you might qualify for a free Apple repair. A failing GPU, that’s a different conversation entirely. Here’s what’s happening inside the machine for each scenario
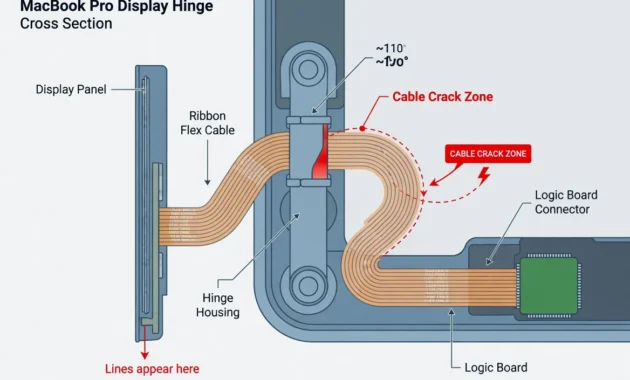
Flexgate cracking occurs — directly causing lines at
the bottom of the display
Software Glitch or Graphics Driver Bug
Software corruption is one of the most frequent culprits behind a MacBook screen glitch, and it’s also the easiest to rule out. The three most common triggers are a corrupted macOS display driver, a GPU rendering error, or an NVRAM setting that conflicts with your display configuration.
Lines from software behave differently than hardware damage. They appear randomly. They might vanish after a restart on their own. I’ve seen flickering lines that only showed up during video editing or when someone had fifteen browser tabs open alongside Final Cut. The tell is inconsistency — if the lines shift position or disappear unpredictably, software is the likely cause.
Cost to fix: zero dollars. Time required: five to ten minutes with the resets covered later
The Flexgate Problem: A Known MacBook Pro Design Flaw
Flexgate is the term repair technicians coined for a documented design flaw in certain MacBook Pro models one Apple eventually acknowledged publicly after enough machines started showing the same symptoms. The problem surfaced primarily in 2016 and ran through early 2019 across the 13-inch MacBook Pro lineup. Some 15-inch models were also affected, though less consistently
The display flex cable runs from your screen down to the logic board through the hinge. Apple designed that cable slightly too short. Every lid open, it stretches. Every lid close, it relaxes. After two or three years of daily use, the cable starts cracking internally right at the hinge point — the exact place where tension is highest. Once those internal cracks form, electrical signals stop reaching the bottom rows of pixels. That’s why the lines appear at the bottom specifically. That’s where the cable terminates.
If you own a 2016, 2017, 2018, or early 2019 13-inch MacBook Pro and you’re seeing horizontal lines at the bottom, Flexgate is a strong possibility. Test for it later in this guide. And some of these models qualify for a completely free Apple repair — even years after the warranty expired
Overheating and T-CON Board Stress
The T-CON board is the timing control component inside your MacBook that manages all electrical signals going to your display. On 2017 MacBook Pro models specifically, this board sits mounted directly above the heatsink radiator — which turns out to be a significant design problem.
Heat causes the board to expand slightly. When it expands, it loses contact with the microscopic traces that carry signals to your screen. Lines appear. You keep working. An hour later you shut everything down. The MacBook cools, the board contracts, the traces reconnect — and the lines are gone by morning. That disappear-after-cooling pattern is your diagnostic signal. It means thermal expansion, not a cracked panel or failing GPU.
I see this most often in 2017 MacBook Pros running video editing or 3D rendering software. Dust accumulation inside the vents makes the problem worse by reducing airflow. If your lines vanish reliably after the machine cools down, that’s almost certainly your answer.
Liquid Damage from Cleaning Sprays: The Hidden Cause
This one comes up constantly, and almost nobody writes about it. When someone sprays a liquid cleaner directly onto their MacBook screen, the liquid doesn’t stay on the surface. It runs down. It collects at the bottom edge of the display housing. From there it seeps into the internal components slowly, quietly, sometimes weeks before the lines ever show up.
Inside the display panel sits a small logic board with microscopic electrical traces printed in a grid pattern. Liquid corrodes those traces — eats through the conductive material and breaks the connection permanently. Because the traces are laid out in a grid, the corrosion follows a predictable path. Every fourth row of pixels loses power. That’s not random damage. That’s the grid at work, which is why liquid-damaged screens show evenly spaced horizontal lines rather than random scattered artifacts
The difference between liquid damage and Flexgate is consistency. Flexgate changes with screen angle and temperature. Liquid damage doesn’t. Once those traces are corroded, they stay corroded. Restarting doesn’t help. An external monitor test won’t reveal it because the damage is physical it’s in the panel itself, not the GPU. The only move here is replacement. Which makes this the one cause on this list that is entirely, 100% preventable with a single habit change: stop spraying anything directly on your screen.
Physical Impact or Pressure Damage
If you’ve dropped your MacBook, closed the lid on a pen or pair of earbuds, or put accidental pressure on the screen, you may have cracked the LCD panel internally. The crack doesn’t always show on the glass surface. Sometimes the damage is completely hidden inside, but it still kills rows of pixels or severs connections that appear as lines on your display.
Someone brought me a MacBook once where a friend had briefly sat on it while it was closed. No visible cracks anywhere on the outside. But internal pressure had fractured the LCD matrix — vertical lines ran down one side of the screen. That kind of damage is permanent. It needs a panel replacement. But at least it’s one of the easier things to diagnose: the lines sit in exactly the same spot every single time you look
GPU or Logic Board Failure
The GPU (graphics processing unit) is the chip that renders everything you see on your screen. If the GPU fails or if solder joints on the logic board crack, you get rendering artifacts that can include horizontal lines, colored artifacts, or sections of the display going black.
GPU and logic board problems are the most expensive cause on this list — and the hardest to fix. But they’re also easy to distinguish from screen damage using a simple external monitor test I’ll walk through in the next section.
Plug your MacBook into an external display. If that external screen shows a clean, perfect image while your built-in screen still has lines, the GPU is fine. The problem is with the screen itself. If the external monitor also shows lines or artifacts — same problem, different screen that’s your GPU or logic board telling you something is wrong at the source.
Weak Battery Causing Voltage Instability
Here’s a connection many people don’t think about: your battery delivers power to every component in your MacBook, including the display backlight and logic circuits. When a battery ages and the cells degrade, it can’t deliver stable voltage anymore. The display is sensitive to voltage fluctuations, so when power delivery becomes unstable, you see flickering lines or intermittent artifacts.
This one develops slowly. The lines flicker, come and go, and tend to get noticeably worse when battery percentage drops below 30 or 40 percent. Check your battery health: System Settings → Battery → Battery Health. Anything below 80 percent, and a battery replacement should be high on your list.
Temporary fix while you sort it out: keep the MacBook plugged in. A wired connection bypasses the aging battery cells and delivers stable voltage directly. In my experience, the flickering often stops completely when the machine stays on AC power — which at least confirms what you’re dealing with.
Is It Software or Hardware? 3 Tests That Tell You in 5 Minutes
Software problem or hardware problem those two words determine everything that comes next. These three tests take less than five minutes combined and will tell you with reasonable certainty which side of that line you’re on, before you try a single fix or spend a dollar.
I put this section here for a specific reason. I’ve watched too many people burn an hour on NVRAM resets and Safe Mode boots when their real problem was a cracked LCD panel. And I’ve watched the opposite too — someone about to pay $600 for a screen replacement when a five-minute software fix would have done it. Know which category you’re in before you do anything else.
If you want to see what these diagnostic tests actually look like in practice, this video walks through the entire process visually:
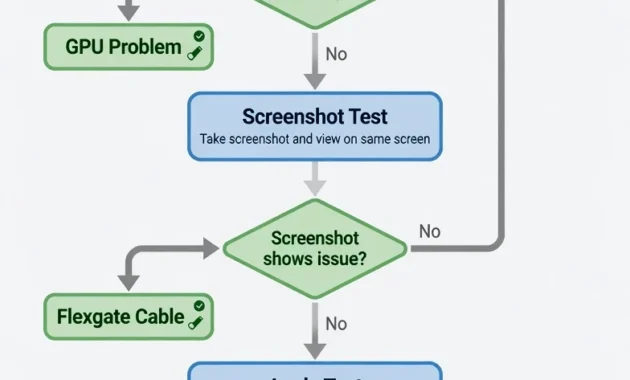
tell you exactly which repair path applies
Test #1: The External Monitor Test (Takes 2 Minutes)
The external monitor test is the fastest way to separate a GPU problem from a screen problem and it’s the first test I run every single time I’m diagnosing display issues. Two minutes, and you’ll know whether your graphics card is rendering correctly or whether the damage is specific to your built-in display.
Find a TV or external monitor borrow one if you don’t have one nearby. The adapter you need depends on your MacBook generation. Older MacBooks from before 2015 sometimes accept a standard HDMI cable directly. Mid-generation MacBooks from 2016 to 2017 need a Mini DisplayPort to HDMI adapter or a Thunderbolt 2 adapter depending on the specific model. Modern MacBooks with USB-C ports use a USB-C to HDMI adapter or a USB-C hub with HDMI output
Before you connect anything, disconnect all third party accessories from your MacBook. That means external keyboards, mice, scanners, printers, and webcams all need to be unplugged. These devices sometimes cause driver conflicts that can create false test results.
Now plug the adapter into your MacBook, connect it to the external monitor, and turn on the monitor. Your MacBook should automatically detect the external display within a few seconds. If nothing appears, try going to System Settings and clicking Displays to manually detect the external display.
Here’s how to read the results. If the external monitor shows a perfectly clean image with no lines, no artifacts, and no flickering at all, then your graphics card and GPU are working fine. The problem is with your MacBook’s internal display panel or the flex cable connecting it. If the external monitor also shows the same lines or artifacts that you see on your built-in screen, then your GPU or logic board is failing. This is the more serious scenario because it means the problem isn’t just with the screen.
Test #2: The Screenshot Test (Takes 10 Seconds)
The screenshot test sounds too easy to be useful. It isn’t. When you take a screenshot, you’re capturing what your GPU rendered before your display had any involvement raw image data, straight from the graphics processor
Press Command + Shift + 3. Your MacBook captures the screenshot and saves it to the desktop automatically. Open it in Preview or any image viewer and examine it closely.
Clean screenshot, no lines? Your GPU is rendering correctly. The problem is with the physical display panel hardware that no software fix will touch. Screenshot shows the same lines you see on screen? The problem lives in how your GPU is processing the image. That points to a software rendering bug or an early-stage GPU failure.
The reason this works is because screenshots capture what the graphics processor created before your actual display gets involved. If the problem shows up in the screenshot, it’s a GPU issue. If the screenshot is clean but your screen shows lines, it’s a display hardware problem.
Test #3: The 45-Degree Angle Test (Instant)
This one I picked up from repair technicians — it pinpoints the problem just by watching how the lines behave as you move the screen. No equipment needed. No adapters. Just your eyes and your lid
Start with your MacBook closed. Open it slowly to about 45 degrees and look at the screen. Watch what the lines do. Keep opening past 90 degrees toward 180. Do the lines disappear, change intensity, shift position? Or do they stay exactly the same no matter what angle you’re at?
Lines that disappear or shift at certain angles mean your flex cable is worn or loose that’s Flexgate behavior, and it’s something Apple may fix for free if your model qualifies. Lines that stay exactly the same regardless of lid position? That’s a cracked LCD panel or a GPU issue. No amount of cable manipulation changes a cracked panel or a failing chip.
The reason this test works is simple. Flex cables only work when they maintain proper electrical contact. When you open your lid to different angles, you change the tension and pressure on that cable. A worn cable will intermittently lose contact, making the lines appear and disappear. A physically damaged screen or failing GPU produces consistent problems regardless of lid position.
Three results, three scenarios.
External monitor clean + screenshot clean + lines change with lid angle = worn flex cable. Possibly Flexgate. Possibly free repair from Apple.
All three tests show problems external monitor included = GPU or logic board failure. Most expensive scenario.
Screenshot clean, angle test shows no change = cracked LCD panel. Replacement needed
In the next section, I’m going to show you what your options are before you spend a dime on fixing anything.
Is Your MacBook Covered for Free Repair? Check These 3 Things First
Apple has repair programs and warranty coverage that most MacBook owners never look into and I’ve watched people hand over $400 out of pocket when they had free repair options sitting unused. Before you pay anything, check these three things. It takes five minutes, and in the best case, your repair costs you exactly nothing
Having Apple cover the repair at zero cost is always the first option to pursue. If your MacBook is within its factory warranty or AppleCare Plus coverage, stop all DIY attempts immediately and go straight to an Apple Authorized Service Provider. You’ll get a new display. You’ll pay nothing. But whether you qualify comes down to three specific criteria.
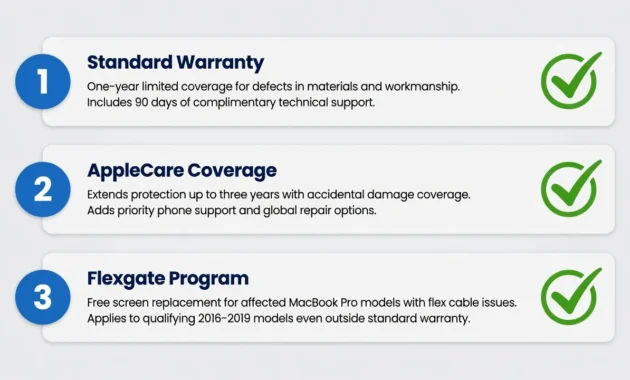
qualify for free repair without knowing it.
1. Check Your Standard 1-Year Warranty Status
Every MacBook comes with a standard one year limited warranty from Apple. If you purchased your MacBook within the last year and the display problem is not from accidental damage, your repair is covered for free.
To check your warranty status, visit Apple’s official coverage checker and enter your MacBook’s serial number.
You can find the serial number by clicking the Apple menu in the top left corner and selecting About This Mac. Look for the Serial Number field in the window that opens. Copy that number and paste it into the Apple coverage check website.
The website will instantly show you your warranty expiration date. If today’s date is before that expiration date and your MacBook Pro warranty repair issue is not accidental damage, Apple will repair or replace your display at no charge. The warranty covers manufacturing defects, which includes problems like Flexgate, cracked LCD panels, and failed GPU components. Your warranty does not cover damage from dropping your MacBook, liquid damage that you caused, or intentional physical damage.
If you’re within warranty and you’re eligible, make an appointment at your nearest Apple Store or contact an Apple Authorized Service Provider. They’ll either repair your MacBook on site or send it to Apple for repair, depending on parts availability.
2. Check Your AppleCare+ Coverage
AppleCare plus extends your coverage to three years from your purchase date instead of just one year. It also covers accidental damage, though accidental damage claims do come with a service fee. For display issues specifically, AppleCare plus covers hardware failures at no cost or with just a small service fee depending on the type of damage.
To check if you have AppleCare plus, go to checkcoverage.apple.com again and enter your serial number. The website will show you all active coverage including AppleCare plus if you purchased it. If you have AppleCare plus and your three year coverage period hasn’t ended, your display repair is covered.
Here’s something I’ve seen happen many times: AppleCare plus coverage expired, but when the person calls Apple and explains the situation, Apple sometimes extends coverage or offers discounted repair rates. It’s always worth calling even if you think you’re just outside the coverage window. Apple support representatives have some flexibility, especially with known issues like Flexgate. The phone number is 1-800-MY-APPLE. Tell them you have MacBook Pro screen lines and ask about your coverage options.
3. The Flexgate Repair Extension Program for 2016-2019 13-Inch Models
This is the most important section because many people don’t know this program exists. Apple acknowledged that certain 13 inch MacBook Pro models have a design flaw with the display flex cable. Apple launched a repair extension program to address this issue at no cost to customers, even if the standard warranty expired.
If you own a 13 inch MacBook Pro from 2016, 2017, 2018, or early 2019, you may qualify for free Flexgate repair through the Apple Repair Extension Program. The eligibility requirements are straightforward. Your MacBook must be a 13 inch model, it must be within four years of the original purchase date, and it must show symptoms of the Flexgate problem like horizontal lines at the bottom of the display or a stage light effect where the bottom of the screen looks dimmer.
To start the repair process, visit an Apple Store or contact an Apple Authorized Service Provider. Tell them you want to use the Flexgate Repair Extension Program. Here’s an important tip: not all support staff know about this program by name. If someone tells you it’s not covered, be specific and say you’re requesting service under the Flexgate repair extension program for display backlight issues on 2016 to 2019 13 inch MacBook Pro models. You can also find official information on Apple’s support website by searching for Flexgate repair extension program.
Apple will replace your display flex cable and any related components at no charge if you qualify. The repair takes a few days typically, and you don’t pay anything if the issue is confirmed as Flexgate. Some Apple locations can do the repair same day, but most will send your MacBook to a service center, which takes about one week including shipping time.
Free Apple Diagnostics for US and Canada Users
US and Canada users can call Apple Support at 1-800-MY-APPLE and request a free remote diagnostic session. A technician connects to your MacBook remotely, runs hardware tests, and gives you error codes identifying whether the problem is a display issue, GPU failure, or logic board fault. Those codes are valuable. Bring them to any repair shop or service provider they prevent misdiagnosis and make it much harder for a shop to quote you for work that isn’t actually necessary.
Having these error codes gives you concrete information before you commit to any repair. You can use the error codes when talking to repair shops or Apple Authorized Service Providers to ensure you get the right diagnosis. This free diagnostic session can save you time and money by preventing misdiagnosis.
Now that you know whether you have free repair options available, you’re ready to decide your next step. If you qualify for free repair, book an appointment immediately. If you don’t qualify for free coverage, the next section will show you the fixes to try yourself before paying for a professional repair.
How to Fix Black Lines on Your MacBook Pro Screen: 8 Solutions
Eight fixes, arranged from simplest to most involved. Start at the top and work down. Six of these cost nothing. If a restart fixes the problem, you’re done in sixty seconds and you never needed the rest of this section. If it doesn’t work, move to the next step. By Fix 8, you’ll have a definitive answer: software problem you solved yourself, or hardware problem that needs a professional
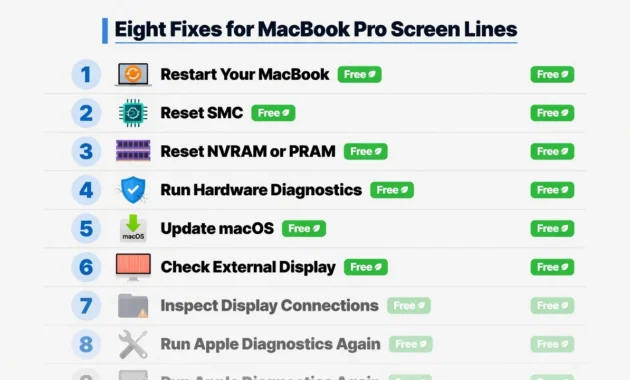
cases resolve within the first four steps.
Fix #1: Restart Your MacBook Pro (Takes 1 Minute)
A restart clears temporary data corruption and resets your GPU rendering process. After running for hours — especially after intensive work the display driver can end up in a state where it simply won’t render cleanly. A full shutdown and reboot loads those drivers fresh from scratch.
Success probability: 15 to 20 percent for temporary software glitches. When this works: the lines appeared for the first time right after a macOS update. Or they show up unpredictably and sometimes vanish on their own. Or they only appear after the MacBook has been running for several hours straight.
Here’s exactly what to do. Click the Apple menu in the top left corner. Select Restart. Wait while your MacBook shuts down and boots back up. Check your screen when the desktop appears.
If your screen is now clean, you’re done. Your problem was a temporary software glitch. If the lines are still there after restart, move to Fix 2.
Special situation: If your screen is completely frozen and won’t respond to clicks, hold down the physical power button for about 10 seconds until the MacBook powers off completely. Then press the power button once to turn it back on. This is a force shutdown, and it accomplishes the same thing as a normal restart when the system isn’t responsive.
Fix #2: Reset the SMC (System Management Controller) (Takes 5 Minutes)
The SMC is the chip that manages power delivery to every component in your MacBook — including your display backlight and GPU circuits. When it gets miscalibrated, voltage inconsistencies show up as flickering or display glitches. Resetting it forces a full power recalibration from scratch.
Success probability: 20 to 25 percent for power management problems. When this works: Lines appear randomly or intermittently. Your display brightness seems to jump up and down on its own. You’ve had power issues like unexpected shutdowns or slow charging.
The steps are different depending on your MacBook model. If you have a MacBook from 2018 to 2020 with a T2 security chip, follow these steps. If you have an M1, M2, M3, or newer MacBook, your SMC resets automatically, so skip this fix and go to Fix 3.
For T2-equipped MacBooks: shut down completely. Connect your power adapter stable power matters for this reset. Locate Shift (left side), Control (left side), Option (left side), and the Power button. Press and hold all four simultaneously for exactly 15 seconds. The screen may go black or the power indicator may flicker that’s expected. Release all keys, wait a moment, then press the power button once to boot normally
One important detail: keyboard layouts vary by country. Make absolutely certain you’ve identified the correct keys for your specific keyboard before you start. If you have a non English keyboard, the key positions might be different. Look at your keyboard carefully and find the Shift, Control, Option, and Power buttons specific to your layout.
What this does: Disk Utility repairs corrupted file system structures that can interfere with driver loading. Display drivers that can’t load properly cause visual glitches. Repairing file system corruption often allows drivers to load cleanly. If Disk Utility finds serious corruption that can’t be repaired, you may need to consider a complete system reinstall. I’ve written a detailed guide on how to factory reset your MacBook Pro without a password that walks through the entire Recovery Mode process if you need to go that route.
Fix #3: Reset NVRAM and PRAM (Takes 3 Minutes)
NVRAM and PRAM are tiny storage areas in your MacBook that remember your display settings like screen resolution, brightness level, and color profile. When these settings get corrupted, your display can show artifacts or lines. Resetting them clears all those stored settings so your MacBook can restore them fresh from macOS.
Success probability: 25 to 30 percent for display settings corruption. When this works: Lines appeared after you changed your display resolution. Your screen looked fine until you disconnected an external monitor. The problem started right after you updated macOS.
Shut down completely. Press power, then immediately hold Option + Command + P + R. Keep all four held down through the entire boot. You’ll hear the startup chime. Keep holding. You’ll hear it a second time that’s when you release. Let your MacBook finish booting normally.
Hold through two chimes, not just one. Most people release after the first chime and the reset never completes. Two chimes means the reset processed fully. Newer MacBooks with security chips show the Apple logo appear and disappear twice instead of chiming same logic: wait for the second disappearance before releasing.
What this does: NVRAM reset erases all stored display configuration data. When your MacBook boots, macOS recreates these settings from defaults. Sometimes corrupted settings are cleared, and fresh settings solve the display problem.
Fix #4: Boot into Safe Mode and Test (Takes 5 Minutes)
Safe Mode is a special boot mode that loads only essential system files and disables all third-party apps and extensions. If your lines disappear in Safe Mode, you know for certain that a third-party app is causing the problem. If the lines stay even in Safe Mode, you know it’s a system issue or hardware problem.
Success probability: 30 to 35 percent for software conflicts. When this works: Lines appeared after you installed a new app. You use screen recording software, video editing apps, or GPU intensive applications. You added a color calibration tool or display management software recently.
Shut down your MacBook. Press power, then immediately hold Shift. Keep holding through the entire boot it takes a couple of minutes longer than normal. The login screen will say Safe Boot in the top-left corner. Log in with your password
Check your display. Lines still there in Safe Mode? The problem is macOS or hardware — move to the next fix.
Lines completely gone in Safe Mode? A third-party app is responsible. Go to System Settings → Apps and look through recent installs. Screen recording software like OBS or ScreenFlow, color calibration tools, and GPU-intensive apps are the most common culprits. Uninstall the suspect, restart normally, and the problem typically disappears with it.
To exit Safe Mode: restart without holding Shift
Fix #5: Update macOS to the Latest Version (Takes 10 Minutes)
Apple regularly releases display driver patches and GPU firmware fixes through macOS updates. If your lines appeared right after an update, there’s a good chance Apple already pushed a fix in a newer build. And even if the update didn’t cause the issue, newer versions often contain display corrections relevant to specific MacBook models
Success probability: 20 to 25 percent for known driver bugs. When this works: Lines appeared right after you updated macOS. You haven’t updated macOS in several months. You know there’s a newer version available but haven’t installed it yet.
Click the Apple menu and select System Settings. Click General in the sidebar. Click Software Update. Your MacBook will check for available updates. If updates are available, click Update Now. Your MacBook will download and install the updates. This process takes about 10 minutes. You’ll need to restart your MacBook when the installation completes.
After restart, check your screen. If the update included a display driver patch, your lines might be gone.
What this does: macOS updates include patches to display drivers that handle GPU communication with your screen. Newer versions often fix glitches that appeared in previous versions. Apple releases display fixes regularly as they discover and patch issues.
Fix #6: Adjust Display Settings (Disable Auto-Brightness and Enable Color Filters) (Takes 3 Minutes)
Two display settings can stabilize flickering or intermittent lines. First: Auto-brightness. The ambient light sensor constantly adjusts screen brightness, and those constant adjustments can conflict with your backlight controller and cause flicker. Second: Color Filters. Enabling them forces your GPU into a different pixel rendering pathway and sometimes that alternative pathway bypasses the exact rendering bug causing your lines
Success probability: 15 to 20 percent for flickering issues. When this works: Your lines flicker or change intensity. The lines appear and disappear. The brightness seems to jump around. Lines are worse in different lighting conditions.
Part A: Disable Automatic Brightness. Click the Apple menu and select System Settings. Click Displays in the sidebar. Look for the option that says Automatically adjust brightness and uncheck that box. That’s it. Your brightness will stay at whatever level you set manually.
Part B: Enable Color Filters. Click the Apple menu and select System Settings. Click Accessibility in the sidebar. Click Display. You’ll see an option that says Enable Color Filters. Check that box. A dropdown menu will appear with filter options. Select any filter. Grayscale works well for testing, but you can choose Greyscale, Red Green Brown, Blue Yellow, or any other option. The specific filter doesn’t matter as much as forcing a different rendering mode.
Color Filters reroutes GPU pixel processing through an alternative pipeline. When a rendering bug lives in the default pipeline, the alternative one sidesteps it entirely. One minute to try. Zero dollars. If it works, you’ve just bypassed a GPU bug without touching hardware.
Fix #7: Free Up Storage Space (Takes 5 Minutes)
When your MacBook storage is nearly full and you have less than 10 gigabytes of free space, macOS starts using swap memory. Swap memory uses your hard drive as temporary RAM. When swap memory gets heavy, your GPU processing can become slow and choppy, causing visual artifacts and lines on your display.
Success probability: 10 to 15 percent for storage pressure issues. When this works: Your storage is below 10 gigabytes free. Lines appeared during heavy multitasking when many apps were open. Lines are worse when you’re doing intensive tasks like video rendering or photo editing.
Check how much free space you have. Click the Apple menu and select About This Mac. Click the Storage tab. You’ll see a visual representation of your drive space and exactly how much free space remains.
If you have less than 15 gigabytes free, delete files to free up space. Start with large video files, old app installers, or duplicate photos. Empty your Trash. Uninstall apps you no longer use, making sure to completely remove them including all their leftover files that can consume gigabytes of hidden space. The goal is to get 15 gigabytes or more of free space
After you’ve freed up space, restart your MacBook. Watch your screen carefully over the next few hours. Sometimes the lines improve dramatically once swap memory pressure is reduced.
What this does: With adequate free storage, your Mac doesn’t need to use slow swap memory. Everything runs faster and your GPU doesn’t struggle. Display glitches that appeared under storage pressure often disappear once space is available.
Fix #8: Run Disk Utility First Aid in Recovery Mode (Takes 15 Minutes)
Unexpected shutdowns, force restarts, and disk errors can corrupt your MacBook’s file system and corrupted file systems affect how display drivers load. Disk Utility First Aid is Apple’s built-in tool for scanning your drive and repairing those corrupted structures automatically
Success probability: 10 to 15 percent for file system corruption. When this works: Lines appeared after your MacBook crashed or shut down unexpectedly. Your MacBook has been acting slow or strange in other ways. You hear clicking sounds from your drive or spinning sounds that don’t stop.
Shut down your MacBook completely. Press the power button to start it up. Immediately press and hold Command and R together. Keep holding them while the MacBook boots. After about 30 seconds, you’ll see the macOS Utilities window appear. This is Recovery Mode.
Click Disk Utility and select Continue. In the left sidebar, you’ll see your drive listed. Usually it’s called Macintosh HD. Select it. Click the First Aid button. Disk Utility will scan your entire drive for errors and repair them automatically. This process takes 10 to 15 minutes depending on your drive size.
When First Aid finishes, it will show you results. If errors were found and repaired, you might see a message like Disk appears to be OK. Click Done. Then close Disk Utility. Click the Apple menu in the top left and select Restart. Your MacBook will exit Recovery Mode and boot normally.
What this does: Disk Utility repairs corrupted file system structures that can interfere with driver loading. Display drivers that can’t load properly cause visual glitches. Repairing file system corruption often allows drivers to load cleanly.
If you’ve tried all eight of these fixes and your screen lines are still there, the problem is definitely hardware. Move to the next section where I’ll show you more advanced fixes and when it’s time to seek professional repair.
Advanced Fixes for Persistent Screen Lines (Use with Caution)
If you’ve tried all eight basic fixes and the black lines are still there, you’re dealing with something more serious than a simple software glitch. These advanced fixes target specific hardware problems like overheating and failing batteries. I want to be clear upfront: these fixes require more technical confidence, and some of them are temporary workarounds rather than permanent solutions. But they’re worth trying before you accept that you need professional repair.
The key difference between this section and the previous one is that these fixes address underlying hardware issues rather than software corruption. They won’t fix a cracked LCD panel or a worn flex cable permanently, but they can stabilize your MacBook enough to give you time to back up files or save money for repair.
Install Macs Fan Control to Combat Overheating
If your black lines appear after your MacBook has been running for one or two hours and then disappear after the system cools down, overheating is almost certainly your problem. Excess heat causes the T-CON board inside your display to expand and lose electrical contact with the traces that power your screen. Manual fan control can prevent this by keeping temperatures lower.
Success probability: 25 to 30 percent for heat-related lines, especially on 2017 MacBook Pro models. When this works: Lines appear after extended use and disappear after shutdown. Your MacBook feels hot to the touch. Fans get very loud during intensive tasks. You use video editing or 3D rendering software regularly.
Here’s how to set this up. Visit crystalidea.com and download the free version of Macs Fan Control. Install the app and open it. You’ll see real-time temperature readings for your GPU and CPU. The default settings let your fans run on automatic, which can allow temperatures to climb above 80 degrees Celsius before the fans spin up to maximum.
Create a custom fan profile. Set your fans to increase speed when GPU temperature exceeds 70 degrees Celsius. Aim for fan speeds between 4000 and 5000 RPM at that temperature threshold. This keeps your internal components cool without making your MacBook sound like a jet engine all the time.
The reason this works is straightforward. Cooler temperatures mean the T-CON board doesn’t expand as much. With less thermal expansion, electrical connections stay stable, and your display doesn’t lose power to certain pixel rows. This is especially effective for 2017 MacBook Pro owners whose T-CON boards are mounted directly above the heatsink radiator.
Keep monitoring your temperatures with the app running. If you notice temperatures staying below 75 degrees Celsius, your overheating problem is under control. This isn’t a permanent fix because it doesn’t address why your MacBook runs hot in the first place, but it gives you a working computer while you decide on repair options.
Disable Automatic Graphics Switching (For Dual-GPU MacBooks)
Some older MacBook Pro models from 2015 to 2019, particularly the 15-inch and 16-inch versions, have both an integrated graphics processor and a discrete GPU. Your MacBook Pro automatically switches between them depending on what you’re doing. Sometimes the switching process causes rendering glitches that appear as lines or artifacts on your display.
Success probability: 15 to 20 percent for GPU switching conflicts. When this works: Lines appear when you switch between tasks. You have a 15-inch or 16-inch MacBook Pro from 2015 to 2019. Lines are worse when running both light and heavy applications at the same time.
Go to System Settings and click Battery in the sidebar. On older MacBooks, this setting might be in Energy Saver instead of Battery. Look for the option that says Automatic Graphics Switching. Uncheck that box. Restart your MacBook.
This forces your MacBook to use only the high-performance discrete GPU all the time. You’ll notice slightly shorter battery life because the discrete GPU uses more power than the integrated one, but rendering becomes consistent and stable. If your lines disappear after disabling automatic graphics switching, you’ve confirmed that GPU switching was causing the problem.
The downside is you’re sacrificing battery life for stability. This is a reasonable tradeoff if you primarily use your MacBook plugged in or if you’re waiting for repair anyway.
Run Apple Diagnostics for Error Codes
Before you take your MacBook to a repair shop, run Apple Diagnostics. This built-in hardware test gives you specific error codes that tell repair technicians exactly what’s failing. You’ll know whether the problem is your display, your GPU, or your logic board before any technician examines your machine.
When to run this: You’ve tried all the other fixes. You’re about to book a repair appointment. You want concrete diagnostic data to show the technician.
Shut down your MacBook completely. Disconnect absolutely everything except your power adapter, keyboard, and mouse. External devices can interfere with diagnostics. Press the power button to turn on your MacBook. The instant the startup begins, press and hold the D key. Keep holding D while your MacBook boots. You’ll be asked to select your language. Choose your preferred language.
Apple Diagnostics will begin running automatically. This takes five to ten minutes. The test checks your display, GPU, logic board, RAM, storage, battery, and other components. When diagnostics finishes, you’ll see a screen with results. If errors are found, you’ll see error codes. Write down any error codes you see, especially codes starting with ADP or VFD, which indicate display and GPU problems.
If diagnostics shows no errors but you still see lines, the problem might be intermittent or related to how the display cable connects. This information is valuable to give to repair technicians because it narrows down where the problem actually is.
Battery Workaround (If Battery Health Is Low)
A weak battery delivers unstable voltage to your display and GPU. This unstable power causes flickering lines and intermittent artifacts. If your battery health has dropped below 80 percent, a simple workaround is keeping your MacBook plugged in.
Success probability: 10 to 15 percent as a temporary workaround. When this works: Your battery health is below 80 percent. Lines appear more frequently when your battery percentage is low. Lines improve noticeably when your MacBook is plugged into power.
Check your battery health first. Go to System Settings and click Battery. Look for Battery Health. If the health is below 80 percent, a battery replacement is in your future. But while you’re saving money for replacement, here’s the temporary workaround. Keep your MacBook plugged into power at all times. Go to System Settings, click Battery, and disable Low Power Mode. These two steps ensure stable voltage delivery to your display components.
A wired power connection bypasses your aging battery entirely. Your MacBook draws power directly from the adapter, delivering consistent voltage to every component. Many people report that flickering lines disappear completely when plugged in if battery voltage was the cause.
This is purely a temporary workaround. Eventually you’ll need a battery replacement. But it lets you use your MacBook normally while you arrange repair or save money for parts.
If none of these advanced fixes work, you’ve reached the point where professional repair is your only option. The next section explains your repair choices and how much you can expect to pay.
Emergency Workarounds When You Need Your Files Now
Sometimes your MacBook screen is so damaged or glitchy that you can barely use it, but you desperately need to access important files before you take it in for repair. Maybe you have documents you haven’t backed up, photos you need to recover, or work you need to finish before your MacBook goes into the shop for a week. I’m going to show you two methods to get your files accessible again, even when your internal display is completely unusable.
The first method is the safest and most reliable. The second method is something users discovered out of necessity, and I’m including it because I know some people won’t have access to an external monitor. But I need to be very clear: the second method carries real risk of making your problem worse. Use it only as a last resort for emergency file recovery.
Use an External Monitor to Bypass the Broken Screen
An external monitor is your best emergency solution. When you connect your MacBook to a TV or monitor, your GPU renders a perfect image to the external display even if your internal screen is completely damaged. You can back up files, access your data, and even continue working normally while you arrange for MacBook Pro screen replacement.
The adapter you need depends on your MacBook generation. If you have an older MacBook from 2012 to 2015, you might be able to use a standard HDMI cable directly. Most MacBooks from 2016 to 2017 need either a Mini DisplayPort to HDMI adapter or a USB-C to HDMI adapter depending on your specific model. Modern MacBooks from 2018 onward all use USB-C, so you need a USB-C to HDMI adapter or a USB-C hub that includes HDMI output.
You don’t need anything fancy. A basic adapter costs between 15 and 40 dollars. Any TV or monitor with an HDMI input will work. Borrow a monitor from a friend if you need to. You can even use an old television that’s sitting in a closet.
Here’s how to set it up. Plug the adapter into your MacBook’s charging port or USB-C port. Connect an HDMI cable from the adapter to your TV or monitor. Turn on the monitor. Your MacBook should automatically detect the external display within a few seconds and start showing your desktop on the big screen.
If nothing appears on the external monitor, go to System Settings on your MacBook and click Displays. Click Detect Displays. Your MacBook will search for the external monitor and should find it.
You have two display mode options. Mirror mode shows the same image on both screens. Extended desktop mode uses your external monitor as a separate workspace. Choose whichever works better for your situation.
Once you have your desktop showing on the external monitor, you can use your MacBook completely normally. Open Finder and back up your critical files to an external drive. Upload important documents to cloud storage. Do whatever file management you need to do. Your GPU is working fine, so the external display will be absolutely perfect even though your internal screen is completely broken.
This method isn’t a repair, but it buys you time. You can continue using your MacBook productively while you save money for professional repair or decide whether to replace your MacBook entirely.
The Screen Flex Technique (Temporary Data Recovery Only — Use at Your Own Risk)
I’m including this technique because I know it saved someone’s data in an emergency situation. But I want to be extremely clear about something: this is not a fix and it’s not safe. This is a last resort when you have no external monitor available and you desperately need to access your desktop for just a few minutes.
The technique was discovered by someone whose 13-inch MacBook Retina got dropped, causing vertical lines to take over the entire display. They needed to back up important files urgently but had no external monitor available. Through experimentation, they found that carefully flexing the screen housing could temporarily reconnect loose internal connections just long enough to see the desktop.
Here’s exactly how it works. Power on your MacBook and let it boot. Place your left hand firmly on the left side of the screen bezel and your right hand firmly on the right side. Now apply a very gentle twisting or flexing pressure. You’re not trying to bend your screen. You’re applying light, gradual pressure as if trying to twist the screen frame slightly. Watch your display carefully.
If the lines start to clear or the image becomes visible, hold that exact position. Don’t move your hands. Don’t adjust the angle. Keep your hands steady. The moment you release pressure or change the angle, the lines will likely return.
An alternative grip: place one hand on the top-right corner of the screen panel and the other hand on the bottom-left corner. Apply gentle flex pressure diagonally. Some people find this grip easier to maintain than the side-to-side approach.
If the display clears up, you have approximately five to thirty minutes before the lines return. Some people report longer windows, but don’t count on it. Immediately open Finder and start backing up your most critical files to an external drive or cloud storage. Work as fast as you can. Don’t waste time on non-essential files.
Warnings about this technique: First, this is absolutely not a permanent fix. The underlying problem hasn’t changed. Once you release pressure or the MacBook moves even slightly, the lines will return and you’re right back where you started. Second, there’s a real risk of causing further damage. If your screen is cracked, applying pressure could crack the LCD panel further or damage the flex cable even more. Third, some people find it impossible to hold the position steady for more than a few minutes. Your hands will get tired.
Only use this technique if you have no other options. If you can borrow an external monitor or buy an adapter, do that instead. The external monitor approach is safer, more reliable, and gives you unlimited time to access your files.
If the screen flex technique works for you and you successfully back up your files, that’s great. You’ve bought yourself time. But immediately schedule professional repair. Your MacBook’s internal display cable or panel is damaged, and it needs expert attention. Continuing to flex the screen in future emergencies will only make the damage worse.
Three quick tests. That’s all it takes to figure out which of these causes actually applies to your MacBook. Run them in order
How Much Does It Cost to Fix Black Lines at the Bottom of a MacBook Pro Screen?
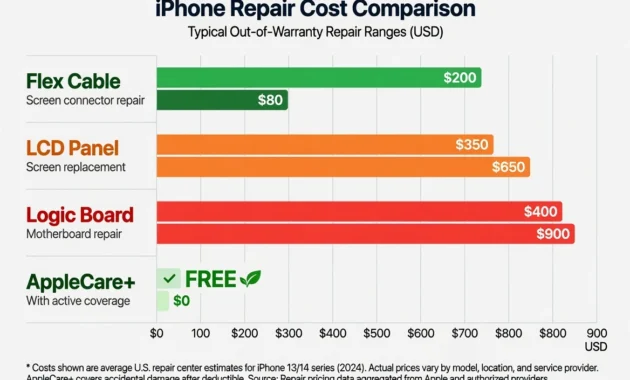
If you’re seeing those frustrating black lines creeping up from the bottom of your MacBook Pro display, the repair cost depends entirely on what’s actually wrong. The price can range anywhere from $80 to $900 or more, and honestly, this is where a lot of people get taken advantage of. I’ve seen repair shops quote customers $600 for a full screen replacement when a simple cable fix would have solved the problem for under $200.
Let me walk you through every scenario so you know exactly what you’re paying for and how to avoid getting overcharged.
replacement — always confirm which repair you need
before approving any work.
Flex Cable Replacement: $80 to $200
The flex cable is often the culprit behind those black lines, and this is the cheapest fix available. The cable itself costs between $15 and $40, but labor is what makes up most of the bill.
At an Apple Authorized Service Provider, you’ll typically pay $150 to $200 for flex cable replacement. Independent repair shops often charge $80 to $150 for the same work since they have lower overhead costs. The flex cable connects your display to the logic board, and when it degrades (a common issue Apple calls Flexgate), you get those telltale black lines at the bottom.
Here’s where I need to give you a critical warning. Many repair shops will tell you the entire LCD panel needs replacing to make significantly more money. If your display clears up when you angle your MacBook a certain way, that’s proof it’s just the flex cable. Before you hand over your laptop, explicitly tell the technician: “I need flex cable replacement only, not LCD panel replacement.” Get it in writing on your quote.
LCD Panel Replacement: $350 to $650
Sometimes the LCD screen itself is actually damaged with cracks or dead pixels that won’t go away. This requires a full panel replacement, and the costs vary widely depending on where you go.
Apple charges $500 to $650 for genuine LCD replacement, and that includes labor and warranty protection. Apple Authorized third-party providers typically charge $400 to $550. Independent repair shops with aftermarket panels run $350 to $500, though your warranty period will be shorter.
Here’s the tricky part: if you have an M1, M2, or M3 MacBook Pro, Apple often requires replacing the entire top case assembly, which includes the screen, keyboard, and trackpad all together. That jumps the cost to $700 to $900. It’s frustrating, but it’s how these newer models are designed.
Logic Board or GPU Repair: $400 to $900 Plus
The most expensive repair scenario is when the problem isn’t the screen or cable at all, but the logic board itself or the GPU (graphics processing unit). This happens when the solder joints connecting components have failed.
Specialized micro-repair shops can fix these solder connections for $400 to $600. A complete logic board replacement costs $600 to $900 or more. The honest truth? If your GPU is actually failing and not just a loose connection, it’s often cheaper to buy a refurbished MacBook than to repair it. Most shops won’t even attempt GPU replacement because it’s not economically realistic.
AppleCare Plus Repair Cost: $0 to $99
If you purchased AppleCare Plus when you bought your MacBook, the Flexgate issue is covered as a manufacturing defect at zero cost. Accidental damage coverage comes with a $99 service fee per incident, and you can file up to two claims per year.
This is one reason AppleCare Plus makes sense for MacBook owners, since screen issues are so common on these machines.
Flexgate Repair Extension Program: $0 (If Eligible)
Apple knows Flexgate is a real problem, so they created a free repair program. If you own a 2016 to 2019 13-inch MacBook Pro and your black lines show up within 4 years of purchase, you qualify for completely free flex cable replacement. No questions asked, no costs involved.
Check Section 3 of our guide for the complete eligibility requirements and how to verify if your machine qualifies.
How to Avoid Being Overcharged
This is where consumer protection matters most. Dishonest repair shops have a playbook they follow. They’ll insist you need a $400 to $650 LCD panel replacement when a $80 to $200 flex cable fix would completely solve your problem.
Before you visit any repair shop, perform the angle test from Section 2 of our guide. Tilt your MacBook screen from different angles. If those black lines disappear completely when you angle the screen a certain way, that’s definitive proof it’s just the flex cable. It’s not the LCD panel failing.
When you get to the repair shop, ask directly: “Are you replacing the flex cable, the LCD panel, or both?” Make them specify exactly which parts they’re replacing before you approve the work. Get everything in writing on your quote.
If a repair technician insists on LCD replacement despite your angle test proving the cable is the issue, walk out and get a second opinion. Reputable shops will respect what you’ve already diagnosed. They’ll be transparent about which component is actually failing because they have nothing to hide.
The goal here is simple: protect yourself from paying double or triple what a repair actually costs.
Repair or Replace? The Decision Framework
This is honestly the question I wish more people asked before spending money on a MacBook Pro screen repair. The answer is not always obvious, and making the wrong call can cost you hundreds of dollars either way. The smart decision comes down to your MacBook’s age, the repair cost, and what a comparable replacement would actually run you today.
Let me give you a clear framework I use when helping people think through this choice.
When Repair Makes Sense
Repairing your MacBook Pro screen makes financial sense when the numbers genuinely favor keeping what you already have.
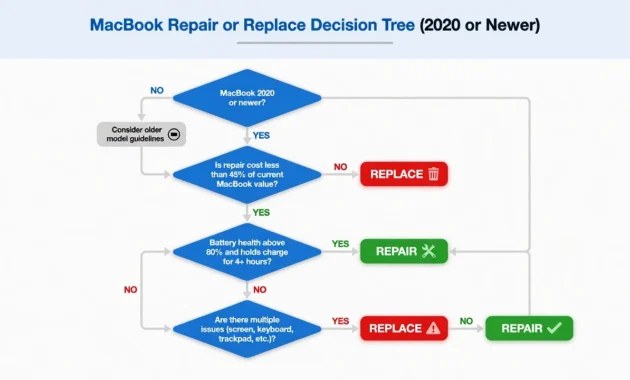
Consider repair if your MacBook was made in 2020 or newer. A 2020 or later model still has five or more years of productive life ahead of it, which means the repair investment pays off over time. Repair also makes sense when your quote comes in under $300, since that’s a reasonable amount to spend on extending a machine’s life.
If you own a high spec model with 16GB or more of RAM, a 512GB or larger SSD, and an M1 Pro, M2, or M3 chip, repairing is almost always the smarter call. Those machines hold their value well and perform at a level that most refurbished alternatives cannot match at the same price point.
Two other situations make repair an obvious choice. First, if you have AppleCare Plus, your screen repair cost is either free or just $99. Second, if your model qualifies for Apple’s free Flexgate repair extension program, there is no financial decision to make at all.
A good general rule: if the total screen repair cost is less than 40% of your MacBook’s current resale value, repair is worth it.
When Replacement Makes More Sense
Sometimes the most financially responsible decision is walking away from a repair and buying a better machine instead.
Think seriously about replacement if your MacBook was made in 2017 or earlier. Older models are reaching the end of Apple’s software support window, meaning they will stop receiving macOS updates sooner rather than later. A $500 repair on a machine that becomes obsolete in two years is a poor investment.
Replacement becomes a stronger option when your repair quote exceeds $500. At that price point, you are spending a significant portion of what a newer refurbished MacBook would cost. If your battery also needs replacement, add another $150 to $250 on top of your screen repair cost. When multiple components need fixing at once, it usually signals the machine is showing its age across the board.
A failing logic board alongside a screen issue is a serious warning sign. Logic board failure often indicates cascading hardware problems that will not stop with one repair. When repair costs exceed 50% of what a comparable refurbished MacBook costs, replacement wins every time.
For reference, current refurbished MacBook prices look roughly like this:
2020 M1 MacBook Air: $650 to $800
2021 M1 MacBook Pro 13 inch: $900 to $1100
2023 M2 MacBook Air: $950 to $1150
The Break-Even Calculation
Here is a simple formula I use to cut through the confusion and get to a clear answer quickly.
Add your total repair cost. Then check what your MacBook would sell for broken on a resale platform like eBay or Swappa. Then find the price of a comparable refurbished replacement. Compare the net cost of each path.
Here is a real example. Suppose you get a MacBook Pro screen replacement quote for $550 and your 2017 MacBook Pro would sell broken for around $300. A comparable refurbished 2020 M1 MacBook Air costs $750. Selling your broken MacBook for $300 and buying the refurbished model for $750 nets you a total cost of $450. That gives you a faster, newer machine with years of support remaining for $100 less than fixing your older one.
The break-even calculation removes emotion from the decision and replaces it with simple math.
decisions come down to MacBook age and repair cost
relative to replacement value.
Where to Buy Refurbished (If You Decide to Replace)
If the numbers point toward replacement, buying from a trustworthy source matters a lot. A bad refurbished purchase can leave you with problems similar to what you were trying to escape.
These are the sources I trust most:
Apple Certified Refurbished at apple.com/shop/refurbished offers the best warranty coverage and genuine Apple tested hardware. Best Buy Outlet sells Geek Squad certified refurbished MacBooks with a solid return policy. Back Market is a reputable refurbished marketplace with buyer protection built into every purchase. Swappa connects buyers with verified sellers and has a strong track record for Mac sales.
Be cautious with Amazon and eBay listings unless the seller carries a 98% or higher rating and clearly states their return policy. The savings are sometimes real but the risk of receiving a poorly refurbished machine is higher on those platforms.
How to Prevent Black Lines from Appearing on Your MacBook Screen
Most people only think about prevention after something has already gone wrong. I want to help you avoid that situation entirely. The good news is that many of the most common causes of black lines on a MacBook Pro display are completely preventable with a few simple habits. Whether you already dealt with this issue once or you want to make sure it never happens, these practices will genuinely protect your screen over the long term.
Never Clean Your Screen with Liquid Spray
Spraying any liquid directly onto your MacBook Pro screen is one of the fastest ways to cause permanent MacBook Pro LCD panel damage. This includes window cleaners, alcohol sprays, and even plain water sprayed directly onto the display surface.
Here is what actually happens. Liquid seeps into the bottom of the display housing where the internal display logic board and micro traces sit. Once moisture reaches those components, corrosion starts quietly and the damage often does not show up as black lines until weeks later. By then, most people have forgotten about that one cleaning session and have no idea what caused the problem.
The safe approach is straightforward. Use a dry microfiber cloth for everyday cleaning. For stubborn smudges, slightly dampen the cloth itself with distilled water before wiping the screen. Never apply moisture directly to the display surface. If you need to disinfect your screen, Apple recommends applying 70% isopropyl alcohol to a cloth first and then gently wiping. The cloth gets wet, not the screen.
Keep Your MacBook Cool (Especially 2017 Models)
Heat is a silent killer for MacBook Pro display components. MacBook Pro overheating is a leading cause of display glitches, particularly in models where the display driver board sits close to the machine’s heat exhaust path.
If you own a 2017 MacBook Pro, pay extra attention here. The T-CON board in that model sits directly above the heatsink radiator area, which makes it especially sensitive to sustained high temperatures. Repeated heat exposure degrades the soldering on display components over time and eventually causes the kind of pixel and line issues we have been discussing throughout this guide.
Follow these habits to manage heat effectively:
Never place your MacBook on soft surfaces like beds or couches during use. Soft surfaces block the bottom vents and trap heat with nowhere to go. Use a laptop stand or a cooling pad for any work session lasting more than an hour. Install Macs Fan Control if you regularly run demanding applications like video editing software or large design files. Clean dust from your MacBook’s vents every six months using short bursts of compressed air. Keep your MacBook away from direct sunlight for extended periods since prolonged heat from sunlight affects the LCD display panel in ways that are often irreversible.
Handle the Lid Gently (Flexgate Prevention)
The display flex cable that connects your MacBook Pro screen to the logic board is not designed for rough handling. Every time you open and close the lid aggressively, the flex cable bends and flexes. Over time that repeated bending causes the cable to crack internally, which leads directly to the black lines associated with the Flexgate issue.
If you own a 2016 to 2019 13 inch MacBook Pro, your model shipped with a shorter display flex cable than other versions. A shorter cable means less slack during movement and faster wear with repeated use.
Protect your flex cable with these simple habits. Always open and close the lid by gripping it at the center rather than at the corners. Let the lid close gently instead of letting it fall shut on its own. Avoid opening the screen beyond 120 to 130 degrees repeatedly since that angle puts maximum tension on the cable. Never carry your MacBook while gripping the open screen by its edges. Do not press on the lid surface while the MacBook is closed since that pressure transfers directly to the internal display components.
Update macOS Regularly
Apple releases display driver patches and GPU bug fixes through regular macOS updates. Keeping your macOS version current ensures your MacBook has the latest software corrections for known display issues.
Enable automatic updates by going to System Settings then Software Update then turning on Automatic Updates. This takes about thirty seconds to set up and quietly protects your display from software side bugs without any ongoing effort from you.
Monitor Battery Health
A degraded battery creates voltage instability that can affect your MacBook Pro display in ways that look identical to hardware screen damage. Checking battery health monthly is one of the simplest preventive habits you can build.
Go to System Settings then Battery then Battery Health to see your current status. When battery health drops below 80%, consider replacing the battery before it starts causing secondary problems. Battery replacement costs between $150 and $250, which is significantly less than a full screen repair. Catching battery degradation early protects both your display and your wallet.
Frequently Asked Questions
Why does my MacBook screen have lines that come and go?
Lines that appear after extended use and disappear after shutdown are almost always caused by overheating. Heat causes the T-CON board or display flex cable to expand and lose electrical contact temporarily, and once your MacBook cools down, the components settle back into position and the lines vanish. Installing Macs Fan Control helps manage temperatures and reduce how often this happens.
Can I fix MacBook screen lines myself without paying for repair?
Yes, if the cause is software related, free fixes like restarting, resetting the SMC, resetting NVRAM, booting into Safe Mode, and updating macOS solve the problem about 20 to 30 percent of the time. If those steps do not work, the issue is hardware and requires professional repair since flex cable or GPU fixes need specialized tools and skills most people do not have at home.
Will Apple fix my MacBook screen lines for free?
Apple will repair your screen for free if your MacBook is within the standard one year warranty, if you have active AppleCare Plus coverage, or if your 2016 to 2019 13 inch MacBook Pro qualifies for the Flexgate Repair Extension Program. Check your coverage status at checkcoverage.apple.com using your serial number before visiting any repair location.
Why do black lines appear at the bottom of the screen specifically?
The black lines at bottom of MacBook Pro screen appear in that location because the bottom edge is where the display flex cable connects to the logic board, where liquid from improper cleaning naturally collects due to gravity, and where the T-CON board sits closest to the machine’s heat output. These three hardware realities make the bottom of the MacBook Pro display the most physically vulnerable area of the entire screen.
Is it safe to keep using my MacBook with screen lines?
Continuing to use your MacBook temporarily with screen lines will not damage other components or cause data loss, but the lines will likely worsen over time if the cause is a failing flex cable or degrading LCD panel. Back up all your important files to an external drive or cloud storage right now and use an external monitor for longer work sessions while you arrange a repair.