
Before You Panic: It’s Probably Not Your Chromebook
Why Does My Chromebook Keep Disconnecting from WiFi? There’s a specific kind of frustration that hits when your Chromebook drops WiFi mid-task. You’re in the middle of something that actually matters a video call that started two minutes ago, an assignment due tonight and the screen just goes offline
Most people assume the Chromebook itself is broken. That assumption is almost always wrong. The overwhelming majority of chromebook wifi problems trace back to network misconfigurations or router behavior not hardware failure on the device.
The pattern I’ve seen over and over is the same: a settings toggle that’s sitting in the wrong position, or a network profile that silently corrupted at some point and never got cleared out. The fix, once you know where to look, takes minutes
It’s not your hardware failing. It’s not a manufacturing defect. Most of the time, it’s just a small setting that needs adjusting.
The disconnection might not be coming from your Chromebook at all. That’s the first thing worth establishing before touching a single setting
Reddit’s r/chromeos and r/techsupport threads are full of this same situation — users convinced their Chromebook is broken who eventually discover the real issue was the router all along. It’s the most common pattern in every technical forum where Chromebook connectivity gets discussed
Spending an hour resetting Chromebook settings when the actual problem is your router means you’ve changed nothing that matters and possibly cleared settings that were working fine. I’ll show you how to rule out the router in 60 seconds before touching anything on the Chromebook
I’ll show you how to identify whether the issue is your Chromebook or your network first. That one answer changes everything about how you fix it.
So take a breath. Your Chromebook is probably fine. The fix is usually simpler than you think, and I’m going to walk you through exactly how to find it.
Is It Your Chromebook or Your WiFi Router? How to Tell in 60 Seconds
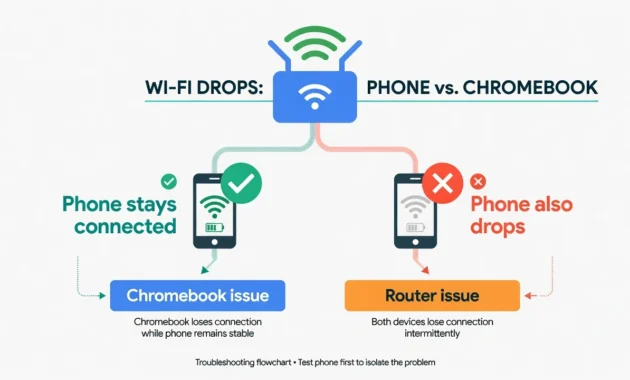
The fastest diagnostic is a single test: check whether another device on the same WiFi network stays connected. If your phone also drops it’s the router. If your phone holds steady while your Chromebook keeps falling off, the problem is specific to your Chromebook
Google’s own Chrome OS support documentation recommends this exact test as step one before any device troubleshooting and there’s a good reason for that. When your Chromebook keeps losing internet connection, the instinct is to start changing things on the device. But if the router is the actual problem, you’ll change everything and fix nothing
Let me walk you through exactly how I determine where the problem actually lives. This takes less than a minute, and it will point you in the right direction immediately.
What the WiFi Status Icons Mean on ChromeOS
Before anything else, check the WiFi icon in the bottom right corner of your Chromebook screen. That icon is your fastest read on what the connection is doing right now.
A solid WiFi fan icon means you’re actively connected. A faded or gray icon means disconnected or out of range. The X through the icon? Your WiFi radio is completely off.
I check this icon first every single time. A gray icon that flickers in and out tells me the Chromebook is actively attempting to connect but something keeps cutting the handshake. A solid white icon where websites still won’t load is a completely different problem that’s almost always DNS or a gateway issue, not a real disconnection
When the disconnection happens, watch what that icon does. Does it go gray? Does it stay solid white but the internet just stops? Those two different behaviors point to two completely different fixes. Don’t skip this observation
The 2-Device Test
Grab your smartphone or another laptop. Connect it to the exact same wireless network your Chromebook is using. That’s the whole test.
If your phone also drops or struggles, the router is the problem full stop. Your Chromebook is fine. Focus on your router settings, router placement, or contact your internet service provider if it persists
If your phone stays connected perfectly while your Chromebook keeps dropping, then your Chromebook has a device specific issue. That’s when you move forward with the Chromebook troubleshooting steps I’ll share in the next sections.
I also recommend testing on a completely different wireless network if you can. Take your Chromebook to a coffee shop, a library, or a friend’s house. Does the disconnection happen there too? If your Chromebook works fine on other networks but only struggles at home, that confirms your home WiFi router needs attention, not your Chromebook.
I’ve watched people factory reset their Chromebook when all they actually needed was a router restart or one changed setting. The two-device test takes 30 seconds and prevents that. Do it before you change anything
Why Your Chromebook Keeps Disconnecting from WiFi: The Real Causes
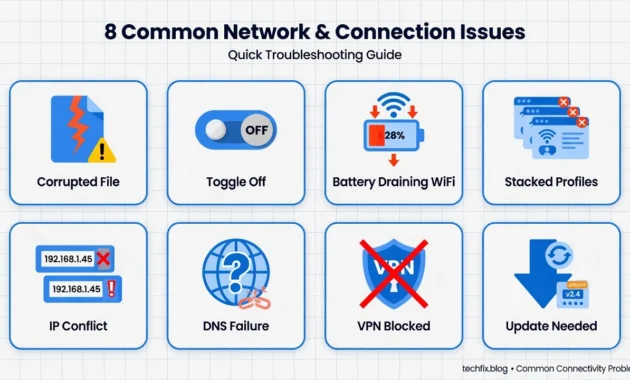
There are eight specific reasons a Chromebook repeatedly drops its WiFi connection. Corrupted saved network profiles, the auto-reconnect toggle sitting in the off position, power management cutting WiFi during idle periods, IP address conflicts on busy networks, DNS misconfigurations, stuck VPN or proxy settings, router compatibility issues, and outdated ChromeOS software with unpatched bugs.
Let me explain each of these causes so you understand exactly what’s happening behind the scenes when your chromebook network connection drops.
Corrupted Network Profiles
Saved network data can corrupt, causing connection loops that prevent your Chromebook from completing a proper handshake with your router. When you save a WiFi network on ChromeOS, the system stores authentication details, security protocols, and connection preferences. If any part of that stored data becomes corrupted, your Chromebook might connect initially then drop the connection seconds later — because the authentication keeps failing at the same point every time.
Automatic Reconnection Disabled
ChromeOS has a specific toggle for each saved network called “Automatically connect to this network.” If this setting is turned off for your WiFi network, your Chromebook will not aggressively maintain or restore the connection when interference happens or when you wake the device from sleep. The device assumes you want to connect manually each time, so it drops the connection and waits for you to reconnect rather than doing it automatically.
Power Management Cutting WiFi
ChromeOS power management wifi settings cut energy consumption during idle periods to stretch battery life. That’s by design. The problem is what happens when it decides WiFi counts as something worth cutting.
When your Chromebook enters sleep mode or sits idle for a period, the system may intentionally disconnect from WiFi to save power. This is especially common if battery saver mode is active. When you wake your device or start using it again, ChromeOS should reconnect automatically, but if the auto reconnect setting is disabled, your Chromebook stays disconnected until you manually choose the network again.
Too Many Saved Networks
Too many saved networks can cause your Chromebook’s network manager to constantly second-guess itself about which connection to maintain.
If you have saved dozens of WiFi networks over time from different locations like schools, coffee shops, friends’ homes, and old apartments, ChromeOS tries to prioritize and connect to any of those networks when it detects them.
When multiple saved networks are broadcasting nearby, the network manager can get confused about which one to maintain, leading to constant hopping between signals or dropped connections as the system tries to decide which network to prefer.
IP Address Conflicts
An IP address conflict means two devices on the same network ended up with the same IP address — and now neither one can communicate cleanly
Your router’s DHCP system is supposed to prevent this, but occasionally the assignment system glitches, especially on busy networks with many connected devices. The result is your Chromebook network connection drops intermittently as the IP conflict prevents stable communication.
DNS Misconfiguration
Misconfigured DNS settings can block web pages from loading even when your WiFi connection shows solid and active.If your Chromebook has custom DNS servers manually entered in the settings and those DNS servers become unreachable or slow to respond, websites won’t load even though the WiFi icon shows you’re connected.
Sometimes users or school IT departments configure custom DNS addresses and forget about them, and when those DNS providers have outages, your internet appears broken even though the WiFi connection itself is fine.
Stuck Proxy or VPN Settings
Stuck proxy settings or background VPN rules are among the most overlooked causes of sudden connection problems. If a VPN app is running in the background and encounters an error, it can block all internet traffic even though your Chromebook remains connected to WiFi.
Similarly, if proxy settings are configured either manually or by a school network policy and those proxy servers become unavailable, your connection will drop or appear non functional because all traffic is being routed through a server that’s not responding.
Router and Chromebook Compatibility
Some routers use wireless standards, security protocols, or frequency configurations that ChromeOS handles poorly. This is the router and chromebook compatibility issue people rarely think about. Beyond that, routers broadcasting on overcrowded WiFi channels especially in apartment buildings create interference that can knock any device off repeatedly, Chromebook included.
Some routers also create router interference by broadcasting on crowded WiFi channels, especially in apartment buildings or offices where dozens of networks overlap.
Chromebooks can struggle to maintain stable connections when too many devices are competing for the same wireless channels or when the router firmware has bugs that affect how it communicates with ChromeOS devices.
Outdated ChromeOS Software
A chromeos wifi bug in outdated system software can cause connection problems that have nothing to do with your settings or your router Google patches these through regular updates, but only if your device actually installs them.
If your Chromebook is running an old version of ChromeOS, you might be experiencing a known bug that has already been fixed in newer updates but hasn’t been applied to your device yet.
Each of those causes has a specific fix. The goal of the next sections is to walk you through identifying which one applies to your setup then fixing it directly.
Quick Fixes to Try First (2 Minutes or Less)
These quick fixes address the most common causes first and in most cases, one of them solves the problem before you need to go any deeper. I start here every time because the simpler fixes have a higher hit rate than the complex ones
When your chromebook wifi keeps dropping, your instinct might be to dive into advanced settings or reset everything. Don’t do that yet. The fixes I’m sharing in this section address the most common causes first, and one of them will likely solve your problem right now.
Turn On “Automatically Connect to This Network”
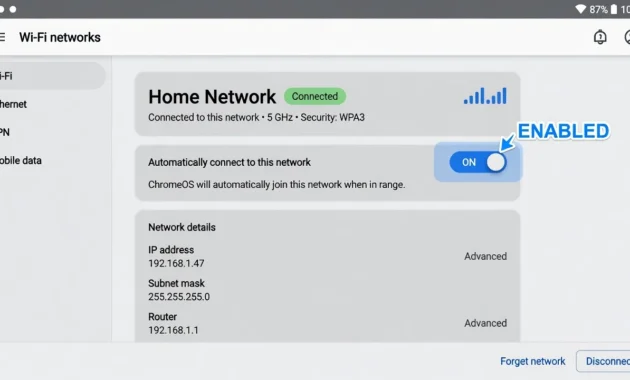
This is the fix I check first — every single time — because it’s the most commonly missed setting and it directly controls whether your Chromebook fights to hold a connection or just gives up
Click the time in the bottom right corner to open Quick Settings. Click the gear icon to open your full chromebook wifi settings. On the left sidebar, click Network, then Wi-Fi. Find your current network in the list and click on its name to open the detailed settings panel.
Look for the toggle labeled ‘Automatically connect to this network’ and turn it ON if it’s currently off. With this enabled, your Chromebook will actively maintain the connection and restore it automatically whenever the network is in range.
This setting tells ChromeOS to prioritize staying connected to this specific network and to reconnect automatically if the connection drops for any reason. When this toggle is off, your Chromebook assumes you want manual control and won’t fight to maintain the connection when interference or power saving features try to disconnect you.
I’ve watched someone spend two days troubleshooting before discovering this toggle was off. It’s that simple and that overlooked. Check it before anything else.
Enable “Prefer This Network”
This toggle stops your Chromebook from switching between saved WiFi networks when multiple familiar signals are broadcasting in range at the same time.
Click the time in the bottom right corner to open Quick Settings. In the Wi-Fi section, click on your current network name to open its settings. If you see an arrow or expand icon next to the network name, use that to open the full options panel.
Find the toggle labeled “Prefer this network” and turn it ON. By turning this on, your Chromebook will prioritize this specific network over any others in the area, preventing random switching or disconnecting when your device detects other saved networks.
This is especially helpful if you live in an apartment building or work in an office where your Chromebook can see multiple networks you’ve connected to before. Without this preference set, ChromeOS might try to switch to a different saved network that has a slightly stronger signal, causing brief disconnections during the switch.
Restart Your Chromebook’s WiFi Radio
Cycling the WiFi radio off and back on resets the wireless adapter without a full device restart. It clears whatever temporary state is making the connection unstable.
Open Quick Settings by clicking the time in the bottom right corner. Look for the WiFi tile and click it to turn WiFi OFF. Wait until you see ‘WiFi is turned off’ on screen you want the radio to fully power down before switching it back on.
After you see that confirmation message, click the WiFi tile again to turn it back ON. Your Chromebook will scan for available networks and reconnect to your preferred network automatically if you enabled the auto connect setting from the first fix.
I use this quick reset constantly when I notice my connection getting sluggish or unstable. It takes ten seconds and often immediately restores a stable connection without touching any other settings.
Restart Your Chromebook (and Your Router)
A full hardware restart of both your Chromebook and your WiFi router clears cached connection states and forces both devices to establish a fresh connection from scratch.
Here’s the exact order I follow, and the sequence matters. First, completely power off your Chromebook: press the power button and select Shut down from the menu that appears. If the screen is frozen and won’t respond, press and hold the power button for about 10 seconds to force a shutdown. Don’t just close the lid. Actually shut it down. Next, unplug your Wi-Fi router from power. If you have a separate modem, unplug that too. Wait a full 30 seconds with everything powered off.
Plug your router back in first and wait for it to fully boot up. Most routers take one to two minutes to complete their startup sequence and begin broadcasting the wireless network again. You’ll know the router is ready when all the normal indicator lights are solid rather than blinking.
After your router is fully running, power on your Chromebook and let it boot up completely. Once ChromeOS loads, your Chromebook should connect to the WiFi network automatically and the connection should be stable.
This sequence works because it clears stuck DHCP assignments, corrupted handshakes, and memory cache issues on both devices simultaneously. Router first, always. Wait for it to fully boot before powering on the Chromebook the Chromebook needs a stable network to connect to when it starts up
How to Fix Chromebook WiFi Disconnecting: Step-by-Step Standard Fixes
If the quick fixes didn’t solve it, these steps target deeper configuration issues. I’ll explain what to do and why each internet disconnection fix works so you understand the cause, not just the solution
These are the proven methods I rely on when simple toggles and restarts don’t resolve the issue. Follow these steps in order, and test your connection after each one to see if the problem is solved.
Update ChromeOS to Fix WiFi Bugs
Outdated ChromeOS software can cause hardware compatibility issues with your WiFi adapter and create bugs that interfere with maintaining stable connections. I always check for system updates first in my standard troubleshooting sequence because Google regularly patches chromeos wifi bug issues through firmware update releases.
Click the time in the bottom right corner and select the Settings gear icon. Scroll down the left sidebar and click on About ChromeOS near the bottom. On the right side of the screen, you’ll see your current ChromeOS version number and a button labeled Check for updates.
Click that button and wait while your Chromebook contacts Google’s servers to see if a newer version is available. If an update exists, ChromeOS will download and install the update automatically. Your Chromebook will need to restart to apply the firmware update, so save any open work before starting this process.
Why does this help?Each ChromeOS update includes driver improvements for wireless adapters, fixes for known connection bugs, and better compatibility with different router models.
You can check your current ChromeOS version and update status directly from your device settings.
If your Chromebook is running an older version, you might be experiencing a networking issue that Google already patched weeks or months ago but that hasn’t been applied to your device yet.
I’ve seen outdated ChromeOS cause random disconnections that vanished the moment the system updated. One update, problem gone. Keep the system current.
Forget and Reconnect to Your WiFi Network
Forcing a fresh connection handshake can eliminate login loop errors caused by corrupted saved network data. When you forget wifi network chromebook settings and reconnect from scratch, you clear out any authentication problems or corrupted security credentials causing the disconnection cycle.
Open Settings and navigate to Network on the left sidebar. Click Wi-Fi to expand your wireless options. Look for the section labeled Known networks and click on it to see all the WiFi networks your Chromebook has saved.
Find your current WiFi network in this list. Click the three vertical dots next to the network name to open a small menu. Select Forget from that menu. Your Chromebook will immediately delete all saved information about this network including your password, security settings, and connection preferences.
Now reconnect to the network as if it’s the first time. Click the time in the bottom right corner, find your WiFi network in the list of available networks, click on it, and enter your network password when prompted. Make sure to enable the “Automatically connect to this network” toggle when you reconnect so you don’t have to repeat this process.
This complete reset of the network profile eliminates corrupted configuration data that can block proper connection handshakes. That repeating connect disconnect pattern is the signature of a corrupted saved profile. When I see it, forgetting and reconnecting is always my first move
Clean Up Old Saved Networks
Removing old connection logs forces your Chromebook to stop trying to connect to obsolete routers that are no longer available. If you’ve saved dozens of WiFi networks over time from coffee shops, schools, friends’ houses, libraries, hotels, and previous apartments, your Chromebook’s network manager can get confused about which connections to prioritize.
Go back to Settings, then Network, then Wi-Fi, then Known networks just like in the previous step. This time, look through the entire list of saved networks and identify any you no longer use regularly. Click the three dots next to each old network and select Forget.
Be aggressive with this cleanup. If you haven’t connected to a network in months or if the network belongs to a place you don’t visit anymore, delete that saved profile. Keep only the networks you actively use like your home WiFi, your workplace or school network, and maybe one or two frequent locations.
Why does this prevent chromebook network connection drops? When multiple saved networks are broadcasting nearby, ChromeOS tries to evaluate which one to connect to based on signal strength and saved preferences. Too many saved profiles can cause the network manager to constantly reevaluate and switch between options, creating brief disconnections during each switch attempt.
I cleaned out 30 old saved networks from a student’s Chromebook once, and the random disconnections that had plagued the device for weeks stopped immediately. The network manager no longer wasted resources trying to evaluate networks that weren’t even accessible.
Run the ChromeOS Network Diagnostics Tool
ChromeOS includes a built in diagnostics tool that tests your wireless hardware, your connection to the router gateway, and your DNS resolution to pinpoint exactly where connection failures are happening. This official troubleshooting utility gives you specific information about what’s breaking rather than making you guess.
Open Settings and click About ChromeOS in the left sidebar. Look for a button or link labeled Diagnostics and click on it to launch the diagnostic app. In the diagnostics window, select Connectivity from the left panel options.
The connectivity diagnostic will run a series of automated network troubleshooting steps. First it checks if your WiFi hardware is functioning properly at the physical layer. Then it tests if your Chromebook can successfully communicate with your router’s gateway address. Finally it verifies that DNS resolution is working so your Chromebook can translate website names into IP addresses.
Watch the results as each test completes. If the hardware test fails, you likely have a physical WiFi adapter problem that might require professional repair. If the gateway test fails but hardware passes, your router or its configuration is the issue. If DNS fails but the other tests pass, you need to reset your DNS settings which I’ll cover in the advanced fixes section.
This diagnostic tool is incredibly valuable because it tells you exactly which layer of the connection is failing. I use the diagnostics results to decide which specific fix to try next rather than working through every possible solution blindly.
This diagnostic tool gets overlooked in most guides, but it’s one of the most direct ways to pinpoint where the connection is actually failing without guessing
Advanced Fixes (For Persistent Issues)
If you’ve worked through the quick fixes and standard troubleshooting without solving your disconnection problem, these advanced techniques target deeper technical issues. I’m sharing these because they address specific scenarios that cause stubborn WiFi problems, but they require a bit more technical comfort to implement safely.
Keep in mind that DNS and proxy configuration changes can sometimes affect overall device performance.If you notice your Chromebook running slowly after making these adjustments, our complete performance troubleshooting guide covers how to diagnose whether it’s a configuration issue or a separate performance problem
Before trying these advanced fixes, make sure you’ve completed all the standard steps from the previous section. These fixes work best when you know exactly what the underlying problem is, so use the diagnostics tool result from Section 5 to guide which advanced fix to try first.
Switch Between 2.4GHz and 5GHz WiFi Bands
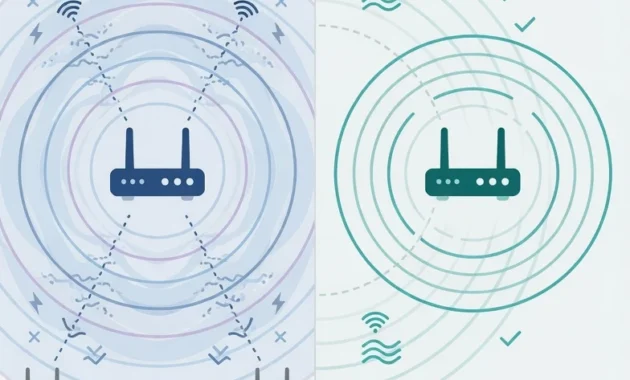
Your WiFi router broadcasts on two different frequency bands that behave very differently, and your Chromebook might be more stable on one band than the other. Understanding how to switch between these bands can solve persistent disconnection issues caused by interference or compatibility problems.
The 2.4GHz band has longer range and travels through walls more easily, but it’s also more crowded. This frequency band is used by WiFi routers, cordless phones, baby monitors, microwave ovens, and countless other wireless devices. When lots of devices compete for the same 2.4GHz space, you get interference and dropped connections.
The 5GHz band is faster and less crowded because fewer devices use this frequency. However, 5GHz signals don’t travel as far and get blocked more easily by walls and obstacles. If your Chromebook is far from your router, 5GHz might give you weak signal. If you’re close to the router, 5GHz usually provides a more stable connection.
Check your router’s settings to see if you can separate the two bands into different WiFi network names. Many modern routers let you create or enable separate SSIDs for 2.4GHz and 5GHz. Try connecting your Chromebook to the opposite band from what you’re currently using. If your Chromebook keeps disconnecting on 2.4GHz, switch to 5GHz and see if the connection stabilizes. If 5GHz is problematic, go back to 2.4GHz.
I had a student with a Chromebook that constantly dropped connection near the windows. Switching from 2.4GHz to 5GHz fixed the problem completely because the 2.4GHz band in that building was overwhelmed with neighborhood WiFi signals and other interference.
Set a Static IP Address
A static IP address locks your Chromebook to a specific address on your network, which prevents your router’s DHCP system from reassigning it a different one during reconnection events. When an IP conflict is the cause, the disconnection typically happens shortly after connecting your Chromebook gets online briefly, then drops off as the conflict surfaces
Open Settings and navigate to Network, then Wi-Fi. Click on your current WiFi network name to open its detailed settings. Look for a Network tab or section where you can configure IP settings. By default, it should say Configure IP automatically which means your router assigns an IP address to your Chromebook automatically.
Change this setting to Manual configuration. Your Chromebook will ask you to enter an IP address, gateway address, and DNS addresses manually. Enter an IP address in the same range as your router uses. Most home routers use addresses starting with 192.168.1. so you might use 192.168.1.200 or 192.168.1.250 for your Chromebook.
For the gateway, enter your router’s IP address which is usually 192.168.1.1. For DNS, use your router’s DNS or Google’s public DNS addresses 8.8.8.8 and 8.8.4.4. Once saved, your Chromebook will always use that specific IP address on your network rather than getting a new one each time it connects.
This fixes chromebook network connection drops caused by IP address conflicts where your router accidentally assigns your Chromebook an address already used by another device. However, only try this fix if you’re comfortable with basic network settings because incorrect configuration can prevent your Chromebook from connecting at all.
Turn Off VPN and Proxy Settings
VPN apps and proxy server settings can create routing conflicts that block your connection entirely or cause intermittent disconnections. If your Chromebook has a VPN app installed or your school or workplace configured proxy settings, these can interfere with normal WiFi operation.
First, check if you have any VPN apps installed on your Chromebook. Click the App Launcher circle in the bottom left corner and search through your installed apps for anything labeled VPN or proxy. If you find a VPN app, uninstall it or at least disable it and restart your Chromebook to see if disconnections improve.
Next, check your network proxy settings. Open Settings and click Network. Select your current WiFi network and look for a Proxy section or Advanced settings option. Make sure the proxy setting is set to Direct internet connection or None rather than Manual proxy or Auto detect proxy. If manual proxy or auto detect is enabled, disable it and save your settings.
Stuck proxy settings or active background VPN rules are incredibly common culprits for sudden connection problems especially on school Chromebooks or work devices. When the proxy server the VPN app is configured to use becomes unavailable or unreachable, your Chromebook appears to be connected to WiFi but can’t actually send or receive internet traffic.
I helped troubleshoot a Chromebook that seemed completely broken until we discovered a proxy setting that was configured months earlier and forgotten about. Disabling that proxy immediately restored full internet functionality.
Check Your DNS Settings
DNS settings control how your Chromebook translates website names into IP addresses so it can find and reach web pages. Misconfigured DNS can block web pages from loading even if you are technically connected to your WiFi network and your connection appears stable.
Open Settings and click on Privacy and security in the left sidebar. Look for a Security section or DNS provider option. Click on the DNS section to see your current DNS configuration. It should be set to With your current service provider or Network default which means your router handles DNS translation automatically.
If you see custom DNS addresses entered manually, try resetting them to Network default. Sometimes school IT departments or previous owners configure custom DNS servers, and if those servers become unavailable, your internet access breaks even though your WiFi shows connected.
Open your browser and try to load a website. If nothing loads but your WiFi icon shows connected, DNS misconfiguration is almost certainly the issue. Resetting to Network default DNS fixes it in most cases without any other changes.
Disable Bluetooth to Reduce Interference
Bluetooth and 2.4GHz WiFi share the same radio frequency spectrum, and when both are active simultaneously, they can cause interference that degrades WiFi performance. If your Chromebook has persistent connection instability, disabling Bluetooth temporarily can help identify whether Bluetooth interference is the culprit.
Open Quick Settings by clicking the time in the bottom right corner. Look for the Bluetooth tile and toggle it OFF. Give your Chromebook a few minutes to stabilize its WiFi connection, then test your internet connection with a speed test or by streaming video.
If disabling Bluetooth immediately improves your WiFi stability, you’ve found the problem. Bluetooth and your 2.4GHz WiFi band are interfering with each other. You can either leave Bluetooth permanently off, switch your Chromebook to 5GHz WiFi band where Bluetooth interference doesn’t apply, or move your WiFi router farther away from Bluetooth devices like wireless headphones or speakers.
Reset Your Network Settings
Resetting your network settings clears all saved WiFi networks and returns network configurations to factory defaults. This is a more drastic step than forgetting a single network because it removes everything, but it can fix persistent problems caused by accumulated configuration corruption.
Open Settings and look for an Advanced section or Reset options. Find Reset network settings and click it. Your Chromebook will warn you that this action will delete all saved WiFi networks and reset network drivers to default. Confirm that you want to proceed.
After the reset completes, your Chromebook will restart and you’ll need to reconnect to your WiFi network fresh. Select your network, enter your password, and enable the auto connect toggle from Section 4 so you don’t have this problem again.
I treat network reset as the last step before a full factory reset. It’s the closest you can get to wiping the device clean without actually wiping it.
Only try this step if all other troubleshooting has failed because you’ll lose all saved network profiles and have to reconfigure everything from scratch.
Your Chromebook Disconnects from WiFi When Idle or You Close the Lid? Here’s the Fix
If your Chromebook drops WiFi specifically when you close the lid or leave it sitting for a few minutes, the culprit isn’t a WiFi problem it’s power management working exactly as designed, just not in a way that works for you
This specific scenario happens because ChromeOS intentionally cuts WiFi to extend battery life during sleep mode, and if your auto reconnect settings aren’t configured correctly, your device won’t automatically restore the connection when you wake it up.
I’m addressing this separately because the troubleshooting path is completely different from general WiFi drops and most guides lump them together, which doesn’t help.
You’ll close your Chromebook for a short break, open it back up, and suddenly you’re offline. The connection was fine before you closed the lid, so you know it’s not a general WiFi problem. It’s your power management settings working against you.
Enable Auto-Reconnect After Sleep
The most important setting for preventing sleep mode disconnections is the auto reconnect toggle I mentioned in Section 4, but it works differently in this specific sleep scenario. When your Chromebook wakes from sleep, ChromeOS needs to know you want it to automatically reconnect to your WiFi network rather than wait for manual reconnection.
Click the time in the bottom right corner and open Settings. Navigate to Network and then Wi-Fi. Find your current WiFi network and click on it to open the detailed settings. Look for the toggle labeled “Automatically connect to this network” and make absolutely sure it’s turned ON.
This setting is the critical piece that prevents sleep mode wifi disconnect problems. When your toggle is enabled and you wake your Chromebook from sleep, the device automatically reconnects to your network within a few seconds. Without this setting enabled, your Chromebook stays disconnected after waking and forces you to manually reconnect every time.
I’ve seen this exact pattern repeatedly — someone closes their Chromebook for a break, comes back 20 minutes later, and can’t figure out why they’re offline.
They restart the router, change settings, and troubleshoot for twenty minutes when the actual problem is just one forgotten toggle. If you’re experiencing this pattern, enable auto reconnect right now and test it.
Turn Off Battery Saver Mode
Battery saver mode in ChromeOS intentionally disables or reduces power consumption on various hardware features including WiFi during low power states. When battery saver mode is active and your Chromebook’s battery drops below a certain threshold, the system may disable WiFi entirely to conserve power, causing immediate disconnections.
Open Settings and look for Device in the left sidebar. Click on Device and then look for Power or Battery settings. You should see an option for Battery saver mode or Power management. This setting usually has three options: Off, Standard, or Maximum power saving.
Set battery saver mode to Off if you want your Chromebook to maintain WiFi connection even when the battery is low. If you want to keep battery saver mode enabled for other power conservation benefits, you can adjust the threshold so it only activates at very low battery levels rather than at moderate power levels.
The chromebook battery saver disconnecting wifi issue happens because battery saver mode prioritizes battery life over connectivity. When the system calculates that disabling WiFi will extend battery life by a meaningful amount, it makes that trade-off. However, this creates the frustrating scenario where you close your lid thinking you’ll quickly reconnect later, only to find yourself offline when you reopen the device.
If you primarily use your Chromebook plugged in, turn battery saver mode off completely. If you rely on battery life, keep it on just know that idle WiFi drops are part of that trade-off.
Try both of these changes together before anything else. In most sleep-disconnect situations I’ve dealt with, one or both of them solves it entirely
Brand-Specific Fixes: HP, Acer and Lenovo Chromebooks
Brand-specific WiFi quirks do exist, but they’re rarer than people assume. HP, Acer, and Lenovo all have certain model runs where firmware or driver issues created specific wireless problems. I’m covering them here so you know whether your model is one of them and where to look if it is.
The good news is that all the fixes I’ve covered in the previous sections work across every Chromebook brand. However, some manufacturers have specific firmware versions or driver updates that address WiFi compatibility problems unique to their models.
HP Chromebook WiFi Keeps Disconnecting
Some older HP Chromebook models have experienced WiFi instability caused by wireless adapter driver issues or firmware bugs specific to those production runs.
If you own an HP Chromebook, especially models released before 2020, check the HP support website to see if there are driver or firmware updates available for your specific model number.
You can find your HP Chromebook model by clicking Settings, then About ChromeOS. Look for the Model name which will be something like HP Chromebook 14 G5 or HP Elite Dragonfly Chromebook. Write down this exact model number and visit hp.com/support.
Search for your specific model on the HP support page and look for any available drivers or firmware updates. HP sometimes releases updates that specifically address wireless connectivity issues. Download and install any available updates for your WiFi adapter or system firmware.
If HP updates don’t solve the problem, work through all the standard fixes from Sections 4, 5, and 6 systematically. Most HP Chromebook WiFi disconnections respond to the auto reconnect toggle, network reset, or DNS configuration fixes I detailed earlier.
The brand itself rarely causes the problem, but confirming you have the latest firmware ensures you’re not dealing with a known bug that HP already patched.
Acer Chromebook Disconnecting from Internet
Some Acer Chromebook models from specific production runs have shown intermittent disconnection issues that Acer resolved through ChromeOS updates.
Since Acer Chromebooks receive updates directly from Google as part of ChromeOS, your first step should be ensuring your system is fully updated.
Open Settings, click About ChromeOS, and verify you’re running the latest version. If updates are available, install them and restart your device. Acer acer chromebook disconnecting internet issues often resolve after a system update because Google continuously improves wireless driver compatibility for all Chromebook manufacturers.
Check the Acer support website for your specific model to see if Acer has published any known WiFi issues or recommended troubleshooting steps. While most fixes are universal across Chromebooks, Acer occasionally documents model specific workarounds that can help.
If your Acer Chromebook continues disconnecting after updating ChromeOS, the problem isn’t brand specific. Follow the troubleshooting sequence from the earlier sections, starting with the quick fixes and progressing through standard and advanced options as needed. Acer devices respond to the same solutions as any other Chromebook brand.
Lenovo Chromebook WiFi Dropping
Lenovo has documented several WiFi issues affecting certain Chromebook production runs, particularly models widely deployed in education settings
Some Lenovo models from specific years had wireless adapter compatibility problems that were resolved through ChromeOS updates and driver improvements.
Visit lenovo.com/support and search for your specific Chromebook model number. You’ll find it in Settings, About ChromeOS under Model name. Check whether Lenovo has published any technical bulletins or known issues related to WiFi connectivity for your exact model.
Like other manufacturers, Lenovo Chromebooks receive their primary software updates through Google and ChromeOS. Make sure your device is completely updated by going to Settings, About ChromeOS, and checking for updates. These system updates often include wireless adapter driver improvements that address lenovo chromebook wifi dropping problems specific to certain hardware configurations.
If you’re experiencing WiFi drops with a newer Lenovo Chromebook model, the issue is almost certainly not hardware related and responds well to the settings adjustments and troubleshooting steps I’ve outlined. Work through the quick fixes first, then progress to standard and advanced fixes if needed.
All three brands run the same ChromeOS operating system on similar wireless hardware. The causes and fixes are virtually the same regardless of manufacturer. Check the brand support pages for model-specific firmware, then work through the universal troubleshooting steps.
School Chromebook Keeps Disconnecting? What Students Need to Know
If your Chromebook came from a school or university, it’s a managed device — and that changes what troubleshooting options you actually have access to.
School administrators lock down certain settings to protect network security and prevent students from making changes that could affect the entire school network.
This means some of the fixes I’ve shared in previous sections won’t be available to you, but plenty of troubleshooting options still are.
I’ve worked with students facing managed Chromebook wifi problems who got frustrated trying fixes that their school’s IT department deliberately disabled. Understanding what you can and cannot change saves you time and frustration.
Your school’s IT team configured your Chromebook with specific network policies before it reached your hands. These policies control which WiFi networks you can connect to, what DNS servers your device uses, whether you can enable certain wireless modes, and which system settings you’re allowed to modify.
The administrator doesn’t want to prevent you from using WiFi. They want to ensure all school devices follow the same security standards and don’t interfere with the school network.
Start with the quick fixes from Section 4 that don’t require admin access. You can definitely toggle the auto reconnect setting by clicking Settings, Network, Wi-Fi, and finding your school network to enable “Automatically connect to this network.”
You can also restart your WiFi radio and restart your Chromebook itself without needing permission. These basic troubleshooting steps work on managed devices just like personal Chromebooks.
You can also run the ChromeOS diagnostics tool from Section 5 by opening Settings, About ChromeOS, then Diagnostics, and selecting Connectivity.
Running this diagnostic doesn’t change any settings, it just shows you what’s happening with your connection. If you see specific errors in the diagnostic results, you can show those results to your IT department and they’ll understand the exact problem.
What you probably can’t do on a managed Chromebook: forget and reconnect to the school network, change DNS, disable Bluetooth, reset network settings, or modify proxy configurations. These are locked deliberately. Trying to force changes around those locks can trigger security alerts that flag your account with the IT team.
If the quick fixes don’t solve your managed Chromebook wifi problems, document what you’ve tried and visit your school’s IT support office. Bring your Chromebook and explain that you’re experiencing WiFi disconnections. Tell them you’ve enabled auto reconnect and restarted the device but the problem persists. Show them the diagnostics results if you have them.
Your school’s IT team has access to network logs and management tools you don’t have. They can see whether your device is having legitimate connection issues or whether it’s a network policy causing the disconnection. They can also push updated drivers or settings to your device that might immediately solve the problem.
Go to your IT department. Bring the diagnostics results if you ran them. Schools expect these reports — the IT team would genuinely rather fix a connection issue than have a student stuck for days
Connected to WiFi But No Internet? Here’s What’s Wrong
This scenario is different from a WiFi drop. Your Chromebook shows a solid connection, but websites won’t load and apps can’t reach anything.
Your WiFi icon displays solid and connected, but when you try to open a browser or check email, nothing happens. This specific problem usually stems from DNS issues, captive portal problems on public networks, or proxy settings blocking your traffic rather than an actual WiFi disconnection.
I’m addressing this separately because the troubleshooting steps are different from fixing WiFi drops. You don’t need to reconnect or restart your router. You need to unblock the path between your Chromebook and the actual internet content.
Connected-but-no-internet situations feel mysterious because the icon says you’re online. But they resolve quickly once you identify whether the block is DNS, a captive portal, or a proxy setting
Public WiFi Not Loading Login Page
When you connect to WiFi at a coffee shop, airport, or library, the network usually requires you to accept terms of service and log in before you get full internet access. This login page is called a captive portal, and it’s supposed to appear automatically in your browser the moment you connect.
Sometimes the captive portal doesn’t appear automatically, especially on newer Chromebook versions or when connecting to certain WiFi networks. When this happens, you’re technically connected to the wireless network but you can’t access any internet content because the network hasn’t authenticated your device yet.
The fix is simple and manual. Open your browser and try visiting a basic HTTP website instead of an HTTPS website. Try going to These unencrypted HTTP sites often trigger the captive portal redirect automatically even when regular websites don’t respond.
When you visit that basic website, your Chromebook will intercept the request and show the network’s login page. Accept the terms of service, log in if required, and the captive portal will release you to full internet access. After that, your regular websites will load normally.
This happens frequently at public WiFi hotspots because the portal system works differently than most people expect. Your Chromebook is doing exactly what it should do, but the portal needs to intercept a specific type of web request to show the login screen.
DNS or Proxy Blocking Your Connection
DNS misconfiguration can block browsing even when your WiFi shows connected because DNS is what translates website names into the IP addresses your Chromebook needs to reach them. If your DNS settings point to servers that are down, unreachable, or incorrectly configured, your Chromebook can’t find any websites even though your wireless connection works perfectly.
Check your DNS settings by opening Settings, then Privacy and security, then finding the DNS or Security section. Look for the DNS provider setting and confirm it’s set to With your current service provider or Network default. If you see custom DNS addresses entered manually, try resetting them to automatic.
Proxy settings work similarly to DNS problems. A proxy server is supposed to act as an intermediary between your Chromebook and the internet, but if the proxy server is misconfigured or unavailable, it blocks all your traffic. Go to Settings, Network, your current WiFi network, and look for Proxy settings. Make sure the proxy is set to Direct internet connection or None rather than Manual proxy.
If you’re on a school or work network, your IT department may have configured both DNS and proxy settings intentionally. In that case, contact your IT support team to verify those settings are correct and the servers are functioning properly.
Reset your DNS to automatic and your proxy to direct connection. In most cases, one of those two settings is the entire problem. Fix them and the internet comes back
Last Resort: Powerwash (Factory Reset) and When to Contact Support
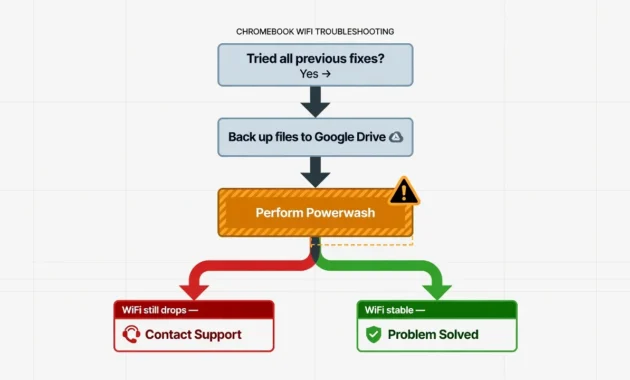
If you’ve worked through every troubleshooting step in this guide and your Chromebook still drops its WiFi connection, you’re looking at either a hardware failure or a problem that requires professional support. Before you give up on your device, I want to walk you through the final nuclear option and explain when it’s time to reach out for expert help.
A Powerwash is a factory reset that wipes everything from your Chromebook and reinstalls ChromeOS from scratch. This is an extreme measure that deletes all your local files, settings, and saved data. I only recommend it after you’ve confirmed the problem isn’t your router and you’ve tried all the standard and advanced troubleshooting steps I’ve detailed.
How to Perform a Powerwash
A Powerwash completely clears your Chromebook’s storage and returns it to factory default settings. The process takes about 10 to 15 minutes depending on your internet connection and Chromebook model. Before you start, understand that this action is irreversible and will delete everything stored locally on your device.
Back up any important files before proceeding. If you have documents, photos, or projects saved directly on your Chromebook rather than in Google Drive or cloud storage, download or move them to a secure location first. ChromeOS stores most data in the cloud automatically through your Google Account, so most of your information should be safe, but anything unique to your device will be lost.
Open Settings and scroll down to find Advanced or Reset options. Look for a button or option labeled Powerwash or Reset settings. Click on Powerwash to begin the reset process. Your Chromebook will ask you to confirm the action and will warn you that all local data will be deleted and the system will reinstall ChromeOS.
Confirm that you want to proceed and your Chromebook will restart and begin the Powerwash process. The device will go through several restart cycles while ChromeOS reinstalls itself fresh. Once the process completes, your Chromebook will boot up as if it came straight from the factory, and you’ll need to log in with your Google Account to set it up again.
After the Powerwash completes, connect to WiFi and enable the auto reconnect toggle immediately before doing anything else. Test your connection for several hours. If the WiFi disconnection problem still occurs after a complete factory reset, the issue is almost certainly a hardware failure in the WiFi adapter rather than a software configuration problem.
When to Contact Support
If your Chromebook still disconnects after trying every fix including a complete Powerwash, it’s time to contact professional support. At this point you’ve eliminated software issues and network configuration problems, which means the WiFi hardware itself is likely failing.
Contact Google Support if you own a personal Chromebook by visiting support.google.com/chromebook. Have your ChromeOS version number ready. You’ll find this in Settings, About ChromeOS. Also have your Chromebook model name and any error messages from the diagnostics tool available to share.
If you’re experiencing this issue on a school or work managed Chromebook, contact your IT department or help desk instead of Google directly. Your school’s IT team manages the device and handles warranty claims and repairs.
Contact your router manufacturer or your internet service provider if your diagnostic tests showed that the gateway connection failed or that other devices couldn’t connect either. This confirms the problem is your network hardware rather than your Chromebook. The internet service provider can run line tests and check whether your modem and router are functioning properly.
When you contact support, explain that you’ve worked through standard troubleshooting and performed a complete Powerwash and that the WiFi disconnection persisted through all of it
Provide your diagnostic results if you saved them. This information helps support teams quickly identify whether the issue is hardware related and whether your device qualifies for repair or replacement under warranty.
Professional support can run hardware diagnostics that go deeper than anything accessible through ChromeOS settings. If they confirm the WiFi adapter is failing, your device likely qualifies for repair or replacement under warranty. That’s the actual next step.
Quick Answers to Common Chromebook WiFi Questions
Why does my Chromebook keep disconnecting from WiFi even after I restart it?
A restart clears the current connection state but doesn’t fix the underlying settings. The auto-reconnect toggle being off or a corrupted network profile both survive restarts. Open Settings, go to Network > Wi-Fi, click your network name, enable “Automatically connect to this network,” then forget and reconnect fresh.
How do I know if it’s my Chromebook or my router causing the disconnections?
Check whether your phone or another device stays connected on the same network. Phone drops too it’s the router. Phone holds steady it’s the Chromebook.
Why does my Chromebook disconnect from WiFi when I close the lid?
Power management cuts WiFi during sleep to save battery. Enable “Automatically connect to this network” and check whether battery saver mode is on. Turn it off if you want WiFi to stay active.
What does the gray WiFi icon mean on my Chromebook?
Disconnected or out of range. Solid white means connected. White with an X means the WiFi radio is off entirely.
Will I lose my WiFi password if I forget the network on my Chromebook?
Yes. Forgetting a network deletes the saved password. You’ll need to re-enter it when reconnecting. Note: ChromeOS doesn’t have a separate “Disconnect” option for saved networks forgetting is the reset option available.