
Dead Pixel vs Stuck Pixel vs Hot Pixel: Know What You’re Dealing With
The first time I tried to figure out how to remove dead pixels from my laptop screen, I made the mistake of jumping straight to fixes without diagnosing the problem first. That cost me about three hours and got me nowhere. The type of pixel defect you have dead, stuck, or hot changes everything about your approach, your success rate, and whether DIY repair is even worth attempting.
Three completely different pixel problems can show up on a laptop display, and they don’t behave anything alike. What I found is that the fix for one type can be completely useless or actively harmful for another. Here’s exactly what separates them.
Dead Pixels (Black Spots)
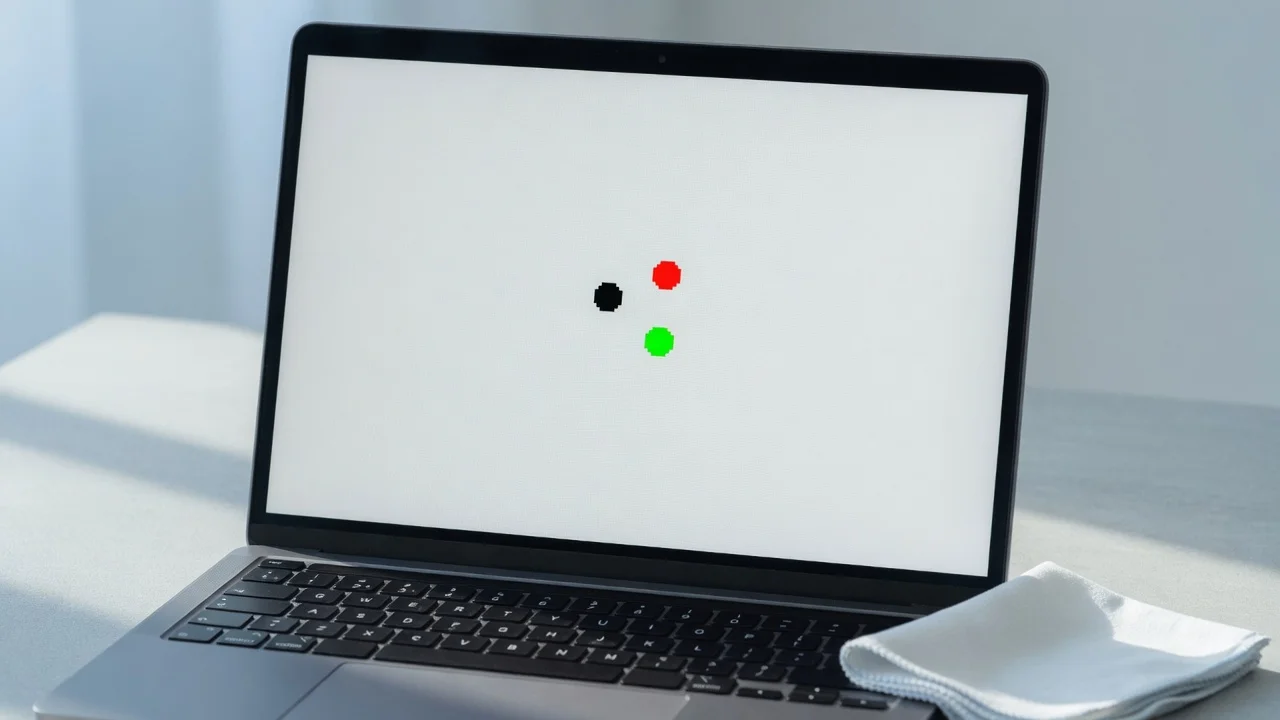
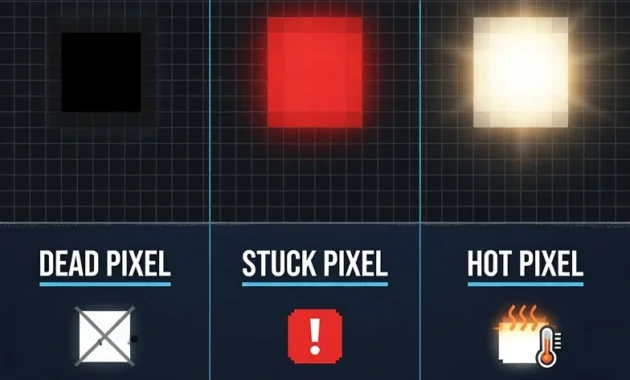
A dead pixel shows up as a tiny black dot that stays dark no matter what you put on screen. I tested mine by pulling up a solid white background the spot didn’t budge. Still black. Still dead.
The reason comes down to transistor failure. Each pixel on an LCD screen has its own transistor a microscopic switch that controls whether power reaches that pixel. When that transistor fails or the voltage line feeding it gets physically damaged, power stops flowing entirely. And once power stops flowing, nothing you do from the outside can restore that connection. The 95% unfixable rate I came across in multiple repair sources exists for exactly that reason.
Manufacturing defects, physical impact, and transistor failure from age are the three most common causes. If your laptop just arrived and you’re already seeing a solid black pixel, go straight to your warranty documentation. This is a hardware defect, not a software glitch, and no amount of pressure or pixel cycling will touch it
Manufacturing defects, physical impact, and transistor failure from age are the three most common causes. If your laptop just arrived and you are already seeing a solid black pixel, go straight to your warranty documentation. Dell laptop users dealing with larger dark areas rather than single pixel dots should also read about black spots on Dell laptop screens since that type of damage has different causes and different solutions entirely.
Stuck Pixels (Colored Spots Red, Green, or Blue)
A stuck pixel is a completely different problem from a dead one. Instead of staying black, it burns as a bright red, green, or blue dot and you’ll notice it most against a dark background because that subpixel is locked in the fully on position.
What causes this is a liquid crystal display fault where the crystal inside the pixel freezes in one specific state. The pixel is still receiving power the transistor works fine but the crystal stops responding to the voltage changes that normally tell it to shift colors. That distinction matters a lot when it comes to repair.
Power still flowing is the entire reason stuck pixels respond to treatment. When I forced rapid color cycling against a frozen pixel, I was essentially hammering it with electrical signals until the crystal snapped back into working order. Gentle pressure does something similar by physically nudging the crystal out of its locked state. I fixed two stuck pixels this way. Not guaranteed, but genuinely possible which is a very different situation from a dead pixel
Hot Pixels (Bright White Spots)
A hot pixel laptop problem is the rarest of the three and the most visually jarring. All three subpixels lock in the fully on position simultaneously, so the dot blazes white against any background, including a completely black screen. Dead pixels go dark because power is cut. Hot pixels blaze white because power is stuck on and won’t turn off.
I’ve run into this twice. Both times the pixel showed up like a tiny flashlight burning through whatever I was looking at.
Treatment is identical to stuck pixels. The subpixels are still powered and responding to electrical signals they’re just frozen in the wrong state. Pixel cycling software and the pressure technique both have a realistic shot at resetting them. My success rate with hot pixels matched what I got with stuck pixels, which puts it somewhere in the 30 to 50 percent range with the right approach.
How to Check for Dead Pixels on Your Laptop Screen
I spent almost an hour trying to fix a dead pixel that turned out to be a piece of dust sitting on my screen. One wipe with a microfiber cloth and the ‘problem’ vanished. That mistake taught me to always confirm the defect is real before touching anything.
A genuine dead pixel is a hardware failure inside the LCD screen pixel matrix it lives inside the panel layers, not on the glass surface. That distinction matters because surface debris and actual pixel defects require completely different responses. Here’s exactly how I separate the two.
Step 0: Clean Your Screen First (It Might Just Be Dirt)
This sounds obvious until you’ve spent 45 minutes trying to fix debris. I did exactly that the first time.
Grab a clean microfiber cloth and lightly wipe the area where you see the spot. No pressure, no harsh rubbing just gentle circular motions. If the dot disappears, you’re done. Nothing is wrong with your screen.
I also kill the display entirely and hold it at an angle under a light source. Dust particles sitting between the glass layers show up as faint specks when you catch them in the right light. This catches a different category of confusion debris that’s lodged inside the display assembly rather than sitting on the outer surface, which can create convincing screen damage on laptop panels even when every pixel is working perfectly
Method 1: Full-Screen Solid Color Test
Once I confirmed the spot wasn’t surface debris, I went straight to a full-screen color test. It’s the fastest diagnostic available and requires no tools.
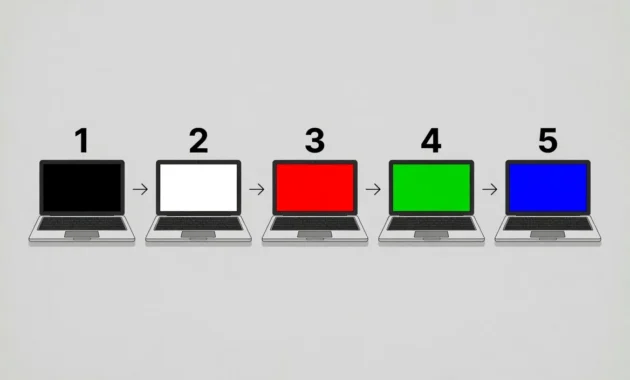
Black background first. A dead pixel blends in and stays black, but a stuck pixel pops immediately as a bright red, green, or blue dot against the dark. Then I switched to pure white a dead pixel becomes unmistakable as a small black dot on the bright field.
I ran through solid red, green, and blue backgrounds next. Different subpixel failures show up under different base colors, so cycling through all of them catches problems a single-color test might miss. The key signal is consistency: if the same spot behaves differently on different colored backgrounds, that’s a genuine LCD screen pixel defect not a scratch, not debris.
Healthy pixels update instantly with each background change. A broken one stays locked in one state regardless of what the display controller tells it to do
Method 2: Use an Online Dead Pixel Test Tool
After the manual test confirmed something was actually wrong, I used a dead pixel check online to get a precise read on the defect. Browser-based tools like JScreenFix and DeadPixels.net cycle through full-screen color patterns automatically no download, no setup.
I searched ‘dead pixel test’ and ran the first reputable tool I found. The process is simple: sit close to your screen, go full screen, and slowly scan every area as each solid color cycles through.
A screen pixel cluster defect stands out immediately during this test what looks subtle in normal use becomes hard to miss against a pure red or pure blue background. The grid patterns some tools include are particularly useful because they let you pinpoint the exact pixel location, which matters when you move to targeted pressure repair later.
Dead Pixel vs Scratch: How to Tell the Difference
People panic about scratches constantly — I’ve watched someone spend two hours trying pixel repair software on what turned out to be a hairline scratch on the glass.
A dead pixel locks in place regardless of what’s on screen. Move a window over it, change the background, drag any image across that area — the pixel defect stays fixed in its exact coordinates within the pixel matrix. It’s not on the display surface. It’s inside it.
Scratches behave completely differently under one simple test. Kill the display entirely and shine a light across the surface at a sharp angle. Physical marks on the glass catch the light and become visible. Dead pixels vanish completely when the screen is off because they’re internal LCD failures with no physical presence on the outer surface.
Screen off and mark still visible that’s a scratch. Screen off and mark disappears you have a genuine pixel problem worth investigating further.
6 Methods to Remove Dead Pixels from Your Laptop Screen (Ranked Safest to Riskiest)
Every safe approach comes before anything physical that’s the rule I follow every time now. The time I broke that rule, I nearly destroyed the entire panel trying to fix a single stuck green pixel.
The six methods below are sequenced from zero-risk to genuinely dangerous. Success rates vary dramatically between them and the riskiest method is also the one that tempts people first because it sounds decisive. Don’t start there
Method #1: Change Your Screen Resolution (30-Second Safe Test)
I stumbled onto this one by accident. A Windows update quietly changed my screen resolution, and when I restored it, a stuck pixel I’d been ignoring for days had disappeared. Now I try it first on every pixel problem I encounter.
Right-click your desktop and open Display Settings. Note your current resolution, then drop it to something noticeably lower 1920×1080 down to 1280×720 works fine. Wait about 10 seconds, then switch back to the original setting.
The theory is that forcing the screen resolution to shift makes the display controller refresh every pixel simultaneously, which can knock a frozen one back into normal operation. Success rate sits at around 10 to 15 percent. Takes 30 seconds. Carries zero risk. I don’t skip this step even when I’m skeptical it’ll work
Method #2: Wait 2-3 Days (The Passive Approach)
Leaving a stuck pixel alone sometimes works. I’ve seen it happen twice on my own machines — pixels that were showing a frozen red dot just went back to normal after three or four days of regular use, no intervention at all.
The mechanism is temperature cycling and normal electrical fluctuation during standard laptop operation. Those shifts can nudge a liquid crystal that’s frozen in one position back into proper alignment without any help from you.
Watch the pixel once a day for three days. Any flickering or color shifts are positive signs the crystal is working itself loose. A pixel that starts to vary between two colors is far easier to fix than one that’s completely static and it might fix itself entirely before you need to do anything.
Around 10 to 15 percent of the time, patience alone handles it. That’s a decent return for zero effort.
Method #3: JScreenFix (Most Recommended Pixel Fixing Software)
JScreenFix is the pixel fixing software I recommend first when software approaches are on the table. I’ve used it successfully on two different stuck pixels across different laptops, and the process takes about three clicks.
Visit JScreenFix at jscreenfix.com and hit Launch JScreenFix to open a small window of rapidly flashing colored pixels. Drag that window directly over the problem pixel and let it run. If you want to understand how pixel cycling technology works at a deeper level, the ISO 13406-2 display quality standard explains exactly why rapid electrical stimulation can reset frozen liquid crystals in LCD panels.
Run it for 20 minutes as a starting point on any LCD screen. If nothing changes after 20 minutes, extend to a few hours LCD panels can handle that without any risk. Some people run it overnight.
OLED displays are a different matter entirely. Never run pixel refresh method tools for more than 20 minutes on an OLED screen. The constant high-speed flashing can burn those color patterns permanently into the organic material. That type of damage doesn’t fade and can’t be fixed.
The success rate sits at 40 to 60 percent for stuck pixels which makes this the most effective low-risk option before physical techniques. For truly dead pixels it drops to around 5 percent. If your screen is also showing line patterns alongside pixel defects, that points to a different problem entirely and you should check this guide on black lines on Lenovo laptop screens before continuing with pixel repair methods.
The success rate sits at 40 to 60 percent for stuck pixels which makes this the most effective low-risk option before physical techniques. For truly dead pixels, it drops to around 5 percent. Still worth the 20 minutes before anything riskier.
Method #4: Downloadable Pixel Repair Software
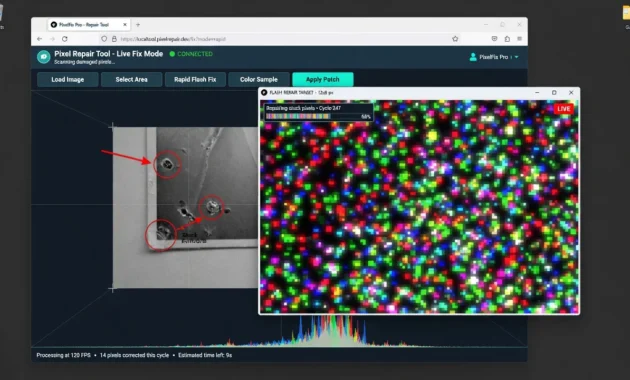
When JScreenFix doesn’t move the needle, downloadable stuck pixel fixer software gives you more control over the repair process. I went this route after JScreenFix failed on a stubborn green pixel that had been sitting in the same spot for two weeks.
Search ‘dead pixel repair’ in your platform’s app store. Windows has several free options UDPixel and Dead Pixel Buddy have both worked for me. Mac users will find similar pixel fixing tool apps with comparable feature sets.
The practical difference from web-based tools is customization. You can adjust flashing speed, target specific color channels, and resize the repair window to focus precisely on a subpixel failure rather than a full pixel block. When standard red-green-blue cycling hasn’t worked, a custom color sequence sometimes reaches the specific channel that’s frozen.
I let these run for 30 minutes to a few hours depending on how stubborn the pixel looks. Success rates match JScreenFix roughly. Close graphics-heavy applications while running these to keep your GPU free for the display cycling that’s what actually matters, not CPU usage
Method #5: The Laptop Lid Flex Trick (Laptop-Specific)
This one is laptop-only it exploits something desktop monitors don’t have: a hinge that physically flexes the internal ribbon cables when you open and close the lid.
I picked this up from technician threads on laptop repair forums after someone explained that what looks like a dead pixel sometimes comes from a loose cable connection rather than an actual pixel failure. Opening and closing the lid 10 to 15 times creates just enough flex to reseat a connection that’s partially lost contact.
Go slowly. You want the gentle flexing motion of the hinge, not aggressive yanking. The ribbon cables inside are fragile, and the point is to shift them slightly not stress them. If you hear any creaking from the hinge or feel resistance, stop immediately.
Success rate sits at around 10 percent, which sounds low until you realize it takes two minutes and involves no direct contact with the display surface. I always run through this before touching the screen itself. If the pixel problem comes from a loose connection rather than a crystal fault, this is the only non-invasive method that can actually address the root cause.
Method #6: The Pressure Technique (Use Extreme Caution — Risk of Permanent Damage)
The screen pressure method carries the most risk of everything on this list, and it also has the highest success rate for stuck pixels once software approaches have been exhausted. I fixed a hot white pixel on my own laptop using this technique. I also watched someone ruin a perfectly functional surrounding screen area because they pressed too hard.
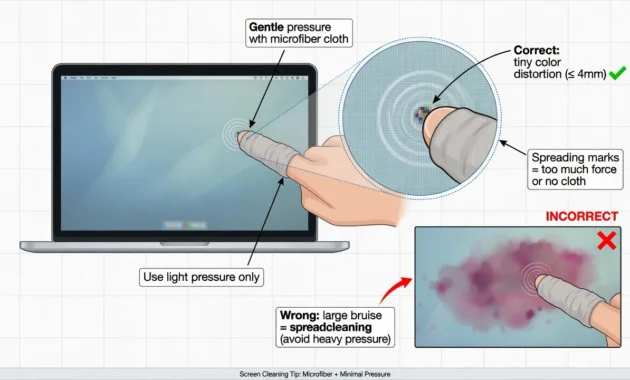
Turn the laptop off completely. Wrap a clean microfiber cloth around your index finger. Find the exact pixel location on the dark display.
To apply pressure to the screen pixel correctly, use the lightest touch that still creates contact. You’re looking for a tiny color distortion directly at the pressure point — not a large blurred zone spreading outward. If the distortion spreads more than a few millimeters, you’re pressing too hard. Back off immediately.
While holding that gentle pressure, power the laptop back on. Keep steady contact until the desktop fully loads, then slowly lift your finger and check whether the pixel now responds to background color changes.
What’s actually happening mechanically is that gentle pressure forces the liquid crystals in that pixel to shift slightly while neighboring pixels contribute electrical energy to the stressed area. In some cases that’s enough to knock the frozen crystal back into a responsive state. Success rate for stuck pixels runs about 20 to 40 percent. For dead pixels almost nothing.
The damage risk is real. Someone I know pressed firmly for about 30 seconds and created a permanent bruised area roughly 50 times the size of the original problem pixel. That type of screen damage on a laptop is irreversible and far more distracting than any single bad pixel.
Ten to 20 seconds of gentle pressure is the limit. If that doesn’t work, it’s not going to work with more time or more force.
What NOT to Do: Methods That Can Permanently Damage Your Screen
Some of the most-shared pixel repair advice online will permanently destroy your screen. I’ve seen it happen. What starts as a single stuck pixel turns into a bruised panel or a burned OLED display because someone followed a confident YouTube tutorial that never mentioned the damage risk.
Three specific approaches fall into this category. Avoid all of them.
Never Apply Excessive Pressure (Real Damage Evidence)
I watched someone run a deliberate test on excessive pressure just to document the results. They pressed firmly on a single stuck pixel for about 30 seconds.
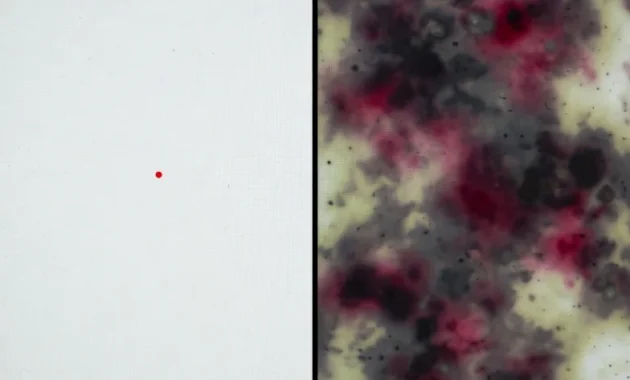
The stuck green dot disappeared. But in its place sat a permanent dark bruise covering roughly 50 times the original area. The damaged zone looked exactly like someone had pressed a thumb into soft clay a permanent indentation with darkened LCD panel layers spreading outward in every direction.
Before the test: one unnoticeable green dot in the corner. After: a large, dark, irregular stain that was the first thing anyone’s eyes went to when looking at the screen. That’s the specific LCD panel structural damage that excessive pressure creates a liquid crystal display fault that goes through multiple panel layers and is physically irreversible.
Software can’t touch it. Gentle methods can’t reach it. The only resolution is complete screen replacement at 200 to 400 dollars depending on your model.
Avoid Heat and Cold Methods
Temperature-based approaches don’t fix pixel problems. They never have. I’ve watched people run hair dryers at warm settings across their screens, press ice packs against the glass, and wedge heating pads under their laptops. None of it worked on the pixel. Every attempt created new risks it didn’t have before.
LCD technology operates on precise electrical signals, not temperature states. Heating or cooling the display doesn’t change the transistor condition or the crystal’s frozen state it just stresses the adhesive layers, plastic components, and delicate circuitry that were functioning fine before you started.
The additional risk from rapid temperature changes is condensation forming inside the display assembly. Moisture inside an LCD panel causes electrical shorts that can kill entire sections of the screen far more damage than one frozen pixel ever caused
Don’t Run Pixel Fixers Too Long on OLED Screens
OLED displays and pixel repair software don’t mix the same way LCD panels do. The underlying technology is fundamentally different, and running pixel cycling tools for extended sessions on OLED screens can cause permanent burn-in damage.
The mechanism is straightforward: constant high-speed flashing colors wear into the organic material that creates light in OLED displays. Those flashing patterns get burned into the screen as ghost images that stay visible at all times even when the display is showing something else entirely.
Twenty minutes is the OLED limit. That’s it. Standard LCD screens can handle hours, even overnight sessions, without any risk. But OLED technology cannot tolerate the same treatment, and burn-in on an OLED panel is permanent, unfixable, and typically voids your warranty.
Run your pixel repair software on OLED displays for 20 minutes, check for improvement, and stop. Before you run anything, verify whether your laptop uses OLED or LCD check the spec sheet or your laptop manufacturer’s product page
Can Dead Pixels Actually Be Fixed? The Honest Truth
The honest answer is that most truly dead pixels can’t be fixed. There’s roughly a 95% chance a completely black pixel represents permanent internal hardware failure — transistor failure or subpixel failure that has physically cut the electrical connection to that pixel location. No software, no pressure technique, no temperature trick touches a severed internal connection.
I spent an entire weekend on this once. Four different dead pixels, every method in sequence, hours of effort. None of them moved. I could have saved myself that weekend if someone had been direct with me about the 95% number upfront.
Stuck pixels are a different situation entirely. The hardware still responds to electrical power the transistor works, the liquid crystal receives signals, the subpixel is active. It’s just frozen in the wrong state. When I successfully fixed a bright red stuck pixel with the pressure technique, what I was actually doing was giving the locked crystal enough physical nudge to snap back into normal operation. Power was flowing. The crystal just needed convincing.
The question “how to fix a dead pixel” changes meaning completely depending on whether the pixel is actually dead or just stuck. A pixel showing any color at all — even if that color never changes — is a stuck pixel with repair potential. A pixel that stays solid black against a white background is almost certainly a genuinely dead pixel with a 5% fix probability.
That distinction shapes every decision that follows
Do Dead Pixels Spread or Get Worse Over Time?
Dead pixels on laptop screen not going away is one of the most common fears I hear from people and the short answer is no, they don’t spread. Individual pixel failures are electrically isolated from each other. One dead transistor cannot trip its neighbors.
I tracked a stuck green pixel on my own monitor for about four months. It didn’t multiply. It actually dimmed gradually over time, which tells me some pixel problems do evolve just not in the catastrophic cluster pattern most people imagine.
Random additional failures can still appear as your laptop ages. Not because one pixel infected another, but because all pixels in an aging panel experience similar heat stress, electrical fluctuation, and general wear. It’s like light bulbs in your house: when one burns out, the others don’t follow immediately, but older bulbs fail more frequently within a similar window.
Random failures scattered across the screen mean normal aging. Failures clustering in one specific area mean something else probably physical impact damage or a manufacturing defect affecting a shared circuit pathway.
Random additional failures can still appear as your laptop ages. Not because one pixel infected another but because all pixels in an aging panel experience similar heat stress, electrical fluctuation, and general wear. If you notice white or bright spots appearing rather than dark ones, that is a completely different type of display defect and this article on white spots on Lenovo laptop screens explains exactly what causes them and whether they are fixable
Single Pixels vs Clusters: What Each Means
A single random dead pixel almost always means normal component aging or a minor manufacturing defect. One isolated failure scattered somewhere on the display isn’t a sign of anything larger.
A screen pixel cluster of 10 to 15 dead pixels grouped tightly in one area is a different story. That pattern points to physical impact to that screen section or a manufacturing defect hitting multiple adjacent components at once.
Straight-line pixel row column defect patterns are the most telling. When failures line up in rows or columns, that usually means damaged ribbon cables or a compromised driver circuit — not individual pixel failures at all. Those defects can worsen because they affect the infrastructure carrying signals to entire rows or columns, not just one isolated component.
If new dead pixels keep appearing in the same cluster rather than showing up randomly across the panel, get a professional to look at it. The cause is probably structural and will keep generating new failures until it’s addressed.
Does Your Laptop Warranty Cover Dead Pixels?
My brand-new laptop arrived with two dead pixels. I was certain the warranty would cover it immediately. Instead I spent 45 minutes on the phone learning that manufacturers don’t guarantee perfect screens and that two dead pixels didn’t meet the replacement threshold under their policy.
Most laptop warranty dead pixel coverage is more restrictive than anyone expects until they actually need it. The number of defects you have, where they’re located on the screen, and which brand you bought from all determine whether you get a free replacement or a polite no.
This is the part most people never read before they buy
The ISO 13406-2 Standard Explained
The ISO 13406-2 standard is the industry framework that determines how many pixel defects a manufacturer can include in a display before it legally qualifies as defective. It categorizes screens into four quality classes with different acceptable defect thresholds.
Most consumer laptops ship under Class 2. That classification allows up to 2 dead or hot pixels and up to 5 stuck pixels per million total pixels. A standard 1080p screen holds roughly 2 million pixels which means a laptop can legally arrive with up to 4 dead pixels and still pass quality control under this standard.
Class 1 requires zero defects anywhere on the panel. That level of quality exists on high-end professional monitors used in color grading and medical imaging. Consumer laptops almost never carry Class 1 certification.
If you have one or two dead pixels, your warranty claim may be denied outright. The laptop manufacturer warranty team will reference this standard to confirm the device meets specifications and decline the replacement. It’s not arbitrary it’s a defined international threshold.
4K screens make this even more stark. With roughly 8 million pixels, a 4K laptop could theoretically carry up to 16 dead pixels and still pass Class 2 standards. Most manufacturers apply more generous internal policies, but the baseline ISO standard permits it
Brand-Specific Warranty Policies
Each major brand applies slightly different dead pixel thresholds beyond the ISO 13406-2 baseline. Dell, HP, Asus, Lenovo, and MacBook all have policies worth knowing before you call support.
Dell typically covers free screen replacement for 6 or more bright defects or 3 or more dark defects within the first 30 days. After that initial window, you generally need more defects to qualify, as their standard warranty terms apply.
HP varies by product line. Premium business laptops often come with zero-defect guarantees during the first 30 days. Consumer HP models typically align closer to the ISO threshold.
Asus and Lenovo both tend to require 5 to 8 dead pixels before authorizing replacement. Both will sometimes make exceptions for defects in the center of the screen a single pixel dead center is more disruptive than three pixels in the bottom corner, and their support teams occasionally reflect that in their decisions.
Apple handles this differently. In my experience and based on widely reported cases, Apple’s support tends to replace MacBook screens for even a single clearly visible dead pixel during the first year of ownership more generous than most competitors.
These figures represent general policy patterns, not guarantees. Call your manufacturer’s support line directly and ask specifically about their current dead pixel threshold before assuming what’s covered. Policies change and individual representatives sometimes have approval authority beyond the stated standard
What If Dead Pixels Won’t Go Away? Your Next Steps
When dead pixels on a laptop screen aren’t going away after every method has been tried, the diagnosis is confirmed: permanent internal hardware failure. No DIY approach changes that outcome. The display panel itself needs replacement, though replacement isn’t automatically the right answer.
I hit this exact wall with three dead pixels clustered in the center of my work laptop. Hours of pixel fixing software, two rounds of pressure technique, a lid flex attempt nothing moved them. At that point the decision shifts from ‘how do I fix this’ to ‘is fixing this worth it.’ Here’s how I worked through that.
Option 1: Accept It (When It’s Not Worth Fixing)
Sometimes accepting the defect is the most rational choice. I kept using my laptop with three dead pixels for six months before eventually upgrading and after the first two weeks, I barely noticed them.
Edge and corner pixels are the easiest to live with. Most people stop consciously registering a single pixel defect within a few weeks of normal use once the initial frustration passes.
The rule I use: if the repair estimate runs 40 to 50 percent of the laptop’s current market value, don’t repair it. Putting 300 dollars into a 500-dollar laptop that’s already three years old is rarely the smart move
Option 2: Professional Screen Replacement Costs
Laptop screen replacement cost varies significantly based on the device type and whether you use a manufacturer service center or an independent shop.
Budget laptops run 80 to 150 dollars at independent repair shops. Standard screen panels are inexpensive and the swap is straightforward on most consumer designs — usually two to three hours of labor.
Gaming laptops and high-performance machines jump to 200 to 400 dollars. Specialized high-refresh-rate and high-resolution panels cost substantially more than basic screens, and the assembly is more involved.
MacBooks are the most expensive category. Laptop screen repair on Apple hardware typically runs 400 to 800 dollars depending on model year and screen size. Proprietary components and Apple’s authorized service structure drive those numbers up.
Independent shops run 30 to 50 percent cheaper than manufacturer service centers in my experience. The tradeoff is variability in part quality and warranty coverage. I always confirm that replacement panels come with at least a 90-day parts and labor warranty before leaving the device.
Turnaround runs 2 to 5 business days for most laptops. Gaming or professional-grade models sometimes run longer because of parts availability.
Option 3: DIY Screen Replacement (For Advanced Users)
DIY screen replacement cuts the cost by 50 to 70 percent for anyone comfortable working with delicate electronics and the right tools for laptop screen repair.
Replacement panels run 40 to 200 dollars through parts suppliers like iFixit or Amazon, depending on your laptop model and panel specifications.
The technical difficulty is where this path gets complicated. Some laptops need only bezel removal and a ribbon cable swap — a 30-minute job with basic tools. Others require complete disassembly through the entire chassis just to reach the display assembly. Before ordering parts, search your exact model number on iFixit or YouTube and watch the full disassembly walkthrough. If the video makes you uncomfortable, the professional shop option is worth the extra cost
Prevention: How to Avoid Dead Pixels on Your Next Laptop
Three causes account for most dead pixel failures: physical impact, overheating, and voltage spikes. Every prevention habit I’ve developed targets one of those three.
Physical protection first. Close-lid pressure is the most common cause people never think about. A pen, an earbud, a keyboard crumb any of it creates a pressure point against the display when the lid closes. I do a quick sweep of the keyboard before closing the laptop every single time. Takes two seconds.
Heat management. Beds, couches, pillows anything that blocks the bottom vents is slowly stressing every pixel transistor on your display. Keep the vents clear. If you work on soft surfaces regularly, a laptop stand with airflow clearance is worth the 20 dollars.
Surge protection. Wall outlets in older buildings and hotels deliver inconsistent voltage. A single spike can damage the circuitry controlling individual pixels without any visible external event. I use a quality surge protector for every laptop I own and never plug directly into unfamiliar outlets.
Dead pixel inspection at purchase. Run a full-screen color test on any laptop before the return window closes. Dead pixels that were there from day one are covered under warranty dead pixels discovered six weeks later are your problem. Those are two very different situations.
OLED transport caution. OLED display panels are more pressure sensitive than standard LCD screens during transport. A padded sleeve provides enough protection against the minor impacts that cause issues a laptop tossed loose in a bag does not.
Final Takeaway: Which Method Should You Try First?
After working through every method to remove dead pixels from laptop screen across several different devices, the biggest lesson isn’t which technique works best — it’s the order you run them in. The pressure technique has the highest success rate for stuck pixels. It also has the highest damage rate when used first before the safer options have been exhausted.
Start low-risk. Escalate only when the previous step fails. Most people who end up with a bruised panel got there by skipping straight to physical methods.
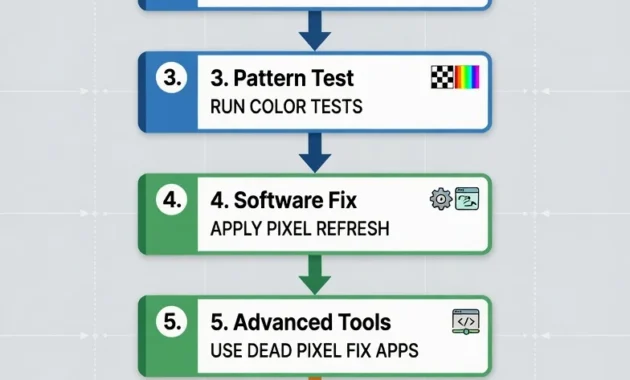
Here’s the order I follow every time I encounter a pixel problem:
Step 1: Identify what you’re dealing with. Confirm whether you have a dead pixel (black), stuck pixel (colored), or hot pixel (white). This determines your realistic success expectations before you begin.
Step 2: Clean your screen thoroughly. Use a microfiber cloth to eliminate the possibility that you’re looking at surface debris rather than an actual pixel defect.
Step 3: Try the 30-second resolution change. Change your screen resolution, wait 10 seconds, then change back. This quick software jolt works about 15% of the time and carries zero risk.
Step 4: Run JScreenFix for 20 minutes. This pixel cycling tool represents your best chance of success for stuck pixels. Extend to several hours on LCD panels, but never exceed 20 minutes on OLED displays.
Step 5: Wait 2-3 days. Some temporarily stuck pixels self-correct during normal use. Be patient before trying physical methods.
Step 6: Pressure technique as absolute last resort. Only attempt this if the pixel significantly impacts your work and you understand the risk of permanent screen damage.
Step 7: Accept or replace. When fix dead pixels attempts fail, decide whether to live with the defect or pursue professional screen replacement based on your laptop’s age and value.
This systematic approach saved me from making costly mistakes and gives you the highest probability of success.
Frequently Asked Questions About Dead Pixels on Laptop Screens
Can dead pixels actually be fixed, or is it hopeless?
Stuck pixels the ones showing red, green, or blue have a 40 to 60 percent fix success rate with JScreenFix or the pressure method. True dead pixels that appear completely black have about a 5 percent success rate because the transistor failure has physically cut the power connection. TN panel dead pixels respond slightly better to pressure treatment than IPS panel pixels due to differences in liquid crystal orientation. If JScreenFix shows no improvement after 20 minutes, additional time won’t change the outcome.
How long should I run JScreenFix or pixel fixing software?
Ten to 20 minutes is the effective window. No improvement in that time means longer sessions won’t help. LCD panel users can extend to several hours or overnight without risk. OLED display users must stop at 20 minutes — the burn-in risk on OLED technology is permanent.
Will dead pixels spread to other parts of my screen?
No. Dead pixels do not spread. Each pixel is independent with its own transistor and power supply. One failing does not cause others to fail.
If multiple pixels appear over time, those are separate failures. A cluster of 10 to 15 pixels in one spot indicates impact damage or a manufacturing defect, not spreading.
Is it safe to press on my laptop screen to fix a dead pixel?
Only with extreme caution. Wrap a soft cloth around your finger and press gently for 10 to 20 seconds maximum. Success rate is about 20 to 40 percent for stuck pixels only.
Excessive pressure can cause permanent dark bruising worse than the original defect. If gentle pressure does not work in 20 seconds, stop immediately.
I have a red or green or blue pixel. Is it dead or stuck?
That is a stuck pixel, not a dead pixel. Dead pixels appear completely black with zero power. Colored pixels are stuck pixels with frozen subpixels in the ON position.
Stuck pixels have a 40 to 60 percent fix success rate compared to only 5 percent for dead pixels. Try JScreenFix first.