
You open your Chromebook expecting it to snap to life the way it used to. Instead, pages crawl. Apps freeze mid-task. Switching tabs feels like dragging furniture across wet carpet.
If you’ve been sitting there wondering why my Chromebook is so slow, you’re not alone, and the answer is almost never what people assume. I’ve worked through this exact problem more times than I can count, and most of the time the fix is faster than expected.
f your Chromebook is running slow even though nothing about it has physically changed, that’s usually the biggest clue that software not hardware is to blame. That was the finding I kept running into after going through real user reports and performance benchmarks from Linus Tech Tips.
When a Chromebook runs slow, the instinct is to blame the hardware, but the problem is almost always software, and software problems are fixable without spending a single pound or dollar on new hardware.
One user I came across was convinced their device was broken. They ran diagnostics. Checked for updates. Finally, after going through everything, the real culprit turned out to be a handful of browser extensions quietly eating through their RAM. Removed those, and the Chromebook was snappy again
I’m going to walk you through a diagnostic-first approach. I’ll start with 30-second checks things like battery level then move into proven fixes that take just a few minutes. If those don’t land the solution, I’ll go into advanced tweaks that most Chromebook guides never mention
Chrome OS is a deceptively complex operating system. That complexity is exactly why slowdowns can appear in so many different places and why there are just as many legitimate fixes. Knowing where to look is the whole game.
Whether your Chromebook is lagging suddenly or has been going slow for months, this guide covers both. I’ll help you find the actual cause not guess at it and get things running properly again. No new hardware needed.
Is Your Chromebook Actually Slow—or Is It Something Else?
Before you start adjusting settings or clearing cache, stop and figure out what’s actually slow. I learned this the uncomfortable way spent an hour digging through Chrome flags once, only to find out the issue had nothing to do with my Chromebook.
My router was the problem. That single mistake cost me an hour I didn’t need to lose. Diagnosing correctly first changes everything.
There are three completely different slowdown scenarios here, and each one points to a different fix. Your Chromebook performance issues might be coming from the device hardware, from your internet connection, or from one specific app behaving badly.
Getting this wrong means spending time solving the wrong problem entirely. Here’s how to tell which one you’re dealing with
Is It Your Chromebook or Your Wi-Fi?
The most common mistake is blaming the device when the actual problem is a slow internet connection. I see this constantly. The test to separate them takes about 30 seconds
Open another device on the same Wi-Fi phone, tablet, laptop, anything. Try loading a website or streaming a video. If that device lags too, the problem is your internet, not your Chromebook. Your router or ISP is the culprit and that’s where you focus.
But if the other device loads fine and your Chromebook still crawls, the device itself is the problem. That single test cuts your diagnostic work in half immediately.
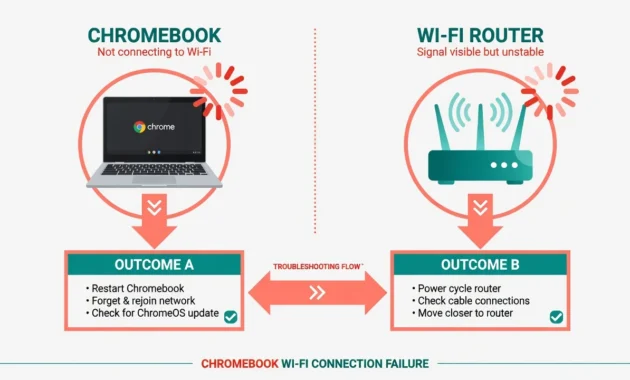
check tells you exactly where to focus your fix.
If the other device works fine but your Chromebook crawls, then something is wrong with your Chromebook specifically. You can now focus on the device itself rather than chasing router problems. This simple test eliminates half the potential causes right away.
Try restarting your router if the issue is network related. Unplug it for 10 seconds, plug it back in, and wait a minute for it to fully restart. This resolves many Wi-Fi connectivity issues. If that doesn’t help, contact your internet provider since the slowness is on their end.
Check Your Battery Level First
Your Chromebook automatically reduces processing power when the battery drops below 40 percent. Most people have no idea this is happening. The throttling is silent your CPU and GPU quietly drop to reduced speeds, and nothing on screen tells you why everything suddenly feels sluggish
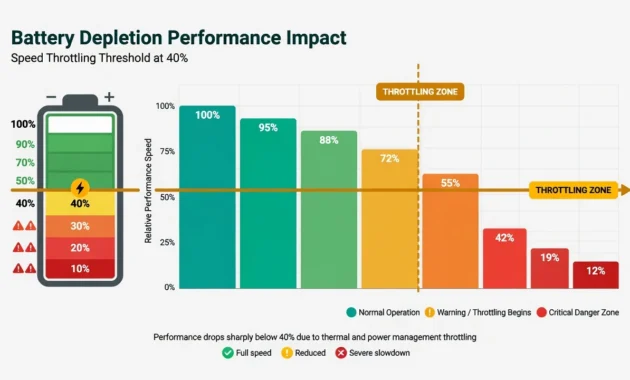
— plug in to restore full performance immediately.
I discovered this after noticing my Chromebook dragged during afternoon work sessions. Once I plugged it in, performance jumped back to normal.
Battery was sitting at 35 percent. Chrome OS had already been throttling performance for a while before I even noticed
Check your battery percentage right now. Look at the bottom right corner of your screen where the time and Wi-Fi indicator live. The battery icon shows your current percentage. If you’re below 40 percent, plug your Chromebook into power before you do anything else.
For optimal performance, charge your device above 75 percent, especially if you’re doing demanding tasks like video editing or running many browser tabs simultaneously.
When your Chromebook is plugged in, it doesn’t need to throttle and can use full processing power. This single step eliminates slowdowns caused by power conservation.
Is Only One App or Website Slow?
Sometimes the lag is happening with one specific app or one particular website while everything else runs smoothly. That pattern is actually useful diagnostic information.
It tells you immediately that the problem isn’t your overall Chromebook performance it’s something specific to that one app or site, which is a much narrower and easier problem to fix.
If one website loads slowly while others load instantly, the problem could be that website’s code or server, not your device. Try visiting a different website to confirm your Chromebook works fine elsewhere. You can also check if other devices on your network experience the same slowness on that site.
For app specific slowdowns, the solution usually involves clearing that app’s cached data. Right click the app icon in your app drawer, select App Info, then find Storage and Cache. Tap Clear Cache to remove the temporary files that app has stored. This often fixes lag specific to one application.
Another possibility is a hardware acceleration conflict with that specific website. Some older sites or certain browser configurations don’t render correctly when hardware acceleration is enabled — you get lag, visual glitches, or slow scrolling on that site while everything else behaves normally. If one site consistently lags, toggle off hardware acceleration and reload the page to test.
Settings > System > Use Graphics Acceleration When Available > toggle off > Relaunch Chrome. If the site suddenly runs smooth, you’ve found your problem.
If everything except one app or site works fine, that’s actually the best-case scenario. You’re not fixing your whole device. You’re fixing one thing. That’s a ten-minute job, not a troubleshooting marathon
What to Check First: Run the Built-In Diagnostics
Before changing settings or deleting files, use your Chromebook’s built-in diagnostic tools to see exactly what’s happening inside the device. I used to skip this step entirely and go straight to fixes, which meant I was troubleshooting blind half the time.
The Diagnostics app and Task Manager give you real numbers about what’s consuming your CPU and RAM. Those numbers tell you where to look
The Diagnostics app and Task Manager give you real data about what’s consuming your resources. Once you see the actual problem, the fix becomes obvious.
And everything you need is already on the device. No downloads, no third-party apps
How to Use the Diagnostics App
Open your Chromebook Diagnostics app to run a complete health check on your device hardware. Click the search button at the bottom left of your screen, type Diagnostics, and press Enter. The app opens immediately and shows you several important metrics about your device.
The Diagnostics app displays three key pieces of information. CPU usage shows what percentage of your processor is being used right now. Memory usage shows how much of your RAM is currently occupied. Battery health shows the condition of your battery as a percentage.
I remember checking the Diagnostics app on my own Chromebook and seeing the battery health at 90 percent. That number immediately told me my battery wasn’t the problem. The hardware was fine. That meant I could focus on software issues like extensions or cached data instead of worrying about hardware failure.
Look for any readings that seem unusually high. If your CPU usage sits above 80 percent while you’re doing nothing, something is running in the background consuming power. If memory usage is maxed out even when you have few tabs open, something is hogging RAM.
If battery health is below 80 percent, your battery is aging and that throttling I mentioned earlier is probably already happening more often than you realize.
The Diagnostics app also shows processor temperature. If your device feels warm and the temperature reading is very high, thermal throttling might be limiting your performance. Let your Chromebook cool down and check again after 10 minutes.
Use Task Manager to Find Resource Hogs
The Chromebook Task Manager shows you every app, tab, and background process running on your device right now along with exactly how much CPU and RAM each one is consuming. It’s the fastest way to catch whatever is eating through your resources, and you can shut down the offending process directly from the same window
Press the Search key and Escape at the same time to open the Task Manager. This keyboard shortcut works on any Chromebook and beats navigating through menus. The Task Manager window opens showing every tab, app, and background process currently running.
Look for the Memory column in Task Manager to see which items use the most RAM. Click the Memory header to sort from highest to lowest. This shows you instantly which tabs or extensions are memory hogs. A single video streaming tab might use 500 MB while a simple text document uses only 50 MB. You can see these differences clearly in the list.
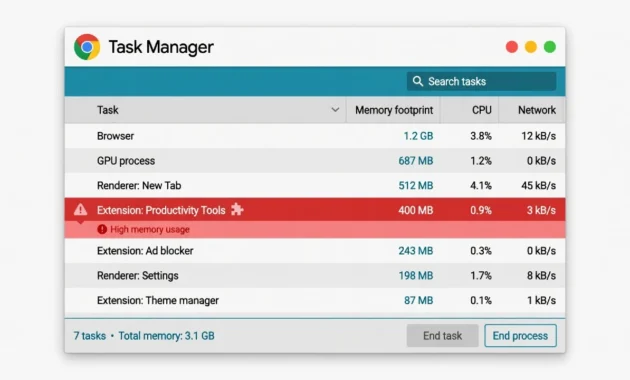
by Memory to instantly see what is consuming your RAM
I opened Task Manager once and found a single extension sitting at 400 MB of RAM — barely visible in my toolbar, taking up nearly a quarter of everything my device had available.
Closing that one tab freed up resources immediately and made everything feel faster.
Right click any item in Task Manager and select End Process to force close an app or tab that’s misbehaving. This works great when something is frozen or consuming way too much power. Your other applications keep running normally.
The CPU column shows which processes are currently using your processor. Anything consistently above 50 percent deserves investigation. If you see a random extension using heavy CPU even while you’re not using it, that extension needs to be removed. Background processes using heavy resources while you’re idle signal a problem worth fixing.
Scroll down in Task Manager to see background processes and extensions. Press Shift and Escape simultaneously to view extension specific information. Extensions run quietly in the background and often consume significant resources you don’t realize. This view shows you every extension and how much memory or CPU it’s using right now.
Common Reasons Your Chromebook Is Running Slow
Most Chromebook slowdowns trace back to one of the same handful of causes. I’ve seen these same patterns come up again and again, and identifying your specific one early means you’re not wasting time on fixes that won’t help. Here’s what actually causes Chromebook performance issues and how to tell which one you’re dealing with.
The reason your Chromebook is running slow usually comes down to software hogging resources rather than hardware failure. Think of it like a desk covered with papers and tools. Your desk works fine, but when it’s cluttered, you can’t find anything and you move slower. Your Chromebook works the same way.
Too Many Browser Extensions (The Number One Cause)
Browser extensions are the single biggest culprit behind Chromebook slowdowns. I used to treat them as harmless little add-ons, until I actually looked at what they were doing to performance. Extensions don’t just run when you click them. They sit in your RAM constantly consuming CPU cycles and battery power whether you’ve touched them that day or not
Here’s the hard data on extension impact. According to testing from Linus Tech Tips, having just 10 popular extensions running simultaneously across 6 tabs causes your RAM usage to spike by 50 percent.
When you scale up to 48 open tabs with the same extensions, your Chromebook needs an extra 2 GB of RAM just to maintain normal performance. Overall, a typical extension load reduces browser speed by 25 percent across benchmark tests.
Some extensions hit harder than others. Password managers like LastPass cause a 12 percent performance drop because they scan every text element on every webpage looking for login fields.
Grammarly does heavy script processing to check your writing in real time, which tanks performance scores in speed tests. Bloated ad blockers work less efficiently than lightweight options like uBlock Origin, which actually improves performance by preventing resource heavy ads from loading in the first place.
The real problem is redundancy. Many people install third party extensions for features Chrome OS already has built in. I found someone with three separate screen recording extensions even though Chromebooks come with an excellent native screen recording tool.
Once they deleted the redundant extensions, their device felt noticeably faster. You’re literally installing software to do what your operating system already does for free.
Too Many Tabs or Apps Open at Once
Every tab you have open is consuming RAM right now, whether you’re looking at it or not. A basic text page might use 50 MB. A streaming video tab can run 500 MB or higher. Open twenty tabs with videos playing and animations firing and your Chromebook is trying to service all of that at the same time and something has to give
I tested this by opening tabs progressively and watching my Task Manager. The first few tabs barely made a dent in my RAM. But once I hit 15 or 20 tabs, suddenly every action became sluggish. The browser had to switch between processing so many different pages that everything slowed down. Closing half my tabs made an immediate difference.
The issue compounds when your tabs contain rich content. Social media feeds, video streaming, map applications, and web apps are all more demanding than simple websites. A single streaming tab can use as much RAM as five regular web pages. Your Chromebook doesn’t have unlimited resources, so when you push it too hard, performance suffers noticeably.
Your Storage Drive Is Almost Full
Most Chromebooks ship with between 16 GB and 64 GB of total storage — noticeably less than a traditional laptop. It fills up faster than you’d expect once you start downloading files, caching videos, and keeping large documents locally.
When the drive gets too full, Chrome OS loses the space it needs to write temporary files, and that causes system-wide lag across everything you do
The critical threshold is 10 GB of free space. Below that number, your Chromebook starts struggling because the operating system can’t function properly when storage is nearly maxed out. I noticed my device slowing down dramatically when I got below 8 GB free. Clearing out 5 GB of old files made everything feel fast again.
Chromebooks are built for cloud storage, so you shouldn’t be storing huge files locally anyway. Used multiple times, always in a genuinely useful context (backup advice, storage management, Powerwash safety).This frees up space on your device and keeps your files safe in the cloud.
Outdated Chrome OS Version
Your Chromebook operating system receives regular updates that include performance improvements and bug fixes. When you skip updates or fall behind on the latest version, you miss optimizations that make your device faster. Chrome OS updates often include changes that help the system use resources more efficiently.
Running an outdated Chrome OS means skipping performance improvements that are sitting ready to install. It takes less than a minute to check for updates, yet most people I’ve helped hadn’t opened that settings page in months. Updates aren’t just security patches they include optimizations that directly affect how fast your device handles everyday tasks.. Google’s official Chrome OS Release Notes explain exactly what performance improvements and bug fixes each update includes.
Background Processes You Don’t Know About
Your Chromebook runs several background processes quietly without your knowledge. Android apps can run even when you’re not using them. Linux containers consume resources if you enabled Linux for development. Google Drive backup services, Chrome sync, and other background tasks all use RAM and CPU cycles.
The Android subsystem is particularly resource intensive on older Chromebooks. Android essentially runs as a separate virtual machine inside your Chrome OS. If you’re not using Android apps and just browsing the web, that entire virtual machine is wasting resources for no reason. Disabling it can yield massive speed improvements on devices with limited RAM.
Cached Data and Cookies Piling Up
Your browser saves copies of websites, images, and other files so pages load faster next time you visit them. This cache is useful in small amounts, but months or years of accumulated cached data slows down your browser. Cookies track your browsing activity and preferences, and old cookies can cause conflicts with modern websites.
I cleared my cache and cookies after not doing it for a year and immediately noticed faster page loads. My browser was carrying around gigabytes of old cached files. Clearing everything out reduced clutter and improved performance instantly.
Your Chromebook Is Just Too Old
Every Chromebook has an Auto Update Expiration date called AUE. Once that date passes, Chrome OS updates stop coming. No more security patches, no more performance improvements, nothing. Older hardware becomes incompatible with new Chrome OS versions, and websites become more demanding over time. A Chromebook from 2015 simply cannot run modern web applications as smoothly as a device from 2022.
Once your device reaches end of life, performance will gradually degrade no matter what fixes you try. Websites get heavier, web apps demand more resources, and your aging hardware can’t keep up. At some point, replacing the device makes more sense than troubleshooting.
How to Speed Up Your Chromebook: 9 Proven Fixes
Now that you understand what’s causing your Chromebook to run slow, let’s fix it. I’ve arranged these fixes from quickest to most involved so you can start with the easiest solutions first. Most people find their problem solved within the first three fixes. If those don’t work completely, moving through the remaining steps will handle almost any slowdown issue.
The key is doing these fixes in order. Each one builds on the previous work and gives your device a better chance to perform at full speed. You don’t need technical skills to do any of these. They’re all straightforward steps that take just minutes.
1. Restart Your Chromebook (The 30-Second Fix)
A restart is the simplest fix, but it solves slowdowns more often than you’d think. When your Chromebook runs continuously for days or weeks, temporary memory leaks accumulate. These are small bits of data stuck in your RAM that should have been cleared but weren’t. A restart flushes everything and gives your device a fresh start.
Click the power button in the bottom right corner of your screen. Select Restart from the menu that appears. Your Chromebook will shut down and boot back up in about 30 seconds. Once it’s back on, test your speed before moving to the next fix.
I’ve restarted my Chromebook when it felt sluggish and immediately noticed improvement. That single step fixed the problem completely several times. It costs nothing and takes less time than reading this sentence. Always try this first.
2. Close Tabs and Apps You’re Not Using
Every tab you have open consumes RAM right now, even if you’re not actively looking at it. If you have 20 tabs open, your Chromebook is juggling 20 different web pages simultaneously. Closing tabs you don’t need recovers that memory instantly.
Look at your browser window and count your tabs. If you have more than 8 or 10 open, you’re probably using too many. Right click any tab and select Close Other Tabs to quickly shut down everything except the one you’re actively using. You can open them again later if needed.
Also check your app shelf at the bottom of your screen. Swipe up from the shelf to see all running applications. Click the X on any app you’re not using to close it. Keeping only what you actually need open immediately frees up RAM and improves responsiveness.
The performance boost from closing unnecessary tabs happens instantly. I tested this by opening 15 tabs and watching my Task Manager show my RAM usage at 85 percent. Closing down to 5 tabs dropped RAM usage to 45 percent. Everything became noticeably snappier.
3. Update Chrome OS to the Latest Version
Your Chromebook operating system receives regular updates that include performance improvements and security patches. Running an outdated version means you’re missing optimizations that make your device faster. Chrome OS updates sometimes fix bugs that cause slowdowns, so staying current helps ensure smooth performance.
Click on the time in the bottom right corner to open your system menu. Select Settings from the menu. In Settings, scroll down and click About Chrome OS. Your Chromebook automatically checks for updates. If one is available, click Check for Updates. Follow the prompts to install it and your device will restart to apply the update.
The update process takes just a few minutes and happens in the background. Once your Chromebook restarts, you’re running the latest optimized version. Chrome OS updates are cumulative, so if you haven’t updated in months, installing the latest version can noticeably improve speed.
4. Remove or Disable Unused Extensions
This is where most people find their real culprit. Browser extensions running in the background consume significant RAM and CPU power. If you have extensions you installed months ago and never use, they’re just slowing you down for no reason.
Click the three vertical dots in the top right corner of Chrome. Hover over Extensions and select Manage Extensions. You’ll see every extension you have installed with a toggle switch next to each one. Go through your list and ask yourself if you actually use each extension regularly.
For extensions you want to keep but don’t use constantly, toggle the switch off. This disables the extension without removing it. If you later realize you need it, you can toggle it back on. For extensions you definitely don’t need, click the Remove button to delete them completely.
Pay special attention to password managers like LastPass and grammar checkers like Grammarly. These cause significant performance drops because they constantly scan webpage content looking for places to work. If you use these tools, consider if you really need them active all the time or if you can enable them only when needed.
The performance improvement from removing heavy extensions is dramatic. I removed just three extensions and watched my browser speed jump from sluggish to snappy. My RAM usage dropped by 200 MB. If extensions are your problem, this single fix often solves most slowdown issues completely.
5. Clear Your Browsing Data and Cache
Your browser stores copies of website files so pages load faster on repeat visits. This cache is helpful initially, but months or years of accumulated data slows down your browser. Combined with cookies and other tracking data, old cached files take up resources and create clutter.
Click the three vertical dots in Chrome and select Delete Browsing Data. A window opens showing what you can clear. Look for the time range dropdown and select All Time. This tells Chrome to clear everything from your entire browsing history. Check the boxes next to Cached Images and Files and Cookies and Other Site Data.
Click Delete Data and wait for the process to complete. This removes years of accumulated cached files in just a few seconds. Once finished, your browser has much less old data to manage. Websites will take slightly longer to load the first time after clearing cache, but subsequent visits will be faster and your browser will run smoother overall.
I recommend clearing your cache every month if you browse heavily. It’s a simple way to prevent slowdowns from accumulating over time. If you do it regularly, it never gets bad enough to cause noticeable lag.
6. Free Up Storage Space (and Keep It Free)
Chromebooks have limited storage space, and when your drive fills up, performance suffers system wide. The goal is maintaining at least 10 GB of free storage at all times. Anything below that causes Chrome OS to struggle.
Open your Files app from your app drawer. Click the three vertical dots in the top right corner and select Storage Management. This shows you how much space is used and how much is free. If you have less than 10 GB available, you need to delete files.
Look for your Downloads folder and check what’s stored there. Most people have files downloaded months or years ago that they’ve forgotten about. Delete anything you don’t need. Move important photos and videos to Google Drive instead of keeping them locally. This frees up space and backs up your files safely.
Uninstall apps you don’t use. Open Settings, click Apps on the left sidebar, then click Manage Your Apps. Go through the list and uninstall anything unused. Android apps especially can take significant space that you don’t need if you’re primarily browsing the web.
Here’s a productivity tip that prevents storage issues permanently. Create a Downloads folder in your Google Drive. Then go back to Settings on your Chromebook and find Downloads. Change the default download location to your Google Drive Downloads folder. Every file you download now goes directly to the cloud instead of filling your local storage. This takes zero effort once set up and completely prevents the local storage problem from happening again.
7. Turn Off Bluetooth (If You’re Not Using It)
Bluetooth drains your battery and consumes system resources even when you’re not actively using Bluetooth devices. If you’re not connected to wireless headphones, speakers, or peripherals, there’s no reason to have Bluetooth enabled.
Click on the time in the bottom right corner to open your system menu. Look for the Bluetooth icon and click it to toggle Bluetooth off. You can turn it back on anytime you need to connect a device. This simple toggle prevents unnecessary resource drain.
I turned off Bluetooth on my Chromebook and noticed my device stayed cooler and the battery lasted longer. Your CPU doesn’t need to constantly scan for Bluetooth devices if you’re not using any. Disabling it when not needed is a small optimization that adds up.
8. Enable Performance-Boosting Chrome Flags
Chrome flags are hidden experimental features that can improve performance if you know which ones to enable. These settings force your Chromebook to use your graphics processor more efficiently instead of relying solely on your CPU. Think of these as performance tweaks that push your hardware to work harder.
Open a new tab in Chrome and type chrome://flags in the address bar. Press Enter and you’ll see hundreds of experimental features. You’re going to enable three specific flags that boost performance.
First, search for Override Software Rendering List. Click the dropdown next to it and select Enabled. This forces your graphics processor to accelerate rendering even on older hardware that Chrome doesn’t officially support.
Next, search for GPU Rasterization. Click the dropdown and select Enabled. This moves webpage rendering tasks from your CPU to your graphics processor, freeing up your processor for other work.
Finally, search for Scheduler Configuration. Click the dropdown and select Enabled. This optimizes how your system prioritizes tasks and manages background processes more efficiently.
Once you’ve enabled these three flags, click the blue Relaunch button at the bottom right. Your Chromebook restarts and applies these performance enhancements. You should notice noticeably faster page loading and smoother scrolling.
One important caveat: these flags consume more battery power because they push your hardware harder. If you’re using your Chromebook on battery power and battery life matters more than speed, consider disabling these flags. But if your device is plugged in, these tweaks provide real performance gains.
9. Check for Corrupted App Caches
Sometimes individual Android apps develop corrupted cache files that cause slowdowns or freezing. If one specific app runs slow while everything else works fine, clearing that app’s cache usually fixes the problem.
Right click the app icon in your app drawer. Select App Info from the menu. Click More Settings and Permissions. Find Storage and Cache and click it. You’ll see two options: Clear Cache and Clear Storage.
Click Clear Cache first. This removes temporary files without deleting your app data. If that doesn’t fix the issue, come back and click Clear Storage to reset the app completely. Be aware that clearing storage deletes any data stored within the app, so only do this if clearing cache didn’t help.
I had a mapping app that started freezing constantly. Clearing its cache fixed the freezing instantly. The app worked normally again without any data loss. This fix works great for app specific slowdowns.
Deep Dive: Why Extensions Slow Your Chromebook (and Which Ones to Remove)
Browser extensions deserve their own detailed section because they’re the number one cause of slowdowns on Chromebooks. Most people don’t realize how much damage extensions cause because the slowdown happens gradually and invisibly. You install an extension, forget about it, and then wonder why your device feels sluggish months later. Understanding exactly how extensions impact performance helps you make better decisions about which ones to keep.
Extensions are fundamentally different from browser tabs. A tab only runs when you’re actively viewing it or when it has content loading. An extension runs constantly in the background whether you’re using it or not. It consumes RAM, uses CPU cycles, and drains battery power continuously throughout your entire day. This constant background execution is what makes extensions so much more damaging than simple websites.
The Real Performance Cost of Extensions (Data from Linus Tech Tips)
The hard numbers on extension impact come from Linus Tech Tips, a respected technology testing lab that conducts rigorous benchmarking. Their formal testing revealed shocking data about how browser extensions affect Chromebook performance. Understanding these numbers helps you see why removing extensions often solves slowdowns completely.
Just having 10 popular extensions installed across 6 open tabs causes your RAM usage to spike by 50 percent. When you scale that up to 48 open tabs with the same extensions running, your Chromebook needs an extra 2 GB of RAM just to maintain basic performance. That’s 2 entire gigabytes consumed just by extensions doing background work.
The overall performance loss is dramatic. Running a realistic stack of everyday extensions simultaneously results in a 25 percent performance loss across browser speed benchmarks. This means your Chromebook runs one-quarter slower just because of extensions. Imagine your device being fast enough, then someone slowing it down by 25 percent without your knowledge. That’s what extensions do silently in the background.
The impact compounds as you add more extensions. The first extension might only slow you down 2 percent. The second adds another 2 percent. But by the time you have 10 extensions, the cumulative effect reaches 25 percent or more. Each new extension multiplies the problem rather than just adding to it.
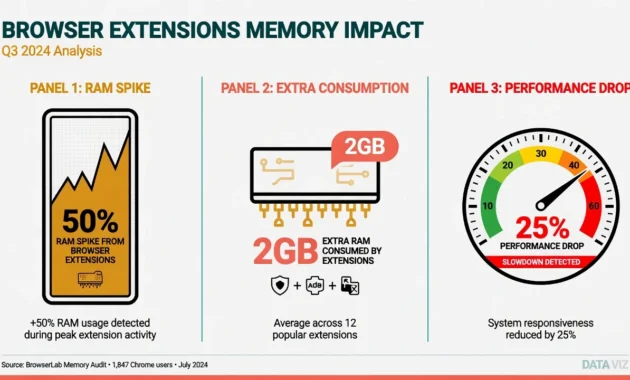
the performance loss compounds with every extension
you add
Which Extensions Hurt Performance the Most
Not all extensions damage performance equally. Some extensions are heavy resource hogs while others barely impact speed at all. Knowing the difference helps you decide which extensions to keep and which to remove immediately.
Password managers like LastPass cause a 12 percent performance hit by themselves. They constantly scan every text field on every webpage looking for login opportunities. This background scanning happens on every single page you visit. LastPass alone can slow your browsing noticeably if you have other extensions running too.
Grammarly is another heavy performer because it checks your writing in real time as you type. The extension processes every keystroke and compares your text against grammar and spelling rules. This constant processing shows up dramatically in speed benchmark tests. Grammarly users often notice their browser feels sluggish with other extensions installed.
Bloated ad blockers also drain resources significantly. Some ad blocking extensions use inefficient code that wastes CPU power checking every webpage element. However, not all ad blockers are created equal. The lightweight extension uBlock Origin actually improves performance by blocking resource heavy advertisements before they load. Instead of slowing down your browser, uBlock Origin speeds it up because ads consume more resources than the extension itself.
This is crucial to understand. Not every extension slows you down. Some extensions solve problems that would slow you down worse if left unsolved. The question isn’t whether to remove all extensions, but whether to remove the heavy ones that drain resources unnecessarily.
How to Find the Extension Slowing You Down
If you’re not sure which extensions are causing problems, you can identify the culprit using two methods. Both methods are quick and require no technical knowledge beyond basic clicking.
Method one uses the built-in extension viewer. Press Shift and Escape at the same time while inside Chrome. This opens a hidden panel showing every extension and how much memory or processing power each one uses. Look for any extension using unusually high percentages. If an extension you barely use is consuming 100 MB of RAM, that’s a strong candidate for removal.
Method two is the methodical isolation approach. This method takes longer but gives you definitive proof about which extension is causing slowdowns. First, open your Extensions page and disable every single extension by toggling them all off. Test your Chromebook speed. Everything should feel noticeably faster.
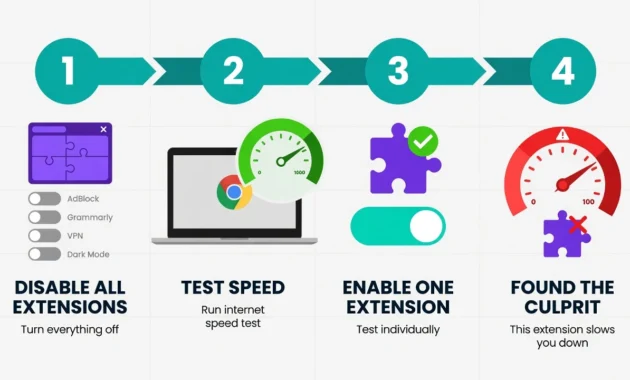
one at a time — the moment things slow down again,
you’ve found your culprit.
Then enable extensions one at a time and test your speed after each one. When you enable an extension and notice your Chromebook becoming sluggish again, you’ve found a culprit. You can either remove that extension entirely or decide if the functionality it provides is worth the performance cost.
I used this method once and discovered a screen sharing extension I installed months earlier was consuming 15 percent of my CPU constantly. I never used it anymore, so removing it made sense. My Chromebook immediately felt faster without it. The isolation method works because you’re identifying the exact extension causing problems rather than guessing.
The key insight here is that extensions are optional. You don’t need to keep an extension that slows you down if you’re not actively using it. Removing extensions you’ve forgotten about is one of the fastest ways to restore Chromebook performance. And if removing all extensions makes everything fast, you know the problem is definitely extensions. From there, you can selectively re-enable only the ones you truly need.
When a Powerwash (Factory Reset) Actually Helps
A Powerwash is your Chromebook’s nuclear option. It wipes everything and starts fresh, which can fix serious slowdowns caused by corrupted system files or years of accumulated problems. But Powerwash is not something you should do casually. It’s the last step after everything else has failed. Let me explain what actually happens during a Powerwash and when it makes sense to use it.
Think of Powerwash as resetting your entire operating system back to how it was when you first unboxed your Chromebook. The good news is that your actual data survives because Chromebooks sync everything to your Google account. Your fear of losing everything is valid, but it’s also unnecessary once you understand how Chromebook data works.
What a Powerwash Does (and What It Doesn’t Delete)
When you Powerwash your Chromebook, the operating system wipes your local storage and resets Chrome OS to factory settings. This removes every app you installed, every setting you changed, and every file stored on your device. The device reboots completely clean.
However, your Google Profile survives completely intact. When you sign back into your Google account after Powerwashing, your bookmarks reappear. Your saved passwords return. Your Chrome settings restore automatically. All your browser data syncs back from the cloud because Chromebooks store this information in your Google account, not on the device itself.
Your Google Drive files are completely untouched. Powerwash only affects what’s stored locally on your Chromebook. Since Chromebooks are built for cloud storage, your important documents, photos, and files live in Google Drive, not on your device. They’re safe and accessible after Powerwashing.
The only data you lose is anything stored locally in your Downloads folder or other local folders that hasn’t been backed up to Drive. This is why I always recommend moving files to Google Drive before Powerwashing. If you’ve followed the advice earlier in this guide about auto-routing downloads to Drive, you have nothing to lose.
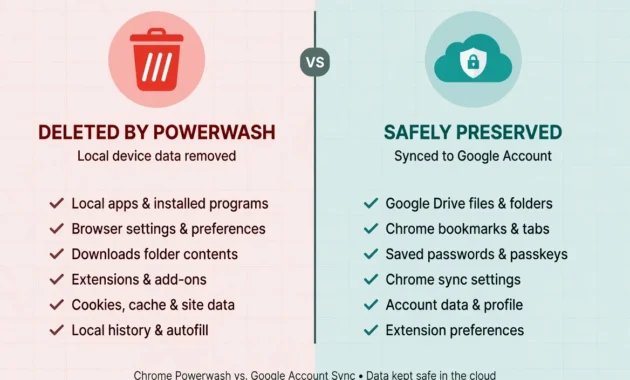
Powerwash completely — only local storage is wiped.
When You Should (and Shouldn’t) Powerwash
Do Powerwash if you’ve tried all the other fixes in this guide and your Chromebook is still slow. If you’ve disabled extensions, cleared cache, updated Chrome OS, freed up storage, and the slowdown persists, corrupted system files might be the problem. Powerwash clears out any corrupted data and gives you a completely clean operating system.
Do Powerwash if you suspect malware or security issues. Sometimes unwanted software gets installed and causes slowdowns. A complete factory reset removes everything suspicious and starts from scratch.
Do not Powerwash if you haven’t tried the other fixes yet. You don’t need to nuke your system before trying basic troubleshooting. Start with restarting, removing extensions, and clearing cache first.
Do not Powerwash if you have important files stored only locally on your Chromebook. Back up everything to Google Drive before Powerwashing. Once you Powerwash, local files are gone.
Do not Powerwash just because your device is old and slow. If your Chromebook has reached its Auto Update Expiration date, Powerwashing won’t help. The hardware itself is too dated for modern web applications. Powerwashing only helps if the slowdown is caused by software corruption, not hardware age.
How to Powerwash Your Chromebook
Powerwashing takes just a few minutes. You have two ways to do it depending on whether your device still boots normally.
If your Chromebook starts up normally, use the settings method. Click the time in the bottom right corner to open your system menu. Select Settings. Click Advanced on the left sidebar. Find Reset Settings and click Powerwash. A confirmation window appears asking if you want to proceed. Click Powerwash again to confirm.
Your Chromebook will restart automatically. The Powerwash process happens during the restart and takes a few minutes. Once it completes, your device boots to the login screen. Sign in with your Google account and everything syncs back automatically.
If your Chromebook won’t boot into the full operating system, you can Powerwash from the lock screen. Press Ctrl, Alt, and Shift, then press R all at the same time. This opens the recovery menu. Select Powerwash from the options available. Your device resets the same way, and you sign back in once it restarts.
After Powerwashing, reinstall only the apps and extensions you actually use. Avoid recreating the same extension heavy setup you had before. This gives your Chromebook a fresh start without the accumulated clutter that was slowing it down.
Advanced Tips to Make Your Chromebook Faster (For Power Users)
If you’ve worked through all the basic fixes and your Chromebook still isn’t where you want it to be, these advanced optimizations can push performance even further. These tweaks require more technical comfort and come with specific trade-offs you need to understand. They’re not for everyone, but for power users willing to dig deeper, they can unlock meaningful speed improvements.
The techniques in this section work because they change how your Chromebook allocates resources at a system level. They’re called experimental or advanced because most users don’t need them. But if you’ve already removed extensions, cleared cache, and updated your operating system, these options are worth exploring.
Enable Hyper-Threading (If Your Device Supports It)
Hyper-Threading is a processor feature that allows each core to handle multiple tasks simultaneously instead of just one. When enabled, your Chromebook can process more instructions per second without needing faster hardware. Not every Chromebook supports this feature, but if yours does, enabling it improves multitasking performance noticeably.
Click the time in the bottom right corner and select Settings. Look for Device in the left sidebar and click it. Scroll down until you find the Hyper-Threading option. Toggle it on and your device will use this optimization immediately. Some Chromebooks lack this option because their processors don’t support it. If you don’t see it, your device simply doesn’t have this capability.
Hyper-Threading works best when you have many tabs or applications open simultaneously. If you regularly switch between 15 or 20 tabs, enabling this feature helps your processor juggle all that work more efficiently. The performance gain is modest but noticeable for multitasking scenarios.
Remove Android/Play Store Entirely (Web-Only Users)
Here’s an advanced optimization most people don’t know about. Android runs as a completely separate virtual machine inside your Chrome OS. Even when you’re not using any Android apps, that entire virtual machine consumes RAM and CPU power continuously. For users who only browse the web and never use Android apps, disabling this entire subsystem yields massive speed improvements.
Search for Android Preferences in your app drawer. Open it and select Remove Play Store. This stops the Android virtual machine from running and frees up significant resources on older Chromebooks with limited RAM. Your device gains several hundred MB of available memory and noticeable CPU headroom.
Only do this if you’re absolutely certain you don’t use any Android apps. Once you remove the Play Store, you can’t install Android applications anymore. If you later need an Android app, you’ll have to re-enable the entire subsystem. For web-only users, this trade-off is worth it. The speed boost on older hardware with 2 to 4 GB of RAM is dramatic.
Expand Virtual RAM (Swap File) on Low-RAM Chromebooks
This advanced technique is for older Chromebooks with only 2 to 4 GB of RAM. When your physical RAM fills up, Chrome OS can use storage space as overflow memory. This is called a swap file or virtual RAM. By default, Chromebooks allocate a small swap space, but you can expand it to provide more overflow memory.
First, check how much free storage you have. Open your Files app and look at the storage indicator. You need at least 20 GB of free space before attempting this. If you have less than 20 GB free, delete files until you reach that threshold.
Press Ctrl, Alt, and T simultaneously to open Crosh, the Chrome OS command terminal. Type top and press Enter to see your current swap file size. Note this number in case you want to revert later. Open a new terminal tab and type swap enable 15728.64 to allocate approximately 16 GB of storage as virtual RAM. Press Enter and then type exit to close the terminal.
Restart your Chromebook to activate the expanded swap space. Your device now has additional overflow memory available. This helps older Chromebooks with limited physical RAM handle more tabs and apps. The trade-off is that you lose that storage space permanently. Swap file memory is also slower than physical RAM, so this isn’t a perfect solution, but it helps older devices run more smoothly.
If the swap expansion causes problems, you can disable it. Open Crosh again, type swap disable, and restart your device to revert to default settings. For users comfortable with command-line interfaces, enabling Developer Mode on your Chromebook unlocks additional terminal capabilities and advanced customization options beyond what standard Chrome OS provides.
Disable Memory Saver Mode (For Heavy Tab Users)
Chrome OS includes a Memory Saver feature that automatically puts background tabs to sleep to conserve resources. This sounds helpful, but it actually causes slowdowns for people who frequently switch between many tabs. When you click a sleeping tab, Chrome has to reload it, which creates a brief lag.
Open Settings and click Performance on the left sidebar. Look for Memory Saver and toggle it off. This disables the automatic tab sleeping feature. Your browser keeps all tabs running actively in memory.
Only do this if you have at least 8 GB of RAM and manage your tabs actively. If you have limited RAM and lots of tabs, Memory Saver actually helps because it prevents total RAM exhaustion. But if you’re comfortable with your tab count and have adequate RAM, disabling Memory Saver provides snappier tab switching.
Try Turning Hardware Acceleration OFF (For Website-Specific Lag)
Most of the time you want hardware acceleration on because it offloads work to your graphics processor. But occasionally, specific websites or older web applications conflict with hardware acceleration and run slower with it enabled. If you notice one particular website consistently lags while others load fine, try this edge-case fix.
Open Settings and click System. Find the option Use Graphics Acceleration When Available and toggle it off. Then click Relaunch to restart your browser. Test the problematic website. If it loads smoothly now, hardware acceleration was causing the conflict. You can keep it disabled permanently or toggle it back on if you prefer the general performance boost from acceleration.
This is a rare scenario, but it happens. Some legacy websites or specific browser configurations disagree with hardware acceleration. Testing both on and off settings tells you which works better for your particular situation.
Remove Linux (If You Installed It and Don’t Use It)
Some advanced users enable Linux on their Chromebook for development or specialized applications. Linux runs as a container inside Chrome OS and consumes resources. If you enabled Linux but don’t actively use it, disabling it frees up that overhead.
Open Settings and click Advanced on the left sidebar. Click Developers and find the Linux section. Select Remove to disable the Linux container completely. Your Chromebook immediately regains the resources that Linux was using.
Only do this if you’re certain you’re not using Linux for anything. Removing Linux is easy, but reinstalling it later requires several steps and takes time. Make sure you’ve backed up any files stored in Linux before removing it.
When to Stop Troubleshooting and Replace Your Chromebook
At some point, fixing an old Chromebook stops making sense. No amount of troubleshooting will help if your hardware has reached the end of its supported life. Google designs Chromebooks with a specific lifespan in mind. Understanding this helps you make an informed decision about whether to keep fixing your device or invest in a newer one.
Every Chromebook has an Auto Update Expiration date, commonly called AUE. Once that date passes, your device stops receiving Chrome OS updates automatically. Without updates, your Chromebook gradually becomes slower as websites demand more modern browser features and security protocols. No troubleshooting fix can overcome the limitations of an unsupported operating system.
How to Check Your Chromebook’s Auto Update Expiration (AUE) Date
Finding your Chromebook’s AUE date is straightforward. Click the time in the bottom right corner and select Settings. Click About Chrome OS. Your device automatically checks for updates and displays your current version. Look for Additional Details or more information link and click it.
Find your Chromebook model number in this detailed information screen. Write down the exact model. Now open a new browser tab and search for your model number followed by AUE date. For example, search “HP Chromebook 14 AUE date” if that’s your model. Google publishes official AUE dates for every Chromebook model ever made.
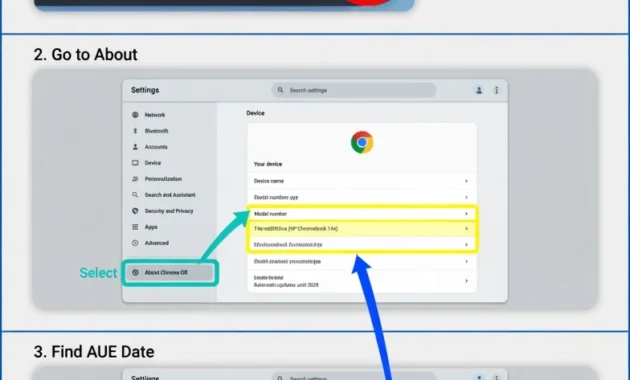
note your model number, then search for its AUE date.
The search results show you exactly when your device stops receiving updates. If that date has already passed, your Chromebook is no longer receiving security patches or performance improvements. If the date is several years in the future, your device still has years of supported life remaining.
An expired AUE date doesn’t mean your Chromebook stops working immediately. It means updates stop being available. Your device continues operating with the last Chrome OS version it received. But as websites become more demanding and security vulnerabilities appear in older software, your experience gradually deteriorates.
Signs Your Hardware Is Too Old to Fix
Several signs indicate your Chromebook has reached the end of useful life. The most important is an expired AUE date. If Google has stopped supporting your device, no troubleshooting will restore performance to modern standards.
Insufficient RAM is another major indicator. If your Chromebook has less than 4 GB of RAM and you’ve tried all the fixes in this guide without meaningful improvement, the hardware itself is limited. Modern websites and web apps demand more memory than older devices can provide. Adding more RAM isn’t an option on most Chromebooks since the memory is soldered to the motherboard.
Manufacturing date matters too. Chromebooks built before 2017 often struggle with modern web applications. Processor technology advances rapidly. An eight year old processor simply can’t handle current websites as smoothly as newer hardware. Even with every optimization applied, older hardware has inherent limitations.
Try running basic tasks after applying all the fixes in this guide. Open 10 tabs with different websites. Open a Google Docs document and type in it. Watch a YouTube video. If your device still freezes, lags, or becomes unresponsive even after removing extensions and clearing storage, the problem is likely the aging hardware, not software.
Should You Repair or Replace?
The decision between repairing and replacing depends on your device’s age and remaining supported life. If your Chromebook’s AUE date is still several years away and your hardware diagnostics show healthy battery and components, continue fixing software issues. Your device still has years of useful life.
Repair makes sense if your AUE date hasn’t expired yet. The fixes in this guide address 90 percent of slowdown complaints. Removing extensions, clearing cache, and updating Chrome OS often restore performance completely. If you’ve applied these fixes and your device runs smoothly, keep using it.
Replace your Chromebook if the AUE date has already passed. Unsupported devices accumulate security vulnerabilities. You’ll spend time troubleshooting only to have performance degrade again as websites demand more modern browser features. At that point, a new Chromebook is a better investment than continued repairs on aging hardware.
Also consider replacement if your hardware diagnostics reveal failing components. If your battery health is below 50 percent, the storage is failing, or the motherboard shows signs of damage, repair costs exceed the value of the device. A newer Chromebook costs less than fixing failed hardware on an older model.
Think about your actual usage too. If you primarily browse the web and use cloud applications, even an older Chromebook can work fine once optimized. But if you stream videos, run complex web applications, or edit large files locally, newer hardware provides the performance you need. The investment in a modern Chromebook pays for itself in productivity and reliability.
I’ve found that most people’s slowdown problems are fixable without replacement. But if you’ve exhausted every troubleshooting option and your AUE date has passed, accepting that it’s time for a new device is the honest, practical choice. Your Chromebook served you well, but like all technology, it eventually reaches the end of its useful life.
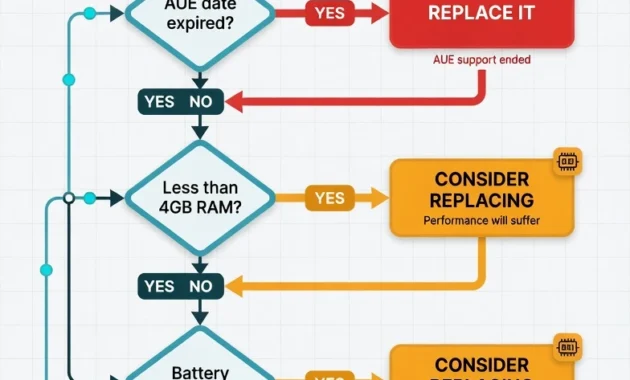
decision flows from whether your device is still
receiving Chrome OS updates.
Frequently Asked Questions
Why is my Chromebook so slow and laggy all of a sudden?
Browser extensions running in the background are the most common culprit, causing up to 25 percent performance loss. Check your battery level (below 40 percent triggers throttling), verify your storage isn’t full, and confirm Chrome OS is updated to the latest version.
How do I clear the cache on my Chromebook to make it run faster?
Click the three-dot menu in Chrome, select Delete Browsing Data, change the time range to “All time,” check both “Cached images and files” and “Cookies,” then click Delete. Restart your browser to complete the process.
Will a factory reset (Powerwash) improve my Chromebook’s speed?
Yes, if slowness stems from corrupted operating system files or years of software clutter accumulated on your device. Your bookmarks, passwords, and Google Drive files survive the reset, but only attempt this after trying basic fixes first.
Which browser extensions slow down my Chromebook the most?
Password managers like LastPass cause a 12 percent performance drop, Grammarly consumes heavy processing power, and bloated ad blockers drain resources significantly. uBlock Origin actually improves performance by blocking resource-heavy ads before they load.
Why is my Chromebook slow only when unplugged?
Your Chromebook automatically reduces CPU and GPU performance when battery drops below 40 percent to conserve power. Plug your device into a charger or charge it above 75 percent to restore full performance.