
This guide exists because of a mistake I keep watching people make: they empty the bin, panic, and start downloading recovery tools onto the very drive they are trying to save.
Below are the five methods I reach for when someone asks how to recover deleted files from the recycle bin after emptying it, ordered exactly the way I would try them, starting with the free ones already built into Microsoft Windows. The first section is not a method at all. It is the move that protects every method after it.
| Method | Software needed? | Best for | Difficulty | Recovery chance |
|---|---|---|---|---|
| Previous Versions | No | Files/folders with saved versions | Easy | High if available |
| File History | No | Previously backed-up personal files | Easy | High if enabled |
| OneDrive Recycle Bin | No | Files synced to OneDrive | Very easy | High within retention period |
| Windows File Recovery | Yes | Deleted files when backups aren’t available | Advanced | Depends on drive/use |
| Recuva / other recovery tools | Yes | Deeper recovery attempts | Easy–Intermediate | Depends on overwrite/TRIM |
Emptied the Recycle Bin? Don’t Panic—and Don’t Touch Anything Else

Your bin is empty. Don’t touch anything else.
Emptying the Recycle Bin does not immediately guarantee that the underlying file data has been physically erased. Windows marks the space used by a deleted file as available, so some of the data may remain recoverable until that space is reused.
The chance of recovery depends heavily on the storage device, filesystem, and what happened after deletion.
The danger isn’t the empty action; it’s what happens next. Every new download, every browser cache, every installer writes over that free space. I’ve seen it: a user empties the bin, then browses for two hours and writes fresh data over the old files. That’s not panic. That’s just how drives work.
Three quick checks before you panic. Haven’t opened the bin yet? Right-click the file and choose Restore. Deleted it seconds ago? Hold Ctrl and press Z inside File Explorer; it undoes fresh deletions.
The file came from a USB stick? Plug it back in. Each drive carries its own hidden $Recycle. Bin folder.
If you feel uncertain, shut the machine down and come back with a plan. Doing nothing is the smartest first move when your goal is recovering an emptied Recycle Bin.”
Where Deleted Files Actually Go When the Recycle Bin Is Emptied
Emptying the bin feels like shredding. It isn’t.
Your files stay exactly where they were. Windows removes the index entry the signpost and flags the space as free. On a standard NTFS file system, the actual photo and document data remains intact until another file writes over that block.
That gap invisible but not gone is why recovering deleted files from the recycle bin after emptying is possible at all. This is the basic principle behind Recycle Bin recovery: the file may disappear from view before its underlying data is actually overwritten.
People panic because the icon vanished and the search came up empty. Your brain reads ‘gone’ when all you have is ‘unlisted. ‘ The file did not die. It just lost its name.”
Whether those unlisted files survive long enough to bring back depends on one question most guides never ask. Hard disk or SSD?
Where Do Deleted Files Go When the Recycle Bin Gets Emptied?
Here is the straight answer.
Permanently deleted files stay exactly where they were. They vanish from view, but the data remains until new files overwrite that space. Nothing travels, nothing shreds.
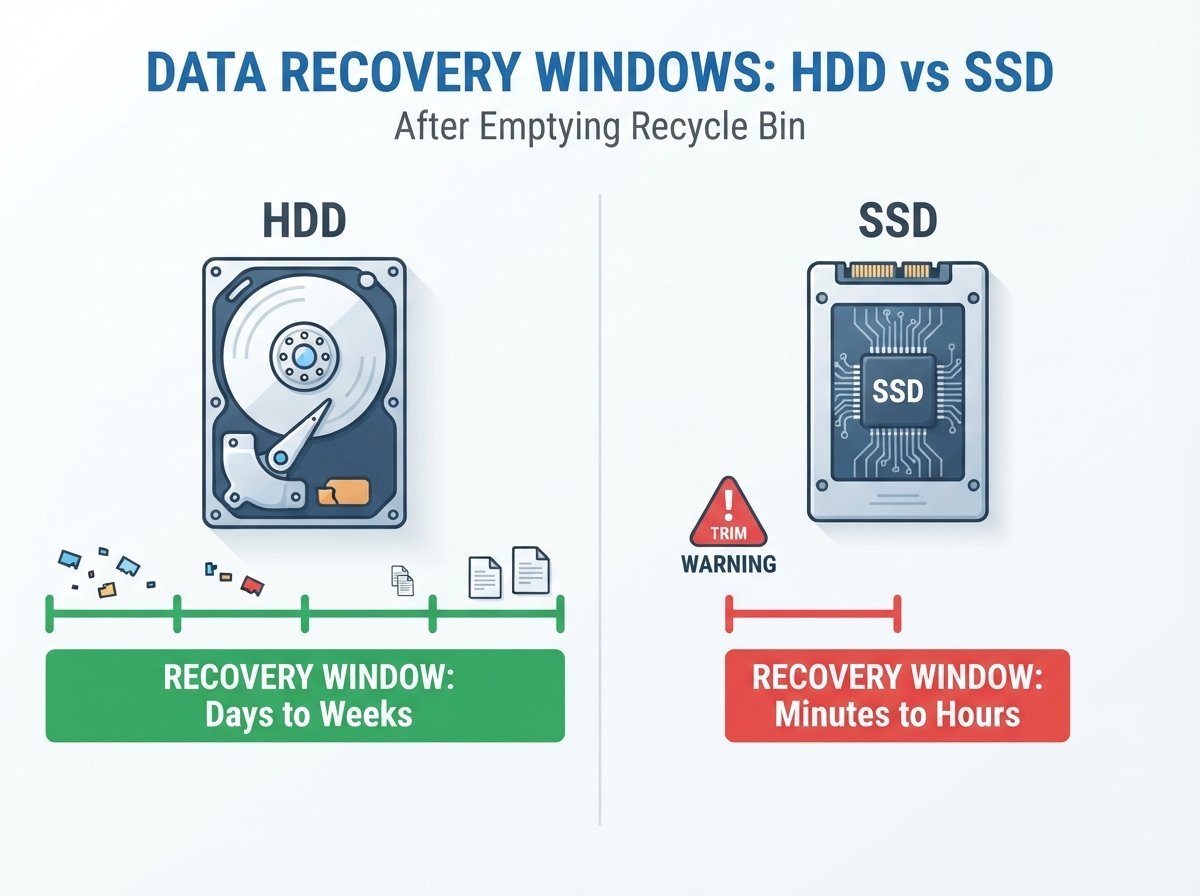
On a hard disk drive, yes—the data just sits there. On an SSD, the rules change fast, and SSD TRIM is why.
Hard disk drive (HDD) | Solid state drive (SSD)
What happens after empty? | Data sits untouched until overwritten | TRIM flags block for cleanup
What erases for real? Only new data you write. The drive itself, on its schedule.
Realistic window | Days or weeks if idle | Often minutes to hours once TRIM runs
What it means: Pause and scan soon. Start recovery this hour, not tonight.”
HDD vs SSD: Your Recovery Window Is Probably Smaller Than You Think
HDD vs. SSD matters, but there is no reliable recovery countdown. On a traditional hard drive, deleted data may remain recoverable until the space is reused. SSDs can be more difficult because TRIM and internal garbage collection may make deleted data unavailable. Instead of assuming you have “hours” or “weeks,” stop using the affected drive and begin with the least invasive recovery option as soon as possible.
| Factor | HDD | SSD | USB / Flash |
|---|---|---|---|
| Deleted data | May remain until overwritten | TRIM may make data unavailable | Depends on controller/filesystem |
| Recovery difficulty | Usually easier | Often harder | Varies |
| Best first action | Stop using drive | Stop using drive immediately | Stop using device |
| Should you install recovery software? | Prefer another drive | Prefer another drive | Recover to another drive |
| Overall outlook | More favorable if unused | Often limited after TRIM | Highly variable |
And if the files vanished months ago while the PC stayed in daily use, the honest odds drop near zero, SSD or not. I would rather tell you that than watch you waste a weekend on a scan that cannot win.
Not sure which drive you have? Press Start, type “Defragment and Optimize Drives,” and read the Media type column. It says “solid-state drive” or “hard disk drive” in plain words.
The SSD recoveries I have seen succeed share one thing. The person started the same day, often the same hour.
| Do this | Why |
|---|---|
| Stop using the affected drive | Prevents overwriting |
| Don’t download recovery software to it | Installation creates new writes |
| Don’t save recovered files to it | Recovered data can overwrite other deleted data |
| Disconnect unnecessary external devices | Reduces accidental writes |
| Prepare a different drive for recovered files | Gives you a safe destination |
| If the drive is clicking/disappearing, stop scanning | Could indicate hardware failure |
Method 1: Recover Deleted Files Without Software Using Previous Versions
Before downloading anything, try this first. It is the cleanest free method I know, and the feature is called “Previous Versions”—or “Restore Previous Versions” if you prefer the formal label.
I have watched this rescue a folder minutes after the Recycle Bin emptied.
Behind that tab sits Volume Shadow Copy. That is the formal name for the dated snapshots Windows quietly keeps when the feature is on.
How to restore previous versions of a folder:
- Open File Explorer, and go to the folder where the file lived its parent folder, not the bin.
- Right-click the folder. Choose Restore previous versions. (Windows 10: open Properties first, use the Previous Versions tab.)
- Pick a dated copy from before the deletion. Click Open not Restore. Open is safer.
- Find the missing file inside that snapshot window. Copy and paste it back.
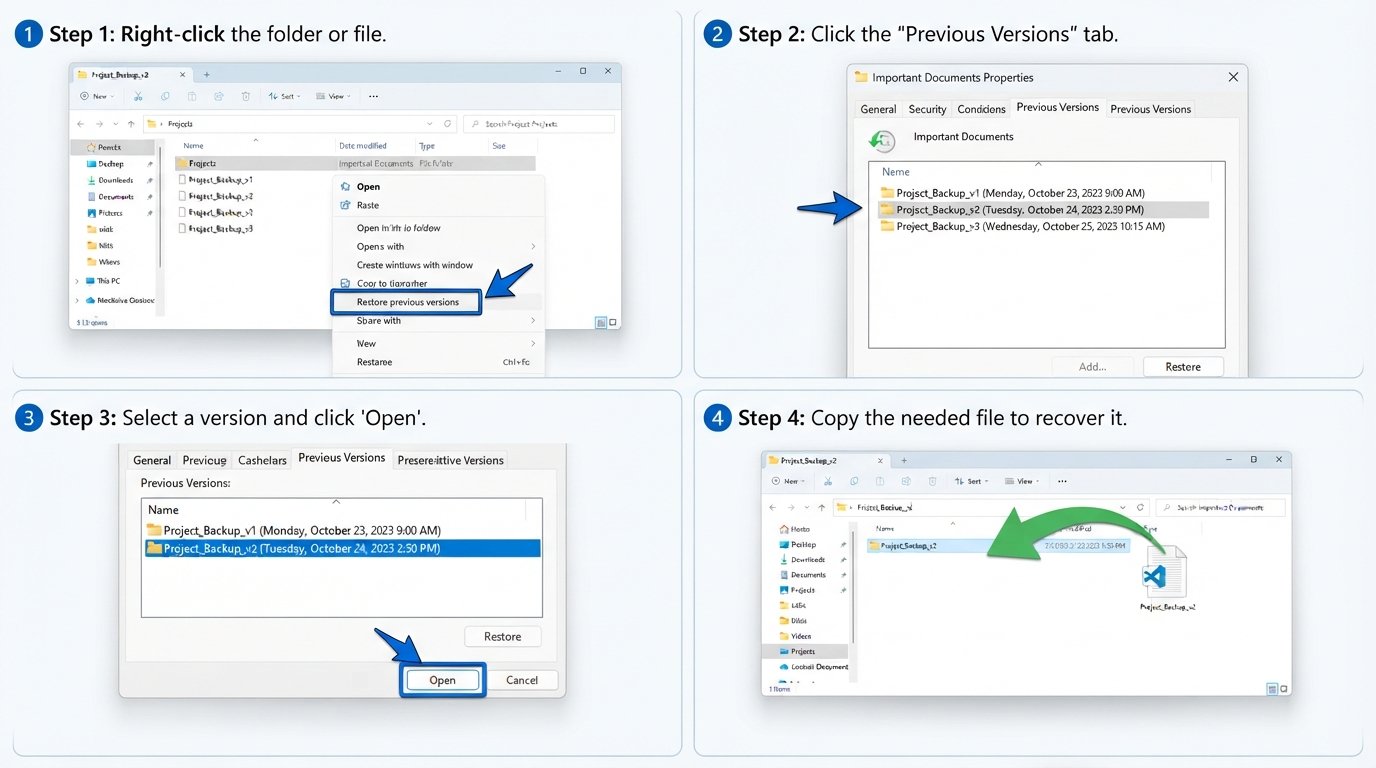
Why Open Instead of Restore? Restore rewinds the entire folder to that date and can overwrite newer files inside it. Copy out what you need. Touch nothing else.”
Here is how to restore previous versions of a folder:
- Open File Explorer and go to the folder where the deleted file used to live, its parent folder rather than the bin.
- Right-click the folder and choose Restore previous versions. On Windows 10, open Properties first and use the Previous Versions tab.
- Pick a dated copy from before the deletion and click Open. Not Restore.
- Find the missing file inside that snapshot window, then copy and paste it back where it belongs.
I pick Open over Restore on purpose. Restore rewinds the entire folder to that date and can overwrite newer files inside it. Copying out what you need touches nothing else.
Now the honest part. If the tab shows nothing, Windows never kept a copy of that folder, so skip ahead to the next method. But do one small thing first.
System protection is not a backup for your personal files. System Restore can roll Windows system settings and other system components back to an earlier restore point, but it is not a reliable way to recover deleted documents, photos, or videos.
If you want protection against accidental deletion, use File History, Windows Backup, or OneDrive instead.
And next time the bin gets emptied in a hurry, that tab will not be empty.
Method 2: Restore Files Using File History (Windows 10 & 11)
File History is quietly one of the best things Windows does, and most people never open it. When it is running, you can use it to restore deleted files in about a minute. Windows has been copying your Documents, Desktop, and Pictures folders to a backup drive on a schedule, and those copies survive an emptied Recycle Bin.
A ten-second check first. Open Control Panel, then System and Security, then File History. A backup drive marked “On” means copies exist. If it shows a flat off, nothing was ever set aside, so head to Method 3. “.
The path depends on your version:
- Windows 11: Settings, System, Storage, Advanced storage settings, Backup options, Restore files from a current backup.
- Windows 10: Settings, Update and Security, Backup, More Options, Restore Files from a Current Backup.
Typing “Restore your files with File History” into the Start menu reaches the same window on both.
Once inside, search the file by name or page through older dates with the arrow buttons. Select what you need and click the round green. Restore button at the bottom. Everything lands back in its original location.
File History can only return what the backup drive already held, so an empty window means those files were never copied. And if the feature said “Off today,” plug in a spare drive tonight and switch it on. It asks for nothing and quietly pays off.
Method 3: OneDrive’s Second Recycle Bin Most People Never Check
I have lost count of users who swore they had no backup. Many were wrong without knowing. If OneDrive backup or folder syncing was previously enabled, your deleted files may still be available in the OneDrive Recycle Bin.
Sign in to the correct Microsoft account and check OneDrive before attempting file-recovery software. Personal OneDrive accounts generally retain deleted items for up to 30 days, while work or school accounts generally retain them for up to 93 days, unless different policies apply.
Thirty seconds. Open oneDrive.com, sign in, and click Recycle Bin. Deleted files wait roughly thirty days. Select, choose Restore, and the cloud backup restore puts everything back without any downloads.
Sign in to Windows with a Microsoft account, and OneDrive backup often switches on by itself during setup, with Windows Backup nudging Desktop, Documents, and Pictures into the cloud on newer machines.
Thirty seconds, maybe less. Open oneDrive.com, sign in, and click Recycle Bin in the left panel. Deleted files wait there for roughly thirty days. Select the files you need, choose Restore, and the cloud backup restore puts everything back without any downloads at all.
Two things worth knowing. Right-click a file in OneDrive, and Version History can undo a bad edit, which is a different rescue than a deletion. And once the thirty-day window closes, items leave that bin for good, though files you truly cannot lose still justify one ask of Microsoft support.
If the OneDrive bin shows nothing, sync was never running, so Method 4 is your next stop. Afterwards, switch the sync on. The free tier covers 5 GB of storage, which holds a surprising number of documents and photos.
Method 4: How to Recover Deleted Files from Recycle Bin After Emptying with Windows File Recovery
Microsoft has an official answer to the query on how to recover deleted files from the recycle bin after it is empty. It is called Windows File Recovery, Microsoft’s command-line data recovery tool for Windows. It is the one free tool with no recovery cap—but it asks for patience.
| Option | Works after Empty Recycle Bin? | Backup required? | Command line? | Destination must be different drive? |
|---|---|---|---|---|
| Previous Versions | Sometimes | Yes | No | Not necessarily |
| File History | Yes, if previously enabled | Yes | No | Backup drive required |
| OneDrive Recycle Bin | Yes | OneDrive sync/backup | No | No |
| Windows File Recovery | Yes | No | Yes | Yes |
| Recuva | Yes | No | No | Yes recommended |
Two minutes in the store: search Windows File Recovery, install, and open it. It works on Windows 10 (version 2004 or newer) and Windows 11.
Pick a mode:
- Regular: file deleted recently from a normal Windows drive.
- Extensive: older losses, formatted drives, memory cards.
My rule: try regular first, then extensive if the result list looks thin.
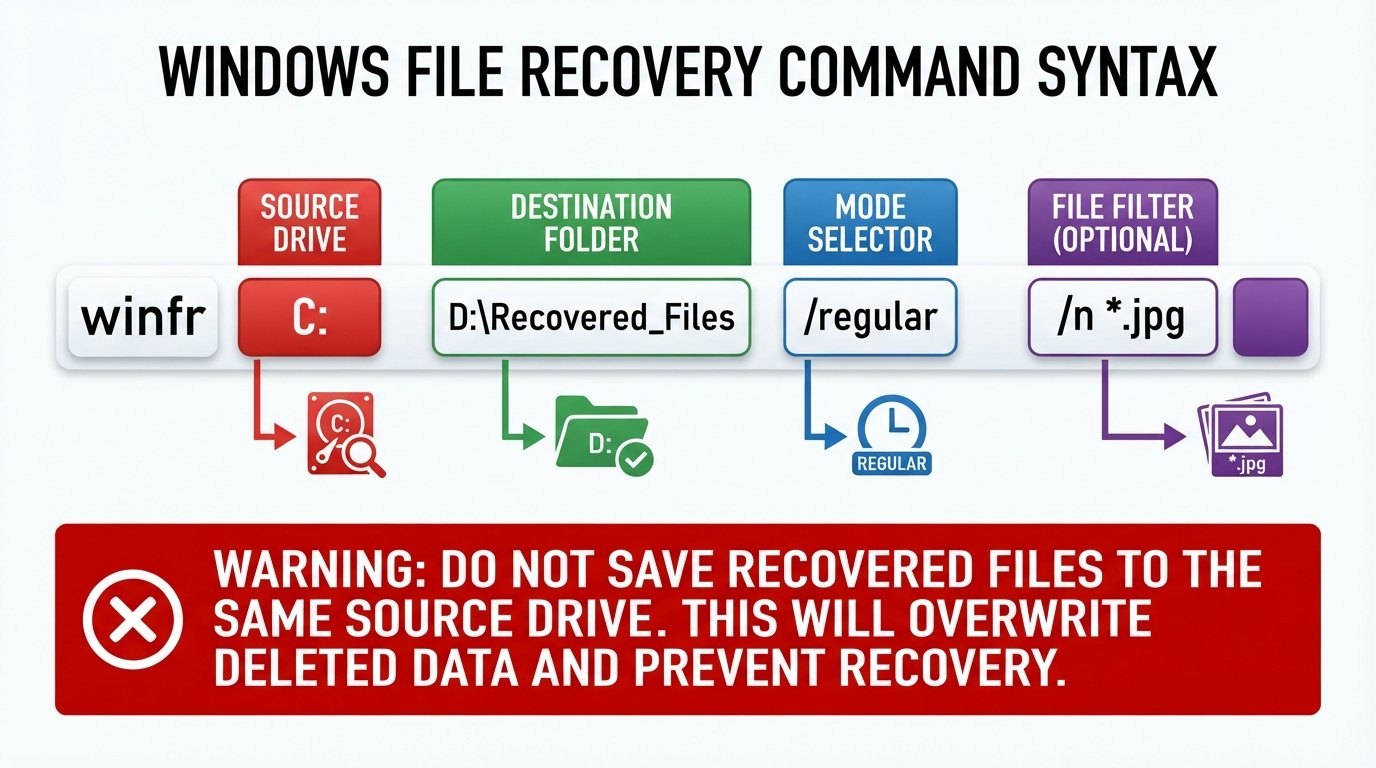
Every command follows one shape:
winfr C: D:\Recovery\regular\n\Users\YourName\Downloads\report.docx
That hunts one named file. For all PDFs instead:
winfr C: D:\Recovery /extensive /n *.pdf
Source drive, destination drive, mode, /n filter. The destination must be a different drive—always. A spare USB stick is perfect. Saving into the scanned drive can overwrite the very files you came to rescue.
Press Enter, confirm Y, and give it time. Found files land in a dated folder on the destination drive. There is no preview—you learn what survived only after that folder opens.
If typed commands make you sweat, Method 5 trades keyboards for checkboxes.
Two minutes in the store and you are set. Search Windows File Recovery, install the app, and open it. It works to recover files in Windows 10 (version 2004 or newer), and you can also use it to recover files in Windows 11.
Pick one of two modes. Regularly fits a file deleted recently from a normal Windows drive. Extensive digs deeper for older losses, formatted drives, and memory cards.
My rule is simple. Try Regular first, then rerun with Extensive if the result list looks thin.
Every command follows one shape:
winfr C: D:\Recovery /regular /n \Users\YourName\Downloads\report.docx
That line hunts one named file in Downloads. To undelete files by type instead, swap the filter:
winfr C: D:\Recovery /extensive /n *.pdf
The pattern never changes: source drive, destination drive, mode, then /n plus what to look for. And that destination must be a different drive, no exceptions. A spare USB stick is perfect. Saving into the drive being scanned can overwrite the very files you came to rescue.
Press Enter, confirm with Y when asked, and give the scan time. Anything found lands in a dated folder on the destination drive. One honest trade-off: there is no preview, so you learn what survived only after that folder opens.
“If the command prompt makes your palms sweat, Method 5 trades the keyboard for checkboxes.
Method 5: Recuva and Disk Drill What ‘Free’ Actually Gets You
Every recovery page promises magic. The difference is at the Recover button. File recovery software can locate data that is still recoverable, but the results depend on whether the original data has been overwritten. Recuva lets you keep what you find. Disk Drill and EaseUS let you look at the metering.
| Your situation | What to do |
|---|---|
| You just emptied the Recycle Bin | Stop using the drive immediately. |
| File was deleted recently | Check Previous Versions/File History |
| You use OneDrive | Check OneDrive Recycle Bin |
| No backup exists | Try Windows File Recovery |
| Windows File Recovery doesn’t find it | Try a reputable recovery application |
| SSD + significant use since deletion | Recovery may be difficult |
| HDD + little/no use since deletion | Recovery may be more promising |
| Drive is clicking or disappearing | Stop DIY scanning and consider professional recovery |
Before you download:
- Install on a different drive, or run portable from a USB stick. Every installer writes new data. New data is what you fight.
- Scan fast before scanning deep. A quick scan checks records in minutes. A deep scan reads every sector and can stretch past an hour. Start quick; escalate only on a miss.
Recuva: open the wizard. Pick Pictures or Documents. Choose ‘I’m not sure’ for location so the whole drive is checked. Leave Enable Deep Scan unticked first. Press Start.
When results appear, open the preview pane. A clean preview is the best proof a file survived. Tick files, hit Recover, and point to another drive. No size wall on the free version that is why Recuva stays my first download.
Disk Drill and EaseUS Scan are free, preview beautifully, and meter the keeping. The number moves between versions.
One user planning a roughly 400 MB rescue met a 100 MB wall on a newer build; EaseUS hovers near 2 GB at last check. Read official limits before scanning, not after.
Preview before recovery. Test everything you bring back. One forum regular got his videos returned in name only every MP4 refused to play, partially overwritten weeks earlier. Small items fare better. Photos and documents usually survive intact; long videos are the common casualties.
Recovered files with weird names? Deep scans read signatures, not names. Skip the scroll. Filter by extension docx, .jpg, .mp4 then sort by date modified. Check for a rebuilt $Recycle. Bin branch too. Freshly emptied items pile there first.
Save to a different drive. Open each file before calling it saved.”
Before You Download: Two Rules That Save Rescues
Rule one. Install your data recovery software on a different drive than the one being rescued, or run the portable build from a USB stick. Every installer writes new data, and new data is what you are fighting.
Rule two. Scan fast before scanning deep. A quick scan checks the drive’s records and wraps in minutes. A deep scan reads every sector of the raw disk and can stretch past an hour on big drives. Start quick; escalate only on a miss.
Recuva: The Free One With No Real Catch
Recuva opens with a small wizard, and the wizard is the shortcut most people skip. For straightforward free file recovery, it is one of the simplest options to try before moving to more advanced tools.
Pick a file type like Pictures or Documents, choose “I’m not sure” for location so the whole drive gets checked, and leave Enable Deep Scan unticked on round one. “I’m not sure” for location so the whole drive gets checked, and leave Enable Deep Scan unticked on round one.
Press Start and let Recuva scan for deleted files.
When results appear, open the preview pane before ticking anything. A preview that opens cleanly is the best proof a file survived. Tick your files, hit Recover, and point the destination at another drive.
No recovery size wall on the free version, which is why Recuva stays my first download.
Disk Drill & EaseUS: Check the Free Limit Before You Start
Disk Drill and EaseUS Data Recovery Wizard scan free, preview beautifully, and meter the keeping. The free tier caps how much data you pull out.
And the number moves between versions. Older guides quote 500 MB for Disk Drill, yet one recovery forum user planning a roughly 400 MB rescue met a 100 MB wall on a newer build. EaseUS hovers near 2 GB of free recovery at last check. Vendor pages change, so read the official limits before you scan, not after.
Either way, preview files before recovery and test everything you bring back. One forum regular got his videos returned in name only: every MP4 refused to play, partially overwritten weeks earlier. Small items fare far better, so people usually recover photos and documents intact while long videos are the common casualties.
Recovered Files With Weird Names? How to Find Yours
A deep scan reads signatures, not names, so real filenames often vanish into machine-made strings. Skip the ten thousand-row scroll. Filter by extension, .docx or .rtf for text, .jpg for pictures, and .mp4 for video, then sort by date modified.
One forum user found his text file renamed to gibberish and surfaced it in a minute with exactly this combo.
Check the results tree for a rebuilt $Recycle. Bin branch too. Freshly emptied items often pile there first.
Whatever tool you pick, save recovered files to a different drive, then open each one before you call it saved.
When Nothing Works: Reading the Situation Honestly
Sometimes the honest answer is no; the files are not coming back. Three things decide that: drive type, time since deletion, and use in between.
Emptied months ago on a laptop with daily use and an SSD inside? Recovery forums are blunt about that combination. I would be blunt too: odds sink near zero.
Emptied last week on a hard disk that mostly sat idle? A serious deep scan still has teeth.
One red flag changes everything: clicking, beeping, or a drive that keeps vanishing points at hardware trouble, not deletion trouble. More scans grind a sick drive down.
If the lost files are genuinely irreplaceable, that is the moment for a professional hard drive recovery lab with a clean room not another download.
Note: this guide never promises you will recover permanently deleted files every time. The variables refuse to sit still for a measurement. Any success number you read elsewhere is invented confidence.
What you can always control comes next.
Set Up Your Safety Net Now (This Takes Ten Minutes)
Everything so far has been about tonight’s rescue. This part makes sure your important files never need a rescue like this again. Four switches ten minutes.
- Turn on File History. Plug in a spare external drive, open backup options, and add it. Windows starts a file history backup of your main folders automatically.
- Check your OneDrive backup. Click the cloud icon, open Settings, and find Sync and Backup. Toggle Desktop, Documents, and Pictures on.
- Switch on System Protection. Search, create a restore point, select your main drive, configure, and turn on system protection.
- Tune recycle bin settings. Right-click the Recycle Bin and open Properties. Flip on Display to delete the confirmation dialog. Raise custom size. Then check Settings > System > Storage for Storage Sense—if it runs, Windows empties the bin on its own schedule unless you stop it.
That last one is the quiet trapdoor. Nobody expects the bin to empty itself.”
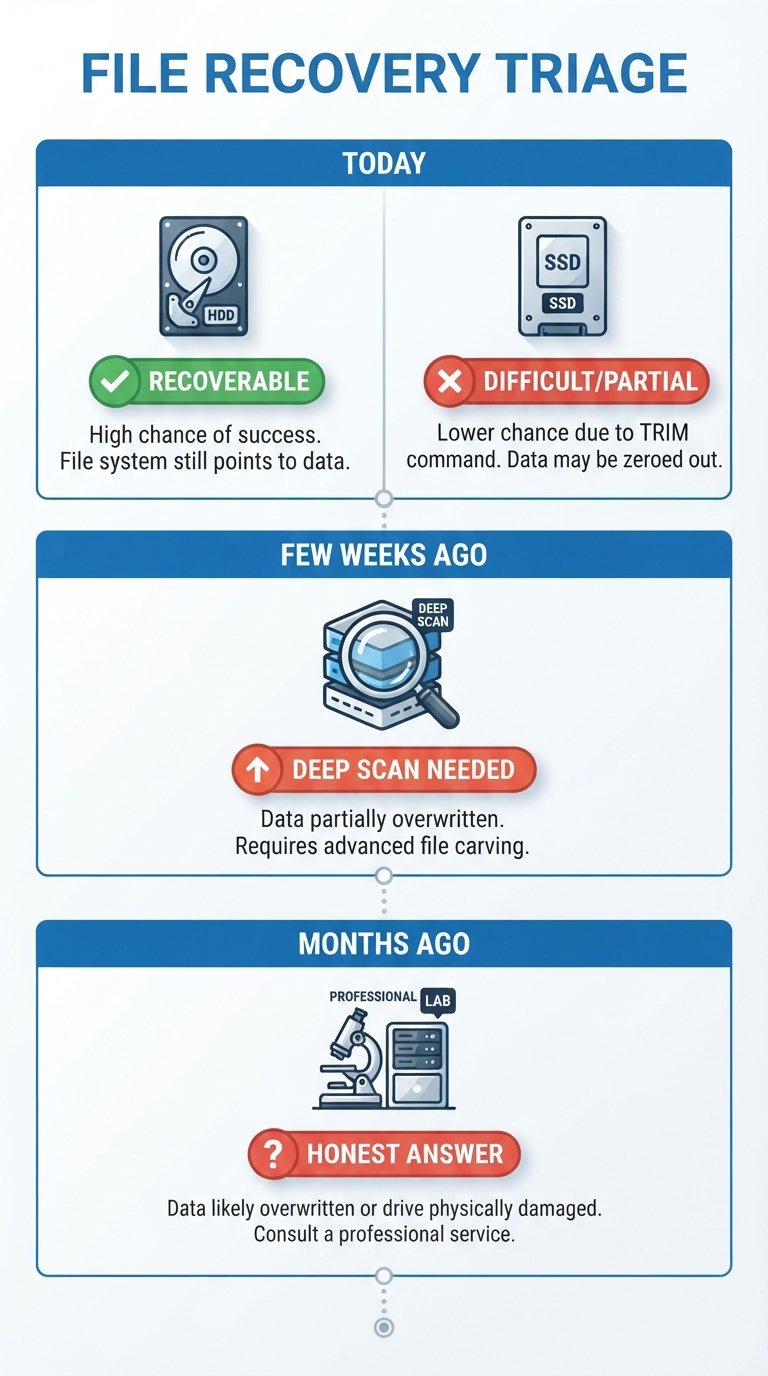
Everyone asking how to recover deleted files from the recycle bin after emptying is really asking two things: how long ago, and whether it is an HDD or SSD. Here is my triage.
| When | HDD | SSD |
|---|---|---|
| Emptied today | Work down from Method 1. Odds are strong. | Go straight to Method 4. Minutes matter. |
| A few weeks ago | Start at Method 4. Method 5 backs you up. | One careful Method 4 pass. Hopes are modest. |
| Months ago | Method 5 on a deep scan. Use since decides. | Read Section 8 first. An honest answer saves hours. |
But one rule beats every cell here. A deleted file survives until new data overwrites it, so do not save or install anything to that drive. Find your row. Start now.
FAQs: How to Recover Files Deleted from Recycle Bin After Empty
These are the questions I hear most after someone empties the bin.
Where do deleted files go when the Recycle Bin is emptied?
Nowhere physical. The files stay where they were on the drive, flagged as free space and hidden from view, until new data writes over them.
Can I recover files after emptying the Recycle Bin without any software?
Yes, but only if a backup feature was already running. Try the previous versions and File History above, then the OneDrive Recycle Bin online, before downloading anything.
How long do I have? Is it already too late?
On a hard disk, often days or weeks if the PC stays idle. On an SSD, sometimes hours. Months of daily use in between? I would keep hopes measured.
Does recovery still work on an SSD?
TRIM. Solid-state drives run a built-in cleanup that wipes deleted blocks to stay fast. Once that runs, no software brings the blocks back.
Why did my recovered photos or videos open as corrupted files?
Something wrote over part of the file before the scan ran. Recovery rebuilds the name while pieces of the data are gone. Videos suffer most, so preview before trusting.
Will System Restore bring my personal files back?
No. System Restore rolls back Windows settings, drivers, and system files only. Personal folders like Documents and Pictures sit outside its reach.
Can I recover files deleted with Shift and Delete?
Yes. Shift and Delete only skips the Recycle Bin visit. The file lands in the same state as an emptied one, so every method above applies.