
What Is That Black Spot on Your Dell Laptop Screen?
If you see a dark spot or discoloration on your Dell laptop screen, you are probably experiencing a “black spot” that is a form of damage to the LCD panel that will appear as a permanent dark area on the screen. This problem occurs many times and the first thing is to know what you are seeing.
A black spot on a Dell laptop computer is a physical issue to the LCD screen due to liquid leakage within the screen or disruption of the crystal structure.
This results in a dark spot on the screen that won’t fade to black or clear upon changing the brightness or rebooting.
These black spots will be different to other display issues that you may be experiencing. Black spots are fixed areas of darkness, but otherwise your display will function as normal unlike a totally black screen where nothing is visible.
They are also different from what are known as dead pixels, which are generally very small and can be seen as small dots. The black spot can appear small, but may expand with time. An observation I have made is that the initial dark area in one corner will get larger if the damage continues.
When these spots show up, some Dell users say their screens are “cooked” and that’s a very apt description:
The LCD panel is permanently damaged and cannot be fixed by itself. The spot may be referred to as a black dot on the laptop screen, laptop display issue, or black mark on the LCD screen.
In any case, the problem is the same: there is something that has disrupted the liquid crystal layer within your display panel. The spot is usually found on the bottom corners or edges of Dell laptop screens, but sometimes it’s seen in the top corners.
This is due to the fact that these areas can be easily damaged when the laptop’s lid is pressed shut too hard or when the laptop is carried in a tight bag. The first step is to understand what is going on so you can determine the best solution for your case.
Why Black Spots Appear on Dell Laptop Screens (The Real Causes)
This is due to physical damage to the internal structure of the LCD panel on the Dell laptop. Black spot on screen cause will help you to determine if your display can be repaired or replaced after working with hundreds of laptop repairs.
Pressure marks from normal use are the most common cause I see of these dark marks. While Dell laptops are well made, the screens are still fragile.
Too hard a closed or carrying your laptop in a packed bag can cause permanent damage to the screen, which will appear as black spots. Many people don’t realize that these areas tend to have a pattern to them.
I have seen Dell users report screen flickering, small dark spots appear, and then vertical lines across the screen begin to appear.
This progression is a warning to me that the LCD damage is worsening as the time goes by. The liquid that’s supposed to fill the inside of your screen has leaked out, leaving these black patches visible. It’s not something that’s easy to remove or patch.
The damage is enacted in the inner layers of the display panel that are responsible for providing the image that you see.
Pressure and Physical Damage (Most Common)
The 80% of the black spots I see on Dell laptop screens happen due to pressure damage. If you apply excessive pressure to your screen, even by accident, you run the risk of damaging the thin layers of LCD that are inside.
This tends to occur when people pick up their laptop by the screen rather than under it, or when there’s something stuck between the keyboard and screen when they’re closing the laptop.
Just a pen or crumb can put enough strain on the screen to damage the display when you close your laptop. It causes permanent damage to laptop screen as it messes up the alignment of the liquid crystals inside the laptop’s display.
However, when these crystals get out of alignment, or the encapsulating layer cracks, it is no longer able to regulate light in that region.
Dell Inspiron and XPS models appear to be especially susceptible to corner damage due to the way the hinges distribute closing force.
I would suggest closing the laptop on the keyboard gently at all times and ensuring there are no objects on the keyboard before closing the laptop.
Understanding the technical structure of LCD displays helps explain why these black spots form and spread over time. According to Dell’s official documentation on display technology, LCD panels consist of multiple delicate layers that work together to create the images you see on your screen.
When any of these layers becomes damaged or when the liquid crystal material leaks between them, it creates the permanent dark areas that characterize black spot damage. This technical foundation explains why some repair methods work while others fail completely
Ink Bleed from LCD Layers
The ink bleed from damage to the laptop screen is caused by the leakage of the liquid crystal material between the layers of the screen.
Imagine a small liquid leak that can’t be mopped up and it just lodges inside the screen. This kind of damage tends to be more subtle, and tends to increase with the amount of liquid crystal material spreading.
The liquid causes dark spots that may grow larger as the crack or tear grows. Laptop screen displays have a cracked LCD layer in which the liquid crystal can move around instead of being contained in cells. In this case, those spots are black due to the fact that the liquid is no longer able to properly filter light.
I have seen where applying some pressure may temporarily shift the leak around, but in the long term this can make the issue worse. The liquid crystal needs to stay in its designated areas to work properly.
Dead vs Stuck Pixels
A laptop with dead pixels will display permanently black spots that cannot be changed, whereas stuck pixels will present as bright spots that won’t change color even if the rest of the screen changes.
The occurrence of dead pixels is due to the failure of the electronic circuits that control the individual dots. They are typically very tiny, about the size of a pinhead, and have sharp edges, so they are easily identifiable.
Stuck pixels are those that are stuck into one color state and continue to be powered-on. Stuck pixels, unlike dead pixels, are sometimes remedied by using the pixel fixing software or light pressure techniques.
In general, I know how to tell from the edges of the dark area. Damage from dead pixels will be clearly defined whereas ink bleed will be an irregular shape with murky edges which may move gradually over time.
glow in one color and sometimes respond to software repair tools
The difference is that dead and stuck pixels are electronic problems, while ink bleeding represents physical damage to the liquid crystal in your Dell laptop screen. If you’re experiencing similar display issues with other laptop brands, you might find my guides on black lines on Lenovo laptop screens , as these often share similar underlying causes
Try This Dell Graphics Reset First (30-Second Fix)
If you’re seeing that your Dell laptop screen is black, there’s a quick keyboard trick that could fix the issue right away before you attempt any physical repairs on the screen.
This method for Dell Laptop Trouble Shooting resets the graphics drivers which may resolve display problems due to software glitches and not physical damage.
I always suggest using this one first– it’s safe and only takes 30 seconds to try! Hold Shift, Ctrl, Windows Key and B down together for 5-10 seconds and then press them all and release.
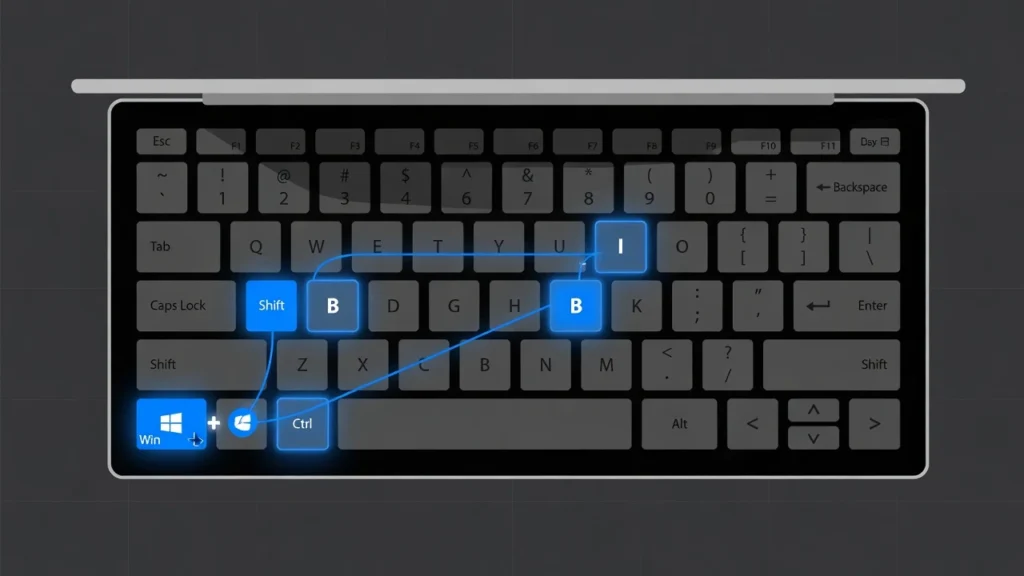
your Dell graphics driver a safe 30-second fix to try first.
The graphics reset will cause your Dell laptop screen to flash or make a short noise and then the screen will refresh. This has been effective if the black spot was not present over the course of time, but rather it appeared suddenly and after a Windows update.
This is why the Dell display driver reset works: Windows comes with a command to refresh your graphics drivers without having to reboot your computer.
Display drivers may become stuck or corrupt, resulting in black spots or artifacts in the display screen, which are not hardware related, but are software related.
Even if you believe that your black spot is caused by physical damage, I recommend the following method to try.
If the black space appears to move around or if new software has been installed recently, the issue may be caused by a problem with the display driver, not the hardware. Press the keyboard combination and wait approximately 10 seconds for your Dell laptop to reset graphics.
If the black spot goes away completely, then you just saved yourself from possibly a costly repair job on your screen! If the issue was software related the spot should remain absent. Unfortunately, if the graphics reset doesn’t work you don’t have to worry.
This just means there’s more of a possibility that the black spot is a physical damage to the LCD panel instead of a display driver problem. You now know that this is a problem that needs tackling in another way, and you’ve saved time and from unnecessarily complicating the situation with physical manipulation.
This Dell laptop troubleshooting shortcut is valid for all the Dell laptop series that includes Inspiron, XPS and Latitude series laptops running Windows 10 or 11 operating system.
The 20-Minute Software Fix (Try Before Physical Methods)
You can fix some types of black spots on your Dell laptop screen without touching the screen by using some pixel fixing software.
The online tools are free programs that cycle through colors and patterns and have the effect of “unsticking” the stuck pixels or helping to remove minor display glitches that appear as black spots. I advise people to try these software first before doing anything physical because these are 100% safe and sometimes very effective to repair.
The secret is to allow the pixel repair software free tools sufficient time to operate, which is typically 20 minutes or more sustained.
While not as effective as hardware failure, these screen pixel test tools will be helpful when testing stuck pixels, which you may not always be able to tell by a visual inspection. There have been instances where I thought the LCD was damaged, but it was actually a software problem and it was fixed.
The most important key to remember is patience. While software solutions to dead pixels may appear quick and easy, you will have to wait the recommended length of time for the Dell laptop to run the repair program to evaluate if they work.
Online LCD Repair Tools
The most easy to use Dell laptop screen pixel fixing software will be found online at LCD repair sites. Go to the website of the company for a screen repair tool called flexcode.org/lcd2.html, that is specially designed for stuck and dead pixels.
Click on the “Fix My Screen” button to begin the repair process. The colors and patterns will flash quickly all over your screen even your black spot. Continue to display this screen on your Dell laptop for 20 minutes, no matter what.
I have found that the time limits of less than 1 hour have about as much effect on the process as anything else and the 20 minute time limit corresponds to the free tool being given enough cycles to be able to potentially repair stuck pixels.
In the process, refrain from using the laptop for anything else. Your entire display must be controlled by the repair program in order to function. Do not put laptop to sleep because of power saving settings! Close the browser window after 20 minutes and see if your black spot has gotten better or gone away entirely.
If there is any improvement you can repeat the program for another 20 minute session to see if any more progress can be made.
Windows Explorer Reset Method
Sometimes, a black spot or partial screen malfunction is a Windows interface problem, and not a hardware damage problem, with Dell laptops. To open the Task Manager directly (if it does not open normally using other start-up methods), press Ctrl + Shift + Esc.
Under Processes tab, look for the “Windows Explorer” application. Right click on Windows Explorer and choose “Restart” on the menu. Your screen will go black as Windows re-loads the desktop interface for a few seconds.
With this Dell laptop troubleshooting technique, you can repair black spots that are actually a result of the Windows display system locking up instead of being a result of damage to the LCD.
This is helpful when your mouse is still visible on the screen, but the rest of your screen looks black or unresponsive. All the graphical aspects of your desktop are refreshed during the Windows Explorer restart.
If this resolves the black spot issue then it was software related and you shouldn’t see the black spot again unless you have similar system issues with Windows in the future.
Manual Removal: The Cotton Swab Method That Actually Works
When the damage is caused by leaked liquid crystal that is not permanently in place, the manual cotton swab method will work to remove the black spots from Dell laptop screens.
I have seen this method in action, with black spots slowly fading and becoming invisible after a few minutes of gentle manipulation. In the case of how to remove black spots on dell laptop screen, the way it is done is by moving the leaked liquid crystal material towards the edges of the laptop screen so that it is hidden under the bezel.
The secret behind this is knowing that you’re not fixing up the damage, but moving the problem liquid to an area where you can’t see it. I should be very clear about the dangers here. This manual laptop display repair can be a bad idea as it could make your screen damage worse.
If you apply the pressure too much, you may break your LCD screen altogether, and if you go the other way you may spread the black spot instead of lifting it. But, if done carefully, with proper tools and technique, this method can have a certain level of success.
I have seen marks that presented as black spots on the screen wither to only minor marks in a matter of 5 – 10 minutes of patience. The most crucial element to success is knowing how LCD screens are made and understanding how to do it.
The screen on your Dell laptop is set at a particular pixel orientation which influences the motion of liquid crystals under soft pressure.
What You’ll Need (Safety First)
You only need a few simple items for this technique, but using the right tools makes the difference between success and accidentally damaging your screen further. Get a clean cotton swab with soft, undamaged tips that won’t scratch your display surface.
Keep the screen vertical throughout the entire process. Do not lay your Dell laptop screen against a flat surface while working because this position makes it easy to apply too much pressure accidentally.
Work in good lighting so you can clearly see the black spot and monitor your progress. Have a microfiber cloth nearby in case you need to clean fingerprints or smudges from your screen when you’re finished.
Make sure your laptop is turned on so you can see the black spot clearly against a light background. Some people find it helpful to open a white document or web page to make the dark area more visible during the removal process.
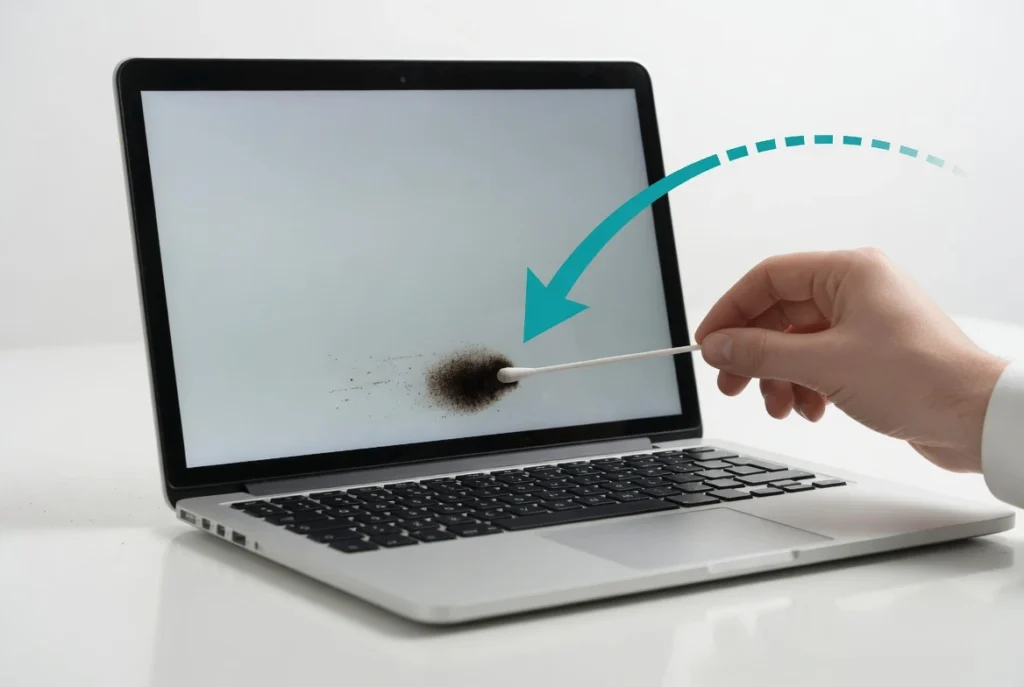
black spot, pushing slowly toward the nearest screen border.
The Pixel Direction Technique
Understanding your LCD liquid crystal display structure is crucial for moving the leaked material effectively. Identify the orientation of the pixel lines in your Dell laptop screen by looking closely at how the display elements are arranged.
Most laptop screens have either vertical or horizontal pixel orientation, and you want to push the black spot along these lines rather than against them. Pushing liquid crystal against the pixel structure is less effective and potentially more damaging.
Look at the edges of your black spot to determine the easiest path for the leaked material to travel toward the screen bezel. The goal is to move the liquid crystal in the direction that requires the least resistance from the internal screen structure.
Start by gently touching the cotton swab to the edge of the black spot that’s closest to the nearest screen border. Apply very light pressure and move the swab slowly toward that edge in small, controlled motions.
Watch how the black spot responds to your gentle pressure. If the dark area starts to shift or change shape slightly, you’re on the right track. If nothing happens after 30 seconds of gentle pressure, try a different direction or slightly more pressure.
Step-by-Step Process
Begin with the gentlest possible pressure using just the tip of your cotton swab. Place the swab at the edge of the black spot and slowly push toward the nearest screen edge with consistent, light pressure for about 30 seconds.
Monitor the laptop screen black patch carefully as you work. Over several minutes of patient manipulation, you should see the black spot gradually shrink and move toward the edge of your display.
Continue this process in 30-second intervals, giving yourself short breaks to assess your progress. The leaked liquid crystal material moves slowly, so don’t expect instant results from this laptop display dark spot removal technique.
If you see the black area getting larger or new spots appearing, stop immediately. This means you’re applying too much pressure or the LCD damage is too extensive for manual repair.
The entire process typically takes 5 to 10 minutes of active manipulation. Some black spots respond quickly while others require more patience and repeated gentle pressure to move completely out of the visible screen area.
When Your Dell Screen Is “Cooked” (Signs to Stop Trying)
Sometimes your Dell laptop screen reaches a point where no DIY method will work, and continuing to try repairs will only waste your time or make the damage worse. Professional repair technicians use the term “cooked” to describe LCD panel failure that requires complete screen replacement rather than any kind of fix.
I’ve learned to recognize these signs early because there is no simple fix or software solution for these black spots when they indicate true physical damage to the LCD panel. Professional computer repair experts can usually tell within seconds whether a screen problem is fixable or needs replacement.
When your Dell laptop screen damage has progressed beyond repair, the black spots represent permanent structural failure of the liquid crystal layers inside your display. No amount of pressure, software tools, or other DIY methods will restore these areas to normal function.
The key is learning to recognize when your laptop screen damage has crossed the line from potentially fixable to definitely requiring professional replacement. This knowledge can save you hours of frustration and prevent you from accidentally making the problem worse.
Dell employees and certified repair technicians consistently recommend stopping DIY attempts when certain warning signs appear. Continuing to manipulate a severely damaged screen often spreads the problem to previously unaffected areas.
Progressive Warning Signs
The progression pattern for serious Dell Inspiron screen problems typically follows a predictable sequence that indicates worsening LCD panel damage. Screen flickering often appears first, followed by small dark spots, and eventually vertical or horizontal lines across the display.
I’ve noticed that once vertical lines start appearing alongside black spots, the internal LCD structure has usually failed beyond any hope of manual repair. The flickering represents the early stages of electrical connection problems within the screen layers.
When laptop screen discoloration spreads rapidly or changes significantly within hours or days, this indicates active deterioration of the LCD panel. Healthy screens develop problems slowly over weeks or months, not overnight.
Multiple black spots appearing in different areas of your Dell screen simultaneously suggest widespread LCD failure rather than localized damage that might respond to manual techniques. Single spots might be fixable, but multiple spots almost always require replacement.
Temperature-related changes in the black spots also indicate serious structural damage. If the dark areas look different when your laptop is warm versus cool, the LCD layers have separated or bonded incorrectly.
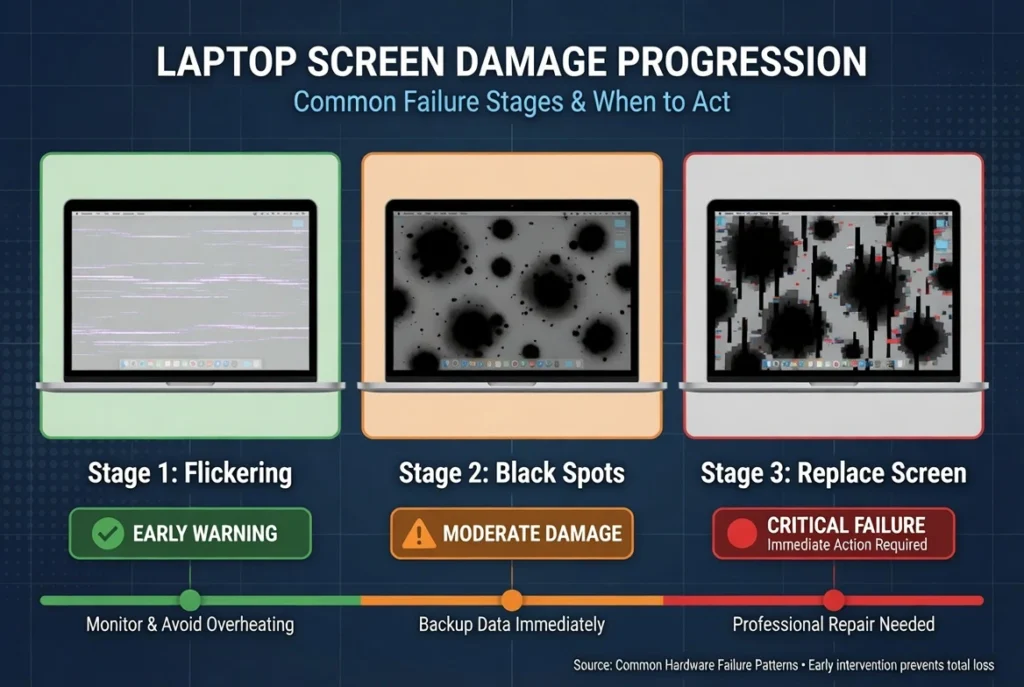
appearing alongside black spots, DIY repair is no longer
possible replacement is needed.
When to Stop DIY Attempts
Stop all DIY repair attempts immediately if applying gentle pressure makes your black spots larger or causes new dark areas to appear on your Dell laptop screen. This expansion indicates that the LCD damage is actively spreading and further manipulation will make the problem worse.
Professional repair technicians recommend ending self-repair efforts when black spots cover more than 20% of your visible screen area. At this level of laptop display repair need, the cost of replacement parts usually approaches the price of a complete screen replacement.
Dell warranty screen repair coverage may be voided if you continue attempting manual fixes after obvious signs of extensive damage appear. Insurance claims and manufacturer warranties often require proof that you didn’t cause additional damage through inappropriate repair attempts.
If your black spots return within 24 hours after successful manual removal, the underlying LCD panel failure is too extensive for DIY solutions. Temporary improvement followed by rapid deterioration indicates structural problems that only professional replacement can solve.
When multiple different DIY methods fail to produce any improvement in your Dell screen, professional replacement becomes the only viable option. Continuing to try different techniques after several failures risks cracking the LCD panel completely and making the laptop unusable.
Dell Warranty and Repair Options (What Actually Gets Covered)
Dell warranty screen repair coverage depends entirely on whether your black spot problem resulted from a manufacturing defect or physical damage that you caused. I’ve seen Dell employees make this distinction many times, and understanding the difference can save you hundreds of dollars in repair costs.
The reality is that most black spots on Dell laptop screens fall outside standard warranty coverage because they typically result from pressure damage during normal use. However, if your screen developed problems without any physical impact or mishandling, you might qualify for free replacement under Dell’s manufacturing defect policy.
Dell Technologies provides excellent documentation and support for screen replacement, even when the repair isn’t covered under warranty. Dell may be able to provide you the part if you contact their support team directly, and they often offer competitive pricing compared to third-party repair shops.
I always recommend starting with Dell’s official support process because they can definitively determine whether your screen issue qualifies for warranty coverage. Even if you end up paying for the repair, using genuine Dell parts ensures compatibility and maintains your laptop’s overall warranty status.
The key is being honest about how the damage occurred and understanding that Dell warranty screen repair decisions are based on clear technical criteria rather than customer preference.
What Dell Warranty Covers
Dell warranty coverage for screen problems applies specifically to manufacturing defects that appear without any external physical damage to your laptop. Manufacturing defects include problems with the LCD panel that develop due to faulty materials or assembly errors during production.
If your Dell laptop screen developed black spots within the first year of ownership and you can’t identify any specific incident that caused the damage, you likely qualify for free Dell warranty screen repair replacement. Dell Technologies typically covers these issues under their standard hardware warranty.
However, warranty coverage excludes damage from drops, pressure, liquid spills, or any other user-caused incidents. Even minor impacts that seem harmless at the time can create internal LCD damage that shows up as black spots days or weeks later.
Dell requires you to describe how the screen problem developed when you contact support. Be completely honest about any incidents you can remember because warranty fraud can void your entire laptop coverage, not just the screen repair.
Age also affects warranty coverage. Laptops older than three years rarely qualify for free screen replacement unless you purchased extended warranty coverage when you bought the computer.
Getting Parts and Service from Dell
Contact Dell support through their official website or by calling their technical support line to start the warranty evaluation process. Dell SupportAssist software can also help you run diagnostic tests and submit support requests directly from your laptop.
Dell support representatives will guide you through their standard LCD diagnostic procedures, which may include connecting an external monitor to test your graphics hardware. This Dell laptop troubleshooting process helps them determine whether the problem is screen-related or caused by other components.
If Dell determines that your screen needs replacement, they can provide you with the exact part number and official repair instructions for your specific laptop model. Dell does have pretty good documentation for most repair procedures, including detailed disassembly guides with photos.
For out-of-warranty repairs, Dell offers both mail-in service and on-site repair options depending on your location and laptop model. Mail-in service typically costs less but takes longer, while on-site service provides convenience at a higher price.
Dell SupportAssist can also help you locate authorized repair centers in your area if you prefer professional installation over attempting the repair yourself.
Typical Repair Costs
Laptop screen repair cost through Dell typically ranges from $200 to $400 depending on your specific laptop model and screen size. Premium models like XPS and Alienware systems generally cost more to repair than basic Inspiron models.
Dell charges separately for the LCD panel part and the labor to install the replacement screen. If you’re comfortable doing the installation yourself, you can save $100 to $150 by ordering just the part and following Dell’s repair documentation.
Third-party repair shops often charge less than Dell’s official service, but using non-Dell parts can affect your laptop’s remaining warranty coverage. I recommend comparing costs carefully and considering whether saving money is worth the potential warranty implications.
For laptops older than four years, the laptop screen repair cost often approaches 50% or more of the computer’s current value. In these cases, connecting an external monitor and using your laptop as a desktop replacement becomes a more economical solution.
How to Prevent Future Black Spots on Your Dell Screen
Preventing black spots on your Dell laptop screen requires understanding that most damage happens from everyday handling mistakes rather than dramatic accidents. I’ve found that simple changes in how you close, carry, and store your laptop can eliminate 90% of the pressure damage that leads to black spots.
The most effective prevention strategy focuses on avoiding pressure damage to laptop screen components during normal use. Dell laptop screens are surprisingly fragile, and even gentle pressure applied in the wrong way or wrong location can create permanent LCD damage that shows up days or weeks later.
Most laptop screen damage occurs during three specific activities: closing the laptop lid, carrying the computer in a bag, and placing objects on top of the closed laptop. Understanding how physical damage happens during these routine actions helps you develop habits that protect your screen.
I always tell people that prevention costs nothing but saves hundreds of dollars in repair expenses. A $300 screen replacement becomes completely unnecessary when you follow proper handling techniques consistently.
The key insight is that LCD screens can tolerate normal use but fail quickly when exposed to concentrated pressure or flexing forces. Small changes in your daily laptop habits provide enormous protection against costly screen damage.
Proper Laptop Closing Technique
Always grab your Dell laptop by the base or bottom section when closing the lid, never by the screen itself. Holding the screen while closing creates pressure damage to laptop screen components because you’re applying force directly to the delicate LCD panel.
Close the laptop lid slowly and gently, allowing the hinges to control the movement rather than forcing the screen down quickly. Rapid closing can create pressure spikes that damage the LCD layers even when no objects are trapped between the keyboard and screen.
Before closing your laptop, always check the keyboard and trackpad area for small objects like crumbs, pens, or paperclips. Even tiny items can create concentrated pressure points that crack the LCD panel when the lid closes completely.
Never close your laptop while holding it at an angle or with one hand. This technique puts uneven stress on the hinges and can cause the screen to flex abnormally, leading to internal LCD damage that appears as black spots.
I recommend developing a consistent closing routine where you pause, check for objects, grip the base properly, and close slowly. This habit becomes automatic after a few weeks and prevents most pressure-related screen damage.
Safe Transport and Storage
Choose a laptop bag with a dedicated padded compartment that prevents your Dell computer from moving around during transport. Loose movement inside a bag can cause the laptop to bump against hard objects, creating laptop screen damage even when the lid is closed.
Never place heavy objects on top of your closed laptop, even for short periods. Books, other laptops, or boxes can create enough pressure to damage the LCD panel through the closed lid especially if the weight concentrates on the screen area rather than the base.
When storing your laptop in a backpack or briefcase, position the computer so the screen faces toward the padded back panel rather than outward where it might contact hard objects. This orientation provides maximum protection against physical damage during transport.
Avoid carrying your laptop in bags that are too small, which forces you to compress or bend the computer to fit. Flexing forces can damage both the screen and the hinges, leading to multiple expensive repair problems.
Temperature changes also affect LCD panels, so avoid leaving your Dell laptop in extremely hot or cold environments for extended periods. Rapid temperature changes can cause the LCD layers to expand and contract at different rates, potentially creating internal stress that shows up as black spots.
Alternative Solutions When Repair Isn’t Worth It
Sometimes laptop display repair costs more than your Dell computer is actually worth, especially for older models where screen replacement can run $300 or more. I’ve helped many people realize that connecting an external monitor creates a perfectly functional desktop setup for a fraction of the repair cost.
The key decision point comes down to simple math: if your Dell laptop is more than three years old and the repair estimate exceeds 50% of its current value, you’re better off keeping the money and adapting to the damaged screen. This Dell laptop troubleshooting approach turns your portable computer into a capable desktop workstation.
External monitor solutions work particularly well when your laptop’s keyboard, trackpad, and internal components function normally despite the screen damage. You’re essentially getting a desktop computer with all your existing files and software already installed.
I always recommend trying this approach before spending money on expensive repairs because many people discover they prefer the larger screen and permanent desk setup. The damaged laptop screen becomes irrelevant when you’re using a much better external display for all your work.
The financial savings can be substantial. Instead of spending $300 on laptop display repair, you can buy a quality external monitor for $150 and use your Dell laptop for several more years without any functionality loss.
Connect your Dell laptop to any external monitor using the HDMI, USB-C, or VGA port depending on your model and available connections. Modern monitors often provide better image quality and larger screen size than your original laptop display.
Set up your workspace so the external monitor becomes your primary display while keeping your damaged laptop screen closed or positioned where the black spots don’t interfere with visibility. Many people find this configuration more comfortable for extended computer use.
This solution works especially well for students, home office workers, and anyone who primarily uses their laptop in one location. You maintain access to all your programs and files while gaining the benefits of a larger, higher-quality display.
Consider investing the money you would have spent on screen repair toward a new laptop instead. Older Dell computers with expensive repair needs often signal that other components like the battery or hard drive may soon require attention as well.
The external monitor approach also gives you time to research and save for a laptop upgrade without losing productivity during the transition. You can continue using your current setup until you find the right replacement computer at the right price. This workaround strategy works for various laptop display problems I’ve written similar guides for resolving HP laptop line issues that use the same cost effective approach.
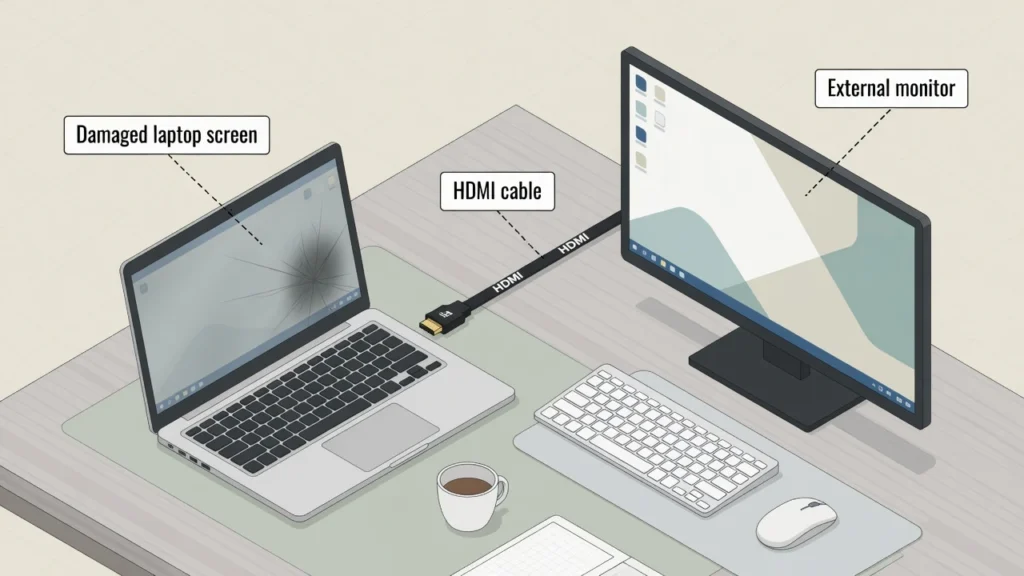
can cost under $150 far less than a $300 screen replacement.
Frequently Asked Questions
What does it mean when my Dell laptop screen is “cooked”?
When your Dell laptop screen is “cooked,” it means the LCD panel has permanent heat or pressure damage that cannot be repaired. Professional technicians use this term to describe screens that need complete replacement rather than any kind of fix.
How long should I try the pressure technique before giving up?
Try the gentle pressure technique for 5 to 10 minutes maximum with a cotton swab or soft cloth. If you don’t see any improvement in the black spot on Dell laptop screen during this time, stop immediately to avoid making the damage worse.
Will Dell replace my screen under warranty if I have black spots?
Dell will replace your screen under warranty only if the black spots resulted from manufacturing defects, not physical damage you caused. Contact Dell support to determine if your specific black spot on Dell laptop screen qualifies for free warranty coverage
Should I try software fixes or physical methods first?
Always try software fixes first, including the Windows graphics reset shortcut (Win+Ctrl+Shift+B) and online pixel repair tools. These methods are completely risk-free and can sometimes fix black spot on Dell laptop screen issues caused by driver problems rather than hardware damage.
Can applying pressure make the black spot worse?
Yes, applying too much pressure or using the wrong technique can definitely make your black spot larger or create new damaged areas. Always use gentle pressure with soft materials and stop immediately if the black spot on Dell laptop screen starts expanding.

